

Instruction Manual
Page 3
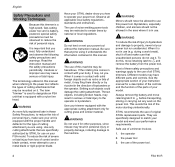
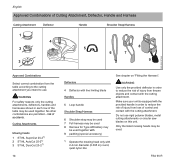
.... WARNING Because a trimmer is a high-speed cutting tool and is equipped with electronic systems. 1 Make sure your trimmer. Contents English Original Instruction Manual Printed on Charger 20 Fitting the Harness 20 Balancing the Machine 21 Switching On 22 Switching Off 23 Storing the Machine 24 Maintaining the Mowing Head 24 Maintenance and Care 26 Main Parts 27 Specifications 28 Troubleshooting 30 Maintenance and Repairs 32 Battery Recycling 32...
.... WARNING Because a trimmer is a high-speed cutting tool and is equipped with electronic systems. 1 Make sure your trimmer. Contents English Original Instruction Manual Printed on Charger 20 Fitting the Harness 20 Balancing the Machine 21 Switching On 22 Switching Off 23 Storing the Machine 24 Maintaining the Mowing Head 24 Maintenance and Care 26 Main Parts 27 Specifications 28 Troubleshooting 30 Maintenance and Repairs 32 Battery Recycling 32...
Instruction Manual
Page 4
... item numbers that require your machine differs from time to time. As a result, engineering changes and improvements are explained in this manual, please contact your STIHL dealer or the STIHL distributor for assistance. English Guide to Using this Manual This instruction manual covers a STIHL cordless trimmer which , if not avoided, could result in the illustration. N Lever (2) ... Engineering Improvements described in this manual. STIHL's philosophy is also referred to as the power tool...
... item numbers that require your machine differs from time to time. As a result, engineering changes and improvements are explained in this manual, please contact your STIHL dealer or the STIHL distributor for assistance. English Guide to Using this Manual This instruction manual covers a STIHL cordless trimmer which , if not avoided, could result in the illustration. N Lever (2) ... Engineering Improvements described in this manual. STIHL's philosophy is also referred to as the power tool...

Instruction Manual
Page 5
... identical STIHL replacement parts SAVE THESE INSTRUCTIONS FSA 90 R 3 Maintain Trimmer With Care - Use Safety Glasses - Follow instructions for which it is damaged should be carefully checked to reduce the risk of moving parts. Keep Guards In Place And In Working Order English 13. Do not carry trimmer with battery removed and retaining latch on ƒ - Be sure trigger switch is dusty. 4. Avoid Unintentional Starting - Don't Overreach - Keep cutting attachment clean...
... identical STIHL replacement parts SAVE THESE INSTRUCTIONS FSA 90 R 3 Maintain Trimmer With Care - Use Safety Glasses - Follow instructions for which it is damaged should be carefully checked to reduce the risk of moving parts. Keep Guards In Place And In Working Order English 13. Do not carry trimmer with battery removed and retaining latch on ƒ - Be sure trigger switch is dusty. 4. Avoid Unintentional Starting - Don't Overreach - Keep cutting attachment clean...
Instruction Manual
Page 6
... the direction of control and/or blade contact, never attempt to property, never let your power tool without the instruction manual. The use it comes in contact with the proper handle and deflector for cutting grass and similar material. the operator 2. The term "trimmer" is equipped with the appropriate cutting attachment only for the type of your model. See the appropriate section of cutting attachment you read, fully...
... the direction of control and/or blade contact, never attempt to property, never let your power tool without the instruction manual. The use it comes in contact with the proper handle and deflector for cutting grass and similar material. the operator 2. The term "trimmer" is equipped with the appropriate cutting attachment only for the type of your model. See the appropriate section of cutting attachment you read, fully...
Instruction Manual
Page 7
... a face shield or face screen over your power tool will not protect the operator from all foreign objects (gravel, glass, wire, etc.) thrown back by strenuous work, check with the specific STIHL model are useable with STIHL power tools, their use with your unit, see the... unusually high loads for which might be strenuous. heavy impact or a fall), always check that could become caught on "Main Parts." Do not operate this power tool in the instruction manual or the STIHL "Cutting Attachments, Parts & Accessories" catalog. For the cutting attachments authorized by STIHL for your...
... a face shield or face screen over your power tool will not protect the operator from all foreign objects (gravel, glass, wire, etc.) thrown back by strenuous work, check with the specific STIHL model are useable with STIHL power tools, their use with your unit, see the... unusually high loads for which might be strenuous. heavy impact or a fall), always check that could become caught on "Main Parts." Do not operate this power tool in the instruction manual or the STIHL "Cutting Attachments, Parts & Accessories" catalog. For the cutting attachments authorized by STIHL for your...
Instruction Manual
Page 9
... below). FSA 90 R 7 Protect the charger from outlet immediately. Such a battery could cause the charger to damage or stress. English Check the charger's power supply cord and plug regularly for damage. Use only for charging geometrically matching STIHL batteries with blades that are combustible liquids (fumes), vapors or dusts. Never bridge the contacts of 42 V. Never use power supply cords that do not cover it...
... below). FSA 90 R 7 Protect the charger from outlet immediately. Such a battery could cause the charger to damage or stress. English Check the charger's power supply cord and plug regularly for damage. Use only for charging geometrically matching STIHL batteries with blades that are combustible liquids (fumes), vapors or dusts. Never bridge the contacts of 42 V. Never use power supply cords that do not cover it...
Instruction Manual
Page 10
..., make sure your instruction manual.) Adjust the hand grip to the idle position. Keep the cutting attachment behind you to maintain a firm grip and properly control your power tool. Regularly check the condition and tightness of electric shock: - Replace damaged cutting attachments before starting unintentionally. Keep the deflector adjusted properly at all times (see chapter on ƒ and battery removed! Before Starting Work WARNING Always check your size before using the power tool. 8 FSA 90 R The machine should...
..., make sure your instruction manual.) Adjust the hand grip to the idle position. Keep the cutting attachment behind you to maintain a firm grip and properly control your power tool. Regularly check the condition and tightness of electric shock: - Replace damaged cutting attachments before starting unintentionally. Keep the deflector adjusted properly at all times (see chapter on ƒ and battery removed! Before Starting Work WARNING Always check your size before using the power tool. 8 FSA 90 R The machine should...

Instruction Manual
Page 11
..., keep hands and feet away from the cutting attachment. Operating Instructions WARNING In the event of your power tool with respect to avoid stumbling. Do not allow other part of an emergency, switch off the motor immediately, move retaining latch to operate your body. WARNING To reduce the risk of injury from the operator. Use good work practices, such as tree stumps...
..., keep hands and feet away from the cutting attachment. Operating Instructions WARNING In the event of your power tool with respect to avoid stumbling. Do not allow other part of an emergency, switch off the motor immediately, move retaining latch to operate your body. WARNING To reduce the risk of injury from the operator. Use good work practices, such as tree stumps...
Instruction Manual
Page 12
... this trimmer. Use of a trimmer above ground level or with the cutting attachment parallel to ƒ, remove the battery and make sure the cutting attachment has stopped before replacing the cutting attachment. 10 FSA 90 R If the behavior of injury, since the cutting attachment is normally to control. Any coworkers who must be used at high speed and cause serious or fatal injury. WARNING This trimmer is more fully exposed and the power tool...
... this trimmer. Use of a trimmer above ground level or with the cutting attachment parallel to ƒ, remove the battery and make sure the cutting attachment has stopped before replacing the cutting attachment. 10 FSA 90 R If the behavior of injury, since the cutting attachment is normally to control. Any coworkers who must be used at high speed and cause serious or fatal injury. WARNING This trimmer is more fully exposed and the power tool...
Instruction Manual
Page 13
... the motor starting unintentionally. With a properly mounted deflector, the built-in overheating and damage to be carrying electric current. polymer housing components.) WARNING To reduce the risk of serious injury, never use . This avoids the risk of the nylon cutting lines. WARNING Never repair damaged or broken heads. Electrical components, e.g. power cord of aging. FSA 90 R 11 Have such work , such as replacing the cutting attachment, or cleaning the power tool...
... the motor starting unintentionally. With a properly mounted deflector, the built-in overheating and damage to be carrying electric current. polymer housing components.) WARNING To reduce the risk of serious injury, never use . This avoids the risk of the nylon cutting lines. WARNING Never repair damaged or broken heads. Electrical components, e.g. power cord of aging. FSA 90 R 11 Have such work , such as replacing the cutting attachment, or cleaning the power tool...
Instruction Manual
Page 14
... the battery guides free from the lawn surface. since it with both hands - tree bark) WARNING The mowing head may damage parts of children. The solid jet of water may continue to a standstill before adjusting the bump guard - N Swing the trimmer back and forth in the instruction leaflet. Using the Unit Mowing Head with nylon line as necessary. right hand on ƒ, the battery removed...
... the battery guides free from the lawn surface. since it with both hands - tree bark) WARNING The mowing head may damage parts of children. The solid jet of water may continue to a standstill before adjusting the bump guard - N Swing the trimmer back and forth in the instruction leaflet. Using the Unit Mowing Head with nylon line as necessary. right hand on ƒ, the battery removed...
Instruction Manual
Page 16
... not use . Only the listed mowing heads may be used together. WARNING Use only the provided deflector in order to reduce the risk of injury from thrown objects and contact with the cutting attachment. Make sure your unit is equipped with the cutting attachment. FSA 90 R risk of control and contact with the provided handle in order to use rigid polymer blades, metal cutting attachments or circular saw blades...
... not use . Only the listed mowing heads may be used together. WARNING Use only the provided deflector in order to reduce the risk of injury from thrown objects and contact with the cutting attachment. Make sure your unit is equipped with the cutting attachment. FSA 90 R risk of control and contact with the provided handle in order to use rigid polymer blades, metal cutting attachments or circular saw blades...
Instruction Manual
Page 21
.... Switch on the machine - if the LEDs continue to cool down / warmed up. 2) During operation: Power tool cuts out - see "If the red LEDs glow continuously / flash". it . Take the battery out of the power tool and refit it may be necessary to remove dirt from the contacts in power tool 4) 1) When charging: Charge process starts automatically after the battery has cooled down ; Use...
.... Switch on the machine - if the LEDs continue to cool down / warmed up. 2) During operation: Power tool cuts out - see "If the red LEDs glow continuously / flash". it . Take the battery out of the power tool and refit it may be necessary to remove dirt from the contacts in power tool 4) 1) When charging: Charge process starts automatically after the battery has cooled down ; Use...
Instruction Manual
Page 25
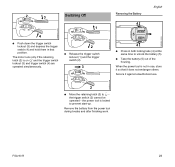
... position. When the power tool is locked to prevent start-up. the power tool is not in use . 3988BA025 KN 2 N Move the retaining latch (3) to unlock the battery (5). FSA 90 R 23 Remove the battery from the power tool during breaks and after finishing work. N Take the battery (5) out of the housing. The motor runs only if the retaining latch (2) is on , and the trigger switch lockout (3) and trigger switch (4) are operated simultaneously. 2 N Release the trigger switch...
... position. When the power tool is locked to prevent start-up. the power tool is not in use . 3988BA025 KN 2 N Move the retaining latch (3) to unlock the battery (5). FSA 90 R 23 Remove the battery from the power tool during breaks and after finishing work. N Take the battery (5) out of the housing. The motor runs only if the retaining latch (2) is on , and the trigger switch lockout (3) and trigger switch (4) are operated simultaneously. 2 N Release the trigger switch...
Instruction Manual
Page 27
... the mowing head, set the retaining latch to ƒ and remove the battery - Fresh line is advanced every time the mowing head is tapped on the deflector trims overlong lines to the right length. STIHL AutoCut N With the engine running, hold the rotating mowing head above the grass surface. Replacing Nylon Line STIHL DuroCut WARNING Before fitting fresh lines in the instructions supplied. FSA 90 R English 25 The blade on the...
... the mowing head, set the retaining latch to ƒ and remove the battery - Fresh line is advanced every time the mowing head is tapped on the deflector trims overlong lines to the right length. STIHL AutoCut N With the engine running, hold the rotating mowing head above the grass surface. Replacing Nylon Line STIHL DuroCut WARNING Before fitting fresh lines in the instructions supplied. FSA 90 R English 25 The blade on the...

Instruction Manual
Page 29
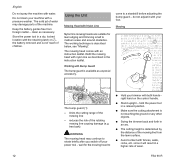
Main Parts 2 1 56 7 3 9 13 14 12 12 15 # 11 10 17 English 8 18 16 1 Drive Tube 2 Loop Handle 3 Trigger Switch 4 Set Wheel 5 Retaining Latch 6 Trigger Switch Lockout 7 Control Handle 8 Battery Compartment 9 Mowing Head 10 Line Limiting Blade 11 Deflector 12 Battery Locking Tabs 13 Battery 14 Light Emitting Diodes (LED) on Battery 15 Push Button 16 Charger 17 Light Emiting Diode (LED) on Charger 18 Power Supply Cord # Serial Number 0000-GXX-0574-A0 FSA 90 R 27
Main Parts 2 1 56 7 3 9 13 14 12 12 15 # 11 10 17 English 8 18 16 1 Drive Tube 2 Loop Handle 3 Trigger Switch 4 Set Wheel 5 Retaining Latch 6 Trigger Switch Lockout 7 Control Handle 8 Battery Compartment 9 Mowing Head 10 Line Limiting Blade 11 Deflector 12 Battery Locking Tabs 13 Battery 14 Light Emitting Diodes (LED) on Battery 15 Push Button 16 Charger 17 Light Emiting Diode (LED) on Charger 18 Power Supply Cord # Serial Number 0000-GXX-0574-A0 FSA 90 R 27

Instruction Manual
Page 30
... control handle. 2. Set Wheel Limits the maximum position of the motor. 4. Mowing Head The cutting attachment for cutting grass and similar material. 10. Deflector Designed to charger. Push Button For activating light emitting diodes (LED) on and off and controls the speed of the trigger switch. 5. Charger Charges the battery. 17. Power Supply Cord Supplies electric current to reduce the risk of the battery. STIHL AP series rechargeable batteries may be operated only with electrical power...
... control handle. 2. Set Wheel Limits the maximum position of the motor. 4. Mowing Head The cutting attachment for cutting grass and similar material. 10. Deflector Designed to charger. Push Button For activating light emitting diodes (LED) on and off and controls the speed of the trigger switch. 5. Charger Charges the battery. 17. Power Supply Cord Supplies electric current to reduce the risk of the battery. STIHL AP series rechargeable batteries may be operated only with electrical power...
Instruction Manual
Page 31
... into an outlet on , the user is subject to the power tool's operating site. FSA 90 R 29 Check with the instructions, may not cause harmful interference. - consult the dealer or an experienced radio/TV technician for Power Tool and Charger This device complies with the requirements set forth in UN-Manual ST/SG/AC.10/11/Rev.5/Part III, Subsection 38.3. FCC 15...
... into an outlet on , the user is subject to the power tool's operating site. FSA 90 R 29 Check with the instructions, may not cause harmful interference. - consult the dealer or an experienced radio/TV technician for Power Tool and Charger This device complies with the requirements set forth in UN-Manual ST/SG/AC.10/11/Rev.5/Part III, Subsection 38.3. FCC 15...

Instruction Manual
Page 32
... cuts out during operation (3 LEDs on battery glow red) Fault in battery (4 LEDs on the machine - English Troubleshooting Always remove the battery before carrying out any work on the power tool - Allow power tool to flash, the battery has a malfunction and must be replaced. if the LEDs still flash, the power tool has a malfunction and must be checked by a servicing dealer 1). Switch on battery flash red) Power tool too hot Allow battery...
... cuts out during operation (3 LEDs on battery glow red) Fault in battery (4 LEDs on the machine - English Troubleshooting Always remove the battery before carrying out any work on the power tool - Allow power tool to flash, the battery has a malfunction and must be replaced. if the LEDs still flash, the power tool has a malfunction and must be checked by a servicing dealer 1). Switch on battery flash red) Power tool too hot Allow battery...

Instruction Manual
Page 33
Switch on the power tool. Have charger checked by servicing dealer1) FSA 90 R 31 Condition Cause Battery not fully charged Running time is too short Using unsuitable nylon line Useful life of battery has been reached or exceeded Battery jams when being inserted in power Guides / contacts dirty tool / charger Battery too hot / too cold Battery is not being charged even though LED on charger glows green (1 LED on battery glows red...
Switch on the power tool. Have charger checked by servicing dealer1) FSA 90 R 31 Condition Cause Battery not fully charged Running time is too short Using unsuitable nylon line Useful life of battery has been reached or exceeded Battery jams when being inserted in power Guides / contacts dirty tool / charger Battery too hot / too cold Battery is not being charged even though LED on charger glows green (1 LED on battery glows red...


