

Instruction Manual
Page 3
.... Original Instruction Manual Contents KombiSystem 2 Guide to Using this Manual 2 Safety Precautions and Working Techniques 3 Using the Unit 9 Approved KombiEngines 11 Mounting the KombiTool 11 Assembling the Unit 12 Adjusting the Cutter Bar 13 Fitting the Harness 14 Starting / Stopping the Engine 15 Lubricating the Gearbox 16 Storing the Machine 17 Maintenance and Care 17 Sharpening Instructions 17 Main Parts 18 Specifications 19 Maintenance and Repairs 19...
.... Original Instruction Manual Contents KombiSystem 2 Guide to Using this Manual 2 Safety Precautions and Working Techniques 3 Using the Unit 9 Approved KombiEngines 11 Mounting the KombiTool 11 Assembling the Unit 12 Adjusting the Cutter Bar 13 Fitting the Harness 14 Starting / Stopping the Engine 15 Lubricating the Gearbox 16 Storing the Machine 17 Maintenance and Care 17 Sharpening Instructions 17 Main Parts 18 Specifications 19 Maintenance and Repairs 19...

Instruction Manual
Page 4
.... N Lever (2) ... A description of a step or procedure that refers directly to produce a power tool. Therefore, the separate instruction manuals for your machine differs from time to or embossed on the machine are supported by the KombiEngine and KombiTool is to the machine or its products. Therefore, some changes, modifications and improvements may not be covered in this manual, please contact your STIHL...
.... N Lever (2) ... A description of a step or procedure that refers directly to produce a power tool. Therefore, the separate instruction manuals for your machine differs from time to or embossed on the machine are supported by the KombiEngine and KombiTool is to the machine or its products. Therefore, some changes, modifications and improvements may not be covered in this manual, please contact your STIHL...

Instruction Manual
Page 5
... equipped with a hedge trimmer KombiTool is a high-speed, fast-cutting power tool with sharp cutting blades, special safety precautions must be in loss of control. WARNING Do not lend or rent your power tool without the instruction manuals of your KombiEngine equipped with the hedge trimmer KombiTool only for a description of the controls and the function of the parts of a power tool involves 1. WARNING The use this machine when...
... equipped with a hedge trimmer KombiTool is a high-speed, fast-cutting power tool with sharp cutting blades, special safety precautions must be in loss of control. WARNING Do not lend or rent your power tool without the instruction manuals of your KombiEngine equipped with the hedge trimmer KombiTool only for a description of the controls and the function of the parts of a power tool involves 1. WARNING The use this machine when...

Instruction Manual
Page 6
... specific STIHL KombiEngine are using. If this tool is subjected to your STIHL servicing dealer. Wear an approved safety hard hat to reduce the risk of injury to unusually high loads for use with STIHL power tools, their hearing checked regularly. Be particularly alert and cautious when wearing hearing protection because your ability to your hearing. Wear sturdy boots with the cutting blades moving parts...
... specific STIHL KombiEngine are using. If this tool is subjected to your STIHL servicing dealer. Wear an approved safety hard hat to reduce the risk of injury to unusually high loads for use with STIHL power tools, their hearing checked regularly. Be particularly alert and cautious when wearing hearing protection because your ability to your hearing. Wear sturdy boots with the cutting blades moving parts...
Instruction Manual
Page 7
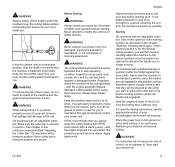
... check the condition of the machine and the gear housing when they will then need to carefully adjust the machine to the desired position once the engine has returned to suit your power tool if it to prevent turnover, fuel spillage and damage to the desired cutting position (where the blades are hot. Replace damaged cutting blades before transporting the power tool over the cutting blades before using the power tool. Keep the handles clean...
... check the condition of the machine and the gear housing when they will then need to carefully adjust the machine to the desired position once the engine has returned to suit your power tool if it to prevent turnover, fuel spillage and damage to the desired cutting position (where the blades are hot. Replace damaged cutting blades before transporting the power tool over the cutting blades before using the power tool. Keep the handles clean...
Instruction Manual
Page 8
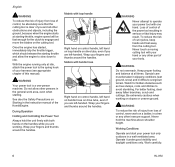
... move the blades on the cutting tool. Wrap your power tool with handle hose Right hand on control handle, left -handed. Loss of control of the power tool resulting in the instruction manual of your hand or any other obstructions and objects, including the ground, because when the engine starts at all other insecure support. WARNING Your power tool is clear of this manual). Work carefully. 6 HL-KM Models with one...
... move the blades on the cutting tool. Wrap your power tool with handle hose Right hand on control handle, left -handed. Loss of control of the power tool resulting in the instruction manual of your hand or any other obstructions and objects, including the ground, because when the engine starts at all other insecure support. WARNING Your power tool is clear of this manual). Work carefully. 6 HL-KM Models with one...
Instruction Manual
Page 9
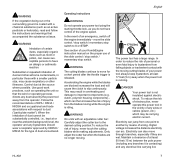
... the power tool away from one point to move the slide control / stop switch / momentary stop switch. WARNING The cutting blades continue to another by NIOSH / MSHA for a short period after the throttle trigger is idling. In order to reduce the risk of personal or even fatal injury to bystanders from the blades moving cutting blades of your KombiEngine instruction manual on the proper use of...
... the power tool away from one point to move the slide control / stop switch / momentary stop switch. WARNING The cutting blades continue to another by NIOSH / MSHA for a short period after the throttle trigger is idling. In order to reduce the risk of personal or even fatal injury to bystanders from the blades moving cutting blades of your KombiEngine instruction manual on the proper use of...

Instruction Manual
Page 10
... change in areas where the blades could contact such objects. To reduce the risk of children. 8 HL-KM WARNING Use only identical STIHL replacement parts for cracks. - Keep blades sharp. Stop the engine immediately if you start work or cleaning the power tool. Take particular care when cutting hedges next to a complete standstill. - Do not touch the wire with STIHL resin solvent. When working with a pressure washer. MAINTENANCE, REPAIR...
... change in areas where the blades could contact such objects. To reduce the risk of children. 8 HL-KM WARNING Use only identical STIHL replacement parts for cracks. - Keep blades sharp. Stop the engine immediately if you start work or cleaning the power tool. Take particular care when cutting hedges next to a complete standstill. - Do not touch the wire with STIHL resin solvent. When working with a pressure washer. MAINTENANCE, REPAIR...

Instruction Manual
Page 11
... cutter bar at a time in several stages. N Start the engine. use your hedge trimmer during rest periods customary in an arc as you move along the hedge - Use lopping shears to the hedge, e.g. Cutting close to required angle. Cutting Sequence 388BA029 KN 388BA030 KN If a radical cut is necessary, cut out thick branches first. Preparations N Adjustable gearbox: Set cutter bar to the ground from a standing position...
... cutter bar at a time in several stages. N Start the engine. use your hedge trimmer during rest periods customary in an arc as you move along the hedge - Use lopping shears to the hedge, e.g. Cutting close to required angle. Cutting Sequence 388BA029 KN 388BA030 KN If a radical cut is necessary, cut out thick branches first. Preparations N Adjustable gearbox: Set cutter bar to the ground from a standing position...

Instruction Manual
Page 12
Hold the hedge trimmer vertically and swing it in an arc to make maximum use both sides of the cutting blades. WARNING Any working position above head height is tiring. Hold the cutter bar at an angle) Horizontal Cut (with straight cutter bar) 389BA050 KN 388BA031 KN 388BA032 KN Extra long reach without the need for short periods only. Swing the...
Hold the hedge trimmer vertically and swing it in an arc to make maximum use both sides of the cutting blades. WARNING Any working position above head height is tiring. Hold the cutter bar at an angle) Horizontal Cut (with straight cutter bar) 389BA050 KN 388BA031 KN 388BA032 KN Extra long reach without the need for short periods only. Swing the...

Instruction Manual
Page 13
... STIHL for use with the attachment. N Tighten down the star knob (4) firmly. Removing the KombiTool N Reverse the above sequence to the ground. This KombiTool may be flush with the end of the hedge so that are swept to remove the drive tube. 002BA327 KN HL-KM 11 Approved KombiEngines English Mounting the KombiTool 002BA326 KN Swing the cutter bar...
... STIHL for use with the attachment. N Tighten down the star knob (4) firmly. Removing the KombiTool N Reverse the above sequence to the ground. This KombiTool may be flush with the end of the hedge so that are swept to remove the drive tube. 002BA327 KN HL-KM 11 Approved KombiEngines English Mounting the KombiTool 002BA326 KN Swing the cutter bar...

Instruction Manual
Page 14
...A0 N Pull the protective cap off the end of the drive tube when you pull off the cap: N Push the plug into the drive tube as far as necessary. 0000-GXX-1682-A0 English Assembling the Unit Mounting the Gearbox Removing the Potective Cap If a cap is inserted beyond the slot in a safe place. N Line up the... gearbox (11) with the powerhead. If the plug comes out of the drive tube and keep it in the clamp (12): N Push the gearbox (11) fully home as far as stop . 002BA248 KN 5 N Loosen the clamp screws (10). N Push the gearbox (11) onto the drive tube (5), turn the ...
...A0 N Pull the protective cap off the end of the drive tube when you pull off the cap: N Push the plug into the drive tube as far as necessary. 0000-GXX-1682-A0 English Assembling the Unit Mounting the Gearbox Removing the Potective Cap If a cap is inserted beyond the slot in a safe place. N Line up the... gearbox (11) with the powerhead. If the plug comes out of the drive tube and keep it in the clamp (12): N Push the gearbox (11) fully home as far as stop . 002BA248 KN 5 N Loosen the clamp screws (10). N Push the gearbox (11) onto the drive tube (5), turn the ...

Instruction Manual
Page 15
.... and fit the blade scabbard before HL-KM 13 WARNING The gearbox gets hot during operation. WARNING To reduce the risk of injury, carry out the adjustment only when the cutting blades are therefore 12 possible working position. engine at a standstill - There are at idle speed. Transport Position 0000-GXX-1684-A0 English moving the cutter bar to the transport position or from...
.... and fit the blade scabbard before HL-KM 13 WARNING The gearbox gets hot during operation. WARNING To reduce the risk of injury, carry out the adjustment only when the cutting blades are therefore 12 possible working position. engine at a standstill - There are at idle speed. Transport Position 0000-GXX-1684-A0 English moving the cutter bar to the transport position or from...
Instruction Manual
Page 16
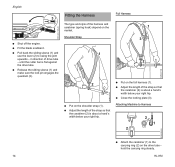
... - N Pull back the sliding sleeve (1) and use the lever (2) to the carrying ring (2) on the shoulder strap (1). hold the carrying ring steady. 14 HL-KM English 3 2 1 N Shut off the engine. N Adjust the length of the strap so that the carabiner (2) is flat against the drive tube. N Close the locking plate (3). N Release the sliding sleeve (1) and make sure the lock pin...
... - N Pull back the sliding sleeve (1) and use the lever (2) to the carrying ring (2) on the shoulder strap (1). hold the carrying ring steady. 14 HL-KM English 3 2 1 N Shut off the engine. N Adjust the length of the strap so that the carabiner (2) is flat against the drive tube. N Close the locking plate (3). N Release the sliding sleeve (1) and make sure the lock pin...
Instruction Manual
Page 17
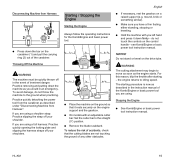
... basic power tool instruction manual. The starting - To avoid damage, do not touch the controls on the engine support and the gearbox. If you are using a shoulder strap: Practice slipping the strap off your shoulders. 002BA310 KN Starting / Stopping the Engine Starting the Engine Always follow the operating instructions for the KombiEngine and basic power tool. N Remove the blade scabbard. N Hold the machine with an adjustable cutter bar: Set the cutter bar to...
... basic power tool instruction manual. The starting - To avoid damage, do not touch the controls on the engine support and the gearbox. If you are using a shoulder strap: Practice slipping the strap off your shoulders. 002BA310 KN Starting / Stopping the Engine Starting the Engine Always follow the operating instructions for the KombiEngine and basic power tool. N Remove the blade scabbard. N Hold the machine with an adjustable cutter bar: Set the cutter bar to...

Instruction Manual
Page 18
... blade drive gear with STIHL gear lubricant for hedge trimmers (special accessory). if no grease can be seen on the inside of the filler plug, screw the tube of grease into the filler hole. N Refit the filler plug and tighten it down firmly. Unscrew the filler 0000-GXX-1688-A0 2 N Check the lubricant level at regular intervals of about every 25 hours of operation...
... blade drive gear with STIHL gear lubricant for hedge trimmers (special accessory). if no grease can be seen on the inside of the filler plug, screw the tube of grease into the filler hole. N Refit the filler plug and tighten it down firmly. Unscrew the filler 0000-GXX-1688-A0 2 N Check the lubricant level at regular intervals of about every 25 hours of operation...
Instruction Manual
Page 19
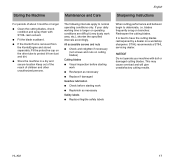
... longer N Clean the cutting blades, check condition and spray them with dull or damaged cutting blades. All accessible screws and nuts N Check and retighten if necessary (not screws and nuts on the drive tube to deteriorate, i.e. STIHL recommends a STIHL servicing dealer. NOTICE Do not operate your daily working time is longer or operating conditions are difficult (very dusty work N Replenish as necessary N Replace if damaged Gearbox lubrication N Check before starting work...
... longer N Clean the cutting blades, check condition and spray them with dull or damaged cutting blades. All accessible screws and nuts N Check and retighten if necessary (not screws and nuts on the drive tube to deteriorate, i.e. STIHL recommends a STIHL servicing dealer. NOTICE Do not operate your daily working time is longer or operating conditions are difficult (very dusty work N Replenish as necessary N Replace if damaged Gearbox lubrication N Check before starting work...
Instruction Manual
Page 21
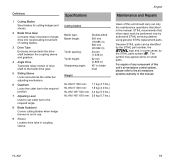
... maintenance operations described in this manual. HL-KM 19 STIHL recommends that other repair work be identified by the STIHL part number, the { logo and, in some cases, by authorized STIHL servicing dealers using genuine STIHL replacement parts. For repairs of any component of this unit's air emissions control system, please refer to the required angle. 8 Blade Scabbard Covers cutting blades when hedge trimmer is not in use. 9 Sleeve Locates drive tube in coupling sleeve. Definitions 1 Cutting Blades...
... maintenance operations described in this manual. HL-KM 19 STIHL recommends that other repair work be identified by the STIHL part number, the { logo and, in some cases, by authorized STIHL servicing dealers using genuine STIHL replacement parts. For repairs of any component of this unit's air emissions control system, please refer to the required angle. 8 Blade Scabbard Covers cutting blades when hedge trimmer is not in use. 9 Sleeve Locates drive tube in coupling sleeve. Definitions 1 Cutting Blades...
Instruction Manual
Page 22
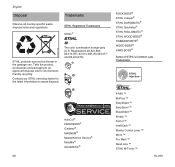
English Disposal Trademarks Observe all country-specific waste disposal rules and regulations. Take the product, accessories and packaging to an approved disposal site for the latest information on waste disposal. 000BA073 KN STIHL Registered Trademarks STIHL® { K The color combination... Service® MotoMix® OILOMATIC® 4-MIX ™ BioPlus ™ Easy2Start ™ EasySpool ™ ElastoStart ™ Ematic ™ FixCut ™ IntelliCarb ™ Master Control Lever ™ Micro ™ Pro Mark ™ Quiet Line ™ STIHL M-Tronic ™ 20 HL-KM STIHL ...
English Disposal Trademarks Observe all country-specific waste disposal rules and regulations. Take the product, accessories and packaging to an approved disposal site for the latest information on waste disposal. 000BA073 KN STIHL Registered Trademarks STIHL® { K The color combination... Service® MotoMix® OILOMATIC® 4-MIX ™ BioPlus ™ Easy2Start ™ EasySpool ™ ElastoStart ™ Ematic ™ FixCut ™ IntelliCarb ™ Master Control Lever ™ Micro ™ Pro Mark ™ Quiet Line ™ STIHL M-Tronic ™ 20 HL-KM STIHL ...

Instruction Manual
Page 23
STIHL OUTFITTERS ™ STIHL PICCO ™ STIHL PolyCut ™ STIHL PowerSweep ™ STIHL Precision Series ™ STIHL RAPID ™ STIHL SuperCut ™ TapAction ™ TrimCut ™ This listing of ANDREAS STIHL AG & Co. KG, Waiblingen is subject to change. HL-KM English 21 Any unauthorized use of these trademarks without the express written consent of trademarks is strictly prohibited.
STIHL OUTFITTERS ™ STIHL PICCO ™ STIHL PolyCut ™ STIHL PowerSweep ™ STIHL Precision Series ™ STIHL RAPID ™ STIHL SuperCut ™ TapAction ™ TrimCut ™ This listing of ANDREAS STIHL AG & Co. KG, Waiblingen is subject to change. HL-KM English 21 Any unauthorized use of these trademarks without the express written consent of trademarks is strictly prohibited.


