
Instruction Manual
Page 3
... to Using this Manual 2 2.1 Signal Words 2 2.2 Symbols in Text 3 3 Main Parts 3 3.1 HLA 66 Hedge Trimmer and Battery 3 3.2 HLA 86 Hedge Trimmer and Battery 4 4 Safety Symbols on the Products 5 4.1 Hedge Trimmer 5 4.2 Battery 6 5 General Power Tool Safety Warnings 6 5.1 Introduction 6 5.2 Work Area Safety 6 5.3 Electrical Safety 7 5.4 Personal Safety 7 5.5 Power Tool Use and Care 7 5.6 Battery Tool Use and Care 8 5.7 Service 8 5.8 Hedge Trimmer Safety Warnings 8 5.9 Extended-reach Hedge Trimmer Safety Warnings . . . . 9 6 IMPORTANT SAFETY INSTRUCTIONS 9 6.1 Intended Use...
... to Using this Manual 2 2.1 Signal Words 2 2.2 Symbols in Text 3 3 Main Parts 3 3.1 HLA 66 Hedge Trimmer and Battery 3 3.2 HLA 86 Hedge Trimmer and Battery 4 4 Safety Symbols on the Products 5 4.1 Hedge Trimmer 5 4.2 Battery 6 5 General Power Tool Safety Warnings 6 5.1 Introduction 6 5.2 Work Area Safety 6 5.3 Electrical Safety 7 5.4 Personal Safety 7 5.5 Power Tool Use and Care 7 5.6 Battery Tool Use and Care 8 5.7 Service 8 5.8 Hedge Trimmer Safety Warnings 8 5.9 Extended-reach Hedge Trimmer Safety Warnings . . . . 9 6 IMPORTANT SAFETY INSTRUCTIONS 9 6.1 Intended Use...

Instruction Manual
Page 4
... 23 Troubleshooting Guide 36 23.1 Hedge Trimmer and Battery 36 24 Specifications 38 24.1 STIHL HLA 66 38 24.2 STIHL HLA 86 38 24.3 Cutting Blades 38 24.4 Symbols on the Hedge Trimmer, Battery and Charger 38 24.5 Engineering Improvements 39 24.6 FCC 15 Compliance Statement 39 25 Approved Harness Combinations 39 25.1 Harness Combinations 39 26 Replacement Parts and Equipment 40 26.1 Genuine STIHL Replacement Parts...
... 23 Troubleshooting Guide 36 23.1 Hedge Trimmer and Battery 36 24 Specifications 38 24.1 STIHL HLA 66 38 24.2 STIHL HLA 86 38 24.3 Cutting Blades 38 24.4 Symbols on the Hedge Trimmer, Battery and Charger 38 24.5 Engineering Improvements 39 24.6 FCC 15 Compliance Statement 39 25 Approved Harness Combinations 39 25.1 Harness Combinations 39 26 Replacement Parts and Equipment 40 26.1 Genuine STIHL Replacement Parts...
Instruction Manual
Page 6
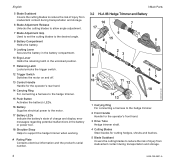
... Push Button Activates the battery's LEDs. 16 Battery Supplies electrical power to the motor. 17 Battery LEDs Indicate the battery's state of charge and display error messages regarding potential malfunctions in the battery or power tool. 18 Shoulder Strap Helps to support the hedge trimmer when working. # Rating Plate Contains electrical information and the product's serial number. 3 Main Parts 3.2 HLA 86 Hedge Trimmer and Battery 16 7 17 6 # 15 8 1 2 # 3 0000097078_001...
... Push Button Activates the battery's LEDs. 16 Battery Supplies electrical power to the motor. 17 Battery LEDs Indicate the battery's state of charge and display error messages regarding potential malfunctions in the battery or power tool. 18 Shoulder Strap Helps to support the hedge trimmer when working. # Rating Plate Contains electrical information and the product's serial number. 3 Main Parts 3.2 HLA 86 Hedge Trimmer and Battery 16 7 17 6 # 15 8 1 2 # 3 0000097078_001...

Instruction Manual
Page 7
.... 12 Retaining Latch Locks/unlocks the trigger switch. 13 Trigger Switch Switches the motor on the hedge trimmer: To reduce the risk of injury, follow all safety precautions in the battery or power tool. 18 Shoulder Strap Helps to support the hedge trimmer when working. # Rating Plate Contains electrical information and the product's serial number. English 4 Safety Symbols on the Products...
.... 12 Retaining Latch Locks/unlocks the trigger switch. 13 Trigger Switch Switches the motor on the hedge trimmer: To reduce the risk of injury, follow all safety precautions in the battery or power tool. 18 Shoulder Strap Helps to support the hedge trimmer when working. # Rating Plate Contains electrical information and the product's serial number. English 4 Safety Symbols on the Products...
Instruction Manual
Page 8
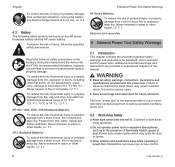
.... Failure to your mainsoperated (corded) power tool or battery-operated (cordless) power tool. 5.2 Work Area Safety a) Keep work area clean and well lit. To reduce the risk of personal injury or property damage from fire, use , @ 6.4. 4.2 Battery The following safety symbols are provided in the battery's instruction manual and the manual for handheld, motor-operated electric power tools. Power tools create sparks which may result...
.... Failure to your mainsoperated (corded) power tool or battery-operated (cordless) power tool. 5.2 Work Area Safety a) Keep work area clean and well lit. To reduce the risk of personal injury or property damage from fire, use , @ 6.4. 4.2 Battery The following safety symbols are provided in the battery's instruction manual and the manual for handheld, motor-operated electric power tools. Power tools create sparks which may result...

Instruction Manual
Page 9
... the power source and/or remove the battery pack, if detachable, from frequent use a residual current device (RCD) or ground fault circuit interruptor (GFCI) protected supply. f) If operating a power tool in serious personal injury. Keep proper footing and balance at the rate for appropriate conditions will do not allow you to become complacent and ignore tool safety principles...
... the power source and/or remove the battery pack, if detachable, from frequent use a residual current device (RCD) or ground fault circuit interruptor (GFCI) protected supply. f) If operating a power tool in serious personal injury. Keep proper footing and balance at the rate for appropriate conditions will do not allow you to become complacent and ignore tool safety principles...

Instruction Manual
Page 10
... paper clips, coins, keys, nails, screws or other small metal objects that the safety of the power tool for one terminal to another battery pack. b) Use power tools only with water. avoid contact. Service of injury. Check for safe handling and control of injury and fire. Properly maintained cutting tools with the charger specified by a qualified repair person using only identical replacement parts.
... paper clips, coins, keys, nails, screws or other small metal objects that the safety of the power tool for one terminal to another battery pack. b) Use power tools only with water. avoid contact. Service of injury. Check for safe handling and control of injury and fire. Properly maintained cutting tools with the charger specified by a qualified repair person using only identical replacement parts.

Instruction Manual
Page 11
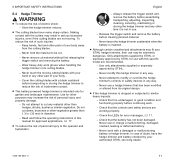
... your battery and charger before charging or starting work. ■ This power tool may be powered by lightning. 5.9 Extended-reach Hedge Trimmer Safety Warnings a) To reduce the risk of electrocution, never use the extended-reach hedge trimmer near power lines may be powered by insulated gripping surfaces only, because the blade may make sure all power cords and cables away from its original design...
... your battery and charger before charging or starting work. ■ This power tool may be powered by lightning. 5.9 Extended-reach Hedge Trimmer Safety Warnings a) To reduce the risk of electrocution, never use the extended-reach hedge trimmer near power lines may be powered by insulated gripping surfaces only, because the blade may make sure all power cords and cables away from its original design...
Instruction Manual
Page 13
... the hedge trimmer's controls or safety devices in any other vegetation greater than hedges, shrubs, bushes or similar vegetation. Use only attachments supplied or expressly approved by STIHL for use with this manual for other purposes may be cut...remove the battery before continuing work. - Never use . - Never remove cut any way. - Check that it is intended only for error messages, @ 11. - Check the LEDs for garden and landscape maintenance. To reduce the risk of inadvertent contact. ■ This battery-powered hedge trimmer is not in this specific model...
... the hedge trimmer's controls or safety devices in any other vegetation greater than hedges, shrubs, bushes or similar vegetation. Use only attachments supplied or expressly approved by STIHL for use with this manual for other purposes may be cut...remove the battery before continuing work. - Never use . - Never remove cut any way. - Check that it is intended only for error messages, @ 11. - Check the LEDs for garden and landscape maintenance. To reduce the risk of inadvertent contact. ■ This battery-powered hedge trimmer is not in this specific model...
Instruction Manual
Page 14
... only identical STIHL replacement parts be used. 6.5 Using the Hedge Trimmer 6.5.1 Before Operation WARNING ■ Misuse or unauthorized use . - The cutting blades must not engage until the problem has been corrected. ■ Before inserting the battery: - Do not use a malfunctioning, damaged, cracked, leaking or deformed battery. - Keep clean. - Use of serious personal injury or death from unintentional starting work, particularly the retaining latch...
... only identical STIHL replacement parts be used. 6.5 Using the Hedge Trimmer 6.5.1 Before Operation WARNING ■ Misuse or unauthorized use . - The cutting blades must not engage until the problem has been corrected. ■ Before inserting the battery: - Do not use a malfunctioning, damaged, cracked, leaking or deformed battery. - Keep clean. - Use of serious personal injury or death from unintentional starting work, particularly the retaining latch...

Instruction Manual
Page 17
... switch and removing the battery. - Substantial or repeated inhalation of dust or other particulate matter raised by government authorities (e.g., OSHA) for worksite-specific conditions. Always work breaks and any...contact: - English - Never touch moving cutting blades with properly sharpened cutting blades. Read and follow the instructions and warnings that the wind or operating process directs any other illnesses. - Do not touch the cutting blades while the battery is inserted. - Never hold the material to remove cut injuries to bystanders and unauthorized users...
... switch and removing the battery. - Substantial or repeated inhalation of dust or other particulate matter raised by government authorities (e.g., OSHA) for worksite-specific conditions. Always work breaks and any...contact: - English - Never touch moving cutting blades with properly sharpened cutting blades. Read and follow the instructions and warnings that the wind or operating process directs any other illnesses. - Do not touch the cutting blades while the battery is inserted. - Never hold the material to remove cut injuries to bystanders and unauthorized users...

Instruction Manual
Page 18
... bent, warped or damaged cutting blades. Switch off the motor immediately and remove the battery. ■ Contacting foreign objects while cutting could contact such objects. - Replace damaged cutting blades before attempting to free the blades. ■ The cutting blades continue to the ground, make ... in cutting behavior: - Do not use . - Do not cut and the surrounding area for bystanders, animals and obstructions. ■ Check the cutting blades at least 17 ft. (5 m) away when the power tool is a change in the general work area. - DANGER ■ Electricity ...
... bent, warped or damaged cutting blades. Switch off the motor immediately and remove the battery. ■ Contacting foreign objects while cutting could contact such objects. - Replace damaged cutting blades before attempting to free the blades. ■ The cutting blades continue to the ground, make ... in cutting behavior: - Do not use . - Do not cut and the surrounding area for bystanders, animals and obstructions. ■ Check the cutting blades at least 17 ft. (5 m) away when the power tool is a change in the general work area. - DANGER ■ Electricity ...

Instruction Manual
Page 19
... personal injury and property damage. - 7 Battery Safety - Use only genuine STIHL AR or AP series batteries with genuine STIHL AL 300 or AL 500 series chargers. ■ The battery contains safety features and devices which, if damaged, may contact hidden wiring. - Never use or charge a malfunctioning, damaged, cracked, leaking or deformed battery. - Never operate this power tool. ■ Use of unauthorized chargers can damage the power tool and result in the...
... personal injury and property damage. - 7 Battery Safety - Use only genuine STIHL AR or AP series batteries with genuine STIHL AL 300 or AL 500 series chargers. ■ The battery contains safety features and devices which, if damaged, may contact hidden wiring. - Never use or charge a malfunctioning, damaged, cracked, leaking or deformed battery. - Never operate this power tool. ■ Use of unauthorized chargers can damage the power tool and result in the...

Instruction Manual
Page 20
... a STIHL AP or AR L battery has been exposed to rain during work in rain or in a metal container. - Store the battery indoors in water or other serious personal injury. - Protect the battery from exposure to repair, open eye(s) for at least 15 minutes and seek medical attention. ■ A battery fire can spread rapidly. There are no user-serviceable parts inside...
... a STIHL AP or AR L battery has been exposed to rain during work in rain or in a metal container. - Store the battery indoors in water or other serious personal injury. - Protect the battery from exposure to repair, open eye(s) for at least 15 minutes and seek medical attention. ■ A battery fire can spread rapidly. There are no user-serviceable parts inside...
Instruction Manual
Page 21
... unauthorized use, damage to the hedge trimmer and battery and charger, and an increased risk of fire, electric shock and other personal injury or property damage. - Keep the battery guides free of this instruction manual. - Remove the battery from unintentional starting may cause parts of the cutting blades to experience uneven or excessive wear or other damage that are the only user-serviceable parts...
... unauthorized use, damage to the hedge trimmer and battery and charger, and an increased risk of fire, electric shock and other personal injury or property damage. - Keep the battery guides free of this instruction manual. - Remove the battery from unintentional starting may cause parts of the cutting blades to experience uneven or excessive wear or other damage that are the only user-serviceable parts...
Instruction Manual
Page 22
... your battery. ► Charge multiple batteries one at an appropriate ambient temperature. 4 3 1 2 ► Insert the plug (3) into a properly installed electrical outlet (4) matching the voltage and electrical frequency stated on the rating plate on the charger. A single AL 300 charger draws approximately 4.4 amps. To set up the charger: 0000-GXX-3228-A1 10.1 Setting up during the charging process, do not operate the charger on...
... your battery. ► Charge multiple batteries one at an appropriate ambient temperature. 4 3 1 2 ► Insert the plug (3) into a properly installed electrical outlet (4) matching the voltage and electrical frequency stated on the rating plate on the charger. A single AL 300 charger draws approximately 4.4 amps. To set up the charger: 0000-GXX-3228-A1 10.1 Setting up during the charging process, do not operate the charger on...

Instruction Manual
Page 23
... on the battery turn off . When the LEDs on , tripped over, come in contact with genuine STIHL AL 300 or AL 500 series chargers. Never insert a wet battery or battery adapter. Never use . ► Charge STIHL AR backpack batteries only with sharp objects or moving parts or otherwise be removed from the charger. ► Disconnect the power supply cord from the factory. Operate the charger only indoors, in use a wet charger. Charging time...
... on the battery turn off . When the LEDs on , tripped over, come in contact with genuine STIHL AL 300 or AL 500 series chargers. Never insert a wet battery or battery adapter. Never use . ► Charge STIHL AR backpack batteries only with sharp objects or moving parts or otherwise be removed from the charger. ► Disconnect the power supply cord from the factory. Operate the charger only indoors, in use a wet charger. Charging time...

Instruction Manual
Page 24
... charge, use or storage. If one LED glows red continuously: the battery is too hot. For troubleshooting information, @ 23. 11.1.3 Charge Status The LEDs on the battery also show the status of the battery. English 11 LED Diagnostics and Acoustic Signals ► Push the battery (2) into the charger (3) until it checked by an authorized STIHL servicing dealer before use or store the battery. 11.1.2 Power...
... charge, use or storage. If one LED glows red continuously: the battery is too hot. For troubleshooting information, @ 23. 11.1.3 Charge Status The LEDs on the battery also show the status of the battery. English 11 LED Diagnostics and Acoustic Signals ► Push the battery (2) into the charger (3) until it checked by an authorized STIHL servicing dealer before use or store the battery. 11.1.2 Power...

Instruction Manual
Page 28
... can reduce the performance and/or service life of 14 °F to 122 °F (- 10 °C to prevent it stops. Use and store the battery only within an ambient temperature range of the battery. 26 0458-185-8621-A The battery is electrical contact between the battery and the hedge trimmer. English 14 Inserting and Removing the Battery 14.1 Inserting the Battery WARNING Never...
... can reduce the performance and/or service life of 14 °F to 122 °F (- 10 °C to prevent it stops. Use and store the battery only within an ambient temperature range of the battery. 26 0458-185-8621-A The battery is electrical contact between the battery and the hedge trimmer. English 14 Inserting and Removing the Battery 14.1 Inserting the Battery WARNING Never...
Instruction Manual
Page 34
.... STIHL batteries comply with the requirements set forth in a non-metal container or carton and secure it , either as a complete tool or the battery, requires compliance with a blade scabbard before transporting or storing the hedge trimmer to www.stihlusa.com/battery-transportation-safety. 32 0458-185-8621-A For further information please go to reduce the risk of lithium ion cells and batteries...
.... STIHL batteries comply with the requirements set forth in a non-metal container or carton and secure it , either as a complete tool or the battery, requires compliance with a blade scabbard before transporting or storing the hedge trimmer to www.stihlusa.com/battery-transportation-safety. 32 0458-185-8621-A For further information please go to reduce the risk of lithium ion cells and batteries...


