
Instruction Manual
Page 2
... Loop Handle 13 Fitting Carrying Eye (Clamp 14 Fitting the Harness 15 Balancing the Machine 15 Starting / Stopping the Engine ........ 16 Operating Instructions 17 Storing the Machine 17 Replacing Sweeper Drum 17 Replacing the Rubber Sleeve ......... 18 Removing the Gearbox 18 Main Parts 19 Specifications 19 Special Accessories 20 Maintenance and Repairs 20 STIHl KW English / USA Allow only persons who understand this Manual, please...
... Loop Handle 13 Fitting Carrying Eye (Clamp 14 Fitting the Harness 15 Balancing the Machine 15 Starting / Stopping the Engine ........ 16 Operating Instructions 17 Storing the Machine 17 Replacing Sweeper Drum 17 Replacing the Rubber Sleeve ......... 18 Removing the Gearbox 18 Main Parts 19 Specifications 19 Special Accessories 20 Maintenance and Repairs 20 STIHl KW English / USA Allow only persons who understand this Manual, please...
Instruction Manual
Page 3
... approved basic power tool models are supported by illustrations. This instruction manual contains only descriptions of a step or procedure that refers directly to an illustration may contain item numbers that require your attachment and power tool combination, also read and observe the appropriate chapters in the instruction manual of the basic power tool you are marked with shaft and handle system). The operating and handling instructions are listed in the...
... approved basic power tool models are supported by illustrations. This instruction manual contains only descriptions of a step or procedure that refers directly to an illustration may contain item numbers that require your attachment and power tool combination, also read and observe the appropriate chapters in the instruction manual of the basic power tool you are marked with shaft and handle system). The operating and handling instructions are listed in the...
Instruction Manual
Page 4
... from time to time. Therefore some changes, modifications and improvements may not be covered in this manual, please contact your STIHL dealer for a description of the controls and function of the parts of your power tool model. It is important that you how to operate your power tool and PowerSweep attachment owner's manual for assistance. Bystanders, especially children, and animals should never be allowed to use of the power tool...
... from time to time. Therefore some changes, modifications and improvements may not be covered in this manual, please contact your STIHL dealer for a description of the controls and function of the parts of your power tool model. It is important that you how to operate your power tool and PowerSweep attachment owner's manual for assistance. Bystanders, especially children, and animals should never be allowed to use of the power tool...
Instruction Manual
Page 5
... the handles with gloves when handling the power tool. Never operate a PowerSweep unless wearing goggles or properly fitted safety glasses with adequate top and side protection complying with any of the above mentioned precautions do not guarantee that affect blood vessels and blood transport, as well as high vibration levels and long periods of their hearing checked regularly...
... the handles with gloves when handling the power tool. Never operate a PowerSweep unless wearing goggles or properly fitted safety glasses with adequate top and side protection complying with any of the above mentioned precautions do not guarantee that affect blood vessels and blood transport, as well as high vibration levels and long periods of their hearing checked regularly...

Instruction Manual
Page 6
... the throttle trigger, throttle trigger interlock (if applicable), stop switch, sweeper drums, rubber sleeve and harness. Good footing is above shoulder level. Preparation for the STIHL power tool, their use with the specific STIHL power tool models are authorized. The machine should be in operation. Both sweeper belts must be properly balanced as specified in your PowerSweep with nonslip soles. Do not operate your owner's manual for worn or damaged parts. Replace...
... the throttle trigger, throttle trigger interlock (if applicable), stop switch, sweeper drums, rubber sleeve and harness. Good footing is above shoulder level. Preparation for the STIHL power tool, their use with the specific STIHL power tool models are authorized. The machine should be in operation. Both sweeper belts must be properly balanced as specified in your PowerSweep with nonslip soles. Do not operate your owner's manual for worn or damaged parts. Replace...
Instruction Manual
Page 7
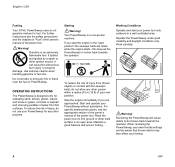
... fuel mix. Working Conditions Operate and start position" the sweeper belts will rotate when the engine starts - For further instructions see the appropriate section of the owner's manual of the power tool. !Warning! this may also affect your own position. If you are approached. When reversing the PowerSweep, use your PowerSweep for fuel. Reversing the PowerSweep will cause debris to be aware that thrown debris may set...
... fuel mix. Working Conditions Operate and start position" the sweeper belts will rotate when the engine starts - For further instructions see the appropriate section of the owner's manual of the power tool. !Warning! this may also affect your own position. If you are approached. When reversing the PowerSweep, use your PowerSweep for fuel. Reversing the PowerSweep will cause debris to be aware that thrown debris may set...
Instruction Manual
Page 8
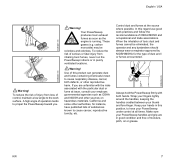
... engine is running. Use of operation tends to propel the PowerSweep toward you are in this position, to cause cancer, reproductive toxicity, etc. A high angle of this regard use good work surface. In this product can generate dust and fumes containing chemicals known to the work practices and follow the recommendations of moisture, pitch, oil or grease. 002BA054 KN KW...
... engine is running. Use of operation tends to propel the PowerSweep toward you are in this position, to cause cancer, reproductive toxicity, etc. A high angle of this regard use good work surface. In this product can generate dust and fumes containing chemicals known to the work practices and follow the recommendations of moisture, pitch, oil or grease. 002BA054 KN KW...
Instruction Manual
Page 9
... attempt to operate any maintenance or repair work area and check for maintenance and repair. Important adjustments !Warning! MAINTENANCE, REPAIR AND STORING Use only identical STIHL replacement parts for solid objects (such as you cannot set the correct idle speed, have stopped before cleaning. Use of the PowerSweep may cause serious or fatal injury. Loss of control of non-STIHL parts may result in pairs. Do not operate the PowerSweep using the starting throttle lock as...
... attempt to operate any maintenance or repair work area and check for maintenance and repair. Important adjustments !Warning! MAINTENANCE, REPAIR AND STORING Use only identical STIHL replacement parts for solid objects (such as you cannot set the correct idle speed, have stopped before cleaning. Use of the PowerSweep may cause serious or fatal injury. Loss of control of non-STIHL parts may result in pairs. Do not operate the PowerSweep using the starting throttle lock as...
Instruction Manual
Page 10
... injury, use . An improperly maintained muffler will result. Do not modify or remove any part of children. !Warning! Use the specified spark plug and make sure ignition lead is missing or damaged. in the USA, Canada and Australia), never operate your STIHL Owner's Manual should be attached.) A loose connection between spark plug boot and ignition wire connector in good condition. !Warning! English / USA KW 9 Additionally, the daily maintenance schedule...
... injury, use . An improperly maintained muffler will result. Do not modify or remove any part of children. !Warning! Use the specified spark plug and make sure ignition lead is missing or damaged. in the USA, Canada and Australia), never operate your STIHL Owner's Manual should be attached.) A loose connection between spark plug boot and ignition wire connector in good condition. !Warning! English / USA KW 9 Additionally, the daily maintenance schedule...
Instruction Manual
Page 11
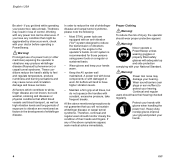
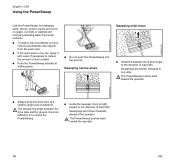
... 1 : Guide the sweeper drum at an angle to the direction of travel (1). The PowerSweep pushes back toward the operator. 223BA026 KN 223BA001 KN : Always keep the drive tube at a shallow angle (see illustration). 223BA027 KN English / USA Using the PowerSweep Use the PowerSweep for sweeping sand, stones, gravel, leaves and snow on grass, concrete or asphalt and removing...
... 1 : Guide the sweeper drum at an angle to the direction of travel (1). The PowerSweep pushes back toward the operator. 223BA026 KN 223BA001 KN : Always keep the drive tube at a shallow angle (see illustration). 223BA027 KN English / USA Using the PowerSweep Use the PowerSweep for sweeping sand, stones, gravel, leaves and snow on grass, concrete or asphalt and removing...
Instruction Manual
Page 12
... basic L power tools are thrown back toward the operator. For this happens push the drive shaft back into the tube. The PowerSweep pulls the operator forward. The drive shaft may result in to the required length. 11 If this reason: : Run the PowerSweep at the same time until it slowly at a low throttle setting only. The drive shaft must be equipped with a bike handle or models FS...
... basic L power tools are thrown back toward the operator. For this happens push the drive shaft back into the tube. The PowerSweep pulls the operator forward. The drive shaft may result in to the required length. 11 If this reason: : Run the PowerSweep at the same time until it slowly at a low throttle setting only. The drive shaft must be equipped with a bike handle or models FS...
Instruction Manual
Page 13
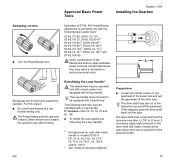
ease the rubber sleeve to one side to check this - Secure pin with cotter pin (5). 223BA008 KN 12 KW push the gearbox right up to the stop. : Fit clamp screw and tighten as far as stop. : Line up the gearbox (2) on the drive tube so that the machine support (5) on end of axle (2) and press home as far as...
ease the rubber sleeve to one side to check this - Secure pin with cotter pin (5). 223BA008 KN 12 KW push the gearbox right up to the stop. : Fit clamp screw and tighten as far as stop. : Line up the gearbox (2) on the drive tube so that the machine support (5) on end of axle (2) and press home as far as...
Instruction Manual
Page 14
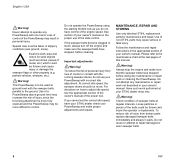
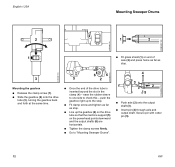
... installed position (see "Guide to Using this Manual" KW 13 the spacer sleeve* (3) and carrying eye* (4), are already fitted, ie. English / USA Mounting the Loop Handle* 223BA009 KN 223BA010 KN 002BA184 KN 2 6 7 A 2 2 : Push sweeper drum assembly (6) onto the axle (2) - Always mount both sweeper drum assemblies! Position of Loop Handle : Fit the loop handle (1) on the drive tube approx. 8" / (20 cm) (A) forward of the control handle...
... installed position (see "Guide to Using this Manual" KW 13 the spacer sleeve* (3) and carrying eye* (4), are already fitted, ie. English / USA Mounting the Loop Handle* 223BA009 KN 223BA010 KN 002BA184 KN 2 6 7 A 2 2 : Push sweeper drum assembly (6) onto the axle (2) - Always mount both sweeper drum assemblies! Position of Loop Handle : Fit the loop handle (1) on the drive tube approx. 8" / (20 cm) (A) forward of the control handle...

Instruction Manual
Page 15
... comfortable position for the user and application. Aligning the Loop Handle : Adjust the loop handle (1) to Using this Manual" 14 KW Distance A must not be more than 22" (55 cm). English / USA Fitting Carrying Eye* (Clamp) 9 9 8 81 1 A 5 6 7 10 10 1 1 2 Mounting the Loop Handle : Place the clamp (5) in the loop handle (1) and fit handle in position on the drive tube (6). : Fit the clamp (7). : Line up...
... comfortable position for the user and application. Aligning the Loop Handle : Adjust the loop handle (1) to Using this Manual" 14 KW Distance A must not be more than 22" (55 cm). English / USA Fitting Carrying Eye* (Clamp) 9 9 8 81 1 A 5 6 7 10 10 1 1 2 Mounting the Loop Handle : Place the clamp (5) in the loop handle (1) and fit handle in position on the drive tube (6). : Fit the clamp (7). : Line up...
Instruction Manual
Page 16
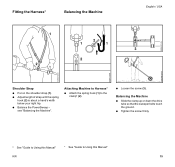
... down the drive tube so that the sweeper belts touch the ground. : Tighten the screw firmly. 223BA013 KN * See "Guide to Using this Manual" * See "Guide to the clamp* (2). : Loosen the screw (3). Fitting the Harness* Balancing the Machine 2 1 1 2 English / USA 3 002BA151 KN 002BA150 KN Shoulder Strap : Put on the shoulder strap (1). : Adjust length of strap until the spring hook (2) is...
... down the drive tube so that the sweeper belts touch the ground. : Tighten the screw firmly. 223BA013 KN * See "Guide to Using this Manual" * See "Guide to the clamp* (2). : Loosen the screw (3). Fitting the Harness* Balancing the Machine 2 1 1 2 English / USA 3 002BA151 KN 002BA150 KN Shoulder Strap : Put on the shoulder strap (1). : Adjust length of strap until the spring hook (2) is...
Instruction Manual
Page 17
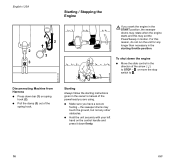
... the starting instructions given in the starting throttle position. English / USA 2 3 Starting / Stopping the Engine 1 2 3 223BA038 KN If you crank the engine in the START position, the sweeper drums may rotate when the engine starts and this reason, do not run the unit for any other obstacles. : Hold the unit securely with your left hand on the control handle and press it down bar (1) on spring hook (2). : Pull...
... the starting instructions given in the starting throttle position. English / USA 2 3 Starting / Stopping the Engine 1 2 3 223BA038 KN If you crank the engine in the START position, the sweeper drums may rotate when the engine starts and this reason, do not run the unit for any other obstacles. : Hold the unit securely with your left hand on the control handle and press it down bar (1) on spring hook (2). : Pull...

Instruction Manual
Page 18
...: : Remove and clean the sweeping attachments, inspect for signs of oil. If leaks are found, have your STIHL dealer check the gearbox. : Install new sweeper drums - out of the reach of children and other unauthorized persons. : Straighten the ends of the cotter pin, remove the cotter pin. : Pull the sweeper drum off the axle. : Repeat the procedure on the other side. : Examine gear housing...
...: : Remove and clean the sweeping attachments, inspect for signs of oil. If leaks are found, have your STIHL dealer check the gearbox. : Install new sweeper drums - out of the reach of children and other unauthorized persons. : Straighten the ends of the cotter pin, remove the cotter pin. : Pull the sweeper drum off the axle. : Repeat the procedure on the other side. : Examine gear housing...
Instruction Manual
Page 19
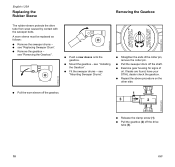
... your STIHL dealer check the gearbox. : Repeat the above procedure on the other side. 223BA022 KN 223BA032 KN : Pull the worn sleeve off the gearbox. 1 3 2 223BA015 KN : Release the clamp screw (1). : Pull the gearbox (2) off the shaft. : Examine gear housing for signs of the cotter pin, remove the cotter pin. : Pull the sweeper drum off the drive tube (3). 18 KW see "Replacing Sweeper Drum". : Remove the...
... your STIHL dealer check the gearbox. : Repeat the above procedure on the other side. 223BA022 KN 223BA032 KN : Pull the worn sleeve off the gearbox. 1 3 2 223BA015 KN : Release the clamp screw (1). : Pull the gearbox (2) off the shaft. : Examine gear housing for signs of the cotter pin, remove the cotter pin. : Pull the sweeper drum off the drive tube (3). 18 KW see "Replacing Sweeper Drum". : Remove the...
Instruction Manual
Page 20
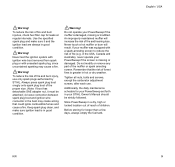
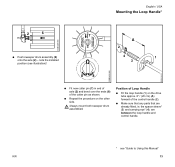
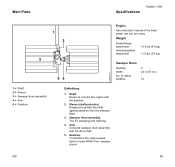
Main Parts Specifications English / USA 1 2 3 54 Engine See instruction manual of the sweeper drums. KW 19 Tool for sweeping and cleaning. 4. To transform the engine speed down to lower RPM of the basic power tool you are using. Shaft. Axle. Sleeve (shaft protector). Designed to connect the engine with the drive shaft. 5. Device to protect the shaft against abrasion from the sweeper flaps. 3. of rubber paddles 2 22 in (57 cm...
Main Parts Specifications English / USA 1 2 3 54 Engine See instruction manual of the sweeper drums. KW 19 Tool for sweeping and cleaning. 4. To transform the engine speed down to lower RPM of the basic power tool you are using. Shaft. Axle. Sleeve (shaft protector). Designed to connect the engine with the drive shaft. 5. Device to protect the shaft against abrasion from the sweeper flaps. 3. of rubber paddles 2 22 in (57 cm...
Instruction Manual
Page 21
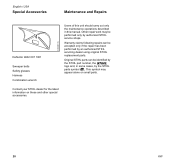
... Sweeper belts Safety glasses Harness Combination wrench 224BA005 KN Users of this unit should carry out only the maintenance operations described in some cases, by an authorized STIHL servicing dealer using original STIHL replacement parts. Other repair work may appear alone on these and other special accessories. 20 KW Original STlHL parts can be identified by the STlHL part number, the STIHl logo and, in this manual. Warranty...
... Sweeper belts Safety glasses Harness Combination wrench 224BA005 KN Users of this unit should carry out only the maintenance operations described in some cases, by an authorized STIHL servicing dealer using original STIHL replacement parts. Other repair work may appear alone on these and other special accessories. 20 KW Original STlHL parts can be identified by the STlHL part number, the STIHl logo and, in this manual. Warranty...


