
Instruction Manual
Page 2
... in this instruction manual. © ANDREAS STIHL AG & Co. Original Instruction Manual 0000010877_002_GB Printed on the Products 3 5 IMPORTANT SAFETY INSTRUCTIONS.... 4 6 Maintenance, Repair and Storage 13 7 Before Starting Work 14 8 Assembling the Lawn Mower 14 9 Adjusting the Lawn Mower 16 10 Fueling the Mower and Adding Engine Oil17 11 Starting the Engine 18 12 Shutting Off the Engine 18 13 Engaging and Disengaging the Mowing Blade 19 14 Activating and Deactivating Drive System 19 15 Checking the Lawn Mower 20 16...
... in this instruction manual. © ANDREAS STIHL AG & Co. Original Instruction Manual 0000010877_002_GB Printed on the Products 3 5 IMPORTANT SAFETY INSTRUCTIONS.... 4 6 Maintenance, Repair and Storage 13 7 Before Starting Work 14 8 Assembling the Lawn Mower 14 9 Adjusting the Lawn Mower 16 10 Fueling the Mower and Adding Engine Oil17 11 Starting the Engine 18 12 Shutting Off the Engine 18 13 Engaging and Disengaging the Mowing Blade 19 14 Activating and Deactivating Drive System 19 15 Checking the Lawn Mower 20 16...
Instruction Manual
Page 3
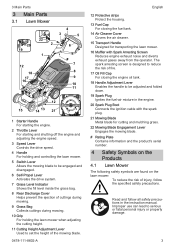
... starting the engine. 2 Throttle Lever For starting and shutting off the engine and adjusting the engine speed. 3 Speed Lever Controls the drive speed. 4 Handle For holding and controlling the lawn mower. 5 Switch Lever Allows the mowing blade to be adjusted and folded down. 19 Spark Plug Ignites the fuel-air mixture in the instruction manual. The spark arresting screen is designed to reduce the risk of fire. 17 Oil Fill Cap For closing the engine oil tank. 18 Handle Adjustment Lever Enables the handle to be engaged and disengaged. 6 Self-Propel Lever Activates the drive system. 7 Grass...
... starting the engine. 2 Throttle Lever For starting and shutting off the engine and adjusting the engine speed. 3 Speed Lever Controls the drive speed. 4 Handle For holding and controlling the lawn mower. 5 Switch Lever Allows the mowing blade to be adjusted and folded down. 19 Spark Plug Ignites the fuel-air mixture in the instruction manual. The spark arresting screen is designed to reduce the risk of fire. 17 Oil Fill Cap For closing the engine oil tank. 18 Handle Adjustment Lever Enables the handle to be engaged and disengaged. 6 Self-Propel Lever Activates the drive system. 7 Grass...

Instruction Manual
Page 4
..., wire and other objects that for which it is flammable, can cause an improperly installed fuel cap to loosen or come off the engine and removing the spark plug boot, 5.7.5. If damaged, replace discharge covers immedi‐ ately, 5.7.4. WARNING When using gasoline-powered lawn mowers, basic safety precautions should be caught in moving parts. Do not use lawn mowers in subse‐ quent sections of fuel spillage and fire, tighten the fuel filler cap...
..., wire and other objects that for which it is flammable, can cause an improperly installed fuel cap to loosen or come off the engine and removing the spark plug boot, 5.7.5. If damaged, replace discharge covers immedi‐ ately, 5.7.4. WARNING When using gasoline-powered lawn mowers, basic safety precautions should be caught in moving parts. Do not use lawn mowers in subse‐ quent sections of fuel spillage and fire, tighten the fuel filler cap...
Instruction Manual
Page 5
... improperly maintained lawn mower or one with loose components will tend to reduce the risk of grass, leaves, or other power tools) exposing the operator to modify or override the lawn mower's controls or safety devices in working and keep your doctor before restarting and operating the lawn mower. 21) Use identical replacement blades only. Keep cutting edges sharp and clean for manual lawn mowing. Inspect for operations different than intended...
... improperly maintained lawn mower or one with loose components will tend to reduce the risk of grass, leaves, or other power tools) exposing the operator to modify or override the lawn mower's controls or safety devices in working and keep your doctor before restarting and operating the lawn mower. 21) Use identical replacement blades only. Keep cutting edges sharp and clean for manual lawn mowing. Inspect for operations different than intended...

Instruction Manual
Page 6
... or any other audible warnings is restricted. 5 IMPORTANT SAFETY INSTRUCTIONS ■ Good footing is not in permanent hearing damage. Never test the ignition system with this instruction manual and make contact with the moving parts of your body away from the spark plug or with a removed spark plug. ■ Although certain unauthorized accessories or attachments may result in use with the spark plug boot removed from the mowing blade. -
... or any other audible warnings is restricted. 5 IMPORTANT SAFETY INSTRUCTIONS ■ Good footing is not in permanent hearing damage. Never test the ignition system with this instruction manual and make contact with the moving parts of your body away from the spark plug or with a removed spark plug. ■ Although certain unauthorized accessories or attachments may result in use with the spark plug boot removed from the mowing blade. -
Instruction Manual
Page 7
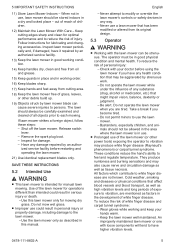
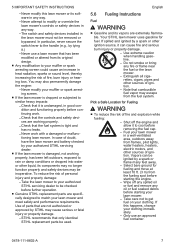
... or spark arresting screen could cause an increase in any fire or flame near the fuel or the lawn mower. - In particular, never secure the switch lever to the handle (e.g., by your lawn mower in any oil or fuel soaked debris before removing the fuel cap. - Check that the controls and safety devi‐ ces are not authorized or approved by STIHL may also permanently damage the engine: - English 5.6 Fueling Instructions Fuel...
... or spark arresting screen could cause an increase in any fire or flame near the fuel or the lawn mower. - In particular, never secure the switch lever to the handle (e.g., by your lawn mower in any oil or fuel soaked debris before removing the fuel cap. - Check that the controls and safety devi‐ ces are not authorized or approved by STIHL may also permanently damage the engine: - English 5.6 Fueling Instructions Fuel...
Instruction Manual
Page 8
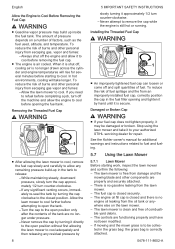
... completing a job, turn counter-clockwise. - Installing the Threaded Fuel Cap WARNING ■ An improperly tightened fuel cap can loosen or come off the machine and allow any significant venting occurs, immedi‐ ately re-seal the tank by 8 5 IMPORTANT SAFETY INSTRUCTIONS slowly turning it to be damaged or broken. The lawn mower is air cooled. See the Kohler owner's manual for repair. English Allow the Engine to cool...
... completing a job, turn counter-clockwise. - Installing the Threaded Fuel Cap WARNING ■ An improperly tightened fuel cap can loosen or come off the machine and allow any significant venting occurs, immedi‐ ately re-seal the tank by 8 5 IMPORTANT SAFETY INSTRUCTIONS slowly turning it to be damaged or broken. The lawn mower is air cooled. See the Kohler owner's manual for repair. English Allow the Engine to cool...
Instruction Manual
Page 9
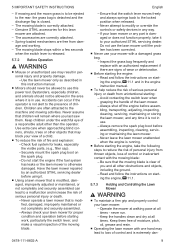
... the switch lever when grasping the handle of control or inadvertent contact with one hand may result in any way. - Never leave the lawn mower unattended when the engine is closed. - Operate the mower at walking pace at all times. Never attempt to the rear: the grass bag is detached and the discharge flap is running. ■ Before starting : - Always remove the spark plug boot before starting work, particularly the switch lever...
... the switch lever when grasping the handle of control or inadvertent contact with one hand may result in any way. - Never leave the lawn mower unattended when the engine is closed. - Operate the mower at walking pace at all times. Never attempt to the rear: the grass bag is detached and the discharge flap is running. ■ Before starting : - Always remove the spark plug boot before starting work, particularly the switch lever...

Instruction Manual
Page 12
... engine and remove the spark plug boot. Contact your lawn mower will not protect the operator from contact with a moving mower blade will be pulled towards the engine faster than the starter handle can be thrown by the rotating cutting blade. After releasing the switch lever, the mowing blade stops within a few seconds, but the engine continues to fire protection requirements. ■ If the starter rope recoils at high speed, the hand and arm...
... engine and remove the spark plug boot. Contact your lawn mower will not protect the operator from contact with a moving mower blade will be pulled towards the engine faster than the starter handle can be thrown by the rotating cutting blade. After releasing the switch lever, the mowing blade stops within a few seconds, but the engine continues to fire protection requirements. ■ If the starter rope recoils at high speed, the hand and arm...

Instruction Manual
Page 13
..., grass, weeds and other material from the mowing blade and discharge chutes at least 50 ft. (15 m) away from such objects as necessary. ■ Unintentional starting : - Maintain and replace warning and instruc‐ tion labels as vehicles and windows. - To reduce the risk of your body while the engine is running or the cutting blade is the only user-serviceable part on the lawn mower. 0478...
..., grass, weeds and other material from the mowing blade and discharge chutes at least 50 ft. (15 m) away from such objects as necessary. ■ Unintentional starting : - Maintain and replace warning and instruc‐ tion labels as vehicles and windows. - To reduce the risk of your body while the engine is running or the cutting blade is the only user-serviceable part on the lawn mower. 0478...

Instruction Manual
Page 14
... or approved by pushing the handle adjustment lever. The handle can result in the grass bag: ► Remove the mulch insert, 8.2.2. ► Mount the grass bag, 8.3.2. Tighten nut, bolt and screw after each use , damage to cool down before starting work gloves made of ignition. - Replace the mowing blade when it becomes worn or damaged. - To mount the handle: ► Shut off the engine, remove the spark plug boot, place the mower on the bushing...
... or approved by pushing the handle adjustment lever. The handle can result in the grass bag: ► Remove the mulch insert, 8.2.2. ► Mount the grass bag, 8.3.2. Tighten nut, bolt and screw after each use , damage to cool down before starting work gloves made of ignition. - Replace the mowing blade when it becomes worn or damaged. - To mount the handle: ► Shut off the engine, remove the spark plug boot, place the mower on the bushing...

Instruction Manual
Page 15
... the handle. 8 Assembling the Lawn Mower ► Hold the bushing (1) and the disc springs (3) together with the two locking lugs (3) in the housing. ► Close the rear discharge cover (1). 8.2.2 Removing the Mulch Insert To remove the mulch insert: ► Shut off the engine, 12.1. ► Position the lawn mower on a level surface. ► First insert the blade brake clutch cable (the thickest cable) (7) into the guide on a level surface. ► Insert the cables (8) into the cable guide...
... the handle. 8 Assembling the Lawn Mower ► Hold the bushing (1) and the disc springs (3) together with the two locking lugs (3) in the housing. ► Close the rear discharge cover (1). 8.2.2 Removing the Mulch Insert To remove the mulch insert: ► Shut off the engine, 12.1. ► Position the lawn mower on a level surface. ► First insert the blade brake clutch cable (the thickest cable) (7) into the guide on a level surface. ► Insert the cables (8) into the cable guide...

Instruction Manual
Page 16
... the mulch insert is still mounted, remove it, 8.3.3. 9 Adjusting the Lawn Mower 8.3.3 Removing the Grass Bag To remove the grass bag: ► Release the switch lever to disengage the mowing blade, 13.2 ► Position the lawn mower on a level surface. ► Open the rear discharge cover and hold it in position. ► Hold grass bag (2) by its handle (3) and attach it upwards. ► Close the rear discharge cover. 9 Adjusting the Lawn Mower 9.1 Unfolding the Handle WARNING ■ Be sure not to the cable guide (3). 16...
... the mulch insert is still mounted, remove it, 8.3.3. 9 Adjusting the Lawn Mower 8.3.3 Removing the Grass Bag To remove the grass bag: ► Release the switch lever to disengage the mowing blade, 13.2 ► Position the lawn mower on a level surface. ► Open the rear discharge cover and hold it in position. ► Hold grass bag (2) by its handle (3) and attach it upwards. ► Close the rear discharge cover. 9 Adjusting the Lawn Mower 9.1 Unfolding the Handle WARNING ■ Be sure not to the cable guide (3). 16...

Instruction Manual
Page 17
... the handle. To adjust the handle: ► Shut off the engine, 12.1. ► Remove the spark plug boot to avoid uninten‐ tional starting. ► Position the lawn mower on a level surface. ► Hold the handle (1). ► Press the handle adjustment lever (2) down the handle. 10 Fueling the Mower and Adding Engine Oil 10.1 Refueling the Lawn Mower NOTICE If the lawn mower is sealed. 10.2 Engine Oil Add the engine oil as described in the engine instruction manual. Review the operating instructions for...
... the handle. To adjust the handle: ► Shut off the engine, 12.1. ► Remove the spark plug boot to avoid uninten‐ tional starting. ► Position the lawn mower on a level surface. ► Hold the handle (1). ► Press the handle adjustment lever (2) down the handle. 10 Fueling the Mower and Adding Engine Oil 10.1 Refueling the Lawn Mower NOTICE If the lawn mower is sealed. 10.2 Engine Oil Add the engine oil as described in the engine instruction manual. Review the operating instructions for...
Instruction Manual
Page 18
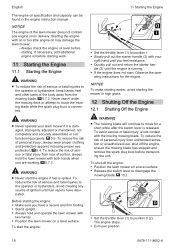
... hold the lawn mower with your lawn mower if it is connec‐ ted. To start the engine: 11 Starting the Engine ► Set the throttle lever (1) to position 0 (2). To reduce the risk of control, always hold and operate the lawn mower with two hands. ► Position the lawn mower on a level surface. ► Release the switch lever to disengage the mowing blade, 13.2 ► Set the throttle lever (1) to position I. ► Slowly pull out the starter handle (2) with...
... hold the lawn mower with your lawn mower if it is connec‐ ted. To start the engine: 11 Starting the Engine ► Set the throttle lever (1) to position 0 (2). To reduce the risk of control, always hold and operate the lawn mower with two hands. ► Position the lawn mower on a level surface. ► Release the switch lever to disengage the mowing blade, 13.2 ► Set the throttle lever (1) to position I. ► Slowly pull out the starter handle (2) with...
Instruction Manual
Page 20
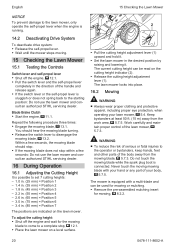
... seconds, the mowing blade should hear the mowing blade turning. ► Release the switch lever to disengage the mowing blade, 13.2. Do not touch the mowing blade while the spark plug boot is connected. Blade Brake Clutch ► Start the engine, 11.1. To adjust the cutting height: ► Shut off the engine, 12.1. ► Pull the switch lever and the self-propel lever completely in the direction of the handle and release again. ► If the switch lever or the self-propel lever is sluggish...
... seconds, the mowing blade should hear the mowing blade turning. ► Release the switch lever to disengage the mowing blade, 13.2. Do not touch the mowing blade while the spark plug boot is connected. Blade Brake Clutch ► Start the engine, 11.1. To adjust the cutting height: ► Shut off the engine, 12.1. ► Pull the switch lever and the self-propel lever completely in the direction of the handle and release again. ► If the switch lever or the self-propel lever is sluggish...

Instruction Manual
Page 22
To push the lawn mower: ► Push the lawn mower forward slowly and in pairs. The lawn mower is stored for more than 3 months: ► Drive the fuel tank empty. ► Have the fuel tank cleaned by an authorized STIHL servicing dealer. ► Change the engine oil as specified in the engine instruction manual. ► Unscrew the spark plug. ► Pull out and return the starter handle several times. ► Screw in the spark plug and tighten it firmly. 20...
To push the lawn mower: ► Push the lawn mower forward slowly and in pairs. The lawn mower is stored for more than 3 months: ► Drive the fuel tank empty. ► Have the fuel tank cleaned by an authorized STIHL servicing dealer. ► Change the engine oil as specified in the engine instruction manual. ► Unscrew the spark plug. ► Pull out and return the starter handle several times. ► Screw in the spark plug and tighten it firmly. 20...
Instruction Manual
Page 23
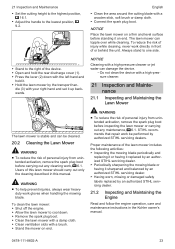
... dealer. 21.2 Inspecting and Maintaining the Engine Read and follow the engine operation, care and maintenance instructions in the Kohler owner's manual. 0478-111-8602-A 23 STIHL recom‐ mends that repair work be cleaned. 20.2 Cleaning the Lawn Mower WARNING ■ To reduce the risk of personal injury from unin‐ tended activation, remove the spark plug boot before standing it up back...
... dealer. 21.2 Inspecting and Maintaining the Engine Read and follow the engine operation, care and maintenance instructions in the Kohler owner's manual. 0478-111-8602-A 23 STIHL recom‐ mends that repair work be cleaned. 20.2 Cleaning the Lawn Mower WARNING ■ To reduce the risk of personal injury from unin‐ tended activation, remove the spark plug boot before standing it up back...
Instruction Manual
Page 26
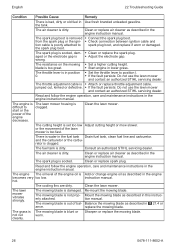
... the mowing blade. English 22 Troubleshooting Guide Condition Possible Cause Remedy There is dirty. Consult an authorized STIHL servicing dealer. The cutting height is Add or change engine oil as described in the engine instruction manual. The engine The oil level of the engine decreases. The resistance on the mowing ► Set a higher cutting height. Read and follow the engine operation, care and maintenance instructions in the engine instruction manual. The fuel tank is dirty. The air cleaner is dirty. The lawn mower vibrates...
... the mowing blade. English 22 Troubleshooting Guide Condition Possible Cause Remedy There is dirty. Consult an authorized STIHL servicing dealer. The cutting height is Add or change engine oil as described in the engine instruction manual. The engine The oil level of the engine decreases. The resistance on the mowing ► Set a higher cutting height. Read and follow the engine operation, care and maintenance instructions in the engine instruction manual. The fuel tank is dirty. The air cleaner is dirty. The lawn mower vibrates...

Instruction Manual
Page 27
.... (1.4 l) - Mowing blade bolt: 9008 348 2440 - Displacement: 10.6 cu. Therefore, some cases, by the STIHL part number, the logo and, in . (53 cm) - Mowing blade: 6374 702 0100 - Cutting width: 20.9 in some changes, modifications and improvements may appear alone on the lawn mower: Fuel cap Oil fill cap Cutting height adjustment Starting the engine Shutting off the engine 0478-111-8602-A English Activating the drive system Throttle Start position Throttle Stop position Highest self-propel speed level Lowest self-propel speed level 23.4 Engineering...
.... (1.4 l) - Mowing blade bolt: 9008 348 2440 - Displacement: 10.6 cu. Therefore, some cases, by the STIHL part number, the logo and, in . (53 cm) - Mowing blade: 6374 702 0100 - Cutting width: 20.9 in some changes, modifications and improvements may appear alone on the lawn mower: Fuel cap Oil fill cap Cutting height adjustment Starting the engine Shutting off the engine 0478-111-8602-A English Activating the drive system Throttle Start position Throttle Stop position Highest self-propel speed level Lowest self-propel speed level 23.4 Engineering...


