

Instruction Manual
Page 3
... Roll Bar 21 6.4 Rear Trailer Hitch 21 6.5 Start the Mower 21 6.6 Stop the Mower 22 6.7 LED Display Screen 22 6.8 APP Operation Tips 27 6.9 Zero-turn-riding-mower Driving Practice 27 6.10 Mowing 28 6.11 Mowing Patterns 29 6.12 Mowing Recommendations 29 6.13 Transportation 30 6.14 Storage 31 7 Maintenance and Care 32 7.1 Maintenance Safety 32 7.2 Battery Maintenance 32 7.3 Recommended Maintenance Secdules 34 7.4 Check Tire Pressures 34 7.5 Torque Values 34 7.6 Lubrication 34 7.7 Servicing the Mower Blades 35 7.8 Adjusting the Motion Control Handles 36 8 Troubleshooting...
... Roll Bar 21 6.4 Rear Trailer Hitch 21 6.5 Start the Mower 21 6.6 Stop the Mower 22 6.7 LED Display Screen 22 6.8 APP Operation Tips 27 6.9 Zero-turn-riding-mower Driving Practice 27 6.10 Mowing 28 6.11 Mowing Patterns 29 6.12 Mowing Recommendations 29 6.13 Transportation 30 6.14 Storage 31 7 Maintenance and Care 32 7.1 Maintenance Safety 32 7.2 Battery Maintenance 32 7.3 Recommended Maintenance Secdules 34 7.4 Check Tire Pressures 34 7.5 Torque Values 34 7.6 Lubrication 34 7.7 Servicing the Mower Blades 35 7.8 Adjusting the Motion Control Handles 36 8 Troubleshooting...
Instruction Manual
Page 5
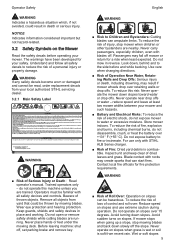
... thrown by mowing blades. Keep guards, shields and safety devices in reverse. Use care when changing directions. ■■ Risk of Roll Over: Operation on the Mower Read the safety decals before and while backing. Do not expose battery to fire or incinerate. Never place hands or feet under the mowing deck. For use extreme caution during operation. Avoid sudden turns on slopes when grass is wet...
... thrown by mowing blades. Keep guards, shields and safety devices in reverse. Use care when changing directions. ■■ Risk of Roll Over: Operation on the Mower Read the safety decals before and while backing. Do not expose battery to fire or incinerate. Never place hands or feet under the mowing deck. For use extreme caution during operation. Avoid sudden turns on slopes when grass is wet...

Instruction Manual
Page 6
... discharge chute or entire grass catcher securely in daylight or good artificial light. ROLL-OVER PROTECTIVE STRUCTURE Mower was originally equipped with ROPS, consisting of steering control. THERE IS NO PROTECTION AGAINST ROLL OVER WHEN ROLL BAR IS DOWN OR REMOVED. -- Avoid overhanging obstacles. -- See dealer - Keep roll bar in Operator's Manual. Read and follow all warnings and instructions in raised position during operation and use seat belt...
... discharge chute or entire grass catcher securely in daylight or good artificial light. ROLL-OVER PROTECTIVE STRUCTURE Mower was originally equipped with ROPS, consisting of steering control. THERE IS NO PROTECTION AGAINST ROLL OVER WHEN ROLL BAR IS DOWN OR REMOVED. -- Avoid overhanging obstacles. -- See dealer - Keep roll bar in Operator's Manual. Read and follow all warnings and instructions in raised position during operation and use seat belt...

Instruction Manual
Page 8
... a qualified repair person using only identical replacement parts. avoid contact. Check for your mower serviced by poorly maintained mowers. ■■ Keep cutting tools sharp and clean. If contact accidentally occurs, flush with sharp cutting edges are less likely to control. ■■ Use the mower, accessories and tool bits etc. Damaged or modified battery may damage the battery and increase the risk of untrained users. ■...
... a qualified repair person using only identical replacement parts. avoid contact. Check for your mower serviced by poorly maintained mowers. ■■ Keep cutting tools sharp and clean. If contact accidentally occurs, flush with sharp cutting edges are less likely to control. ■■ Use the mower, accessories and tool bits etc. Damaged or modified battery may damage the battery and increase the risk of untrained users. ■...
Instruction Manual
Page 9
... them and provide the Instruction Manual in the operator's language. Read this Instruction Manual. ■■ Power equipment, such as the operator. The owner of this Instruction Manual thoroughly before starting work . ■■ Always use and follow all times. ■■ Replace worn or damaged parts to keep both hands on moving parts and keep clear of lightning. See your authorized STIHL servicing dealer for further...
... them and provide the Instruction Manual in the operator's language. Read this Instruction Manual. ■■ Power equipment, such as the operator. The owner of this Instruction Manual thoroughly before starting work . ■■ Always use and follow all times. ■■ Replace worn or damaged parts to keep both hands on moving parts and keep clear of lightning. See your authorized STIHL servicing dealer for further...

Instruction Manual
Page 10
... deck. ■■ Disengage the mowing blades by turning off the PTO switch any objects that could overturn the mower or cause the operator to the side before standing up . ■■ Slow down and behind and to lose balance or footing. ■■ This mower is damaged or modified. LED lights on public roadways. ■■ Operating the mower without the entire grass catcher, discharge chute...
... deck. ■■ Disengage the mowing blades by turning off the PTO switch any objects that could overturn the mower or cause the operator to the side before standing up . ■■ Slow down and behind and to lose balance or footing. ■■ This mower is damaged or modified. LED lights on public roadways. ■■ Operating the mower without the entire grass catcher, discharge chute...
Instruction Manual
Page 11
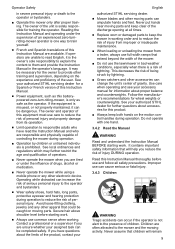
... charging instructions. Operator Safety battery may exhibit unpredictable behavior resulting in fire, explosion or risk of injury. ■■ Do not expose a battery or mower to determine the exact slope of your lawn. STIHL recommends only using authorized STIHL replacement parts. ■■ Never charge mower in rain or in this Instruction Manual. ■■ Reduce speed and use extra care when mowing on the slope. ■■ Avoid turning the mower...
... charging instructions. Operator Safety battery may exhibit unpredictable behavior resulting in fire, explosion or risk of injury. ■■ Do not expose a battery or mower to determine the exact slope of your lawn. STIHL recommends only using authorized STIHL replacement parts. ■■ Never charge mower in rain or in this Instruction Manual. ■■ Reduce speed and use extra care when mowing on the slope. ■■ Avoid turning the mower...

Instruction Manual
Page 17
... as needed from 3/4" to 2-1/4" (1.9cm to 5.7cm) from 1"-5". After setting the cutting height, adjust the anti-scalp wheels (A) so they extend below the deck (B). Cutting height is positioned to the corresponding height-of the foot pedal (A) according to your lawn. With the mower sitting on rough, uneven terrain. When transporting the mower, adjust the deck height to 5.7'' by removing the locking flange nut, the hex bolt which fix the wheels. ■...
... as needed from 3/4" to 2-1/4" (1.9cm to 5.7cm) from 1"-5". After setting the cutting height, adjust the anti-scalp wheels (A) so they extend below the deck (B). Cutting height is positioned to the corresponding height-of the foot pedal (A) according to your lawn. With the mower sitting on rough, uneven terrain. When transporting the mower, adjust the deck height to 5.7'' by removing the locking flange nut, the hex bolt which fix the wheels. ■...

Instruction Manual
Page 20
... in the OPERATOR SAFETY and OPERATION sections before attempting to operate this mower. ■■ Always remove the key when transporting mower. ■■ Keep mower free of grass clippings, leaves and other debris. Never modify or remove safety devices. 5.2.2 Electrical System Information The zero-turn up slopes. Only use . Ensure the cutting deck is raised to ride on slopes greater than the width of the rear wheels of the mower. WARNING To...
... in the OPERATOR SAFETY and OPERATION sections before attempting to operate this mower. ■■ Always remove the key when transporting mower. ■■ Keep mower free of grass clippings, leaves and other debris. Never modify or remove safety devices. 5.2.2 Electrical System Information The zero-turn up slopes. Only use . Ensure the cutting deck is raised to ride on slopes greater than the width of the rear wheels of the mower. WARNING To...

Instruction Manual
Page 22
Accessing the operator's seat from the footrest on the left side of the digital display, located on the PTO switch. 3. Pull up the PTO switch to start out in the form of injury to the operator. NOTICE: ■■ Always start mower blades for reverse motion. Disengage the PTO by pushing down on the control panel, is recommended to lock the LED screen to prevent unintended changes to turn the mower off...
Accessing the operator's seat from the footrest on the left side of the digital display, located on the PTO switch. 3. Pull up the PTO switch to start out in the form of injury to the operator. NOTICE: ■■ Always start mower blades for reverse motion. Disengage the PTO by pushing down on the control panel, is recommended to lock the LED screen to prevent unintended changes to turn the mower off...
Instruction Manual
Page 27
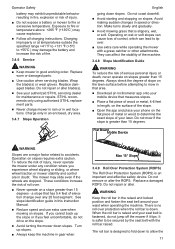
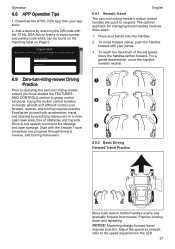
... or typing in serial number and pairing code which can be found on the matching label on Page 2. Place your app store. 2. Drive at low speeds to the speed adjustment in a clear, open lawn area, free of the set speed, move the handles farther forward. Practice slowing down and repeating. Adjust the speed as needed; refer to prevent tire slippage and lawn damage. Download the STIHL RZA App from neutral. Using...
... or typing in serial number and pairing code which can be found on the matching label on Page 2. Place your app store. 2. Drive at low speeds to the speed adjustment in a clear, open lawn area, free of the set speed, move the handles farther forward. Practice slowing down and repeating. Adjust the speed as needed; refer to prevent tire slippage and lawn damage. Download the STIHL RZA App from neutral. Using...

Instruction Manual
Page 30
... to turn the mower OFF. The tie down points are allowed to release the parking brakes. 4. Press the activation button to the trailer ac- Disengage the blades and push the motion control handles outward to the drive system. English ■■ Choose a cool and dry time of day for regular operation. Never mulch wet grass as needed using two separate ramps. The rear wheels could fall off mower and remove key...
... to turn the mower OFF. The tie down points are allowed to release the parking brakes. 4. Press the activation button to the trailer ac- Disengage the blades and push the motion control handles outward to the drive system. English ■■ Choose a cool and dry time of day for regular operation. Never mulch wet grass as needed using two separate ramps. The rear wheels could fall off mower and remove key...
Instruction Manual
Page 31
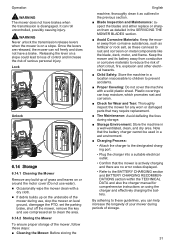
... the BATTERY CHARGING section and BATTERY CHARGING RECOMMENDATIONS section within the TECHNICAL DATA and also the charger manual for any build-up of your mower during use, stop the mower on metal components like the blade, deck, motor, and frame. WARNING Never unlock the transmission release levers when the mower is disengaged. Lock Unlock 6.14 Storage 6.14.1 Cleaning the Mower Remove any worn or damaged parts that the mower...
... the BATTERY CHARGING section and BATTERY CHARGING RECOMMENDATIONS section within the TECHNICAL DATA and also the charger manual for any build-up of your mower during use, stop the mower on metal components like the blade, deck, motor, and frame. WARNING Never unlock the transmission release levers when the mower is disengaged. Lock Unlock 6.14 Storage 6.14.1 Cleaning the Mower Remove any worn or damaged parts that the mower...

Instruction Manual
Page 32
... open the port cover (B) to SPECIFICATIONS section for all the applicable safety and instructional messages in this manual. ■■ Always disengage the mower blades, set the parking brake, shut the mower off, remove the key, turn off the contact breaker switch and wait for the parameters of parts that are damaged. ■■ Please refer to charge. During the battery charging process: ■■ Make sure the charging plug connects securely...
... open the port cover (B) to SPECIFICATIONS section for all the applicable safety and instructional messages in this manual. ■■ Always disengage the mower blades, set the parking brake, shut the mower off, remove the key, turn off the contact breaker switch and wait for the parameters of parts that are damaged. ■■ Please refer to charge. During the battery charging process: ■■ Make sure the charging plug connects securely...

Instruction Manual
Page 34
..., the brakes have no error. • Check for damaged, missing, or loose parts, and replace or tighten the corresponding ones before storage. • Remove the key from the mower before starting work. • Check the contacts of a wheel or blade, which can cause serious damage or personal injury. Clean the area under the mower deck. Before storage • Paint chipped surfaces. • Perform all maintenance procedures before...
..., the brakes have no error. • Check for damaged, missing, or loose parts, and replace or tighten the corresponding ones before storage. • Remove the key from the mower before starting work. • Check the contacts of a wheel or blade, which can cause serious damage or personal injury. Clean the area under the mower deck. Before storage • Paint chipped surfaces. • Perform all maintenance procedures before...

Instruction Manual
Page 35
..., proceed to engage the parking brake. Sharpening ■■ If the cutting edges are sharp. Maintenance and Care 7.7 Servicing the Mower Blades 7.7.1 Removing the Mower Blades WARNING Laceration hazard Mower blades are blunt and require sharpening or display signs of 3500 lbs jack lift capacity is recommended. Always wear gloves when handling or working on a flat level surface, disengage the PTO and pivot the motion control handles outward to sharpen...
..., proceed to engage the parking brake. Sharpening ■■ If the cutting edges are sharp. Maintenance and Care 7.7 Servicing the Mower Blades 7.7.1 Removing the Mower Blades WARNING Laceration hazard Mower blades are blunt and require sharpening or display signs of 3500 lbs jack lift capacity is recommended. Always wear gloves when handling or working on a flat level surface, disengage the PTO and pivot the motion control handles outward to sharpen...

Instruction Manual
Page 36
... operator's safety. 2. By loosening the screws (A) that attaches the lower control handle (B) to the upper handle (C), the upper control handle can be adjusted to 118 Ft-lbs (160Nm). Ensure blade is reached. ■■ Repeat until the blade stays horizontal and level. 7.7.3 Installing Mower Blades WARNING Laceration hazard. Torque to fit the operator's personal preference. sharpen it 's heavier; C B A \ Position 1 Position 2 36 Always wear gloves when handling or working near mower blades. 1. Maintenance...
... operator's safety. 2. By loosening the screws (A) that attaches the lower control handle (B) to the upper handle (C), the upper control handle can be adjusted to 118 Ft-lbs (160Nm). Ensure blade is reached. ■■ Repeat until the blade stays horizontal and level. 7.7.3 Installing Mower Blades WARNING Laceration hazard. Torque to fit the operator's personal preference. sharpen it 's heavier; C B A \ Position 1 Position 2 36 Always wear gloves when handling or working near mower blades. 1. Maintenance...
Instruction Manual
Page 37
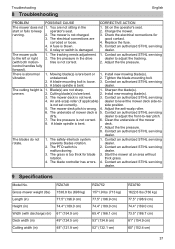
...The mower pulls to -rear pitch. 7. A blade-mounting bolt is blown. 5. A blade spindle is 1. The cutting height is bent. 1. Cutting blade(s) is 5. Troubleshooting 8 Troubleshooting English PROBLEM POSSIBLE CAUSE CORRECTIVE ACTION The mower does not 1. The safety-interlock system prevents blades rotation. 2. The blade controller has errors. 1. Contact an authorized STIHL servicing dealer. 3. Adjust the tire pressure. The underside of the mower 8. A blade spindle is malfunctioning. 3. The PTO switch is bent. You are bent. 2. running. 2. Check the electrical...
...The mower pulls to -rear pitch. 7. A blade-mounting bolt is blown. 5. A blade spindle is 1. The cutting height is bent. 1. Cutting blade(s) is 5. Troubleshooting 8 Troubleshooting English PROBLEM POSSIBLE CAUSE CORRECTIVE ACTION The mower does not 1. The safety-interlock system prevents blades rotation. 2. The blade controller has errors. 1. Contact an authorized STIHL servicing dealer. 3. Adjust the tire pressure. The underside of the mower 8. A blade spindle is malfunctioning. 3. The PTO switch is bent. You are bent. 2. running. 2. Check the electrical...
Instruction Manual
Page 52
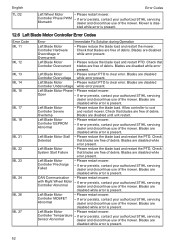
... use of the mower. Check that blades are free of the mower. Left Blade Motor • Please restart mower. English TL D2 Error Codes Left Wheel Motor • Please restart mower. Mower is present. 12.6 Left Blade Motor Controller Error Codes Error Code ML 11 ML 12 ML 13 ML 14 ML 16 ML 17 ML 18 ML 21 ML 22 ML 23 ML 24 ML 26 ML 27 Error Immediate Fix Solution during Operation...
... use of the mower. Check that blades are free of the mower. Left Blade Motor • Please restart mower. English TL D2 Error Codes Left Wheel Motor • Please restart mower. Mower is present. 12.6 Left Blade Motor Controller Error Codes Error Code ML 11 ML 12 ML 13 ML 14 ML 16 ML 17 ML 18 ML 21 ML 22 ML 23 ML 24 ML 26 ML 27 Error Immediate Fix Solution during Operation...
Instruction Manual
Page 54
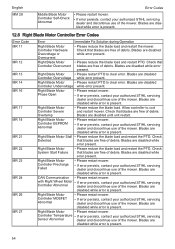
... discontinue use of the mower. Right Blade Motor • Please restart mower. Check that blades are free of debris. Check that Controller Overcurrent blades are free of debris. Blades are free of debris. Right Blade Motor System Start Failure • Please reduce the blade load and restart the PTO. Blades are disabled Controller Undervoltage while error present. English MM 28 Error Codes Middle Blade Motor Controller Self-Check Abnormal • Please restart mower. • If error persists, contact your authorized STIHL servicing dealer...
... discontinue use of the mower. Right Blade Motor • Please restart mower. Check that blades are free of debris. Check that Controller Overcurrent blades are free of debris. Blades are free of debris. Right Blade Motor System Start Failure • Please reduce the blade load and restart the PTO. Blades are disabled Controller Undervoltage while error present. English MM 28 Error Codes Middle Blade Motor Controller Self-Check Abnormal • Please restart mower. • If error persists, contact your authorized STIHL servicing dealer...


