

User Manual
Page 2
... any manner. ii KEEP THESE INSTRUCTIONS FOR FUTURE USE. • Verify that the voltage in your home corresponds to nearest Sunbeam Appliance Authorized Service Center for examination, electrical repair, mechanical repair, or adjustment. • The use of attachments, including canning jars, not recommended by or near children. • Unplug cord from outlet when not in use outdoors. • Do not let...
... any manner. ii KEEP THESE INSTRUCTIONS FOR FUTURE USE. • Verify that the voltage in your home corresponds to nearest Sunbeam Appliance Authorized Service Center for examination, electrical repair, mechanical repair, or adjustment. • The use of attachments, including canning jars, not recommended by or near children. • Unplug cord from outlet when not in use outdoors. • Do not let...

User Manual
Page 3
... lowest speed setting. If you are sharp, handle with care. • Always operate blender with a polarized plug. Jar will fit in place. • When blending hot liquids, remove center piece of plug has one way. Injury can result if moving blades accidentally become hot from the cover opening to insert the iii This plug will become exposed. • If the jar should turn when the motor...
... lowest speed setting. If you are sharp, handle with care. • Always operate blender with a polarized plug. Jar will fit in place. • When blending hot liquids, remove center piece of plug has one way. Injury can result if moving blades accidentally become hot from the cover opening to insert the iii This plug will become exposed. • If the jar should turn when the motor...
User Manual
Page 4
... or accidentally tripped over a long cord. Do not use. If a longer cord is necessary an approved extension cord may be taken to replace the obsolete outlet. This will damage the motor. Do not attempt to defeat this...food or liquid. SAVE THESE INSTRUCTIONS iv The electrical rating of the blender (3.4 ampere). safety plug into the outlet, reverse the plug. Call the toll-free customer service number for information. • Do not place blender in , or tripping over . • If the blender blades lock and do not move, it will freeze and damage the blade assembly, jar and motor...
... or accidentally tripped over a long cord. Do not use. If a longer cord is necessary an approved extension cord may be taken to replace the obsolete outlet. This will damage the motor. Do not attempt to defeat this...food or liquid. SAVE THESE INSTRUCTIONS iv The electrical rating of the blender (3.4 ampere). safety plug into the outlet, reverse the plug. Call the toll-free customer service number for information. • Do not place blender in , or tripping over . • If the blender blades lock and do not move, it will freeze and damage the blade assembly, jar and motor...
User Manual
Page 5
contents Table of Contents Welcome 1 Learning About 10-Speed Blender 2 How to Assemble and Use 3 Using the Blenders Special Features 5 10-Speeds 5 For Continuous Operation 5 For Controlled Cycle Operation 5 Pulse Button 5 Hints for Best Use 6 Maintaining Your 10-Speed Blender 7 Customer Service 7 One-Year Limited Warranty 8 How to Obtain Warranty Service 8 v
contents Table of Contents Welcome 1 Learning About 10-Speed Blender 2 How to Assemble and Use 3 Using the Blenders Special Features 5 10-Speeds 5 For Continuous Operation 5 For Controlled Cycle Operation 5 Pulse Button 5 Hints for Best Use 6 Maintaining Your 10-Speed Blender 7 Customer Service 7 One-Year Limited Warranty 8 How to Obtain Warranty Service 8 v

User Manual
Page 6
Sunbeam offers you an blender to provide the utmost in quality, ease of use and convenience. welcome Welcome Congratulations on the bottom of the blender) 1 Sunbeam has designed your blender to fit your lifestyle: Date product received: Service number: (Located on your purchase of a SUNBEAM® Blender!
Sunbeam offers you an blender to provide the utmost in quality, ease of use and convenience. welcome Welcome Congratulations on the bottom of the blender) 1 Sunbeam has designed your blender to fit your lifestyle: Date product received: Service number: (Located on your purchase of a SUNBEAM® Blender!
User Manual
Page 7
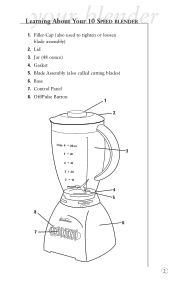
your blender Learning About Your 10 SPEED BLENDER 1. Gasket 5. Blade Assembly (also called cutting blades) 6. Off/Pulse Button 1 2 Cups 6 • 48 oz. 5 • 40 4 • 32 3 • 24 2 • 16 1 •8 8 7 Off High Grate Blend Grind Liquefy CrIucesh Pulse Low Stir Puree Chop Whip Mix 3 4 5 6 2 Base 7. Control Panel 8. Jar (48 ounce) 4. Filler-Cap (also used to tighten or loosen blade assembly) 2. Lid 3.
your blender Learning About Your 10 SPEED BLENDER 1. Gasket 5. Blade Assembly (also called cutting blades) 6. Off/Pulse Button 1 2 Cups 6 • 48 oz. 5 • 40 4 • 32 3 • 24 2 • 16 1 •8 8 7 Off High Grate Blend Grind Liquefy CrIucesh Pulse Low Stir Puree Chop Whip Mix 3 4 5 6 2 Base 7. Control Panel 8. Jar (48 ounce) 4. Filler-Cap (also used to tighten or loosen blade assembly) 2. Lid 3.
User Manual
Page 8
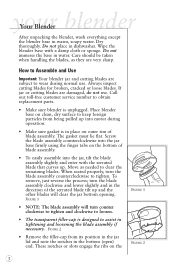
..., turn the blade assembly clockwise and lower slightly and in the direction of blade assembly. FIGURE 2 • Remove the filler-cap from being pulled up into the jar, tilt the blade assembly slightly and enter with a damp cloth or sponge. Care should be taken when handling the blades, as needed to wear during operation. • Make sure gasket is unplugged. How to Assemble and Use Important: Your blender jar and cutting blades are...
..., turn the blade assembly clockwise and lower slightly and in the direction of blade assembly. FIGURE 2 • Remove the filler-cap from being pulled up into the jar, tilt the blade assembly slightly and enter with a damp cloth or sponge. Care should be taken when handling the blades, as needed to wear during operation. • Make sure gasket is unplugged. How to Assemble and Use Important: Your blender jar and cutting blades are...

User Manual
Page 9
... blade assembly in the jar. Place hand on lid when blending liquids. Remember to turn to unlock, then lift jar straight up from base. FIGURE 3 • Hold filler-cap firmly in hand and engage the ribs into the slots. your fingers first and then use the filler-cap to tighten • Set jar into place on blender base, making sure it is securely seated by twisting jar clockwise until blades have stopped...
... blade assembly in the jar. Place hand on lid when blending liquids. Remember to turn to unlock, then lift jar straight up from base. FIGURE 3 • Hold filler-cap firmly in hand and engage the ribs into the slots. your fingers first and then use the filler-cap to tighten • Set jar into place on blender base, making sure it is securely seated by twisting jar clockwise until blades have stopped...
User Manual
Page 10
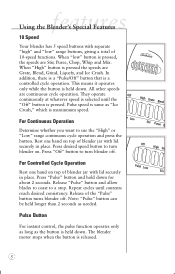
... of the "Pulse" button turns blender off . The blender motor stops when the button is pressed, the speeds are Stir, Puree, Chop, Whip and Mix. features Using the Blender's Special Features 10 Speed Your blender has 5 speed buttons with lid securely in place. When "low" button is released. 5 Press "Pulse" button and hold down . Rest one hand on . Note: "Pulse" button can be held longer than 2 seconds as "Ice Crush," which is same as needed. In...
... of the "Pulse" button turns blender off . The blender motor stops when the button is pressed, the speeds are Stir, Puree, Chop, Whip and Mix. features Using the Blender's Special Features 10 Speed Your blender has 5 speed buttons with lid securely in place. When "low" button is released. 5 Press "Pulse" button and hold down . Rest one hand on . Note: "Pulse" button can be held longer than 2 seconds as "Ice Crush," which is same as needed. In...
User Manual
Page 11
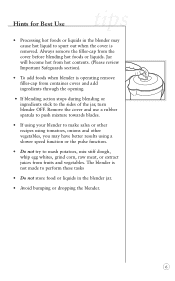
... operating remove filler-cap from container cover and add ingredients through the opening. • If blending action stops during blending or ingredients stick to the sides of the jar, turn blender OFF. Hints for Best Use tips • Processing hot foods or liquids in the blender jar. • Avoid bumping or dropping the blender. 6 Jar will become hot from hot contents. (Please review Important Safeguards section). • To add foods when blender is removed. Always remove the filler-cap...
... operating remove filler-cap from container cover and add ingredients through the opening. • If blending action stops during blending or ingredients stick to the sides of the jar, turn blender OFF. Hints for Best Use tips • Processing hot foods or liquids in the blender jar. • Avoid bumping or dropping the blender. 6 Jar will become hot from hot contents. (Please review Important Safeguards section). • To add foods when blender is removed. Always remove the filler-cap...
User Manual
Page 12
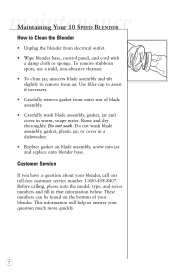
... model, type, and series numbers and fill in that information below. To remove stubborn spots, use a mild, non-abrasive cleanser. • To clean jar, unscrew blade assembly and tilt slightly to Clean the Blender • Unplug the blender from electrical outlet. • Wipe blender base, control panel, and cord with a damp cloth or sponge. Do not wash blade assembly, gasket, plastic jar, or cover in a dishwasher. • Replace gasket on the bottom of blade assembly. • Carefully...
... model, type, and series numbers and fill in that information below. To remove stubborn spots, use a mild, non-abrasive cleanser. • To clean jar, unscrew blade assembly and tilt slightly to Clean the Blender • Unplug the blender from electrical outlet. • Wipe blender base, control panel, and cord with a damp cloth or sponge. Do not wash blade assembly, gasket, plastic jar, or cover in a dishwasher. • Replace gasket on the bottom of blade assembly. • Carefully...
User Manual
Page 13
.... How to Obtain Warranty Service Take the product to the operating instructions, disassembly, repair or alteration by anyone other than Sunbeam or an Authorized Sunbeam Service Center. Further, the warranty does not cover Acts of incidental or consequential damages or limitations on improper voltage or current, use on how long an implied warranty lasts, so the above warranty. If the product is required to...
.... How to Obtain Warranty Service Take the product to the operating instructions, disassembly, repair or alteration by anyone other than Sunbeam or an Authorized Sunbeam Service Center. Further, the warranty does not cover Acts of incidental or consequential damages or limitations on improper voltage or current, use on how long an implied warranty lasts, so the above warranty. If the product is required to...

User Manual
Page 14
Box 948389 Maitland, FL 32794-8389 1.800.458.8407 www.sunbeam.com DO NOT SEND PRODUCT TO THE ABOVE ADDRESS ©2002 Sunbeam Products, Inc. N. 109400 O. Distributed by Sunbeam Products, Inc., Boca Raton, FL 33431 Printed in China P. SUNBEAM® is a registered trademarks of Sunbeam Products, Inc. All rights reserved. DO NOT SEND THIS PRODUCT TO THE PLACE OF PURCHASE For product questions: Sunbeam Consumer Service P.
Box 948389 Maitland, FL 32794-8389 1.800.458.8407 www.sunbeam.com DO NOT SEND PRODUCT TO THE ABOVE ADDRESS ©2002 Sunbeam Products, Inc. N. 109400 O. Distributed by Sunbeam Products, Inc., Boca Raton, FL 33431 Printed in China P. SUNBEAM® is a registered trademarks of Sunbeam Products, Inc. All rights reserved. DO NOT SEND THIS PRODUCT TO THE PLACE OF PURCHASE For product questions: Sunbeam Consumer Service P.


