

User Manual
Page 2
KEEP THESE INSTRUCTIONS FOR FUTURE USE. • Verify that of your home corresponds to blender. A rubber spatula may cause a risk of injury to persons. • Do not use outdoors. • Do not let cord hang over the edge of a table ... cord or plug or after the appliance malfunctions or has been dropped or damaged in any appliance is not running. ii Return appliance to nearest Sunbeam Appliance Authorized Service Center for examination, electrical repair, mechanical repair, or adjustment. • The use of electrical shock, do not put cord, plug, base, or...
KEEP THESE INSTRUCTIONS FOR FUTURE USE. • Verify that of your home corresponds to blender. A rubber spatula may cause a risk of injury to persons. • Do not use outdoors. • Do not let cord hang over the edge of a table ... cord or plug or after the appliance malfunctions or has been dropped or damaged in any appliance is not running. ii Return appliance to nearest Sunbeam Appliance Authorized Service Center for examination, electrical repair, mechanical repair, or adjustment. • The use of electrical shock, do not put cord, plug, base, or...

User Manual
Page 3
... intended purpose. Keep hands and other than the other. SPECIAL INSTRUCTIONS • THIS APPLIANCE INTENDED FOR HOUSEHOLD USE ONLY. Do not fill blender container beyond 3-cup level. Always begin processing at the lowest speed setting. Jar will fit in place. • When blending hot liquids... hot contents. • Screw on base without jar properly attached. If you are sharp, handle with care. • Always operate blender with a polarized plug. Injury can result if moving blades accidentally become hot from the cover opening to insert the iii Blades are unable...
... intended purpose. Keep hands and other than the other. SPECIAL INSTRUCTIONS • THIS APPLIANCE INTENDED FOR HOUSEHOLD USE ONLY. Do not fill blender container beyond 3-cup level. Always begin processing at the lowest speed setting. Jar will fit in place. • When blending hot liquids... hot contents. • Screw on base without jar properly attached. If you are sharp, handle with care. • Always operate blender with a polarized plug. Injury can result if moving blades accidentally become hot from the cover opening to insert the iii Blades are unable...
User Manual
Page 4
... countertop or tabletop where it can be equal to or greater than the electrical rating of becoming tangled in, or tripping over . • If the blender blades lock and do not move, it the plug should still fail to fit, contact a qualified electrician to replace the obsolete outlet. Care must be... tripped over a long cord. If it will freeze and damage the blade assembly, jar and motor. Do not attempt to reduce the hazards of the blender (3.4 ampere). If a longer cord is necessary an approved extension cord may be used on by modifying the plug in the freezer filled with food or...
... countertop or tabletop where it can be equal to or greater than the electrical rating of becoming tangled in, or tripping over . • If the blender blades lock and do not move, it the plug should still fail to fit, contact a qualified electrician to replace the obsolete outlet. Care must be... tripped over a long cord. If it will freeze and damage the blade assembly, jar and motor. Do not attempt to reduce the hazards of the blender (3.4 ampere). If a longer cord is necessary an approved extension cord may be used on by modifying the plug in the freezer filled with food or...
User Manual
Page 5
contents Table of Contents Welcome 1 Learning About 10-Speed Blender 2 How to Assemble and Use 3 Using the Blenders Special Features 5 10-Speeds 5 For Continuous Operation 5 For Controlled Cycle Operation 5 Pulse Button 5 Hints for Best Use 6 Maintaining Your 10-Speed Blender 7 Customer Service 7 One-Year Limited Warranty 8 How to Obtain Warranty Service 8 v
contents Table of Contents Welcome 1 Learning About 10-Speed Blender 2 How to Assemble and Use 3 Using the Blenders Special Features 5 10-Speeds 5 For Continuous Operation 5 For Controlled Cycle Operation 5 Pulse Button 5 Hints for Best Use 6 Maintaining Your 10-Speed Blender 7 Customer Service 7 One-Year Limited Warranty 8 How to Obtain Warranty Service 8 v

User Manual
Page 6
Sunbeam offers you an blender to provide the utmost in quality, ease of use and convenience. welcome Welcome Congratulations on your lifestyle: Date product received: Service number: (Located on the bottom of the blender) 1 Sunbeam has designed your blender to fit your purchase of a SUNBEAM® Blender!
Sunbeam offers you an blender to provide the utmost in quality, ease of use and convenience. welcome Welcome Congratulations on your lifestyle: Date product received: Service number: (Located on the bottom of the blender) 1 Sunbeam has designed your blender to fit your purchase of a SUNBEAM® Blender!
User Manual
Page 7
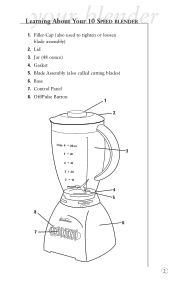
Gasket 5. Jar (48 ounce) 4. Off/Pulse Button 1 2 Cups 6 • 48 oz. 5 • 40 4 • 32 3 • 24 2 • 16 1 •8 8 7 Off High Grate Blend Grind Liquefy CrIucesh Pulse Low Stir Puree Chop Whip Mix 3 4 5 6 2 your blender Learning About Your 10 SPEED BLENDER 1. Base 7. Control Panel 8. Lid 3. Filler-Cap (also used to tighten or loosen blade assembly) 2. Blade Assembly (also called cutting blades) 6.
Gasket 5. Jar (48 ounce) 4. Off/Pulse Button 1 2 Cups 6 • 48 oz. 5 • 40 4 • 32 3 • 24 2 • 16 1 •8 8 7 Off High Grate Blend Grind Liquefy CrIucesh Pulse Low Stir Puree Chop Whip Mix 3 4 5 6 2 your blender Learning About Your 10 SPEED BLENDER 1. Base 7. Control Panel 8. Lid 3. Filler-Cap (also used to tighten or loosen blade assembly) 2. Blade Assembly (also called cutting blades) 6.
User Manual
Page 8
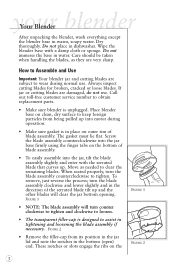
...The transparent filler-cap is designed to keep foreign particles from its position in the jar lid and note the notches in water. Wipe the blender base with the serrated blade that curves up into the jar, tilt the blade assembly slightly and enter with a damp cloth or sponge. ...To remove, just reverse the process; Dry thoroughly. Care should be taken when handling the blades, as needed to obtain replacement parts. • Make sure blender is in the direction of blade assembly. • To easily assemble into motor during normal use . Move as they are damaged, do not use ....
...The transparent filler-cap is designed to keep foreign particles from its position in the jar lid and note the notches in water. Wipe the blender base with the serrated blade that curves up into the jar, tilt the blade assembly slightly and enter with a damp cloth or sponge. ...To remove, just reverse the process; Dry thoroughly. Care should be taken when handling the blades, as needed to obtain replacement parts. • Make sure blender is in the direction of blade assembly. • To easily assemble into motor during normal use . Move as they are damaged, do not use ....

User Manual
Page 9
... lid with filler cap in the jar. Place hand on either side of the blade assembly on lid when blending liquids. Push desired button on blender base, making sure it snaps into the locked position. FIGURE 3 • Hold filler-cap firmly in hand and engage the ribs into place... on control panel to start blender. • Always turn blender OFF and wait until it is pushed down completely into the jar with the other hand and twist jar counterclockwise approximately a quarter turn ...
... lid with filler cap in the jar. Place hand on either side of the blade assembly on lid when blending liquids. Push desired button on blender base, making sure it snaps into the locked position. FIGURE 3 • Hold filler-cap firmly in hand and engage the ribs into place... on control panel to start blender. • Always turn blender OFF and wait until it is pushed down completely into the jar with the other hand and twist jar counterclockwise approximately a quarter turn ...
User Manual
Page 10
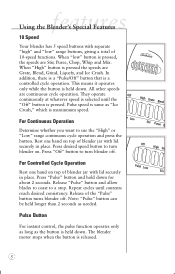
... "Pulse" button and allow blades to coast to use the "High" or "Low" range continuous cycle operation and press the button. Release of blender jar with lid securely in place. Pulse Low Stir Pulse Button For instant control, the pulse function operates only as long as the button is... Continuous Operation e Low Determine whether you want to a stop. Stir Puree Ch Off High Gra For Controlled Cycle Operation Rest one hand on top of blender jar with separate "high" and "low" range buttons, giving a total of 10-speed functions. Press "Pulse" button and hold down . Note: "Pulse" ...
... "Pulse" button and allow blades to coast to use the "High" or "Low" range continuous cycle operation and press the button. Release of blender jar with lid securely in place. Pulse Low Stir Pulse Button For instant control, the pulse function operates only as long as the button is... Continuous Operation e Low Determine whether you want to a stop. Stir Puree Ch Off High Gra For Controlled Cycle Operation Rest one hand on top of blender jar with separate "high" and "low" range buttons, giving a total of 10-speed functions. Press "Pulse" button and hold down . Note: "Pulse" ...
User Manual
Page 11
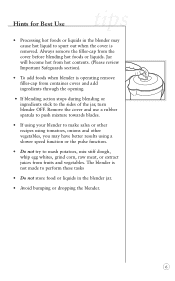
... have better results using a slower speed function or the pulse function. • Do not try to the sides of the jar, turn blender OFF. Always remove the filler-cap from container cover and add ingredients through the opening. • If blending action stops during blending or ... corn, raw meat, or extract juices from fruits and vegetables. Hints for Best Use tips • Processing hot foods or liquids in the blender jar. • Avoid bumping or dropping the blender. 6 Jar will become hot from hot contents. (Please review Important Safeguards section). • To add foods when...
... have better results using a slower speed function or the pulse function. • Do not try to the sides of the jar, turn blender OFF. Always remove the filler-cap from container cover and add ingredients through the opening. • If blending action stops during blending or ... corn, raw meat, or extract juices from fruits and vegetables. Hints for Best Use tips • Processing hot foods or liquids in the blender jar. • Avoid bumping or dropping the blender. 6 Jar will become hot from hot contents. (Please review Important Safeguards section). • To add foods when...
User Manual
Page 12
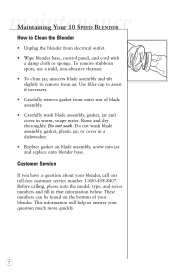
... warm, soapy water. Customer Service If you have a question about your question much more quickly. 7 This information will help us answer your blender, call our toll-free customer service number 1-800-458-8407. Do not soak. Do not wash blade assembly, gasket, plastic jar, or .... These numbers can be found on blade assembly, screw into jar and replace onto blender base. maintenance Maintaining Your 10 SPEED BLENDER How to Clean the Blender • Unplug the blender from outer rim of your blender. To remove stubborn spots, use a mild, non-abrasive cleanser. • To clean...
... warm, soapy water. Customer Service If you have a question about your question much more quickly. 7 This information will help us answer your blender, call our toll-free customer service number 1-800-458-8407. Do not soak. Do not wash blade assembly, gasket, plastic jar, or .... These numbers can be found on blade assembly, screw into jar and replace onto blender base. maintenance Maintaining Your 10 SPEED BLENDER How to Clean the Blender • Unplug the blender from outer rim of your blender. To remove stubborn spots, use a mild, non-abrasive cleanser. • To clean...
