
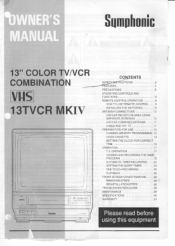
Owner's Manual
Page 1
.../UHF COMBINED ANTENNA 11 CABLE AND PAY TV 11 PREPARATION FOR USE 12 CHANNEL MEMORY PROGRAMMING 12 VIDEO CASSETTE 14 SETTING THE CLOCK FOR CORRECT TIME 15 OPERATION 17 T.V. OPERATION 17 VIEWING AND RECORDING THE SAME PROGRAM 18 AUTOMATIC TIMER RECORDING . . . 20 SETTING THE SLEEP TIMER 24 ONE TOUCH RECORDING 25 PLAYBACK 26 FRONT SCREEN COVER REMOVAL . . . 28 REMOVING STEPS 28 REINSTALLATION STEPS 28 TROUBLESHOOTING GUIDE 29 MAINTENANCE 29 SPECIFICATIONS 30 WARRANTY 31...
.../UHF COMBINED ANTENNA 11 CABLE AND PAY TV 11 PREPARATION FOR USE 12 CHANNEL MEMORY PROGRAMMING 12 VIDEO CASSETTE 14 SETTING THE CLOCK FOR CORRECT TIME 15 OPERATION 17 T.V. OPERATION 17 VIEWING AND RECORDING THE SAME PROGRAM 18 AUTOMATIC TIMER RECORDING . . . 20 SETTING THE SLEEP TIMER 24 ONE TOUCH RECORDING 25 PLAYBACK 26 FRONT SCREEN COVER REMOVAL . . . 28 REMOVING STEPS 28 REINSTALLATION STEPS 28 TROUBLESHOOTING GUIDE 29 MAINTENANCE 29 SPECIFICATIONS 30 WARRANTY 31...

Owner's Manual
Page 2
... some specific reason. Power-Cord Protection-Power-supply cords should be routed so that for future reference. 3. Outdoor Antenna grounding-If an outside antenna or cable system is connected to the TV, be sure the antenna or cable system is grounded so as the possibility of the loss of an authorization code for a CATV converter, is a safety feature. Read instructions-All the safety and operating instructions...
... some specific reason. Power-Cord Protection-Power-supply cords should be routed so that for future reference. 3. Outdoor Antenna grounding-If an outside antenna or cable system is connected to the TV, be sure the antenna or cable system is grounded so as the possibility of the loss of an authorization code for a CATV converter, is a safety feature. Read instructions-All the safety and operating instructions...

Owner's Manual
Page 3
... antenna or cable system. When the TV exhibits a distinct change in a risk of any kind on the TV. 18. e. Unauthorized substitutions may touch dangerous voltage points or shortout parts that the TV is in a fire or electric shock. When the powersupply cord or plug is left unattended and unused for service. 20. If the TV does not operate...
... antenna or cable system. When the TV exhibits a distinct change in a risk of any kind on the TV. 18. e. Unauthorized substitutions may touch dangerous voltage points or shortout parts that the TV is in a fire or electric shock. When the powersupply cord or plug is left unattended and unused for service. 20. If the TV does not operate...
Owner's Manual
Page 4
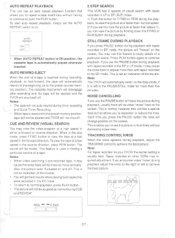
... with Random Access Capability (A converter may play ) for Record/Playback- Select SP mode (Standard short play), LP mode (Long play) and EP mode (Extended play pre-recorded tape at proper speed. Auto Repeat Playback- For best results, we recommend T-60 or T-120 tapes. - 4 - Set, to turn on as you to 480 minutes is possible at any time, for close viewing of OTR button. (You don't need any timer adjustment for...
... with Random Access Capability (A converter may play ) for Record/Playback- Select SP mode (Standard short play), LP mode (Long play) and EP mode (Extended play pre-recorded tape at proper speed. Auto Repeat Playback- For best results, we recommend T-60 or T-120 tapes. - 4 - Set, to turn on as you to 480 minutes is possible at any time, for close viewing of OTR button. (You don't need any timer adjustment for...
Owner's Manual
Page 5
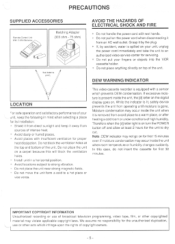
..., unplug the power cord immediately and take the unit to an authorized video service center for servicing. * Do not put your unit, keep it by the plug. * If, by accident, water is gone. Avoid locations subject to a hot place or vice versa. This video cassette recorder is removed from operating until moisture is spilled on . PRECAUTIONS SUPPLIED ACCESSORIES Remote Control Unit With...
..., unplug the power cord immediately and take the unit to an authorized video service center for servicing. * Do not put your unit, keep it by the plug. * If, by accident, water is gone. Avoid locations subject to a hot place or vice versa. This video cassette recorder is removed from operating until moisture is spilled on . PRECAUTIONS SUPPLIED ACCESSORIES Remote Control Unit With...
Owner's Manual
Page 7
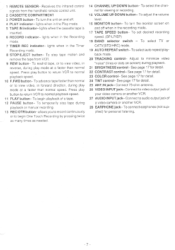
... a video camera or another VCR. 27 AUDIO INPUT jack- To rewind tape, or to view video, in the Timer Recording mode. 8 STOP/EJECT button- Connect 75-ohm antenna. 26 VIDEO INPUT jack- 1 REMOTE SENSOR- Receives the infrared control signals from VCR. 9 REW button- To turn the monitor screen on and off when in reverse, during play button to return VCR to minimize video "noise" (lines or dots on screen) during play button to return VCR to audio output jack of a tape. 12 PAUSE button- Press play mode...
... a video camera or another VCR. 27 AUDIO INPUT jack- To rewind tape, or to view video, in the Timer Recording mode. 8 STOP/EJECT button- Connect 75-ohm antenna. 26 VIDEO INPUT jack- 1 REMOTE SENSOR- Receives the infrared control signals from VCR. 9 REW button- To turn the monitor screen on and off when in reverse, during play button to return VCR to minimize video "noise" (lines or dots on screen) during play button to return VCR to audio output jack of a tape. 12 PAUSE button- Press play mode...

Owner's Manual
Page 8
... set desired channel during play mode at a faster than normal speed. To cancel memorized Timer Program. 5. COUNTER MEMORY button -To set Timer Recording Program and the current time. 6. To rewind tape, or to view video in . 8. Press PLAY button to resume sound. 16. PAUSE button-To stop the tape. 13. SELECT button - TIMER SET button - CHANNEL buttons- To call channel display, counter number, and the current time on and off. 2. SrEiRLECT TIMER --IF Q COUNTER RESET D COUNTER pMEMORY MUTE VOLUME (RECORD - REW PLAY...
... set desired channel during play mode at a faster than normal speed. To cancel memorized Timer Program. 5. COUNTER MEMORY button -To set Timer Recording Program and the current time. 6. To rewind tape, or to view video in . 8. Press PLAY button to resume sound. 16. PAUSE button-To stop the tape. 13. SELECT button - TIMER SET button - CHANNEL buttons- To call channel display, counter number, and the current time on and off. 2. SrEiRLECT TIMER --IF Q COUNTER RESET D COUNTER pMEMORY MUTE VOLUME (RECORD - REW PLAY...

Owner's Manual
Page 10
... antenna, connect to the VHF input terminal of VHF/UHF Combiner then plug the VHF/UHF Combiner to ANT.IN terminal of TV as shown in any direction or angle to the set . ANTENNA CONNECTIONS VHF/UHF RECEPTION AREA USING SEPARATE ANTENNAS VHF ANTENNA HOOK UP The VHF Rod Antenna(supplied) is recommended. Before an outdoor antenna is used, disconnect the detachable Rod antenna twin lead, and connect...
... antenna, connect to the VHF input terminal of VHF/UHF Combiner then plug the VHF/UHF Combiner to ANT.IN terminal of TV as shown in any direction or angle to the set . ANTENNA CONNECTIONS VHF/UHF RECEPTION AREA USING SEPARATE ANTENNAS VHF ANTENNA HOOK UP The VHF Rod Antenna(supplied) is recommended. Before an outdoor antenna is used, disconnect the detachable Rod antenna twin lead, and connect...
Owner's Manual
Page 12
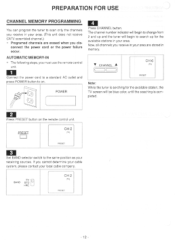
... receive CATV scrambled channel.) * Programed channels are erased when you must use the remote control unit. 1 Connect the power cord to a standard AC outlet and press POWER button to search up and the tuner will begin to change from 2 and up for the available stations in your area. AUTOMATIC MEMORY-IN * The following steps, you dis- The channel number indicator will be blue color, until the...
... receive CATV scrambled channel.) * Programed channels are erased when you must use the remote control unit. 1 Connect the power cord to a standard AC outlet and press POWER button to search up and the tuner will begin to change from 2 and up for the available stations in your area. AUTOMATIC MEMORY-IN * The following steps, you dis- The channel number indicator will be blue color, until the...

Owner's Manual
Page 13
... in blue color. 2 Select the channel number you want to erase). nel indicator will be in preset mode, the TV screen will be blue or may show the station you are going to erase with 10 keys. (Example: Channel 32) ca 2 3 , CH 32 4- Now, channel 32 is erased. Chan- To ERASE PRESET CHANNELS Press PRESET button on the remote control unit. 3 Press...
... in blue color. 2 Select the channel number you want to erase). nel indicator will be in preset mode, the TV screen will be blue or may show the station you are going to erase with 10 keys. (Example: Channel 32) ca 2 3 , CH 32 4- Now, channel 32 is erased. Chan- To ERASE PRESET CHANNELS Press PRESET button on the remote control unit. 3 Press...

Owner's Manual
Page 16
... e. , 10 Press SELECT button. SET THE DATE AND CLOCK MONTH DAY YEAR ( 6)( 3) MON (1991) HOUR MINUTE (5i:(00). PM 11 Press CHANNEL button, up (or down ) repeatedly until the desired minutes are not displayed, then begin to flash. PROG. • SELECT MODE • e' "^'1 PROGRAM SET 2 CLOCK SET 2 Press the number # 2 button, the # 2 will flash. button, selected date and clock is flashing. CLOCK SET MODE - Now, the clock time will start, although...
... e. , 10 Press SELECT button. SET THE DATE AND CLOCK MONTH DAY YEAR ( 6)( 3) MON (1991) HOUR MINUTE (5i:(00). PM 11 Press CHANNEL button, up (or down ) repeatedly until the desired minutes are not displayed, then begin to flash. PROG. • SELECT MODE • e' "^'1 PROGRAM SET 2 CLOCK SET 2 Press the number # 2 button, the # 2 will flash. button, selected date and clock is flashing. CLOCK SET MODE - Now, the clock time will start, although...

Owner's Manual
Page 18
... TVCR in the pause mode for more than five minutes. VIEWING AND RECORDING THE SAME PROGRAM 1 Insert a cassette with erasure prevention tab intact. The unit will go off after one minute. 7 Press PAUSE button again to turn on the screen are recording. RECIOTR (--)] REC SP 2 Ensure TIMER REC indicator is set to on, push TIMER SET button to resume recording. The...
... TVCR in the pause mode for more than five minutes. VIEWING AND RECORDING THE SAME PROGRAM 1 Insert a cassette with erasure prevention tab intact. The unit will go off after one minute. 7 Press PAUSE button again to turn on the screen are recording. RECIOTR (--)] REC SP 2 Ensure TIMER REC indicator is set to on, push TIMER SET button to resume recording. The...
Owner's Manual
Page 20
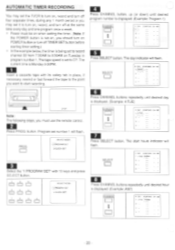
... on POWER button or turn off at the same time every day and one program once a week. * Power must use the remote control. 2 Press PROG. SELECT P OAY STARVEND CH MO 4 TOE-::k4I4A 2 3 8 Press CHANNEL buttons repeatedly until desired day is displayed. (Example: Program 1) -,1-1ANNFL = A • I P OAY STAJAVENO CH MD „ -, .r i lk - 2 -' -:- 9 - .. -. 7 Press SELECT button. The day indicator will flash. r--13 ICM1: Li 5 6 r ' CD 1 = 6 6 =18 _SELECT MODE - Program set number 1 will flash. SELECT MODE •...
... on POWER button or turn off at the same time every day and one program once a week. * Power must use the remote control. 2 Press PROG. SELECT P OAY STARVEND CH MO 4 TOE-::k4I4A 2 3 8 Press CHANNEL buttons repeatedly until desired day is displayed. (Example: Program 1) -,1-1ANNFL = A • I P OAY STAJAVENO CH MD „ -, .r i lk - 2 -' -:- 9 - .. -. 7 Press SELECT button. The day indicator will flash. r--13 ICM1: Li 5 6 r ' CD 1 = 6 6 =18 _SELECT MODE - Program set number 1 will flash. SELECT MODE •...

Owner's Manual
Page 22
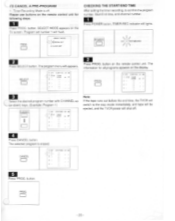
...;• 2 Continue with steps [7] to be on page 20 thru 22. Program 2) Note: When programs overlap, the earliest time se. program has priority. When the TIMER SET button is completed. " - - Example: If you programmed as illustrated, they will flash. t " " Repeat steps [5] through [20] on page 20 to set 1 is pressed, the VCR power and TV monitor will automatically go off and TIMER REC indicator lights.
...;• 2 Continue with steps [7] to be on page 20 thru 22. Program 2) Note: When programs overlap, the earliest time se. program has priority. When the TIMER SET button is completed. " - - Example: If you programmed as illustrated, they will flash. t " " Repeat steps [5] through [20] on page 20 to set 1 is pressed, the VCR power and TV monitor will automatically go off and TIMER REC indicator lights.
Owner's Manual
Page 23
button. i'ftt.1,TIMER REC 2 Press SELECT button. The selected program is off . 4 Press CANCEL button. 10 CANCEL A PRE-PROGRAM Timer Recording Mode is erased. button on the display. PROG. - 23 - Note: If the tape runs out before the end time, the TVCR will switch to confirm the program number, Start/End time, and channel number. 1 Press POWER button, TIMER-REC indicator still lights. CANCEL P DAY STAAT.END CH MD 5 Press PROG. The information for...
button. i'ftt.1,TIMER REC 2 Press SELECT button. The selected program is off . 4 Press CANCEL button. 10 CANCEL A PRE-PROGRAM Timer Recording Mode is erased. button on the display. PROG. - 23 - Note: If the tape runs out before the end time, the TVCR will switch to confirm the program number, Start/End time, and channel number. 1 Press POWER button, TIMER-REC indicator still lights. CANCEL P DAY STAAT.END CH MD 5 Press PROG. The information for...
Owner's Manual
Page 24
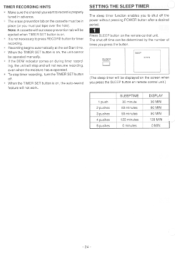
... sleep timer will be in advance. - Make sure the channel you to shut off the power without erase prevention tab will not work. The erase prevention tab on the cassette must put tape over the hole). ik Recording begins automatically at the set Start time. * When the TIMER SET button is on, the unit cannot be ejected when TIMER SET button is on remote control...
... sleep timer will be in advance. - Make sure the channel you to shut off the power without erase prevention tab will not work. The erase prevention tab on the cassette must put tape over the hole). ik Recording begins automatically at the set Start time. * When the TIMER SET button is on, the unit cannot be ejected when TIMER SET button is on remote control...

Owner's Manual
Page 25
...button is 8 hours using T-160 (or 6 hours using T-120). Please note that at a time up-to 8 hours (or to the end of times you to the table below, simply press RECIOTR button twice as many times as needed. According to record a program without pressing REC/OTR button once. Notes: When the REC/OTR button...button, you will extend recording time by the number of the tape). STOP 2 Select the program to be determined by 30 minutes at EP(SLP) (tape speed) mode maximum recording is pressed even while watching a TV program. depending upon your required length of Tape) - 25 - CHANNEL ...
...button is 8 hours using T-160 (or 6 hours using T-120). Please note that at a time up-to 8 hours (or to the end of times you to the table below, simply press RECIOTR button twice as many times as needed. According to record a program without pressing REC/OTR button once. Notes: When the REC/OTR button...button, you will extend recording time by the number of the tape). STOP 2 Select the program to be determined by 30 minutes at EP(SLP) (tape speed) mode maximum recording is pressed even while watching a TV program. depending upon your required length of Tape) - 25 - CHANNEL ...
Owner's Manual
Page 27
... 1), you use the PAUSE button to freeze the picture during playback, adjust the TRACKING control to move vertically. To start auto repeat playback, simply set the AUTO REPEAT switch to view the tape at a fast speed in the play mode, press F.FWD button to on other VCRs may view the video program at faster than five minutes. When in the reverse direction, press REW button. This is usually best. To...
... 1), you use the PAUSE button to freeze the picture during playback, adjust the TRACKING control to move vertically. To start auto repeat playback, simply set the AUTO REPEAT switch to view the tape at a fast speed in the play mode, press F.FWD button to on other VCRs may view the video program at faster than five minutes. When in the reverse direction, press REW button. This is usually best. To...
Owner's Manual
Page 29
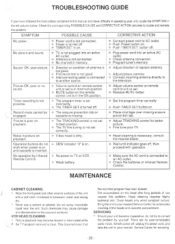
... to another source. * Volume control on remote control unit or set . * Release MUTE button * Set the program timer correctly. * Push TIMER SET button on . SYMPTOM POSSIBLE CAUSE CORRECTIVE ACTION No power. * Power cord is not connected. * Power is turned off . * Plug power cord into an active AC outlet. * Antenna is not connected. * No channel in memory. * Direction or condition of use a solvent or alcohol. poor or no user-serviceable parts inside. Picture OK; Switch power off . There are no sound. This does not...
... to another source. * Volume control on remote control unit or set . * Release MUTE button * Set the program timer correctly. * Push TIMER SET button on . SYMPTOM POSSIBLE CAUSE CORRECTIVE ACTION No power. * Power cord is not connected. * Power is turned off . * Plug power cord into an active AC outlet. * Antenna is not connected. * No channel in memory. * Direction or condition of use a solvent or alcohol. poor or no user-serviceable parts inside. Picture OK; Switch power off . There are no sound. This does not...

Owner's Manual
Page 30
... 5A(between 4 and 5) CHANNEL ELECTRICAL SPECIFICATIONS Video input level: Audio input level: Video S/N ratio: Audio S/N ratio: 0.5-2.0Vp.p -15dBs More than 46dB More than 43dB OTHER SPECIFICATIONS Power requirement: Power consumption: Dimensions: Weight: AC 120V/60Hz 85W 362(W) x 372(D) x 399(H) mm 13.5 kg 29.7 lbs Design and specifications are subject to aid identification in -line gun, 90 deflection tube NTSC-M Rotary two-head helical scan system 1/2 inch :33.40mm/sec...
... 5A(between 4 and 5) CHANNEL ELECTRICAL SPECIFICATIONS Video input level: Audio input level: Video S/N ratio: Audio S/N ratio: 0.5-2.0Vp.p -15dBs More than 46dB More than 43dB OTHER SPECIFICATIONS Power requirement: Power consumption: Dimensions: Weight: AC 120V/60Hz 85W 362(W) x 372(D) x 399(H) mm 13.5 kg 29.7 lbs Design and specifications are subject to aid identification in -line gun, 90 deflection tube NTSC-M Rotary two-head helical scan system 1/2 inch :33.40mm/sec...


