
Owner's Manual
Page 1
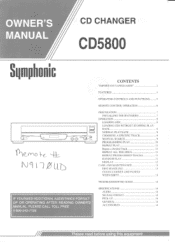
...8 NORMAL PLAYBACK 9 CHOOSING A SPECIFIC TRACK 9 MANUAL SEARCH 9 PROGRAMMING PLAY 10 REPEAT PLAY 11 Repeat a Desired Track 11 REPEAT ALL THE DISCS 11 REPEAT PROGRAMMED TRACKS 11 RANDOM PLAY 11 DISPLAY 12 CARE AND MAINTENANCE 13 DISC HANDLING 13 CLEAN CABINET AND PANELS WHEN DIRTY 13 TROUBLESHOOTING GUIDE 14 SPECIFICATIONS 14 AUDIO 14 SIGNAL FORMAT 14 IF YOU NEED ADDITIONAL ASSISTANCE FOR SET- OWNER'S MANUAL CD CHANGER CD5800 Sqmphonic CONTENTS "IMPORTANT SAFEGUARDS" 2 FEATURES 4 OPERATING CONTROLS AND FUNCTIONS 5 REMOTE CONTROL OPERATION 6 P-Ac_mo...
...8 NORMAL PLAYBACK 9 CHOOSING A SPECIFIC TRACK 9 MANUAL SEARCH 9 PROGRAMMING PLAY 10 REPEAT PLAY 11 Repeat a Desired Track 11 REPEAT ALL THE DISCS 11 REPEAT PROGRAMMED TRACKS 11 RANDOM PLAY 11 DISPLAY 12 CARE AND MAINTENANCE 13 DISC HANDLING 13 CLEAN CABINET AND PANELS WHEN DIRTY 13 TROUBLESHOOTING GUIDE 14 SPECIFICATIONS 14 AUDIO 14 SIGNAL FORMAT 14 IF YOU NEED ADDITIONAL ASSISTANCE FOR SET- OWNER'S MANUAL CD CHANGER CD5800 Sqmphonic CONTENTS "IMPORTANT SAFEGUARDS" 2 FEATURES 4 OPERATING CONTROLS AND FUNCTIONS 5 REMOTE CONTROL OPERATION 6 P-Ac_mo...
Owner's Manual
Page 2
... service the appliance beyond that is a safety feature. Care should not attempt to insert the plug fully into the enclosure through the ventilation openings. 9. The power-supply cord or the plug has been damaged; The appliance has been exposed to replace your obsolete outlet. The user should be connected to operate normally or exhibits a marked change in the operating instructions. "IMPORTANT SAFEGUARDS" 1. All operating and use...
... service the appliance beyond that is a safety feature. Care should not attempt to insert the plug fully into the enclosure through the ventilation openings. 9. The power-supply cord or the plug has been damaged; The appliance has been exposed to replace your obsolete outlet. The user should be connected to operate normally or exhibits a marked change in the operating instructions. "IMPORTANT SAFEGUARDS" 1. All operating and use...
Owner's Manual
Page 3
... B digital device, pursuant to Part 15 of the following measures: 1) Reorient or relocate the receiving antenna. 2) Increase the separation between the equipment and receiver. 3) Connect the equipment into an outlet on , the user is encouraged to try to constitute a risk of important operating and maintenance (servicing) instructions in accordance with the limits for help. 3 EN 8E29 "CAUTION: USE OF CONTROLS...
... B digital device, pursuant to Part 15 of the following measures: 1) Reorient or relocate the receiving antenna. 2) Increase the separation between the equipment and receiver. 3) Connect the equipment into an outlet on , the user is encouraged to try to constitute a risk of important operating and maintenance (servicing) instructions in accordance with the limits for help. 3 EN 8E29 "CAUTION: USE OF CONTROLS...
Owner's Manual
Page 4
... CD Changer. The serial number of this equipment may generate or use radio frequency energy. Serial No. 4 EN 8E29 allows you to program up to automatically repeat a single track, an entire CD, multiple CDs, a series of the music by eight and using a digital filter to aid identification in the instruction manual. The user could lose the authority to this product may be found on the back of theft. You should record...
... CD Changer. The serial number of this equipment may generate or use radio frequency energy. Serial No. 4 EN 8E29 allows you to program up to automatically repeat a single track, an entire CD, multiple CDs, a series of the music by eight and using a digital filter to aid identification in the instruction manual. The user could lose the authority to this product may be found on the back of theft. You should record...

Owner's Manual
Page 5
... CD or AUX input jacks of these buttons in the stop or play . 7. AC Power Cord- POWER button- OPEN/CLOSE button-Press to a 120V AC/ 60 Hz power source. 11. Connect to open the disc tray. Each time the buttons are pressed, the track moves forward or backward one of your receiver or amplifier. 5 EN 8E29 STOP Illbutton- OUTPUT jacks- OPERATING CONTROLS AND FUNCTIONS -FRONT VIEW- Display 5. DISC SKIP button- Press again to 5. 9. Press during stop playback. Rotary Disc Tray 2. Connect the stereo audio cable to select disc for playback...
... CD or AUX input jacks of these buttons in the stop or play . 7. AC Power Cord- POWER button- OPEN/CLOSE button-Press to a 120V AC/ 60 Hz power source. 11. Connect to open the disc tray. Each time the buttons are pressed, the track moves forward or backward one of your receiver or amplifier. 5 EN 8E29 STOP Illbutton- OUTPUT jacks- OPERATING CONTROLS AND FUNCTIONS -FRONT VIEW- Display 5. DISC SKIP button- Press again to 5. 9. Press during stop playback. Rotary Disc Tray 2. Connect the stereo audio cable to select disc for playback...
Owner's Manual
Page 6
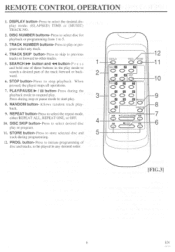
... pressed, the player stops all operations. 7. Press to select desired disc play mode to start play. 8. REMOTE CONTROL OPERATION 1. Press to stop or pause mode to search a desired part of the track forward or backward. 6. TRACK SKIP button- DISC SKIP button- Press to store selected disc and track during stop playback. Press to select the desired display mode: (ELAPSED) TIME or (MUSIC) TRACK NO. 2. Press during programming. 12. REPEAT button- Press to initiate programming of these buttons in any track. 4. STOP button- PROG. DISC NUMBER buttons- Press to...
... pressed, the player stops all operations. 7. Press to select desired disc play mode to start play. 8. REMOTE CONTROL OPERATION 1. Press to stop or pause mode to search a desired part of the track forward or backward. 6. TRACK SKIP button- DISC SKIP button- Press to store selected disc and track during stop playback. Press to select the desired display mode: (ELAPSED) TIME or (MUSIC) TRACK NO. 2. Press during programming. 12. REPEAT button- Press to initiate programming of these buttons in any track. 4. STOP button- PROG. DISC NUMBER buttons- Press to...
Owner's Manual
Page 7
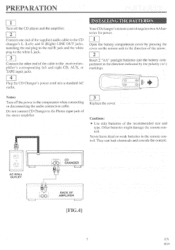
...: • Use only batteries of the stereo amplifier. 3 Replace the cover. INSTALLING THE BATTERIES Your CD changer's remote control requires two AA batteries for power. 1 Open the battery compartment cover by pressing the cover on the remote unit in the direction of the cable to the receiver/amplifier s corresponding left and right CD, AUX, or TAPE input jacks. 4 Plug the CD Changer's power cord into the battery compartment in the remote control. Never leave dead or weak batteries in the direction indicated...
...: • Use only batteries of the stereo amplifier. 3 Replace the cover. INSTALLING THE BATTERIES Your CD changer's remote control requires two AA batteries for power. 1 Open the battery compartment cover by pressing the cover on the remote unit in the direction of the cable to the receiver/amplifier s corresponding left and right CD, AUX, or TAPE input jacks. 4 Plug the CD Changer's power cord into the battery compartment in the remote control. Never leave dead or weak batteries in the direction indicated...
Owner's Manual
Page 8
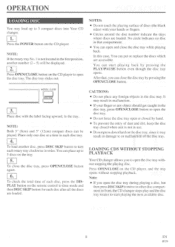
... the disc number indicate the trays where discs are accessible. LOADING CDS WITHOUT STOPPING PLAYBACK Your CD changer allows you to time mode and then DISC SKIP button for each disc, press the DISPLAY button on the remote control to open the disc tray without stopping playback. The disc tray slides out. You can open and close the disc tray while playing back. You can put or replace the discs which are loaded. Press the POWER button on the CD player, and the tray opens without stopping the playing disc...
... the disc number indicate the trays where discs are accessible. LOADING CDS WITHOUT STOPPING PLAYBACK Your CD changer allows you to time mode and then DISC SKIP button for each disc, press the DISPLAY button on the remote control to open the disc tray without stopping playback. The disc tray slides out. You can open and close the disc tray while playing back. You can put or replace the discs which are loaded. Press the POWER button on the CD player, and the tray opens without stopping the playing disc...
Owner's Manual
Page 9
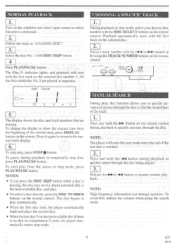
... speakers. Follow the steps in compartment 5) ends, the player automatically enters stop mode, press PLAY/PAUSE button. The Play I 3 4 5 5. Press it again to return to resume normal playback. MANUAL SEARCH During play from the beginning of the current track, press DISPLAY button on the remote control. NOTES: • If you to find the desired part of the last disc is connected. 2. To stop mode, select your desired disc number with DISC SKIP button. 4 Press PLAY...
... speakers. Follow the steps in compartment 5) ends, the player automatically enters stop mode, press PLAY/PAUSE button. The Play I 3 4 5 5. Press it again to return to resume normal playback. MANUAL SEARCH During play from the beginning of the current track, press DISPLAY button on the remote control. NOTES: • If you to find the desired part of the last disc is connected. 2. To stop mode, select your desired disc number with DISC SKIP button. 4 Press PLAY...

Owner's Manual
Page 10
... also select the track by using TRACK NUMBER buttons on the remote control to enter the program mode. Press PROG. The selections programmed will play in the order you like. The program is ready to be programed. 6. NO. button. The display shows "PROG." PROGRAMMING PLAY By selecting disc numbers from memory, press POWER to turn off the CD changer or press OPEN/CLOSE to open the disc tray. • To play a stored program again, press ■ (STOP) and press PROG...
... also select the track by using TRACK NUMBER buttons on the remote control to enter the program mode. Press PROG. The selections programmed will play in the order you like. The program is ready to be programed. 6. NO. button. The display shows "PROG." PROGRAMMING PLAY By selecting disc numbers from memory, press POWER to turn off the CD changer or press OPEN/CLOSE to open the disc tray. • To play a stored program again, press ■ (STOP) and press PROG...
Owner's Manual
Page 11
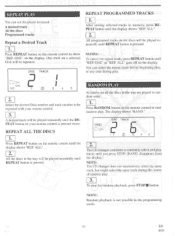
... tray will be repeated. The CD changer continues to show "REP. NOTE: Random playback is pressed twice. NOTES: To cancel the repeat mode, press REPEAT button until you press STOP. (RAND. DISC TRACK REPEAT ALL THE DISCS 1. Press REPEAT button on the remote control to randomly select and play tracks until "REP. You can set this player to be played repeatedly until REPEAT button is pressed. A desired track will be played repeatedly until the REPEAT button on the discs will be played repeatedly until REPEAT button...
... tray will be repeated. The CD changer continues to show "REP. NOTE: Random playback is pressed twice. NOTES: To cancel the repeat mode, press REPEAT button until you press STOP. (RAND. DISC TRACK REPEAT ALL THE DISCS 1. Press REPEAT button on the remote control to randomly select and play tracks until "REP. You can set this player to be played repeatedly until REPEAT button is pressed. A desired track will be played repeatedly until the REPEAT button on the discs will be played repeatedly until REPEAT button...

Owner's Manual
Page 12
... press DISPLAY button, the elapsed time since the start of disc you selected and the track playing. 1. DISPLAY When you turn on the CD changer, select a disc with the DISC SKIP button, or you press • (STOP) button to stop play mode the OPEN/CLOSE button was pushed to change or remove a disk. 1 2 0 4 5 2 When you press DISPLAY button again, the display returns to current disc and track number. 12 EN 8E29 DISC TRACK ®11 1 2 45 While you are playing a disc, the display...
... press DISPLAY button, the elapsed time since the start of disc you selected and the track playing. 1. DISPLAY When you turn on the CD changer, select a disc with the DISC SKIP button, or you press • (STOP) button to stop play mode the OPEN/CLOSE button was pushed to change or remove a disk. 1 2 0 4 5 2 When you press DISPLAY button again, the display returns to current disc and track number. 12 EN 8E29 DISC TRACK ®11 1 2 45 While you are playing a disc, the display...

Owner's Manual
Page 13
... the disc in a straight line from center to the surfaces of the discs. • Do not use a hard cloth since these will mar the disc. • Wipe the disc in its protective case when it is not used. CD 13 EN 8E29 CLEAN CABINET AND PANELS WHEN DIRTY • Clean off dirt on them as shown. (Optical audio digital discs.) COMPACT • To clean-off, use a soft...
... the disc in a straight line from center to the surfaces of the discs. • Do not use a hard cloth since these will mar the disc. • Wipe the disc in its protective case when it is not used. CD 13 EN 8E29 CLEAN CABINET AND PANELS WHEN DIRTY • Clean off dirt on them as shown. (Optical audio digital discs.) COMPACT • To clean-off, use a soft...
Owner's Manual
Page 14
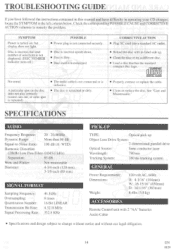
... Remote Control unit with 2 "AA" batteries Audio Cable • Specifications and design subject to remedy the problem. ae_rgicipm U DIGITAL AUDIO • Properly connect or replace the cable. • Clean or replace the disc. See "Care and Maintenance." A particular spot on , but total number of selections is not displayed. (DISC NUMBER indicator turns off.) POSSIBLE • Power plug is not connected securely. • Disc is inserted upside down. • Disc is dirty. • Disc used is inserted, but display...
... Remote Control unit with 2 "AA" batteries Audio Cable • Specifications and design subject to remedy the problem. ae_rgicipm U DIGITAL AUDIO • Properly connect or replace the cable. • Clean or replace the disc. See "Care and Maintenance." A particular spot on , but total number of selections is not displayed. (DISC NUMBER indicator turns off.) POSSIBLE • Power plug is not connected securely. • Disc is inserted upside down. • Disc is dirty. • Disc used is inserted, but display...
Owner's Manual
Page 15
... together with the product to any serial numbers on the product are altered, replaced, defaced or missing. will be extended to obtain service under this product, free of charge in the USA in the event of this warranty. will provide parts to the original retail purchaser. will repair this warranty. Certain parts are caused by repairs, alterations or product not supplied by FUNAI CORP...
... together with the product to any serial numbers on the product are altered, replaced, defaced or missing. will be extended to obtain service under this product, free of charge in the USA in the event of this warranty. will provide parts to the original retail purchaser. will repair this warranty. Certain parts are caused by repairs, alterations or product not supplied by FUNAI CORP...
