
Owner's Manual
Page 3
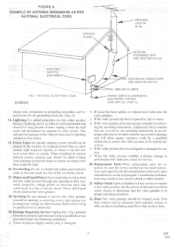
.... 16. Adjust only those controls that could result in damage and will prevent damage to the video product due to rain or water. Replacement Parts-When replacement parts are covered by the manufacturer or have fallen into such power lines or circuits. Power Lines-An outside antenna system, extreme care should be sure the service technician has used replacement parts specified by the operating instructions as radiators...
.... 16. Adjust only those controls that could result in damage and will prevent damage to the video product due to rain or water. Replacement Parts-When replacement parts are covered by the manufacturer or have fallen into such power lines or circuits. Power Lines-An outside antenna system, extreme care should be sure the service technician has used replacement parts specified by the operating instructions as radiators...
Owner's Manual
Page 5
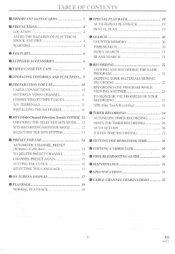
... • SUPPLIED ACCESSORIES ■ RECORDING 22 ■ VIDEO CASSETTE TAPE 7 VIEWING AND RECORDING THE SAME MI OPERATING CONTROLS AND FUNCTIONS.. 8 PROGRAM 22 SKIPPING SOME MATERIALS DURING • PREPARATION FOR USE CABLE CONNECTIONS SETTING A VIDEO CHANNEL CONNECTING TO INPUT JACKS RECORDING 22 10 RECORDING ONE PROGRAM WHILE 10 VIEWING ANOTHER 23 11 TO MONITOR THE PROGRESS OF YOUR 11 RECORDING 23 A/V TERMINALS 11 OTR (One Touch Recording) 23 INSTALLING THE BATTERIES 11 ■ TIMER RECORDING 24 • MTh (Multi-Channel Television Sound) SYSTEM. 12...
... • SUPPLIED ACCESSORIES ■ RECORDING 22 ■ VIDEO CASSETTE TAPE 7 VIEWING AND RECORDING THE SAME MI OPERATING CONTROLS AND FUNCTIONS.. 8 PROGRAM 22 SKIPPING SOME MATERIALS DURING • PREPARATION FOR USE CABLE CONNECTIONS SETTING A VIDEO CHANNEL CONNECTING TO INPUT JACKS RECORDING 22 10 RECORDING ONE PROGRAM WHILE 10 VIEWING ANOTHER 23 11 TO MONITOR THE PROGRESS OF YOUR 11 RECORDING 23 A/V TERMINALS 11 OTR (One Touch Recording) 23 INSTALLING THE BATTERIES 11 ■ TIMER RECORDING 24 • MTh (Multi-Channel Television Sound) SYSTEM. 12...
Owner's Manual
Page 6
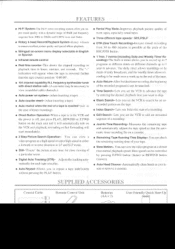
... -screen menu display selectable in English or Spanish • Infrared remote control • Real time counter-This shows the elapsed recording or playback time in hours, minutes, and seconds. Lets you set the VCR to ensure excellent picture quality and special effects playback. • Bilingual on a cassette. • Remaining Tape Running Time Display- Adjusts the tracking automatically for each tape you play. • Auto Repeat-Allows you to repeat a tape indefinitely without pressing the PLAY button. • Rental Play Mode-Improves playback picture...
... -screen menu display selectable in English or Spanish • Infrared remote control • Real time counter-This shows the elapsed recording or playback time in hours, minutes, and seconds. Lets you set the VCR to ensure excellent picture quality and special effects playback. • Bilingual on a cassette. • Remaining Tape Running Time Display- Adjusts the tracking automatically for each tape you play. • Auto Repeat-Allows you to repeat a tape indefinitely without pressing the PLAY button. • Rental Play Mode-Improves playback picture...
Owner's Manual
Page 8
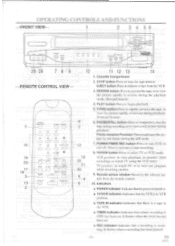
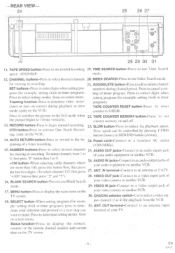
... 23 CD AEC TAPE MENU SELECT DELETE'COUNTER 17 ------C)„,„-CD 18 RESET MEMORY REWIND PLAY F.FWD 3 - PLAY button-Press to select TV or VCR mode. VCR position: to view playback, to monitor video recordings or watch TV or to remove a tape from the remote control. 10. POWER/TIMER REC button-Press to activate a timer recording. 19 20 21 22 8. REWIND button-Press to rewind the tape, or to watch TV using the VCR tuner. Remote sensor window-Receives...
... 23 CD AEC TAPE MENU SELECT DELETE'COUNTER 17 ------C)„,„-CD 18 RESET MEMORY REWIND PLAY F.FWD 3 - PLAY button-Press to select TV or VCR mode. VCR position: to view playback, to monitor video recordings or watch TV or to remove a tape from the remote control. 10. POWER/TIMER REC button-Press to activate a timer recording. 19 20 21 22 8. REWIND button-Press to rewind the tape, or to watch TV using the VCR tuner. Remote sensor window-Receives...
Owner's Manual
Page 9
... Touch Record- for example: setting clock or timer Tracking function-Press to minimize video `noise' program). (lines or dots on screen) during channel preset. ting of a timer recording. (120V/60Hz). 15. Power cord-Connect to use Time Search speed : SP/LP/SLP. AUDIO OUT jacks-Connect to determine setting modes from I . Press to an audio inputs jack for playback from on the VCR) TAPE COUNTER RESET button-Press to reset counter to select a video out- 18. Press to begin manual recording. 23. RECORD button-Press...
... Touch Record- for example: setting clock or timer Tracking function-Press to minimize video `noise' program). (lines or dots on screen) during channel preset. ting of a timer recording. (120V/60Hz). 15. Power cord-Connect to use Time Search speed : SP/LP/SLP. AUDIO OUT jacks-Connect to determine setting modes from I . Press to an audio inputs jack for playback from on the VCR) TAPE COUNTER RESET button-Press to reset counter to select a video out- 18. Press to begin manual recording. 23. RECORD button-Press...
Owner's Manual
Page 11
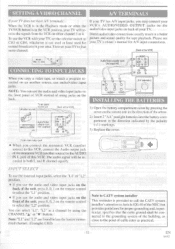
... batteries into the battery compartment in your TV's owner's manual for tape playback. Direct audio/video connections usually result in both L and R channel equally. You can use audio/video input jacks. To an video output jack 6 e." • When you copy a video tape, or watch a program recorded on the front panel of VCR instead of this VCR. Please see your area. The audio signal will receive the signals from the VCR on the remote unit in the direction of...
... batteries into the battery compartment in your TV's owner's manual for tape playback. Direct audio/video connections usually result in both L and R channel equally. You can use audio/video input jacks. To an video output jack 6 e." • When you copy a video tape, or watch a program recorded on the front panel of VCR instead of this VCR. Please see your area. The audio signal will receive the signals from the VCR on the remote unit in the direction of...
Owner's Manual
Page 12
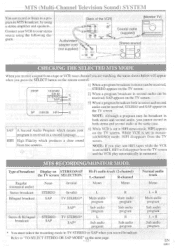
.... Normal audio track Mono L + R Main audio program Sub audio program L + R Sub audio program EN 6B01 CHECKING THE..SELECTED:. from a tape or VCR tuner channel you are watching, the status shown below will disappear from the TV screen. NITS ( uiti-Channel Television Sound) SYSTEM You can be broadcast in both stereo and second audio, you cannot record in both stereo and second audio at the same time. NOTE: If you play automatically in HIFI stereo mode, HIFI appears on...
.... Normal audio track Mono L + R Main audio program Sub audio program L + R Sub audio program EN 6B01 CHECKING THE..SELECTED:. from a tape or VCR tuner channel you are watching, the status shown below will disappear from the TV screen. NITS ( uiti-Channel Television Sound) SYSTEM You can be broadcast in both stereo and second audio, you cannot record in both stereo and second audio at the same time. NOTE: If you play automatically in HIFI stereo mode, HIFI appears on...
Owner's Manual
Page 13
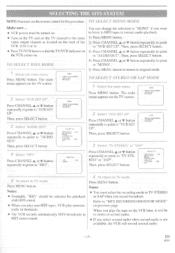
The main menu appears on . TO SELECT HIFI MODE I Select the main menu Press MENU button. " NOTE:You must be turned on. • Turn on the TV and set the TV channel to the same video output channel as located on the back of the VCR. (CH 3 or 4) • Press TVNCR button so that the TV/VCR indicator on the VCR comes on the TV screen. TO SELECT MONO MODE Make sure ... • VCR power must use the remote control for this procedure. ETs SELECTING TH ,a,zve.TrA ' "-
The main menu appears on . TO SELECT HIFI MODE I Select the main menu Press MENU button. " NOTE:You must be turned on. • Turn on the TV and set the TV channel to the same video output channel as located on the back of the VCR. (CH 3 or 4) • Press TVNCR button so that the TV/VCR indicator on the VCR comes on the TV screen. TO SELECT MONO MODE Make sure ... • VCR power must use the remote control for this procedure. ETs SELECTING TH ,a,zve.TrA ' "-
Owner's Manual
Page 14
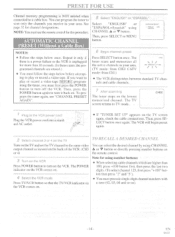
... video output channel as located on the back of the VCR. (CH3 or 4) 3 Turn on the VCR Press POWER button to play or record a video tape BEFORE programming the tuner, you want to play or record a video tape. PRESET FOR USE Channel memory programming is unplugged for using number buttons: • When selecting cable channels which are erased.) • You must precede single-digit channel numbers with a zero (02, 03, 04 and so on). - 14 - If you must use the remote control...
... video output channel as located on the back of the VCR. (CH3 or 4) 3 Turn on the VCR Press POWER button to play or record a video tape BEFORE programming the tuner, you want to play or record a video tape. PRESET FOR USE Channel memory programming is unplugged for using number buttons: • When selecting cable channels which are erased.) • You must precede single-digit channel numbers with a zero (02, 03, 04 and so on). - 14 - If you must use the remote control...
Owner's Manual
Page 16
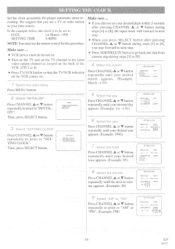
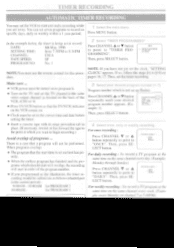
... [8], you use the remote control for proper automatic timer recording. Then, press SELECT button. MEW ni.sER PROGRAMMING VCR SET UP - INMALIZE CHANNEL SET UP - EN 6Al2 Make sure ... • VCR power must use a TV or radio station as your desired hour appears. (Example: 05) seas, ciao( RICNI14DAY YEAR 03 / 01 FRI 5996 sHr; In the example below, the clock is to be set to: DATE 1st March, 1996 SETTING TIME 5:40PM...
... [8], you use the remote control for proper automatic timer recording. Then, press SELECT button. MEW ni.sER PROGRAMMING VCR SET UP - INMALIZE CHANNEL SET UP - EN 6Al2 Make sure ... • VCR power must use a TV or radio station as your desired hour appears. (Example: 05) seas, ciao( RICNI14DAY YEAR 03 / 01 FRI 5996 sHr; In the example below, the clock is to be set to: DATE 1st March, 1996 SETTING TIME 5:40PM...
Owner's Manual
Page 17
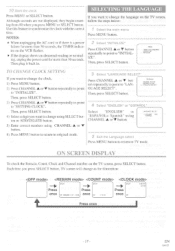
..., the TIMER indicator on the TV screen, press SELECT button. Then, press SELECT button. 4) Select a digit you want to change the clock, 1) Press MENU button. 2) Press CHANNEL A or V button repeatedly to point to "SETTING CLOCK". ON SCREEN DISPLAY To check the Remain, Count, Clock and Channel number on the VCR flashes. • If the display shows an abnormal reading or no reading, unplug the power cord for more than 30 seconds. Use this feature to...
..., the TIMER indicator on the TV screen, press SELECT button. Then, press SELECT button. 4) Select a digit you want to change the clock, 1) Press MENU button. 2) Press CHANNEL A or V button repeatedly to point to "SETTING CLOCK". ON SCREEN DISPLAY To check the Remain, Count, Clock and Channel number on the VCR flashes. • If the display shows an abnormal reading or no reading, unplug the power cord for more than 30 seconds. Use this feature to...
Owner's Manual
Page 18
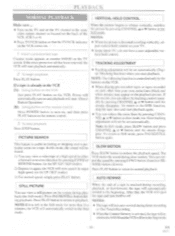
... Still mode for V button in finding or skipping over a particular scene on the remote control. 3 To stop the tape once and start playback. Power will automatically turn on the screen during timer recording or One Touch Recording. • When the Counter Memory is activated, the tape will start . (Direct Button Operation) 2B) Using button on the remote control Press POWER button to turn itself to off. Slow tracking adjustment will start playback automatically. 2 To begin playback Press PLAY button...
... Still mode for V button in finding or skipping over a particular scene on the remote control. 3 To stop the tape once and start playback. Power will automatically turn on the screen during timer recording or One Touch Recording. • When the Counter Memory is activated, the tape will start . (Direct Button Operation) 2B) Using button on the remote control Press POWER button to turn itself to off. Slow tracking adjustment will start playback automatically. 2 To begin playback Press PLAY button...

Owner's Manual
Page 20
... indicator on the VCR comes on the TV screen. Otherwise the Time Search mode will be cancelled. • Press STOP button to the specified point. SEARCH Make sure ... • VCR power must be turned on. • Turn on the TV and set up to 9 hours 59 minutes (9:59). • This function will not operate in the VCR for these functions to work. Stop a tape at which...
... indicator on the VCR comes on the TV screen. Otherwise the Time Search mode will be cancelled. • Press STOP button to the specified point. SEARCH Make sure ... • VCR power must be turned on. • Turn on the TV and set up to 9 hours 59 minutes (9:59). • This function will not operate in the VCR for these functions to work. Stop a tape at which...

Owner's Manual
Page 23
... 8 hours using T-160 (or 6 hours using T-120). • The TV that is set up to [3] under "VIEWING AND RECORDING THE SAME PROGRAM". It is connected to your VCR may be turned on . • Insert a cassette tape with a cable converter box, you cannot record one program while viewing another . 4 Select the TV mode Press TVNCR button to select TV so that the TV/VCR indicator on the VCR disappears. 1 Select the VCR mode Press TV/VCR button...
... 8 hours using T-160 (or 6 hours using T-120). • The TV that is set up to [3] under "VIEWING AND RECORDING THE SAME PROGRAM". It is connected to your VCR may be turned on . • Insert a cassette tape with a cable converter box, you cannot record one program while viewing another . 4 Select the TV mode Press TVNCR button to select TV so that the TV/VCR indicator on the VCR disappears. 1 Select the VCR mode Press TV/VCR button...
Owner's Manual
Page 24
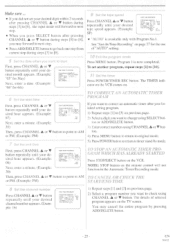
... CHANNEL V or A button repeatedly to point to the same video output channel as follows (shaded part is being set earliest has priority. • When the earliest program has finished and the programs which you are away. cording would be turned on to program it. • Turn on . • Clock must use the remote control for PROGRAM 2 10:00AM - PROGRAM NOW&.4, I ()ICE DAitY WEEKLY For weekly recording : To record a TV program at the same time...
... CHANNEL V or A button repeatedly to point to the same video output channel as follows (shaded part is being set earliest has priority. • When the earliest program has finished and the programs which you are away. cording would be turned on to program it. • Turn on . • Clock must use the remote control for PROGRAM 2 10:00AM - PROGRAM NOW&.4, I ()ICE DAitY WEEKLY For weekly recording : To record a TV program at the same time...
Owner's Manual
Page 25
... use of "AUTO" setting. 10 Exit the program mode Press MENU button. the input mode will not function in the Automatic Timer Recording mode. REG SPEED -- 5) Press POWER button to return to original mode. 7 Set the end time First, press CHANNEL A or V button repeatedly until your desired channel number appears. (Example: 16) ONE MAE PROGRAM PROGRAM MAMSER I GATE 05106 MON START TIME 0 7 . 3 0 PM END TILIEV75#10 PM CHANNEL.. 1 6 ex REC SPEED 3% 1) Repeat steps [1] and [2] on the VCR. SEC SPEED - - 9 Set the tape speed Press CHANNEL...
... use of "AUTO" setting. 10 Exit the program mode Press MENU button. the input mode will not function in the Automatic Timer Recording mode. REG SPEED -- 5) Press POWER button to return to original mode. 7 Set the end time First, press CHANNEL A or V button repeatedly until your desired channel number appears. (Example: 16) ONE MAE PROGRAM PROGRAM MAMSER I GATE 05106 MON START TIME 0 7 . 3 0 PM END TILIEV75#10 PM CHANNEL.. 1 6 ex REC SPEED 3% 1) Repeat steps [1] and [2] on the VCR. SEC SPEED - - 9 Set the tape speed Press CHANNEL...
Owner's Manual
Page 26
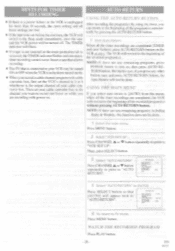
... TAPE SELECT REPEAT PLAY RENTAL AUTO RE TORE AUDIO OUT TV STEREO SAP .T1 3D (ON) 4 Select "AUTO RETURN" to [AUTO] Press SELECT button so that is connected to your cable converter box. EN 6Al2 Then set the VCR's channel to 3 or 4 whichever is the output channel of the recorded program(s). Then, press SELECT button. 3 Select "AUTO RETURN" Press CHANNEL A or V button repeatedly to point to TV mode Press MENU button. WATCH THE RECORDED PROGRAM Press PLAY button. - 26 - HINTS FOR TIMER RECORDING...
... TAPE SELECT REPEAT PLAY RENTAL AUTO RE TORE AUDIO OUT TV STEREO SAP .T1 3D (ON) 4 Select "AUTO RETURN" to [AUTO] Press SELECT button so that is connected to your cable converter box. EN 6Al2 Then set the VCR's channel to 3 or 4 whichever is the output channel of the recorded program(s). Then, press SELECT button. 3 Select "AUTO RETURN" Press CHANNEL A or V button repeatedly to point to TV mode Press MENU button. WATCH THE RECORDED PROGRAM Press PLAY button. - 26 - HINTS FOR TIMER RECORDING...

Owner's Manual
Page 28
... remain time Press SELECT button until RE- Note: SP REMAIN -•• -T130 • In the Remain Time Mode calculating will start point of the tape in a VHS-C cassette adapter. • Shorter tape length such as a 10-minute cassette • T-180 cassette. PLAY IY MAIN appears on the TV display. Follow the steps below to cassette. VCR SET UP TAPE SELECT REPEAT PLAY RE-NTPL AUTO RETURN AUDIO OUT TV STEREO SAP...
... remain time Press SELECT button until RE- Note: SP REMAIN -•• -T130 • In the Remain Time Mode calculating will start point of the tape in a VHS-C cassette adapter. • Shorter tape length such as a 10-minute cassette • T-180 cassette. PLAY IY MAIN appears on the TV display. Follow the steps below to cassette. VCR SET UP TAPE SELECT REPEAT PLAY RE-NTPL AUTO RETURN AUDIO OUT TV STEREO SAP...
Owner's Manual
Page 29
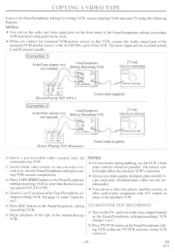
... RECORDING 1) Turn on the TV, and set ] (Use for monitoring) ore an 0 Antenna input jack Lit A o 0 IN AUDIO VIDEO [Source (Playing) VCR ] Coaxial cable (supplied) Connection 2 AudioNideo adapter cord (not supplied) Funai/Symphonic [Editing (Recording) VCR] Mn [TV set it to the same output channel as the Funai/Symphonic editing(recording) VCR channel 3 or 4. 2) Press TV/VCR button on the Funai/Symphonic editing VCR so that the TV/VCR indicator on the VCR comes on. - 29 - The remote control might affect the playback VCR's operation...
... RECORDING 1) Turn on the TV, and set ] (Use for monitoring) ore an 0 Antenna input jack Lit A o 0 IN AUDIO VIDEO [Source (Playing) VCR ] Coaxial cable (supplied) Connection 2 AudioNideo adapter cord (not supplied) Funai/Symphonic [Editing (Recording) VCR] Mn [TV set it to the same output channel as the Funai/Symphonic editing(recording) VCR channel 3 or 4. 2) Press TV/VCR button on the Funai/Symphonic editing VCR so that the TV/VCR indicator on the VCR comes on. - 29 - The remote control might affect the playback VCR's operation...
Owner's Manual
Page 30
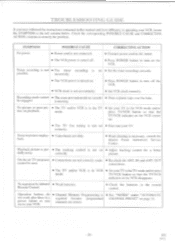
...; Channel Memory Programming is • See "NOTES" under "AUTOMATIC not work after there is set • Adjust tracking control for a better tially noisy. SYMPTOM No power. No picture or poor picture on play- • Video heads are dirty. Remote Control. • Check the batteries in picture on playback. • The TV and/or VCR is not set correctly. • Set VCR clock correctly. power failure or you have followed the instructions contained in this manual and...
...; Channel Memory Programming is • See "NOTES" under "AUTOMATIC not work after there is set • Adjust tracking control for a better tially noisy. SYMPTOM No power. No picture or poor picture on play- • Video heads are dirty. Remote Control. • Check the batteries in picture on playback. • The TV and/or VCR is not set correctly. • Set VCR clock correctly. power failure or you have followed the instructions contained in this manual and...


