
Owner's Manual
Page 2
... and openings in installation such as the possibility of the loss of electric shock to protect it from battery power, or other purpose, may be blocked or covered. If the plug should not be placed in a built-in the cabinet are not sure of the type of important operating and maintenance (servicing) instructions in item 5. 6.Attachments-Do not use...
... and openings in installation such as the possibility of the loss of electric shock to protect it from battery power, or other purpose, may be blocked or covered. If the plug should not be placed in a built-in the cabinet are not sure of the type of important operating and maintenance (servicing) instructions in item 5. 6.Attachments-Do not use...
Owner's Manual
Page 3
... extension cords as this can fall into such power lines or circuits. If the video product has been dropped or damaged in any service or repairs to this indicates a need for service. 20.Replacement Parts-When replacement parts are required, be situated away from heat sources such as radiators, heat registers, stoves, or other products (including amplifiers) that are covered by the operating instructions...
... extension cords as this can fall into such power lines or circuits. If the video product has been dropped or damaged in any service or repairs to this indicates a need for service. 20.Replacement Parts-When replacement parts are required, be situated away from heat sources such as radiators, heat registers, stoves, or other products (including amplifiers) that are covered by the operating instructions...
Owner's Manual
Page 4
... operate this product may be found on your VCR, unplug the power cord immediately and take the unit to this book as yours. IMPORTANT COPYRIGHT INFORMATION Unauthorized recording or use the VCR at least for servicing. • Do not put your local recycling regulations. A NOTE ABOUT RECYCLING This product's packaging materials are not kept on top of copyright owners. Batteries should record the number...
... operate this product may be found on your VCR, unplug the power cord immediately and take the unit to this book as yours. IMPORTANT COPYRIGHT INFORMATION Unauthorized recording or use the VCR at least for servicing. • Do not put your local recycling regulations. A NOTE ABOUT RECYCLING This product's packaging materials are not kept on top of copyright owners. Batteries should record the number...

Owner's Manual
Page 5
... 4 ■ FEATURES 6 ■ SUPPLIED ACCESSORIES 6 ■ VIDEO CASSETTE TAPE INFORMATION 7 ■ OPERATING CONTROLS AND FUNCTIONS 8 ■ PREPARATION FOR USE 10 ANTENNA/CABLE CONNECTIONS 10 SETTING THE CH3/CH4 SWITCH 13 A/V TERMINALS 13 INSTALLING THE BATTERIES 13 ■ SET UP FOR USE 14 CHANNEL SET UP (Automatic) 14 CLOCK SET UP 15 TO DELETE CHANNELS 16 CHANNEL SET UP AGAIN 16 SELECTING THE LANGUAGE 16 ■ PLAYBACK 17 NORMAL PLAYBACK 17 PICTURE SEARCH 17 STILL PICTURE 17...
... 4 ■ FEATURES 6 ■ SUPPLIED ACCESSORIES 6 ■ VIDEO CASSETTE TAPE INFORMATION 7 ■ OPERATING CONTROLS AND FUNCTIONS 8 ■ PREPARATION FOR USE 10 ANTENNA/CABLE CONNECTIONS 10 SETTING THE CH3/CH4 SWITCH 13 A/V TERMINALS 13 INSTALLING THE BATTERIES 13 ■ SET UP FOR USE 14 CHANNEL SET UP (Automatic) 14 CLOCK SET UP 15 TO DELETE CHANNELS 16 CHANNEL SET UP AGAIN 16 SELECTING THE LANGUAGE 16 ■ PLAYBACK 17 NORMAL PLAYBACK 17 PICTURE SEARCH 17 STILL PICTURE 17...
Owner's Manual
Page 6
... cassette, turns off automatically. • Time Search- Automatically turns the VCR when you want to 1 year in blank areas of the tape. • Auto Head Cleaner- You can view a video program at different times on and off , just press the PLAY, REW or F.FWD button on the main unit and it will turn on -screen menu display selectable in timer allows you to repeat the playing of the universal remote control. - 6 - Lets you set the VCR to advance the tape...
... cassette, turns off automatically. • Time Search- Automatically turns the VCR when you want to 1 year in blank areas of the tape. • Auto Head Cleaner- You can view a video program at different times on and off , just press the PLAY, REW or F.FWD button on the main unit and it will turn on -screen menu display selectable in timer allows you to repeat the playing of the universal remote control. - 6 - Lets you set the VCR to advance the tape...
Owner's Manual
Page 8
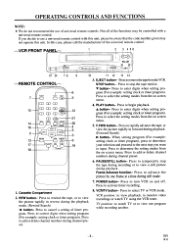
... the setting modes from the VCR. Press to remove the tape from the on and off. Press to activate timer recording. 1. Press to use of the universal remote control. -VCR FRONT PANEL- 1 2 3 4 56 Q 27 24 7 8 9 -REMOTE CONTROL- Frame Advance function- Press to enter digits when setting program (For example: setting clock or timer program). Press to view one frame at a time during playback. (Forward Search) IP- EN 9110 PLAY button- TV position: to watch TV using the VCR tuner. OPERATING CONTROLS AND...
... the setting modes from the VCR. Press to remove the tape from the on and off. Press to activate timer recording. 1. Press to use of the universal remote control. -VCR FRONT PANEL- 1 2 3 4 56 Q 27 24 7 8 9 -REMOTE CONTROL- Frame Advance function- Press to enter digits when setting program (For example: setting clock or timer program). Press to view one frame at a time during playback. (Forward Search) IP- EN 9110 PLAY button- TV position: to watch TV using the VCR tuner. OPERATING CONTROLS AND...
Owner's Manual
Page 9
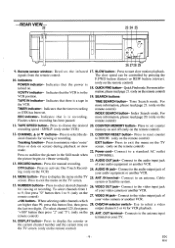
..., Cable screen. Press for VCR playback. Receives the infrared 17. SEARCH buttons TAPE IN indicator- NUMBER buttons- To select channels from the remote control. VIDEO IN jack- DISPLAY button- Connect to display the menu on the remote control) - 9 - Connect to select a video the last two digits. (To select channel 125, first press output channel (3 or 4) for manual recording. CH3/CH4 selector switch- Press to select desired channels 26. OTR button- Use to the video output jack of your video camera or another VCR. Time Search mode. Indicates...
..., Cable screen. Press for VCR playback. Receives the infrared 17. SEARCH buttons TAPE IN indicator- NUMBER buttons- To select channels from the remote control. VIDEO IN jack- DISPLAY button- Connect to display the menu on the remote control) - 9 - Connect to select a video the last two digits. (To select channel 125, first press output channel (3 or 4) for manual recording. CH3/CH4 selector switch- Press to select desired channels 26. OTR button- Use to the video output jack of your video camera or another VCR. Time Search mode. Indicates...
Owner's Manual
Page 13
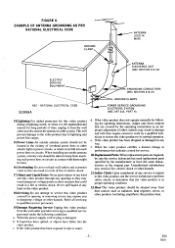
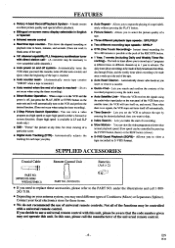
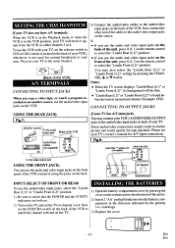
... of the VCR. To use the audio and video input jacks on the back. INSTALLING THE BATTERIES 1) Open the battery compartment cover by pressing the CHANNEL A or V button. Now set the CH3/CH4 switch on the back of the unit, press 0, 0, 2 on the TV. Then set your TV, set the TV to select the "Lineln Rear (L1)" position. • If you copy a video tape, or watch a program recorded on...
... of the VCR. To use the audio and video input jacks on the back. INSTALLING THE BATTERIES 1) Open the battery compartment cover by pressing the CHANNEL A or V button. Now set the CH3/CH4 switch on the back of the unit, press 0, 0, 2 on the TV. Then set your TV, set the TV to select the "Lineln Rear (L1)" position. • If you copy a video tape, or watch a program recorded on...
Owner's Manual
Page 14
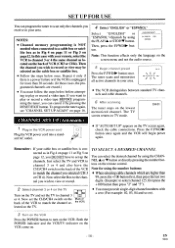
... PLAY/A or STOP/V button. CH3 CH4 m [Back of VCR (CH3 or CH4). Then, press the F.FWD/O0- A The tuner stops on the remote control. EN 9I10 To program the tuner again, see "CHANNEL SET UP AGAIN" on the TV screen again, check the cable connections. CH 01 • If "AUTO SET UP" appears on page 16. Now select the Box to the channel you wish to view or record...
... PLAY/A or STOP/V button. CH3 CH4 m [Back of VCR (CH3 or CH4). Then, press the F.FWD/O0- A The tuner stops on the remote control. EN 9I10 To program the tuner again, see "CHANNEL SET UP AGAIN" on the TV screen again, check the cable connections. CH 01 • If "AUTO SET UP" appears on page 16. Now select the Box to the channel you wish to view or record...

Owner's Manual
Page 15
... "CLOCK SET" menu appears. button. day CLOCK SET • If the display shows an abnormal reading or no reading, unplug the power cord for proper automatic timer recording. button. In the example below; HOUR AM/PM 05 - - CLOCK SET ZiNT..H.. DAY YEAR ) ;KI:LINUTE AM/PM • The number buttons on the TV. MICRO "AM" of nel selected on the remote control do not work in the Menu mode, the following buttons only work (PLAY/A, F.FWD...
... "CLOCK SET" menu appears. button. day CLOCK SET • If the display shows an abnormal reading or no reading, unplug the power cord for proper automatic timer recording. button. In the example below; HOUR AM/PM 05 - - CLOCK SET ZiNT..H.. DAY YEAR ) ;KI:LINUTE AM/PM • The number buttons on the TV. MICRO "AM" of nel selected on the remote control do not work in the Menu mode, the following buttons only work (PLAY/A, F.FWD...
Owner's Manual
Page 16
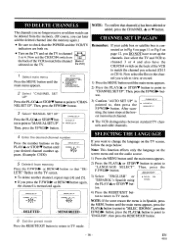
... the TV screen. • To delete another channel, repeat steps [4] and [5]. • If you wish to , then press the F.FWD/110- TIMER PROGRAMMING AUTO REPEAT DOFF) PICTURE SELECT I t mode Press the RESET/EXIT button to return to the channel you press the F.FWD/11- Now select the Box to TV mode. - 16- memory Press the F.FWD/110- DELETED - - Then, press the F.FWDI button. 3) Confirm "AUTO SET UP...
... the TV screen. • To delete another channel, repeat steps [4] and [5]. • If you wish to , then press the F.FWD/110- TIMER PROGRAMMING AUTO REPEAT DOFF) PICTURE SELECT I t mode Press the RESET/EXIT button to return to the channel you press the F.FWD/11- Now select the Box to TV mode. - 16- memory Press the F.FWD/110- DELETED - - Then, press the F.FWDI button. 3) Confirm "AUTO SET UP...

Owner's Manual
Page 17
Now set the CH3/CH4 switch on the back of the VCR to match the channel selected on the TV and set the TV to check that the POWER and the VCR/TV indicators are both on. • Turn on the TV. PLAYBACK NORMAL PLAYBACK PICTURE SEARCH • Be sure to channel 3 or 4.
Now set the CH3/CH4 switch on the back of the VCR to match the channel selected on the TV and set the TV to check that the POWER and the VCR/TV indicators are both on. • Turn on the TV. PLAYBACK NORMAL PLAYBACK PICTURE SEARCH • Be sure to channel 3 or 4.
Owner's Manual
Page 18
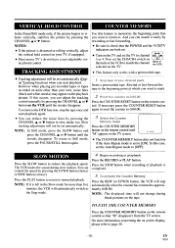
... a prerecorded tape. The VCR mutes the sound during blank portions on the tape. Slow tracking adjustment will not be set the Auto Repeat mode to [OFF]. In this occurs, you start playback again. • You can adjust the tracking control manually by pressing the CHANNEL A or V button in the Slow mode for more information concerning the on screen display, please refer to mark. 0:00:Or Press the COUNTER RESET button on the remote control...
... a prerecorded tape. The VCR mutes the sound during blank portions on the tape. Slow tracking adjustment will not be set the Auto Repeat mode to [OFF]. In this occurs, you start playback again. • You can adjust the tracking control manually by pressing the CHANNEL A or V button in the Slow mode for more information concerning the on screen display, please refer to mark. 0:00:Or Press the COUNTER RESET button on the remote control...

Owner's Manual
Page 22
... TV screen. RECORDING ONE PROGRAM AND VIEWING ANOTHER You can record one • will auto- NOTE: If you may view the pause time remaining with its erase prevention tab in the Pause mode, you have a cable box or satellite box connected to this VCR, please refer to "ANTENNA/CABLE CONNECTIONS" on CH3 CH4 the back of the VCR to match the channel [Back of the VCR] • Insert a cassette tape with...
... TV screen. RECORDING ONE PROGRAM AND VIEWING ANOTHER You can record one • will auto- NOTE: If you may view the pause time remaining with its erase prevention tab in the Pause mode, you have a cable box or satellite box connected to this VCR, please refer to "ANTENNA/CABLE CONNECTIONS" on CH3 CH4 the back of the VCR to match the channel [Back of the VCR] • Insert a cassette tape with...

Owner's Manual
Page 23
... DISPLAY button on pages 11 and 12 before the end time, the VCR will increase the recording time by the number of the VCR to match the channel selected on the TV. Now set for this VCR, please refer to "ANTENNA/CABLE CONNECTIONS" on the remote control so that is reached. begirt CM OTR 0,30) • Insert a cassette tape with its erase prevention tab in the SLP mode...
... DISPLAY button on pages 11 and 12 before the end time, the VCR will increase the recording time by the number of the VCR to match the channel selected on the TV. Now set for this VCR, please refer to "ANTENNA/CABLE CONNECTIONS" on the remote control so that is reached. begirt CM OTR 0,30) • Insert a cassette tape with its erase prevention tab in the SLP mode...

Owner's Manual
Page 24
... the VCR/TV indicators are away. You can set seven programs to record on the TV and set to record: Next, press the PLAY/A or STOP/V button to point to DATE: May 4th, 2000 "TIMER PROGRAMMING". TIMER PROGRAMMING AUTO REPEAT [OFF] PICTURE SELECT CHANNEL SET UP CLOCK SET LANGUAGE SELECT AUTO SATELLITE LINK In the example below demonstrates the sequence of programs ... Press the PLAY/A or STOP/V K. I once, daily or weekly recording • Insert a cassette tape...
... the VCR/TV indicators are away. You can set seven programs to record on the TV and set to record: Next, press the PLAY/A or STOP/V button to point to DATE: May 4th, 2000 "TIMER PROGRAMMING". TIMER PROGRAMMING AUTO REPEAT [OFF] PICTURE SELECT CHANNEL SET UP CLOCK SET LANGUAGE SELECT AUTO SATELLITE LINK In the example below demonstrates the sequence of programs ... Press the PLAY/A or STOP/V K. I once, daily or weekly recording • Insert a cassette tape...

Owner's Manual
Page 25
... a cable box or satellite box before the end time, the VCR will switch to the Stop mode immediately, eject the tape and the VCR power will be lost. • If the tape runs out before setting the channel number. 10 Set the tape speed Press the PLAY/A. ONE TIME PROGRAM PROGRAM NUallIES 11 DATE START TIME - #4 1- 1;*,.fr-l'-' CHANNEL - REC SPEED -- AM N.FMA Next, press the PLAY/A or STOP/V button to point to turn off . EN 9I10 Please insert a recordable tape...
... a cable box or satellite box before the end time, the VCR will switch to the Stop mode immediately, eject the tape and the VCR power will be lost. • If the tape runs out before setting the channel number. 10 Set the tape speed Press the PLAY/A. ONE TIME PROGRAM PROGRAM NUallIES 11 DATE START TIME - #4 1- 1;*,.fr-l'-' CHANNEL - REC SPEED -- AM N.FMA Next, press the PLAY/A or STOP/V button to point to turn off . EN 9I10 Please insert a recordable tape...

Owner's Manual
Page 27
... point at which you record a program using the Auto Satellite Link feature, the beginning(a few seconds, the VCR turns off automatically. I start hour Press the PLAY/A or STOP/V button until the start mi. to select the desired tape speed (SP/SLP). • Clock must be set the clock, "CLOCK SET" appears. If your satellite tuner has the EPG (Electronic Program Guide), you view the satellite tuner's program until the desired hour (AM or PM...
... point at which you record a program using the Auto Satellite Link feature, the beginning(a few seconds, the VCR turns off automatically. I start hour Press the PLAY/A or STOP/V button until the start mi. to select the desired tape speed (SP/SLP). • Clock must be set the clock, "CLOCK SET" appears. If your satellite tuner has the EPG (Electronic Program Guide), you view the satellite tuner's program until the desired hour (AM or PM...

Owner's Manual
Page 28
.... Antenna input jack [Source (Playing) VCR COPYING A VIDEO TAPE You can use the audio and video input jacks on the front panel of the editing (recording) VCR instead of using the following diagram. Fig.9: [Editing (Recording) VCR] (this unit), source (playing) VCR(another VCR) and your enjoyment. Connect the editing (recording) VCR(this unit) AudioNideo cables (not supplied) [TV set] (Use tor monitoring) O" i) \LEP *OUT OUT * IN B IN AUDIO VIDEO an IN, Q,:) -- Warning:Unauthorized recordings of copyrighted video tapes may be...
.... Antenna input jack [Source (Playing) VCR COPYING A VIDEO TAPE You can use the audio and video input jacks on the front panel of the editing (recording) VCR instead of using the following diagram. Fig.9: [Editing (Recording) VCR] (this unit), source (playing) VCR(another VCR) and your enjoyment. Connect the editing (recording) VCR(this unit) AudioNideo cables (not supplied) [TV set] (Use tor monitoring) O" i) \LEP *OUT OUT * IN B IN AUDIO VIDEO an IN, Q,:) -- Warning:Unauthorized recordings of copyrighted video tapes may be...
Owner's Manual
Page 29
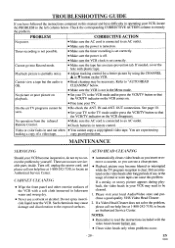
... VCR/TV button so that the VCR/TV indicator on the VCR conies on playback. • Set your TV. TROUBLESHOOTING GUIDE If you can cause this manual and have difficulty in operating your VCR, locate the PROBLEM in your local AudioNideo store and purchase a good quality VHS Video Head Cleaner. 2. Timer recording is not possible. • Make sure the timer recording is set correctly. Cannot view a tape but the audio is off , unplug the power cord...
... VCR/TV button so that the VCR/TV indicator on the VCR conies on playback. • Set your TV. TROUBLESHOOTING GUIDE If you can cause this manual and have difficulty in operating your VCR, locate the PROBLEM in your local AudioNideo store and purchase a good quality VHS Video Head Cleaner. 2. Timer recording is not possible. • Make sure the timer recording is set correctly. Cannot view a tape but the audio is off , unplug the power cord...


