
Owner's Manual
Page 1
...a U.S. OWNER'S MANUAL Sqmphonic VIDEO CASSETTE RECORDER SL240B TABLE OF CONTENTS ■ IMPORTANT SAFEGUARDS 2 ■ PRECAUTIONS 3 ■ FEATURES 4 ■ OPERATING CONTROLS AND FUNCTIONS 4 ■ PREPARATION FOR USE 6 ■ INITIAL SET UP FOR USE 7 ■ SET UP FOR USE AGAIN 8 ■ PLAYBACK FUNCTION 9 ■ RECORDING FUNCTION 10 ■ TIMER RECORDING 11 ■ SPECIAL FEATURES 12 ■ TROUBLESHOOTING GUIDE 12 ■ SPECIFICATIONS 13 ■ MAINTENANCE 13 ■ INSTRUCCIONES EN ESPAROL 14 ■ WARRANTY 16 SUPPLIED ACCESSORIES...
...a U.S. OWNER'S MANUAL Sqmphonic VIDEO CASSETTE RECORDER SL240B TABLE OF CONTENTS ■ IMPORTANT SAFEGUARDS 2 ■ PRECAUTIONS 3 ■ FEATURES 4 ■ OPERATING CONTROLS AND FUNCTIONS 4 ■ PREPARATION FOR USE 6 ■ INITIAL SET UP FOR USE 7 ■ SET UP FOR USE AGAIN 8 ■ PLAYBACK FUNCTION 9 ■ RECORDING FUNCTION 10 ■ TIMER RECORDING 11 ■ SPECIAL FEATURES 12 ■ TROUBLESHOOTING GUIDE 12 ■ SPECIFICATIONS 13 ■ MAINTENANCE 13 ■ INSTRUCCIONES EN ESPAROL 14 ■ WARRANTY 16 SUPPLIED ACCESSORIES...

Owner's Manual
Page 2
... removing covers may be sure the service technician has used replacement parts specified by the manufacturer, or sold with a polarized alternating-current line plug (a plug having one way. Overloading-Do not overload wall outlets and extension cords as this video product yourself as to dangerous voltage or other ). Heed Warnings-All warnings on the rear of important operating and maintenance (servicing) instructions...
... removing covers may be sure the service technician has used replacement parts specified by the manufacturer, or sold with a polarized alternating-current line plug (a plug having one way. Overloading-Do not overload wall outlets and extension cords as this video product yourself as to dangerous voltage or other ). Heed Warnings-All warnings on the rear of important operating and maintenance (servicing) instructions...
Owner's Manual
Page 3
...; Avoid extreme heat, high humidity and magnetic fields. • Do not tamper with the cassette mechanism. • Do not touch the tape with a universal remote control. MOISTURE CONDENSATION right owners. Batteries should record the number and other acts which infringe upon the rights of copy- Do not use of Purchase Dealer Purchase from AC wall outlet. Date of high-quality tapes. Model No.
...; Avoid extreme heat, high humidity and magnetic fields. • Do not tamper with the cassette mechanism. • Do not touch the tape with a universal remote control. MOISTURE CONDENSATION right owners. Batteries should record the number and other acts which infringe upon the rights of copy- Do not use of Purchase Dealer Purchase from AC wall outlet. Date of high-quality tapes. Model No.
Owner's Manual
Page 4
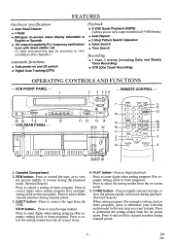
... specifications • Auto Head Cleaner • 4 Head • Bilingual on-screen menu display selectable in English or Spanish • 181 channel capability PLL frequency synthesizer tuner with direct station call (A cable converter box may be necessary to view scrambled cable channels.) Automatic functions • Auto power on screen menu. 5. REW button- Press to enter digits when setting program (For example: setting clock or timer program). Press to remove the tape from the on and off system • Digital Auto Tracking (DTR) Playback • S-VHS Quasi Playback...
... specifications • Auto Head Cleaner • 4 Head • Bilingual on-screen menu display selectable in English or Spanish • 181 channel capability PLL frequency synthesizer tuner with direct station call (A cable converter box may be necessary to view scrambled cable channels.) Automatic functions • Auto power on screen menu. 5. REW button- Press to enter digits when setting program (For example: setting clock or timer program). Press to remove the tape from the on and off system • Digital Auto Tracking (DTR) Playback • S-VHS Quasi Playback...
Owner's Manual
Page 5
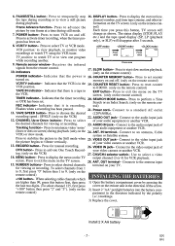
... on the remote control) +100 button- Connect to activate timer recording, when the timer program has been set counter turned on the TV output channel (3 or 4) for viewing or recording. 23. NUMBER buttons- PAUSE/STILL button- Press to the audio input jack 12. Press to set . Indicates that the VCR is recording. Press to select TV or VCR mode. memory on and off . TAPE SPEED button- ing. (only on the remote con- screen. ANT. Connects to view a still picture channel number, real time tape counter, and...
... on the remote control) +100 button- Connect to activate timer recording, when the timer program has been set counter turned on the TV output channel (3 or 4) for viewing or recording. 23. NUMBER buttons- PAUSE/STILL button- Press to the audio input jack 12. Press to set . Indicates that the VCR is recording. Press to select TV or VCR mode. memory on and off . TAPE SPEED button- ing. (only on the remote con- screen. ANT. Connects to view a still picture channel number, real time tape counter, and...

Owner's Manual
Page 6
....IN (Top jack) of your VCR. 3 Connect one connection. For any further complex connections, please contact your TV's owner's manual for recording by pressing the 0, 0, 1 on the remote control or CHANNEL Up/Down button. 2) When you may need additional accessories which are not supplied). Disconnect the antenna or cable from your TV. 2 Connect the antenna or cable to the diagram below. Direct audio/video connections usually result in particular, specifies...
....IN (Top jack) of your VCR. 3 Connect one connection. For any further complex connections, please contact your TV's owner's manual for recording by pressing the 0, 0, 1 on the remote control or CHANNEL Up/Down button. 2) When you may need additional accessories which are not supplied). Disconnect the antenna or cable from your TV. 2 Connect the antenna or cable to the diagram below. Direct audio/video connections usually result in particular, specifies...
Owner's Manual
Page 7
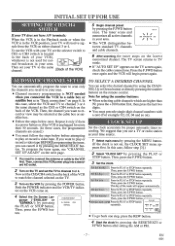
... need to connect the antenna or cable to play or record a video tape BEFORE programming the tuner, you can automatically program the tuner to scan only the channels you use the VCR with a zero (For example: 02, 03, 04 and so on the remote control. Set the mouth Press the PLAY or STOP button repeatedly. Then, press the F.FWD button. Repeat it by pressing the RESET/EXIT button. Press the PLAY or STOP button repeatedly. T UP FO USE SETTING...
... need to connect the antenna or cable to play or record a video tape BEFORE programming the tuner, you can automatically program the tuner to scan only the channels you use the VCR with a zero (For example: 02, 03, 04 and so on the remote control. Set the mouth Press the PLAY or STOP button repeatedly. Then, press the F.FWD button. Repeat it by pressing the RESET/EXIT button. Press the PLAY or STOP button repeatedly. T UP FO USE SETTING...
Owner's Manual
Page 8
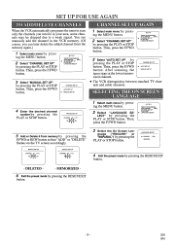
... the PLAY or STOP button. Then, press the F.FWD button. -MENU- CHANNEL SET UP AUTO SET UP 0- TIMER PROGRAMMING AUTO REPEAT [OFF] I. Then, press the F.FWD button. -MENU- ENGLISH ESPAFIOL [ON] 4 Exit the preset mode by pressing the PLAY or STOP button. After scanning, the tuner stops at the lowest memorized channel. AUTO SET UP MANUAL SET UP • The VCR distinguishes between standard TV channels and cable channels. 4 Enter the desired channel number by pressing the RESET/EXIT button. - ing the MENU button...
... the PLAY or STOP button. Then, press the F.FWD button. -MENU- CHANNEL SET UP AUTO SET UP 0- TIMER PROGRAMMING AUTO REPEAT [OFF] I. Then, press the F.FWD button. -MENU- ENGLISH ESPAFIOL [ON] 4 Exit the preset mode by pressing the PLAY or STOP button. After scanning, the tuner stops at the lowest memorized channel. AUTO SET UP MANUAL SET UP • The VCR distinguishes between standard TV channels and cable channels. 4 Enter the desired channel number by pressing the RESET/EXIT button. - ing the MENU button...
Owner's Manual
Page 9
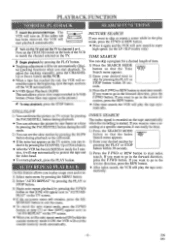
... mode. 2) You can easily be set automatically (Digital Tracking function) when you want to go in the play the tape automatically. If you to protect the tape and the video head. • To return playback, press the PLAY button. If you want to view a recording at a specific start point, it by pressing the PLAY button. • Tracking adjustment will rewind the tape to the beginning, eject the tape, and turn on the TV screen...
... mode. 2) You can easily be set automatically (Digital Tracking function) when you want to go in the play the tape automatically. If you to protect the tape and the video head. • To return playback, press the PLAY button. If you want to view a recording at a specific start point, it by pressing the PLAY button. • Tracking adjustment will rewind the tape to the beginning, eject the tape, and turn on the TV screen...

Owner's Manual
Page 10
... set the TV to record at the cable box or satellite box. Connect the recording VCR(this unit), the playing VCR(another source) and your enjoyment. TO MONITOR THE RECORDING 1) Turn on the VCR repeatedly until the desired recording length appears. • Recording stops when 0:00 is selected in the playing VCR. • For best results during dubbing, use video-quality shielded cables with its safety tab into the recording VCR. 3) Press the TAPE SPEED button on the recording VCR...
... set the TV to record at the cable box or satellite box. Connect the recording VCR(this unit), the playing VCR(another source) and your enjoyment. TO MONITOR THE RECORDING 1) Turn on the VCR repeatedly until the desired recording length appears. • Recording stops when 0:00 is selected in the playing VCR. • For best results during dubbing, use video-quality shielded cables with its safety tab into the recording VCR. 3) Press the TAPE SPEED button on the recording VCR...
Owner's Manual
Page 11
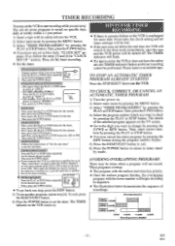
... be turned off. To exit, press the RESET/EXIT button. 6) Press the POWER button to set another program, repeat step [4]. Please insert a recordable tape. If so, follow the steps [3] and [4] in sequence. • The illustration below demonstrates the sequence of the selected program appears on . 2) Select main menu by pressing the MENU button. 3) Select "TIMER PROGRAMMING" by pressing the PLAY or STOP button. • You may set up flashes. PROGRAM NUMBER DATE...
... be turned off. To exit, press the RESET/EXIT button. 6) Press the POWER button to set another program, repeat step [4]. Please insert a recordable tape. If so, follow the steps [3] and [4] in sequence. • The illustration below demonstrates the sequence of the selected program appears on . 2) Select main menu by pressing the MENU button. 3) Select "TIMER PROGRAMMING" by pressing the PLAY or STOP button. • You may set up flashes. PROGRAM NUMBER DATE...

Owner's Manual
Page 12
... Record mode. • Make sure the tape has a safety tab. Playback picture is not in hours, minutes, and seconds. (The displayed time will not change during recording, playback, or fast-forward, the tape will automatically rewind to [ON]. On-the-air TV programs cannot be necessary. Remote Control. • Check batteries in and out when • You cannot copy a copyrighted video tape. Timer recording is not possible. • Make sure the timer recording is set...
... Record mode. • Make sure the tape has a safety tab. Playback picture is not in hours, minutes, and seconds. (The displayed time will not change during recording, playback, or fast-forward, the tape will automatically rewind to [ON]. On-the-air TV programs cannot be necessary. Remote Control. • Check batteries in and out when • You cannot copy a copyrighted video tape. Timer recording is not possible. • Make sure the timer recording is set...
Owner's Manual
Page 13
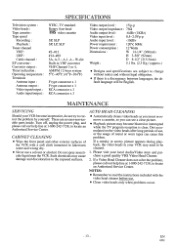
... and specifications are no user-serviceable parts inside. CATIONS Television system : Video heads : Tape cassette : Tape speed Recording : Playback: Tuner channel VHF: UHF : Cable channel : RF converter : Converter output : Timer indication : Operating temperature : Terminals Antenna input : Antenna output : Video input/output : Audio input/output : NTSC, TV standard Rotary four-head VIIS video cassette SP, SLP SP, LP, SLP #2-#13 #14-#69 5A, A-5 A-1, A W+84 Built-in your local Audio/Video store and purchase a good quality VHS Video Head Cleaner. 2. Turn off, unplug the power plug...
... and specifications are no user-serviceable parts inside. CATIONS Television system : Video heads : Tape cassette : Tape speed Recording : Playback: Tuner channel VHF: UHF : Cable channel : RF converter : Converter output : Timer indication : Operating temperature : Terminals Antenna input : Antenna output : Video input/output : Audio input/output : NTSC, TV standard Rotary four-head VIIS video cassette SP, SLP SP, LP, SLP #2-#13 #14-#69 5A, A-5 A-1, A W+84 Built-in your local Audio/Video store and purchase a good quality VHS Video Head Cleaner. 2. Turn off, unplug the power plug...
Owner's Manual
Page 16
... a period of ninety (90) days from the date of original retail purchase. This FUNAI CORPORATION Limited warranty applies only to the following: FUNAI CORPORATION Customer Service 100 North Street; THIS WARRANTY DOES NOT COVER PACKING MATERIALS, ANY ACCESSORIES (EXCEPT REMOTE CONTROL UNITS), ANY COSMETIC PARTS, COMPLETE ASSEMBLY PARTS, DEMONSTRATION OR FLOOR MODELS. FUNAI CORPORATION AND ITS REPRESENTATIVES OR AGENTS SHALL...
... a period of ninety (90) days from the date of original retail purchase. This FUNAI CORPORATION Limited warranty applies only to the following: FUNAI CORPORATION Customer Service 100 North Street; THIS WARRANTY DOES NOT COVER PACKING MATERIALS, ANY ACCESSORIES (EXCEPT REMOTE CONTROL UNITS), ANY COSMETIC PARTS, COMPLETE ASSEMBLY PARTS, DEMONSTRATION OR FLOOR MODELS. FUNAI CORPORATION AND ITS REPRESENTATIVES OR AGENTS SHALL...


