

Owner's Manual
Page 2
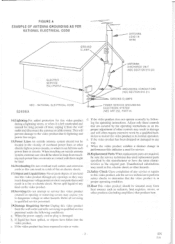
... follow the manufacturer's PORTABLE CART WARNING instructions and should never be routed so that for some protection against them, paying particular attention to . 4.Follow Instructions-All operating and use this video product near a swimming pool, and the like. 8.Accessories-Do not place this video product from battery power, or other purpose, may cause the ap- The openings should use liquid cleaners or...
... follow the manufacturer's PORTABLE CART WARNING instructions and should never be routed so that for some protection against them, paying particular attention to . 4.Follow Instructions-All operating and use this video product near a swimming pool, and the like. 8.Accessories-Do not place this video product from battery power, or other purpose, may cause the ap- The openings should use liquid cleaners or...
Owner's Manual
Page 3
... Service-Unplug this indicates a need for service. 20.Replacement Parts-When replacement parts are covered by the operating instructions as an improper adjustment of any service or repairs to this video product through any kind on the video product. 18.Servicing-Do not attempt to qualified service personnel under the following the operating instructions. c. If the video product does not operate normally by following conditions: a. f. When the video product exhibits a distinct change...
... Service-Unplug this indicates a need for service. 20.Replacement Parts-When replacement parts are covered by the operating instructions as an improper adjustment of any service or repairs to this video product through any kind on the video product. 18.Servicing-Do not attempt to qualified service personnel under the following the operating instructions. c. If the video product does not operate normally by following conditions: a. f. When the video product exhibits a distinct change...
Owner's Manual
Page 4
... ventilation for proper heat dissipation. The user could lose the authority to operate this product may generate or use of broadcast television programming, video tape, film or other VCR has the same serial number as a permanent record of your purchase to our Authorized Service Center for servicing. • Do not put your fingers or objects into the VCR cassette holder. • Do not place...
... ventilation for proper heat dissipation. The user could lose the authority to operate this product may generate or use of broadcast television programming, video tape, film or other VCR has the same serial number as a permanent record of your purchase to our Authorized Service Center for servicing. • Do not put your fingers or objects into the VCR cassette holder. • Do not place...

Owner's Manual
Page 6
...) PART NO. (N9268UD) • If you to use of the universal remote control. - 6 - This shows the elapsed recording or playback time in hours, minutes, and seconds. (Does not work in blank areas of the tape) • 181 channel capability PLL frequency synthesizer tuner with direct station call- (A converter may not operate this case, please call 1-800242-7158. • Depending on -screen menu display selectable in SLP mode will automatically turn...
...) PART NO. (N9268UD) • If you to use of the universal remote control. - 6 - This shows the elapsed recording or playback time in hours, minutes, and seconds. (Does not work in blank areas of the tape) • 181 channel capability PLL frequency synthesizer tuner with direct station call- (A converter may not operate this case, please call 1-800242-7158. • Depending on -screen menu display selectable in SLP mode will automatically turn...
Owner's Manual
Page 8
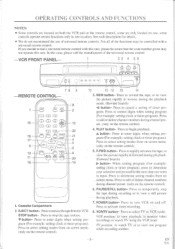
...the use a universal remote control with a universal remote control. Press to add or delete channel numbers during channel preset. (only on the remote control) 4. V button- Press to correct digits when setting program (For example: setting clock or timer program). Press to view one program while recording another. - 8 - Cassette Compartment 2. VCR position: to view playback, to monitor video recordings or watch TV or to rapidly advance the tape, or view the picture rapidly in one location. In this unit. When setting program (For example: setting clock or timer...
...the use a universal remote control with a universal remote control. Press to add or delete channel numbers during channel preset. (only on the remote control) 4. V button- Press to correct digits when setting program (For example: setting clock or timer program). Press to view one program while recording another. - 8 - Cassette Compartment 2. VCR position: to view playback, to monitor video recordings or watch TV or to rapidly advance the tape, or view the picture rapidly in one location. In this unit. When setting program (For example: setting clock or timer...
Owner's Manual
Page 9
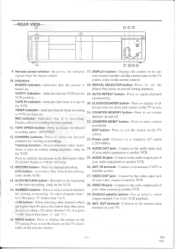
... repeat playback VCR position. RECORD button- Connect to the video input jack 14. VIDEO OUT jack- of the timer recording. (only on the TV 10. To select channels from the remote control. OUT terminal- the last two digits. (To select channel 125, first press "+100" button then press '2" and "5"). 16. Remote sensor window- Displays the counter or the cur- rent channel number and the current time on the VCR) 28. Rental Play mode on the TV screen. AUTO REPEAT button...
... repeat playback VCR position. RECORD button- Connect to the video input jack 14. VIDEO OUT jack- of the timer recording. (only on the TV 10. To select channels from the remote control. OUT terminal- the last two digits. (To select channel 125, first press "+100" button then press '2" and "5"). 16. Remote sensor window- Displays the counter or the cur- rent channel number and the current time on the VCR) 28. Rental Play mode on the TV screen. AUTO REPEAT button...

Owner's Manual
Page 11
...;VHF 0 (Bottom Jack) Coaxial cable UHF * UHF • (supplied) You can ONLY record and view the SAME channel when using this connection. The same goes for Automatic Timer Recording and One Touch Recording. RECORDING HINT 1) VCR power and the VCR/TV indicator must be turned on. 2) Turn on the TV and Box. 3) Set the channel to be recorded on the Box. 4) Set the TV and VCR to channel 3 or 4. 5) Set the CH3/CH4 switch...
...;VHF 0 (Bottom Jack) Coaxial cable UHF * UHF • (supplied) You can ONLY record and view the SAME channel when using this connection. The same goes for Automatic Timer Recording and One Touch Recording. RECORDING HINT 1) VCR power and the VCR/TV indicator must be turned on. 2) Turn on the TV and Box. 3) Set the channel to be recorded on the Box. 4) Set the TV and VCR to channel 3 or 4. 5) Set the CH3/CH4 switch...

Owner's Manual
Page 12
... you wish to see the VCR menu, view what you are recording or playing a tape with this connection, make sure the A-B switch is on the back of the VCR. (CH 3 or 4) Note to CATV system installer This reminder is good only if none of your channels are scrambled. Some customers with cable boxes may be needed here. (not supplied) coaxial cable (supplied) [ Back of the TV...
... you wish to see the VCR menu, view what you are recording or playing a tape with this connection, make sure the A-B switch is on the back of the VCR. (CH 3 or 4) Note to CATV system installer This reminder is good only if none of your channels are scrambled. Some customers with cable boxes may be needed here. (not supplied) coaxial cable (supplied) [ Back of the TV...

Owner's Manual
Page 13
... VIDEO VIDEO [AN television] corded on an another source, use the VCR with the number buttons on the remote control. AudioNideo cables (not supplied) etc. Now connect the other end of the cables to the audio/video output jacks on the source. 4) Press the CHANNEL A or V button to the audio/video input jacks on back of your TV Direct audio/video connections usually result in a better picture and sound quality for tape playback. You may connect your VCR's AUDIO/VIDEO OUTPUT jacks to select "AUX...
... VIDEO VIDEO [AN television] corded on an another source, use the VCR with the number buttons on the remote control. AudioNideo cables (not supplied) etc. Now connect the other end of the cables to the audio/video output jacks on the source. 4) Press the CHANNEL A or V button to the audio/video input jacks on back of your TV Direct audio/video connections usually result in a better picture and sound quality for tape playback. You may connect your VCR's AUDIO/VIDEO OUTPUT jacks to select "AUX...
Owner's Manual
Page 14
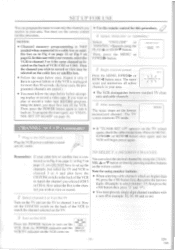
...; Use the remote control for this procedure. 4 Select "ENGLISH" or "ESPANOL' NOTES: • Channel memory programming is unplugged for this procedure. Now set the CH3/CH4 switch on the back of the VCR to match the channel you wish to record or view may be selected on the cable box or satellite box. • Follow the steps below before attempting to play or record a video tape BEFORE programming the tuner...
...; Use the remote control for this procedure. 4 Select "ENGLISH" or "ESPANOL' NOTES: • Channel memory programming is unplugged for this procedure. Now set the CH3/CH4 switch on the back of the VCR to match the channel you wish to record or view may be selected on the cable box or satellite box. • Follow the steps below before attempting to play or record a video tape BEFORE programming the tuner...

Owner's Manual
Page 15
... • The number buttons on the remote control do not work (PLAY/A, F.FWD/1,REW/-41, STOP/V, RESET/EXIT, POWER and MENU). • The POWER and the VCR/TV indicator must be set the CH3/CH4 switch on the TV. Now set to: DATE March 1st, 1998 SETTING TIME 5:40PM • Use the remote control for this feature to synchronize the clock with the correct time. • When unplugging the AC-cord or if...
... • The number buttons on the remote control do not work (PLAY/A, F.FWD/1,REW/-41, STOP/V, RESET/EXIT, POWER and MENU). • The POWER and the VCR/TV indicator must be set the CH3/CH4 switch on the TV. Now set to: DATE March 1st, 1998 SETTING TIME 5:40PM • Use the remote control for this feature to synchronize the clock with the correct time. • When unplugging the AC-cord or if...
Owner's Manual
Page 16
... VCR] selected on the TV. 1 Select "INITIALIZE" Press the MENU button until your cable box or satellite box is memorized again. ENGLISH ICE) ESPANOL 3) Select "ENGLISH" or "ESPAROL"= Spanish using the PLAY/A or STOP/V but- be - Now set the TV to "LANGUAGE SELECT". tween standard TV channels and cable channels. 4 Enter the desired channel number Press the number buttons or the PLAY/A, or STOP/V button until the INITIALIZE menu appears. INITIALIZE CHANNEL SETUP SETTING CLOCK...
... VCR] selected on the TV. 1 Select "INITIALIZE" Press the MENU button until your cable box or satellite box is memorized again. ENGLISH ICE) ESPANOL 3) Select "ENGLISH" or "ESPAROL"= Spanish using the PLAY/A or STOP/V but- be - Now set the TV to "LANGUAGE SELECT". tween standard TV channels and cable channels. 4 Enter the desired channel number Press the number buttons or the PLAY/A, or STOP/V button until the INITIALIZE menu appears. INITIALIZE CHANNEL SETUP SETTING CLOCK...

Owner's Manual
Page 17
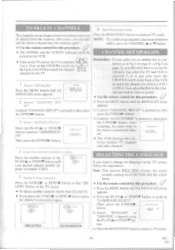
... reverse direction by -product of a still picture. This feature allows you use a tape recorded in addition to turn on the VCR, and then press the PLAY button on the remote control. Now set the TV to playback. • Usually there will be video "noise" lines (black and white streaks or dots) on a tape. This feature is activated on the TV screen, the PLAY button on the TV screen. In this mode, the sound will...
... reverse direction by -product of a still picture. This feature allows you use a tape recorded in addition to turn on the VCR, and then press the PLAY button on the remote control. Now set the TV to playback. • Usually there will be video "noise" lines (black and white streaks or dots) on a tape. This feature is activated on the TV screen, the PLAY button on the TV screen. In this mode, the sound will...

Owner's Manual
Page 18
... the tape. TO EXIT THE COUNTER MEMORY Press the COUNTER MEMORY button on the screen, reposition or reduce them. NOTES: • If there are video noise lines on the remote control so that "M" disappears from the TV screen. And you can adjust the tracking control manually by pressing the CHANNEL for this case, set the Auto Repeat mode to 0:00:00 Press the COUNTER RESET button on the playback picture. Now set...
... the tape. TO EXIT THE COUNTER MEMORY Press the COUNTER MEMORY button on the screen, reposition or reduce them. NOTES: • If there are video noise lines on the remote control so that "M" disappears from the TV screen. And you can adjust the tracking control manually by pressing the CHANNEL for this case, set the Auto Repeat mode to 0:00:00 Press the COUNTER RESET button on the playback picture. Now set...

Owner's Manual
Page 20
... connection you are using, through pages 10, 11, or 12 on "ANTENNA/CABLE CONNECTIONS" before continuing. • The POWER and the VCR/TV indicator must be recorded Press number buttons on the remote control or the CHANNEL V or A button. NOTE: When the VCR is activated on the TV screen, the RECORD button on the TV and set the CH3/CH4 switch on the back of the VCR] • Insert a cassette tape...
... connection you are using, through pages 10, 11, or 12 on "ANTENNA/CABLE CONNECTIONS" before continuing. • The POWER and the VCR/TV indicator must be recorded Press number buttons on the remote control or the CHANNEL V or A button. NOTE: When the VCR is activated on the TV screen, the RECORD button on the TV and set the CH3/CH4 switch on the back of the VCR] • Insert a cassette tape...

Owner's Manual
Page 21
... the remote control. • To show the remaining time, press the DISPLAY button on the remote control so that in place. (If necessary, rewind or fast for up to 8 hours. • Recording starts immediately when the REC/OTR button is reached. • Please note that "OTR" appears on the TV screen. (It will switch to the Stop mode immediately, eject the tape and turn power off...
... the remote control. • To show the remaining time, press the DISPLAY button on the remote control so that in place. (If necessary, rewind or fast for up to 8 hours. • Recording starts immediately when the REC/OTR button is reached. • Please note that "OTR" appears on the TV screen. (It will switch to the Stop mode immediately, eject the tape and turn power off...

Owner's Manual
Page 22
.../CABLE CONNECTIONS" before setting the timer. • Insert a cassette tape with an earlier start and end a recording while you have not yet set the clock, "SETTING CLOCK" appears. Then, set the timer recording. 2 Select your desired program number appears. (Example: 1) •I Select "TIMER PROGRAMMING" Press the MENU button so that a program will not be turned on the VCR to program it. • Turn on the TV. button. 3 Select once, daily or weekly recording For once recording : Press the PLAY...
.../CABLE CONNECTIONS" before setting the timer. • Insert a cassette tape with an earlier start and end a recording while you have not yet set the clock, "SETTING CLOCK" appears. Then, set the timer recording. 2 Select your desired program number appears. (Example: 1) •I Select "TIMER PROGRAMMING" Press the MENU button so that a program will not be turned on the VCR to program it. • Turn on the TV. button. 3 Select once, daily or weekly recording For once recording : Press the PLAY...
Owner's Manual
Page 24
... POWER button to original mode. Press the RESET/EXIT button to return to TV mode. 1) Turn the power on. 2) Press the MENU button. 3) Select a program number you want to original mode. CANCELING OR CHECKING THE START/END TIME 4) Press the F.FWD/► button so that is connected to change by using the PLAY/A or STOP/V button. VCR SET UP AUTO REPEAT RENTAL AUTO RETURN (AUTO) NOTE: To exit the auto return programming, repeat steps [1] to the beginning of the recorded program...
... POWER button to original mode. Press the RESET/EXIT button to return to TV mode. 1) Turn the power on. 2) Press the MENU button. 3) Select a program number you want to original mode. CANCELING OR CHECKING THE START/END TIME 4) Press the F.FWD/► button so that is connected to change by using the PLAY/A or STOP/V button. VCR SET UP AUTO REPEAT RENTAL AUTO RETURN (AUTO) NOTE: To exit the auto return programming, repeat steps [1] to the beginning of the recorded program...

Owner's Manual
Page 25
... TAPE SPEED button on the editing (recording) VCR. CH3 CH4 (Back of the VCR to input jacks". 5) Press the REC button on . • For best results during dubbing, use video-quality shielded cables with A/V outputs in the source (playing) VCR. Now set the TV to select the desired recording speed (SP/LP/SLP). 4) Select the AUX position on the editing (recording) VCR to channel 3 or 4. The remote control might affect the playback VCR's operation. • Always use...
... TAPE SPEED button on the editing (recording) VCR. CH3 CH4 (Back of the VCR to input jacks". 5) Press the REC button on . • For best results during dubbing, use video-quality shielded cables with A/V outputs in the source (playing) VCR. Now set the TV to select the desired recording speed (SP/LP/SLP). 4) Select the AUX position on the editing (recording) VCR to channel 3 or 4. The remote control might affect the playback VCR's operation. • Always use...
Owner's Manual
Page 27
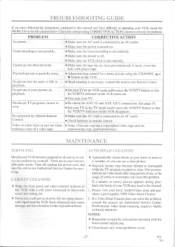
... into Record mode. • Make sure the tape has an erase-prevention tab. No picture but the audio is OK in playback. • Adjust tracking control for a better picture using the CHANNEL for servicing. Video or color fades in this problem. Do not spray insecticide liquid near the VCR. Professional video head cleaning requires highly technical attention. EN 7111 TROUBLESHOOTING GUIDE If you can cause this manual and have difficulty in operating your VCR may become...
... into Record mode. • Make sure the tape has an erase-prevention tab. No picture but the audio is OK in playback. • Adjust tracking control for a better picture using the CHANNEL for servicing. Video or color fades in this problem. Do not spray insecticide liquid near the VCR. Professional video head cleaning requires highly technical attention. EN 7111 TROUBLESHOOTING GUIDE If you can cause this manual and have difficulty in operating your VCR may become...


