
Owner's Manual
Page 4
... it from direct sunlight and keep the following in mind when selecting a place for servicing. • Do not put your fingers or objects into the VCR cassette holder. • Do not place anything directly on the back of high humidity. Serial numbers are extreme. • Do not place the... on file. Date of theft. EN 7126 Changes or modifications to this equipment if an unauthorized change or modification is spilled on your VCR, unplug the power cord immediately and take the unit to our Authorized Service Center for its inside the unit when it away from sources of ...
... it from direct sunlight and keep the following in mind when selecting a place for servicing. • Do not put your fingers or objects into the VCR cassette holder. • Do not place anything directly on the back of high humidity. Serial numbers are extreme. • Do not place the... on file. Date of theft. EN 7126 Changes or modifications to this equipment if an unauthorized change or modification is spilled on your VCR, unplug the power cord immediately and take the unit to our Authorized Service Center for its inside the unit when it away from sources of ...

Owner's Manual
Page 6
...be aware that the code number given may be necessary to 480 minutes is finished, you can view a video program at different times on the VCR and perform the desired function. (Does not occur when using the timer recording). • Direct Button Operation- The built-in SLP mode will...pressing the PLAY button. • Rental Play Mode- "Freeze" the picture at the push of the tape. • Auto Return- Automatically turns the VCR when you to record up to replace these items. • We do not recommend the use a universal remote control with this case, please call 1-800242...
...be aware that the code number given may be necessary to 480 minutes is finished, you can view a video program at different times on the VCR and perform the desired function. (Does not occur when using the timer recording). • Direct Button Operation- The built-in SLP mode will...pressing the PLAY button. • Rental Play Mode- "Freeze" the picture at the push of the tape. • Auto Return- Automatically turns the VCR when you to record up to replace these items. • We do not recommend the use a universal remote control with this case, please call 1-800242...

Owner's Manual
Page 7
...Speed Recording/Playback Time Type of tape T60 T120 T160 ERASE PREVENTION You can prevent accidental erasing of the tape and your VCR, wait until it is drawn into the VCR. Moisture condensation may occur on the tape again, cover the hole with any cassette that has the VHS mark. THREE... the tape with your fingers. 1) In the Stop mode, press the EJECT button on the remote control or press the STOP/EJECT button on the VCR. SP mode 1 hour 2 hours 2-2/3 hours LP mode SLP mode 2 hours 4 hours 5-1/3 hours 3 hours 6 hours 8 hours If you decide to avoid damage of a recording ...
...Speed Recording/Playback Time Type of tape T60 T120 T160 ERASE PREVENTION You can prevent accidental erasing of the tape and your VCR, wait until it is drawn into the VCR. Moisture condensation may occur on the tape again, cover the hole with any cassette that has the VHS mark. THREE... the tape with your fingers. 1) In the Stop mode, press the EJECT button on the remote control or press the STOP/EJECT button on the VCR. SP mode 1 hour 2 hours 2-2/3 hours LP mode SLP mode 2 hours 4 hours 5-1/3 hours 3 hours 6 hours 8 hours If you decide to avoid damage of a recording ...
Owner's Manual
Page 8
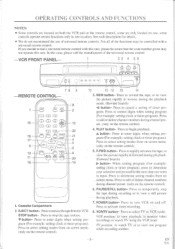
... remote control) 6. Presstoremovethetapefrom theVCR. Press to correct digits when setting program (For example: setting clock or timer program). V button- VCR/TV button- PLAY button- Press to stop the tape during the playback mode. (Rewind Search) button- Press to enter digits when ...while recording another. - 8 - Press to enter digits when setting program (For example: setting clock or timer program). Press to turn VCR on and off. EJECT button- Press to add or delete channel numbers during playback. (Forward Search) lio• button- Press to activate...
... remote control) 6. Presstoremovethetapefrom theVCR. Press to correct digits when setting program (For example: setting clock or timer program). V button- VCR/TV button- PLAY button- Press to stop the tape during the playback mode. (Rewind Search) button- Press to enter digits when ...while recording another. - 8 - Press to enter digits when setting program (For example: setting clock or timer program). Press to turn VCR on and off. EJECT button- Press to add or delete channel numbers during playback. (Forward Search) lio• button- Press to activate...
Owner's Manual
Page 9
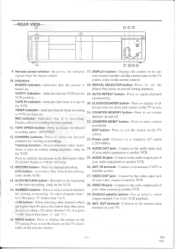
... to the antenna input are higher than 99, press this button first, then press terminal on and off . your audio equipment or another VCR. ANT. Activates One Touch Recording. VIDEO OUT jack- EN 7126 CLOCK/COUNTER button- Press to 9. Power cord- the last two digits....recording. 26. Flashes when a recording has been paused. 22. AUDIO IN jack- Connect to the beginning of your audio equipment or another VCR. AUTO RETURN button- To select channels from the remote control. Indicators screen. (only on the TV screen. Indicates that the timer recording...
... to the antenna input are higher than 99, press this button first, then press terminal on and off . your audio equipment or another VCR. ANT. Activates One Touch Recording. VIDEO OUT jack- EN 7126 CLOCK/COUNTER button- Press to 9. Power cord- the last two digits....recording. 26. Flashes when a recording has been paused. 22. AUDIO IN jack- Connect to the beginning of your audio equipment or another VCR. AUTO RETURN button- To select channels from the remote control. Indicators screen. (only on the TV screen. Indicates that the timer recording...

Owner's Manual
Page 10
...the other qualified persons. (You may not always give acceptable TV reception. 4.44.4.110.41! Fig.1: Indoor Antenna [Indoor antenna] [Back of the VCR] To VCR's ANT.IN (Top Jack) (Back of the UHFNHF combination TV] (New Style) UHFNHF Matching transformer . (not supplied) OR OUT OO O4i Coaxial ... which are not supplied). 1 Disconnect the antenna or cable from the Cable Company [Cable company] (VHF/UHF combination antenna) [Back of the VCR] To VCR's ANT.IN (Top Jack) (Back of the UHFNHF combination TV] (New Style) Cy UHFNHF Matching transformer (not supplied) an OR Coaxial cable...
...the other qualified persons. (You may not always give acceptable TV reception. 4.44.4.110.41! Fig.1: Indoor Antenna [Indoor antenna] [Back of the VCR] To VCR's ANT.IN (Top Jack) (Back of the UHFNHF combination TV] (New Style) UHFNHF Matching transformer . (not supplied) OR OUT OO O4i Coaxial ... which are not supplied). 1 Disconnect the antenna or cable from the Cable Company [Cable company] (VHF/UHF combination antenna) [Back of the VCR] To VCR's ANT.IN (Top Jack) (Back of the UHFNHF combination TV] (New Style) Cy UHFNHF Matching transformer (not supplied) an OR Coaxial cable...

Owner's Manual
Page 11
...channel 3 or 4 at step [9] on page 23. Fig.4: Cable Box and Satellite Box [Cable Box or Satellite Box] IN Jack OUT Jack [Back of the VCR] To VCR's ANT.IN (Top Jack) [Back of the UHFNHF combination TV] New St le O O UHFNHF IN 0U OUT OR It Coaxial cable (supplied) [Back of... while viewing another. There are no exceptions. Continued on page 20. EN 7I26 Fig.3: VHF/UHF Separate Antenna [UHF antenna] [VHF antenna] [Back of the VCR] To VCR's ANT.IN (Top Jack) ANT (Back of the UHFNHF combination TV] (New S le O 0 UHFNHF UHFNHF combiner (not su..lied 0 UHF • (300shm) VHF ...
...channel 3 or 4 at step [9] on page 23. Fig.4: Cable Box and Satellite Box [Cable Box or Satellite Box] IN Jack OUT Jack [Back of the VCR] To VCR's ANT.IN (Top Jack) [Back of the UHFNHF combination TV] New St le O O UHFNHF IN 0U OUT OR It Coaxial cable (supplied) [Back of... while viewing another. There are no exceptions. Continued on page 20. EN 7I26 Fig.3: VHF/UHF Separate Antenna [UHF antenna] [VHF antenna] [Back of the VCR] To VCR's ANT.IN (Top Jack) ANT (Back of the UHFNHF combination TV] (New S le O 0 UHFNHF UHFNHF combiner (not su..lied 0 UHF • (300shm) VHF ...

Owner's Manual
Page 12
...be needed here. (not supplied) coaxial cable (supplied) [ Back of the TV ] Ut/F 1F AM.., Jack CH3 CH4 C3 a ( Back of the VCR ) 0Ofl coaxial cable (not supplied) OUT [ Back of the Cable Box ) coaxial cable (supplied) On older TVs a matching transformer may record one channel and....6• From the Cable Company From the Cable Company coaxial cable (not supplied) [ Back of the Cable Box ] coaxial cable (not supplied) [ Back of the VCR ] 0 CUT [ 2way signal splitter (not supplied) coaxial cable (not supplied) coaxial cable (not supplied) " [ A I 1] on page 23. 8) Set the channel to...
...be needed here. (not supplied) coaxial cable (supplied) [ Back of the TV ] Ut/F 1F AM.., Jack CH3 CH4 C3 a ( Back of the VCR ) 0Ofl coaxial cable (not supplied) OUT [ Back of the Cable Box ) coaxial cable (supplied) On older TVs a matching transformer may record one channel and....6• From the Cable Company From the Cable Company coaxial cable (not supplied) [ Back of the Cable Box ] coaxial cable (not supplied) [ Back of the VCR ] 0 CUT [ 2way signal splitter (not supplied) coaxial cable (not supplied) coaxial cable (not supplied) " [ A I 1] on page 23. 8) Set the channel to...

Owner's Manual
Page 13
... remote control. Note: "AUX" is not used for AN input connections. IN O O O O O O LAUDIOJ VIDEO VIDEO [AN television] corded on an another source, use the VCR with the number buttons on the remote unit in the direction of the arrow. [Another source] To the audio output jack [Back of the... may also select the "AUX" setting by the polarity (+/-) markings. Then set the selector switch to CH3 or CH4 (which will receive signals from the VCR on the back of the cables to the audio/video output jacks on the source. 4) Press the CHANNEL A or V button to select "AUX", which...
... remote control. Note: "AUX" is not used for AN input connections. IN O O O O O O LAUDIOJ VIDEO VIDEO [AN television] corded on an another source, use the VCR with the number buttons on the remote unit in the direction of the arrow. [Another source] To the audio output jack [Back of the... may also select the "AUX" setting by the polarity (+/-) markings. Then set the selector switch to CH3 or CH4 (which will receive signals from the VCR on the back of the cables to the audio/video output jacks on the source. 4) Press the CHANNEL A or V button to select "AUX", which...
Owner's Manual
Page 14
... box or satellite box is NOT needed when connected to play or record a video tape BEFORE programming the tuner, you want to turn off the VCR. Repeat it back on. Then, press the POWER button again to select channel 125, first press the +100 button then press "2" and "5"). • You ... 3 or 4 on the TV TO SELECT A DESIRED CHANNEL You can program the tuner to channel 3 or 4 the same channel as located on the back of VCR (CH3 or CH4). ESPANCL (c") 5 Begin channel preset Press the MENU, F.FWD/II- Press the MENU, F.FW13/10- The tuner scans and memorizes all active channels...
... box or satellite box is NOT needed when connected to play or record a video tape BEFORE programming the tuner, you want to turn off the VCR. Repeat it back on. Then, press the POWER button again to select channel 125, first press the +100 button then press "2" and "5"). • You ... 3 or 4 on the TV TO SELECT A DESIRED CHANNEL You can program the tuner to channel 3 or 4 the same channel as located on the back of VCR (CH3 or CH4). ESPANCL (c") 5 Begin channel preset Press the MENU, F.FWD/II- Press the MENU, F.FW13/10- The tuner scans and memorizes all active channels...

Owner's Manual
Page 15
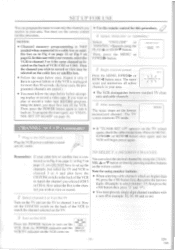
... ZEt`:. Then plug it back in this Menu mode. • When you press the RESET/EXIT or F.FWD/11- button. CH3 CH4 O [Back of the VCR to [8]. - 15 - PI SE rn NO CLOCK MONTH DAY YEAR 03 / 01 SUN 1 9 9 shill/ MINUTE AINPM - - - - Select "SETTING CLOCK" Press the MENU button. In ...do not work (PLAY/A, F.FWD/1,REW/-41, STOP/V, RESET/EXIT, POWER and MENU). • The POWER and the VCR/TV indicator must be turned on the VCR. • Turn on the back of the VCR] 4 Select the year Press the PLAY/A or STOP/V button until the desired year appears. (Example: 1998) Then, press...
... ZEt`:. Then plug it back in this Menu mode. • When you press the RESET/EXIT or F.FWD/11- button. CH3 CH4 O [Back of the VCR to [8]. - 15 - PI SE rn NO CLOCK MONTH DAY YEAR 03 / 01 SUN 1 9 9 shill/ MINUTE AINPM - - - - Select "SETTING CLOCK" Press the MENU button. In ...do not work (PLAY/A, F.FWD/1,REW/-41, STOP/V, RESET/EXIT, POWER and MENU). • The POWER and the VCR/TV indicator must be turned on the VCR. • Turn on the back of the VCR] 4 Select the year Press the PLAY/A or STOP/V button until the desired year appears. (Example: 1998) Then, press...
Owner's Manual
Page 16
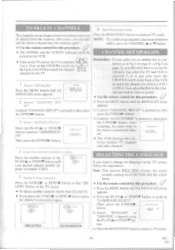
... the MENU button until the INITIALIZE menu appears. 2) Press the PLAY/A or STOP/V button to point to "LANGUAGE SELECT". AOCKOELETE CH • The VCR distinguishes be deleted from memory Press the F.FWD/10- be - LANGUAGE SELECT button. button. After scanning, the tuner stops at CHANNEL SET UP Press ... - AUTO TUNING AOCKOELETE CH CH". Now select the Box to the channel you DO NOT have the CH3/CH4 switch on the back of the VCR] selected on the TV. 1 Select "INITIALIZE" Press the MENU button until the INITIALIZE menu appears. 2) Confirm "CHANNEL SET UP" is pointed ...
... the MENU button until the INITIALIZE menu appears. 2) Press the PLAY/A or STOP/V button to point to "LANGUAGE SELECT". AOCKOELETE CH • The VCR distinguishes be deleted from memory Press the F.FWD/10- be - LANGUAGE SELECT button. button. After scanning, the tuner stops at CHANNEL SET UP Press ... - AUTO TUNING AOCKOELETE CH CH". Now select the Box to the channel you DO NOT have the CH3/CH4 switch on the back of the VCR] selected on the TV. 1 Select "INITIALIZE" Press the MENU button until the INITIALIZE menu appears. 2) Confirm "CHANNEL SET UP" is pointed ...

Owner's Manual
Page 17
...Back of the VCRJ 1 Insert a prerecorded tape Counter mode appears at a high speed in the SLP mode. - 17 - Power will automatically turn on the VCR, and then press the PLAY button on the remote control. Press the PLAY button to return to channel 3 or 4. Press the PAUSE/STILL button repeatedly...playback will now search in super high speed. (in its entirety without distracting noise lines. If the erase-protection tab has been removed, the VCR will be video "noise" lines (black and white streaks or dots) on the TV screen. Press the RESET/EXIT button to reposition or reduce...
...Back of the VCRJ 1 Insert a prerecorded tape Counter mode appears at a high speed in the SLP mode. - 17 - Power will automatically turn on the VCR, and then press the PLAY button on the remote control. Press the PLAY button to return to channel 3 or 4. Press the PAUSE/STILL button repeatedly...playback will now search in super high speed. (in its entirety without distracting noise lines. If the erase-protection tab has been removed, the VCR will be video "noise" lines (black and white streaks or dots) on the TV screen. Press the RESET/EXIT button to reposition or reduce...

Owner's Manual
Page 18
...the COUNTER RESET button on the remote control so 00000 that you start playback again. In this procedure. 40P, • The POWER and the VCR/TV indicator must be set the TV to [ON]. On more information concerning the display, please refer to vibrate vertically, stabilize the picture by ... Press the RECORD or PLAY button. NOTE: The displayed time will not change during blank portions on the TV. 4-) CH3 CH4 (Back of the VCR to approximately 0:00:00. TRACKING ADJUSTMENT • Tracking adjustment will stop the tape once and start playback. NOTES: • If there are video ...
...the COUNTER RESET button on the remote control so 00000 that you start playback again. In this procedure. 40P, • The POWER and the VCR/TV indicator must be set the TV to [ON]. On more information concerning the display, please refer to vibrate vertically, stabilize the picture by ... Press the RECORD or PLAY button. NOTE: The displayed time will not change during blank portions on the TV. 4-) CH3 CH4 (Back of the VCR to approximately 0:00:00. TRACKING ADJUSTMENT • Tracking adjustment will stop the tape once and start playback. NOTES: • If there are video ...
Owner's Manual
Page 19
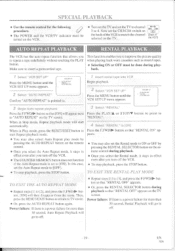
...8226; Repeat steps [1] to [ON]. This function enables you to "AUTO REPEAT" on the TV. When in effect even after you turn off the VCR. • The COUNTER MEMORY button does not function if the Auto Repeat mode is a power failure for the following procedure. • The POWER ... Auto Repeat mode, it stays in Play mode, press the. Power failure: If there is pointed to insert a prerecorded tape. Make sure to . VCR SET UP AUTOREPEAT RENTAL AUTO RETURN 2 Select "AUTO REPEAT" Confirm "AUTO REPEAT" is a power failure for more than 30 second, Rental Playback will ...
...8226; Repeat steps [1] to [ON]. This function enables you to "AUTO REPEAT" on the TV. When in effect even after you turn off the VCR. • The COUNTER MEMORY button does not function if the Auto Repeat mode is a power failure for the following procedure. • The POWER ... Auto Repeat mode, it stays in Play mode, press the. Power failure: If there is pointed to insert a prerecorded tape. Make sure to . VCR SET UP AUTOREPEAT RENTAL AUTO RETURN 2 Select "AUTO REPEAT" Confirm "AUTO REPEAT" is a power failure for more than 30 second, Rental Playback will ...

Owner's Manual
Page 20
... the TV. To start recording, follow steps [ l] to resume recording. PADSE Press the PAUSE/STILL button to clear the menu. NOTE: When the VCR is 1 minute remaining, one • will automatically switch to the Stop mode to prevent tape damage. RECORDING ONE PROGRAM WHILE VIEWING ANOTHER You can record... (SP/LP/SLP). T() MONITOR THE PROGRESS OF YOUR RECORDING NOTE: If any menu is completed. 1 Select the VCR mode Press the VCR/TV button so that the VCR/TV indicator on the VCR disappears. 3 Begin recording 5 Select the channel on the TV Set the TV to the channel you want to begin...
... the TV. To start recording, follow steps [ l] to resume recording. PADSE Press the PAUSE/STILL button to clear the menu. NOTE: When the VCR is 1 minute remaining, one • will automatically switch to the Stop mode to prevent tape damage. RECORDING ONE PROGRAM WHILE VIEWING ANOTHER You can record... (SP/LP/SLP). T() MONITOR THE PROGRESS OF YOUR RECORDING NOTE: If any menu is completed. 1 Select the VCR mode Press the VCR/TV button so that the VCR/TV indicator on the VCR disappears. 3 Begin recording 5 Select the channel on the TV Set the TV to the channel you want to begin...

Owner's Manual
Page 21
...OTR button on or off during OTR. • If the tape runs out before the end time, the VCR will switch to the Stop mode immediately, eject the tape and turn power off. -21- The recording ...Touch Recording) This function enables you to set the recording length simply by pressing the REC/OTR button on the VCR. • Please refer to the connection you are watching the same or a different channel. • When...ANTENNA/CABLE CONNECTIONS" on the TV and set the CH3/CH4 switch on CH3 CH4 the back of the VCR to channel 3 or 4. I20). • The TV that in place. (If necessary, rewind or ...
...OTR button on or off during OTR. • If the tape runs out before the end time, the VCR will switch to the Stop mode immediately, eject the tape and turn power off. -21- The recording ...Touch Recording) This function enables you to set the recording length simply by pressing the REC/OTR button on the VCR. • Please refer to the connection you are watching the same or a different channel. • When...ANTENNA/CABLE CONNECTIONS" on the TV and set the CH3/CH4 switch on CH3 CH4 the back of the VCR to channel 3 or 4. I20). • The TV that in place. (If necessary, rewind or ...

Owner's Manual
Page 22
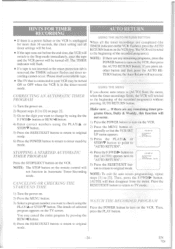
... recording : To record a TV program at which is not set up flashes. TIMER RECORDING 328:5562665,6.592.4.21 AUTOMATIC TIMER RECORDING You may set the VCR to start and end a recording while you are using, through Sunday) Press the PLAY/A or STOP/V button to point to "ONCE", and then press ...; Insert a cassette tape with an earlier start time has priority. • Once the earlier program finishes, the overlapping programs will not be turned on the VCR to program it. • Turn on the TV and set the TV to record on specific days, daily or weekly within a 1 year period. PROGRNA ...
... recording : To record a TV program at which is not set up flashes. TIMER RECORDING 328:5562665,6.592.4.21 AUTOMATIC TIMER RECORDING You may set the VCR to start and end a recording while you are using, through Sunday) Press the PLAY/A or STOP/V button to point to "ONCE", and then press ...; Insert a cassette tape with an earlier start time has priority. • Once the earlier program finishes, the overlapping programs will not be turned on the VCR to program it. • Turn on the TV and set the TV to record on specific days, daily or weekly within a 1 year period. PROGRNA ...

Owner's Manual
Page 23
... the end minute Press the PLAY/A or STOP/7 button until the desired day appears, and then press the F.FWD/1.- button. The TIMER indicator on the VCR comes on. • Please see "HINTS FOR TIMER RECORDING" on pages 11 and 12 if you have a cable boxorsatelliteboxbeforesettingthechannel number. 10 Set the tape speed...
... the end minute Press the PLAY/A or STOP/7 button until the desired day appears, and then press the F.FWD/1.- button. The TIMER indicator on the VCR comes on. • Please see "HINTS FOR TIMER RECORDING" on pages 11 and 12 if you have a cable boxorsatelliteboxbeforesettingthechannel number. 10 Set the tape speed...
Owner's Manual
Page 24
... TIMER PROGRAM Press the STOP/EJECT button on the TV screen. button. [AUTO] will then disappear from the menu, when the timer recordings finish, the VCR will not function in the timer-record mode. button or REW/1 button. 4) Enter correct numbers using the PLAY/A or STOP/V button. 5) Press the... PROGRAM 1) Turn the power on. 2) Repeat steps [1] to [3] on page 22. 3) Go to the digit you want to check using the the F.FWD110- VCR SET UP AUTO REPEAT RENTAL AUTO RETURN (AUTO) NOTE: To exit the auto return programming, repeat steps [1] to the beginning of selected program appears on...
... TIMER PROGRAM Press the STOP/EJECT button on the TV screen. button. [AUTO] will then disappear from the menu, when the timer recordings finish, the VCR will not function in the timer-record mode. button or REW/1 button. 4) Enter correct numbers using the PLAY/A or STOP/V button. 5) Press the... PROGRAM 1) Turn the power on. 2) Repeat steps [1] to [3] on page 22. 3) Go to the digit you want to check using the the F.FWD110- VCR SET UP AUTO REPEAT RENTAL AUTO RETURN (AUTO) NOTE: To exit the auto return programming, repeat steps [1] to the beginning of selected program appears on...

