

Owner's Manual
Page 2
... No. 70, provides information with the video product. A) S3125A - 2 - NO USER SERVICEABLE PARTS INSIDE. A THIS SYMBOL INDICATES THAT DANGEROUS VOLTAGE CONSTITUTING A RISK OF ELECTRIC SHOCK IS PRESENT WITHIN THIS UNIT. Article 810 of an authorization code for a CATV converter, is not intended to . 4.Follow Instructions-All operating and use liquid cleaners or aerosol cleaners. Use only with a cart, stand, tripod...
... No. 70, provides information with the video product. A) S3125A - 2 - NO USER SERVICEABLE PARTS INSIDE. A THIS SYMBOL INDICATES THAT DANGEROUS VOLTAGE CONSTITUTING A RISK OF ELECTRIC SHOCK IS PRESENT WITHIN THIS UNIT. Article 810 of an authorization code for a CATV converter, is not intended to . 4.Follow Instructions-All operating and use liquid cleaners or aerosol cleaners. Use only with a cart, stand, tripod...
Owner's Manual
Page 3
... other hazards. d. EN 7K01 When the power-supply cord or plug is left unattended and unused for service. 20.Replacement Parts-When replacement parts are covered by a qualified technician to restore the video product to qualified service personnel under the following the operating instructions. Adjust only those controls that could result in any service or repairs to this video product from heat sources such as the...
... other hazards. d. EN 7K01 When the power-supply cord or plug is left unattended and unused for service. 20.Replacement Parts-When replacement parts are covered by a qualified technician to restore the video product to qualified service personnel under the following the operating instructions. Adjust only those controls that could result in any service or repairs to this video product from heat sources such as the...
Owner's Manual
Page 4
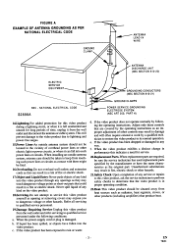
... regulations. FCC WARNING- We assume no responsibility for the unauthorized duplication, use of broadcast television programming, video tape, film or other acts which infringe upon the rights of copyright owners. Changes or modifications to this book as yours. PRECAUTIONS LOCATION For safe operation and optimum performance of your VCR, keep the following in mind when selecting a place for its inside the...
... regulations. FCC WARNING- We assume no responsibility for the unauthorized duplication, use of broadcast television programming, video tape, film or other acts which infringe upon the rights of copyright owners. Changes or modifications to this book as yours. PRECAUTIONS LOCATION For safe operation and optimum performance of your VCR, keep the following in mind when selecting a place for its inside the...

Owner's Manual
Page 5
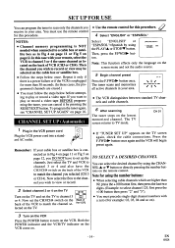
...; FEATURES 6 ■ SUPPLIED ACCESSORIES 6 ■ VIDEO CASSETTE TAPE INFORMATION.... 7 ■ OPERATING CONTROLS AND FUNCTIONS.... 8 ■ PREPARATION FOR USE 10 ANTENNA/CABLE CONNECTIONS 10 SETTING THE CH3/CH4 SWITCH 13 A/V TERMINALS 13 INSTALLING THE BA I I ERIES 13 ■ SET UP FOR USE 14 CHANNEL SET UP (Automatic) 14 CLOCK SET UP 15 TO DELETE OR ADD CHANNELS 16 CHANNEL SET UP AGAIN 16 SELECTING THE LANGUAGE 16 ■ PLAYBACK 17 NORMAL PLAYBACK 17 PICTURE SEARCH...
...; FEATURES 6 ■ SUPPLIED ACCESSORIES 6 ■ VIDEO CASSETTE TAPE INFORMATION.... 7 ■ OPERATING CONTROLS AND FUNCTIONS.... 8 ■ PREPARATION FOR USE 10 ANTENNA/CABLE CONNECTIONS 10 SETTING THE CH3/CH4 SWITCH 13 A/V TERMINALS 13 INSTALLING THE BA I I ERIES 13 ■ SET UP FOR USE 14 CHANNEL SET UP (Automatic) 14 CLOCK SET UP 15 TO DELETE OR ADD CHANNELS 16 CHANNEL SET UP AGAIN 16 SELECTING THE LANGUAGE 16 ■ PLAYBACK 17 NORMAL PLAYBACK 17 PICTURE SEARCH...

Owner's Manual
Page 6
... timer recording. This shows the elapsed recording or playback time in hours, minutes, and seconds. (Does not work in LP and SLP mode only) • Still- Instant timed recording for each tape you set comes on and the VCR receives the signals using the timer recording). • 2 Step Picture Search Operation- Automatically adjusts the tracking for 30 to replace these items. • We do not recommend the use a universal remote control with a universal remote control. Lets you play. • Auto Repeat...
... timer recording. This shows the elapsed recording or playback time in hours, minutes, and seconds. (Does not work in LP and SLP mode only) • Still- Instant timed recording for each tape you set comes on and the VCR receives the signals using the timer recording). • 2 Step Picture Search Operation- Automatically adjusts the tracking for 30 to replace these items. • We do not recommend the use a universal remote control with a universal remote control. Lets you play. • Auto Repeat...
Owner's Manual
Page 8
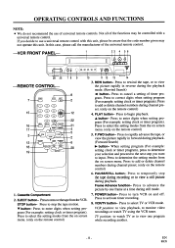
... the tape during the playback mode. (Rewind Search) button- Press to turn VCR on the remote control) 7. PAUSE/STILL button- Frame Advance function- Press to enter digits when setting program (For example: setting clock or timer program). Press to remove the tape from the on screen menu. (only on and off. A button- EJECT button- Press to add or delete channel numbers during channel preset. (only on the remote control) 6. OPERATING CONTROLS AND FUNCTIONS NOTE: • We do not recommend the use a universal remote control with a universal remote control...
... the tape during the playback mode. (Rewind Search) button- Press to turn VCR on the remote control) 7. PAUSE/STILL button- Frame Advance function- Press to enter digits when setting program (For example: setting clock or timer program). Press to remove the tape from the on screen menu. (only on and off. A button- EJECT button- Press to add or delete channel numbers during channel preset. (only on the remote control) 6. OPERATING CONTROLS AND FUNCTIONS NOTE: • We do not recommend the use a universal remote control with a universal remote control...
Owner's Manual
Page 9
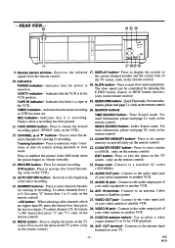
... audio input jack 14. turned on the remote control) POWER Indicator- For more infor- NUMBER buttons- Press to the antenna input on the remote control) terminal on the TV output channel (3 or 4) for viewing or recording. 21. MENU button- Press to choose the desired recording speed : SP/SLP. (only on the TV screen. (only 30. Connects to select desired channels your TV. - 9 - Remote sensor window- the current channel number and the current time on the remote control) TIMER indicator- SLOW button...
... audio input jack 14. turned on the remote control) POWER Indicator- For more infor- NUMBER buttons- Press to the antenna input on the remote control) terminal on the TV output channel (3 or 4) for viewing or recording. 21. MENU button- Press to choose the desired recording speed : SP/SLP. (only on the TV screen. (only 30. Connects to select desired channels your TV. - 9 - Remote sensor window- the current channel number and the current time on the remote control) TIMER indicator- SLOW button...

Owner's Manual
Page 13
... remote unit in the direction of the arrow. 2) Insert 2 "AA" penlight batteries into the battery compartment in a better picture and sound quality for A/V input connections. [Another source] To the audio output jack Pack of the VCR] AUDIO O O OUT IN O O VIDEO [AN television] INSTALLING THE BATTERIES INPUT SELECT OF FRONT OR REAR To use the VCR with your TV. USING THE REAR JACK: Fig.7: If your TV's owner's manual for tape playback. Now set the TV to channel...
... remote unit in the direction of the arrow. 2) Insert 2 "AA" penlight batteries into the battery compartment in a better picture and sound quality for A/V input connections. [Another source] To the audio output jack Pack of the VCR] AUDIO O O OUT IN O O VIDEO [AN television] INSTALLING THE BATTERIES INPUT SELECT OF FRONT OR REAR To use the VCR with your TV. USING THE REAR JACK: Fig.7: If your TV's owner's manual for tape playback. Now set the TV to channel...
Owner's Manual
Page 14
... desired channel by using the CHANNEL A or V button or directly pressing the number buttons on the remote control. Now select the Box to the channel you wish to view or record. 2 Select channel 3 or 4 on the TV Turn on the TV and set the CH3/CH4 switch on the back of the VCR to match the channel selected on the TV. 4--> CH3 CH4 I 03 I am TUNER SETUP 1 • The VCR distinguishes...
... desired channel by using the CHANNEL A or V button or directly pressing the number buttons on the remote control. Now select the Box to the channel you wish to view or record. 2 Select channel 3 or 4 on the TV Turn on the TV and set the CH3/CH4 switch on the back of the VCR to match the channel selected on the TV. 4--> CH3 CH4 I 03 I am TUNER SETUP 1 • The VCR distinguishes...
Owner's Manual
Page 15
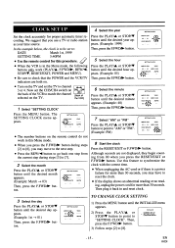
... plug it back in the Menu mode, the following buttons only work (PLAY/A, F.FWD/10-, REW/44, STOP/V, RESET/EXIT, POWER and MENU). • Be sure to check that you press the FTWD/110- EN 8H28 SETTING CLOCK DAY r1SMINUTE YEAR AM/PM • The number buttons on the TV and set to: DATE March 1st, 1999 SETTING TIME 5:40PM • Use the remote control for this procedure. • When...
... plug it back in the Menu mode, the following buttons only work (PLAY/A, F.FWD/10-, REW/44, STOP/V, RESET/EXIT, POWER and MENU). • Be sure to check that you press the FTWD/110- EN 8H28 SETTING CLOCK DAY r1SMINUTE YEAR AM/PM • The number buttons on the TV and set to: DATE March 1st, 1999 SETTING TIME 5:40PM • Use the remote control for this procedure. • When...

Owner's Manual
Page 16
... VCR distinguishes between standard TV channels and cable channels. 4 Enter the desired channel number Press the number buttons or the 3*.LETECH PLAY/A or STOP/V button until the INITIALIZE menu appears. 2) Confirm "CHANNEL SET UP" is pointed to "LANGUAGE SELECT". or REW/1 button so that "DELETE" flashes on the TV screen. • To delete another channel, repeat steps [4] and [5]. • If you wish to view or record. • Use the remote control for...
... VCR distinguishes between standard TV channels and cable channels. 4 Enter the desired channel number Press the number buttons or the 3*.LETECH PLAY/A or STOP/V button until the INITIALIZE menu appears. 2) Confirm "CHANNEL SET UP" is pointed to "LANGUAGE SELECT". or REW/1 button so that "DELETE" flashes on the TV screen. • To delete another channel, repeat steps [4] and [5]. • If you wish to view or record. • Use the remote control for...
Owner's Manual
Page 17
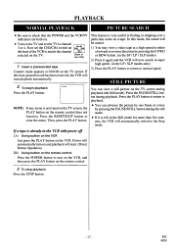
STILL PICTURE You can advance the picture by one frame at a time by pressing the F.FWD or REW button. (in the SP / LP / SLP modes) 2) Press it is activated on the TV screen, the PLAY button on the TV screen. Power will automatically turn on and playback will start . (Direct Button Operation) 281 Using button on the remote control Press the POWER button to turn on the VCR, and then press the PLAY button on the remote control. 3 To...
STILL PICTURE You can advance the picture by one frame at a time by pressing the F.FWD or REW button. (in the SP / LP / SLP modes) 2) Press it is activated on the TV screen, the PLAY button on the TV screen. Power will automatically turn on and playback will start . (Direct Button Operation) 281 Using button on the remote control Press the POWER button to turn on the VCR, and then press the PLAY button on the remote control. 3 To...
Owner's Manual
Page 18
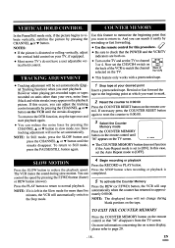
... the Auto Repeat mode is completed. 5 To activate the Counter Memory Press the REW (or F.FWD) button, the VCR will be set the TV to channel 3 or 4. the VCR] TRACKING ADJUSTMENT • This feature only works with a prerecorded tape. • Tracking adjustment will stop the tape once and start playback. In this procedure. • Be sure to check that "M" disappears from the TV screen. NOTE: The displayed time will not change...
... the Auto Repeat mode is completed. 5 To activate the Counter Memory Press the REW (or F.FWD) button, the VCR will be set the TV to channel 3 or 4. the VCR] TRACKING ADJUSTMENT • This feature only works with a prerecorded tape. • Tracking adjustment will stop the tape once and start playback. In this procedure. • Be sure to check that "M" disappears from the TV screen. NOTE: The displayed time will not change...

Owner's Manual
Page 23
... recording mode. • To stop the OTR operation, press the STOP button on the VCR or on the remote control. • To show the remaining time, press the DISPLAY button on the remote control so that "OTR" appears on the TV screen. (It will increase the recording time by the number of the VCR] • Insert a cassette tape with its erase prevention tab in the SLP mode maximum recording time, assuming the tape...
... recording mode. • To stop the OTR operation, press the STOP button on the VCR or on the remote control. • To show the remaining time, press the DISPLAY button on the remote control so that "OTR" appears on the TV screen. (It will increase the recording time by the number of the VCR] • Insert a cassette tape with its erase prevention tab in the SLP mode maximum recording time, assuming the tape...

Owner's Manual
Page 24
..., or 12 on "ANTENNA/CABLE CONNECTIONS" before setting the timer. • Insert a cassette tape with an earlier start and end a recording while you are both on to program it. • Turn on page 15. button. 3 Select once, daily or weekly recording For once recording : Confirm "ONCE" is being set to record: 1 Select "TIMER PRO- There is not set up flashes. button. button. je START TIME END TIME CHANNEL REC SPEED DATE: SETTING TIME: CHANNEL: TAPE SPEED: PROGRAM NO: May 6th...
..., or 12 on "ANTENNA/CABLE CONNECTIONS" before setting the timer. • Insert a cassette tape with an earlier start and end a recording while you are both on to program it. • Turn on page 15. button. 3 Select once, daily or weekly recording For once recording : Confirm "ONCE" is being set to record: 1 Select "TIMER PRO- There is not set up flashes. button. button. je START TIME END TIME CHANNEL REC SPEED DATE: SETTING TIME: CHANNEL: TAPE SPEED: PROGRAM NO: May 6th...
Owner's Manual
Page 25
... a recordable tape. • The TV that is now completed. • To set another program, repeat steps [2] to [11]. • Press the RESET/EXIT button to return to original mode. 12 Set the timer Press the POWER button to turn off . gND ATI NNETIM" r -- AM Next, press the PLAY/A or STOP/V button to point to CHANNEL - - CHANNEL - - ONE TIME PROGRAM PROGRAM NUMBER DATE 05/08 WC" START TIME 0 7:3 08.8.1, M,m• END TIME - - Program 1 is connected to your VCR...
... a recordable tape. • The TV that is now completed. • To set another program, repeat steps [2] to [11]. • Press the RESET/EXIT button to return to original mode. 12 Set the timer Press the POWER button to turn off . gND ATI NNETIM" r -- AM Next, press the PLAY/A or STOP/V button to point to CHANNEL - - CHANNEL - - ONE TIME PROGRAM PROGRAM NUMBER DATE 05/08 WC" START TIME 0 7:3 08.8.1, M,m• END TIME - - Program 1 is connected to your VCR...
Owner's Manual
Page 26
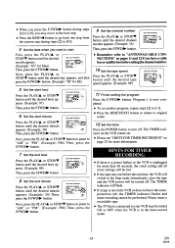
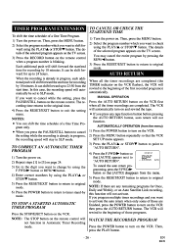
... 24 hours. TO CORRECT AN AUTOMATIC TIMER PROGRAM 1) Turn the power on. 2) Repeat steps [1] to [3] on page 24. 3) Go to the digit you want to turn on the VCR. 2) Press the MENU button repeatedly so that the VCR SET UP menu appears. TO STOP A STARTED AUTOMATIC TIMER PROGRAM Press the STOP/EJECT button on the remote control. The VCR will stay in SLP mode. Then, press the PLAY button. - 26 - Then, press the MENU button. 2) Select the program number...
... 24 hours. TO CORRECT AN AUTOMATIC TIMER PROGRAM 1) Turn the power on. 2) Repeat steps [1] to [3] on page 24. 3) Go to the digit you want to turn on the VCR. 2) Press the MENU button repeatedly so that the VCR SET UP menu appears. TO STOP A STARTED AUTOMATIC TIMER PROGRAM Press the STOP/EJECT button on the remote control. The VCR will stay in SLP mode. Then, press the PLAY button. - 26 - Then, press the MENU button. 2) Select the program number...
Owner's Manual
Page 27
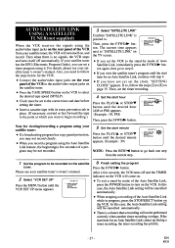
... for viewing/recording a program using your satellite tuner's owner's manual. EN 8H28 le VCR SET UP AUTO REPEAT ',W PM RENTAL AUTO RETURN • If you set the timer recording. 4 Set the start time for the VCR. • Connect the audio/video input jacks on the rear panel of the VCR to the audio/video output jacks on the satellite tuner. • Press the TAPE SPEED button on the VCR to select the desired tape speed (SP/SLP). • Clock must be set the clock, "SETTING CLOCK" appears. button again...
... for viewing/recording a program using your satellite tuner's owner's manual. EN 8H28 le VCR SET UP AUTO REPEAT ',W PM RENTAL AUTO RETURN • If you set the timer recording. 4 Set the start time for the VCR. • Connect the audio/video input jacks on the rear panel of the VCR to the audio/video output jacks on the satellite tuner. • Press the TAPE SPEED button on the VCR to select the desired tape speed (SP/SLP). • Clock must be set the clock, "SETTING CLOCK" appears. button again...
Owner's Manual
Page 28
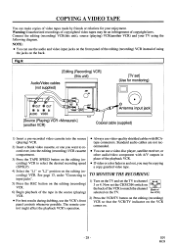
... make copies of video tapes made by friends or relatives for monitoring) AUDIO *OUT O. Fig.9: [Editing (Recording) VCR] (this unit), source (playing) VCR(another VCR) TCD Antenna input jack 5 Coaxial cable (supplied) 1) Insert a pre-recorded video cassette into the editing (recording) VCR cassette compartment. 3) Press the TAPE SPEED button on the TV. Now set ] (Use for your TV using the jacks on the editing (recording) VCR. Standard audio cables are not recommended. • You can use video-quality shielded cables with AN outputs...
... make copies of video tapes made by friends or relatives for monitoring) AUDIO *OUT O. Fig.9: [Editing (Recording) VCR] (this unit), source (playing) VCR(another VCR) TCD Antenna input jack 5 Coaxial cable (supplied) 1) Insert a pre-recorded video cassette into the editing (recording) VCR cassette compartment. 3) Press the TAPE SPEED button on the TV. Now set ] (Use for your TV using the jacks on the editing (recording) VCR. Standard audio cables are not recommended. • You can use video-quality shielded cables with AN outputs...
Owner's Manual
Page 30
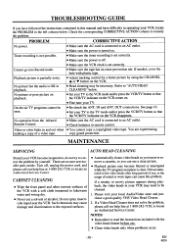
... making a copy of the VCR with plastic tape. Please visit your VCR, locate the PROBLEM in operating your local Audio/Video store and purchase a good quality VHS Video Head Cleaner. 2. Cannot go into Record mode. • Make sure the tape has an erase-prevention tab. No picture but the audio is clear. Turn off . • Make sure the VCR clock is connected to the exposed surfaces. • Automatically cleans video heads as you insert or remove a cassette...
... making a copy of the VCR with plastic tape. Please visit your VCR, locate the PROBLEM in operating your local Audio/Video store and purchase a good quality VHS Video Head Cleaner. 2. Cannot go into Record mode. • Make sure the tape has an erase-prevention tab. No picture but the audio is clear. Turn off . • Make sure the VCR clock is connected to the exposed surfaces. • Automatically cleans video heads as you insert or remove a cassette...


