
Owner's Manual
Page 1
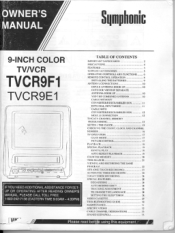
...SETTING THE SLEEP TIMER 28 VIDEO CASSETTE 29 TROUBLESHOOTING GUIDE 10 MAINTENANCE 31 SPECIFICATIONS 12 CABLE CHANNEL DESIGNATIONS 13 SPANISH( ESPANOL) 15 Please read befi using this equipment 9VVNER'S MANUAL Sqmphonic 9-INCH COLOR TVNCR TVCR9F1 TVCR9E1 IF YOU NEED ADDITIONAL ASSISTANCE FOR SETUP OR OPERATING AFTER READING OWNER'S MANUAL, PLEASE CALL TOLL FREE 1-800-242-7158 (EASTERN TIME 9:00AM - 4:30PM) 'FABLE OF CONTENTS IMPORTANT SAFEGUARDS 2 PRECAUTIONS 4 FEATURES 5 SUPPLIED ACCESSORIES 5 OPERATING CONTROLS AND FUNCTIONS 6 REMOTE CONTROL OPERATION 8 INSTALLING...
...SETTING THE SLEEP TIMER 28 VIDEO CASSETTE 29 TROUBLESHOOTING GUIDE 10 MAINTENANCE 31 SPECIFICATIONS 12 CABLE CHANNEL DESIGNATIONS 13 SPANISH( ESPANOL) 15 Please read befi using this equipment 9VVNER'S MANUAL Sqmphonic 9-INCH COLOR TVNCR TVCR9F1 TVCR9E1 IF YOU NEED ADDITIONAL ASSISTANCE FOR SETUP OR OPERATING AFTER READING OWNER'S MANUAL, PLEASE CALL TOLL FREE 1-800-242-7158 (EASTERN TIME 9:00AM - 4:30PM) 'FABLE OF CONTENTS IMPORTANT SAFEGUARDS 2 PRECAUTIONS 4 FEATURES 5 SUPPLIED ACCESSORIES 5 OPERATING CONTROLS AND FUNCTIONS 6 REMOTE CONTROL OPERATION 8 INSTALLING...
Owner's Manual
Page 2
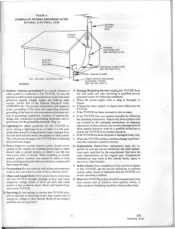
... still fail to fit, contact your electrician to your home, consult your obsolete outlet. Use only with a cart, stand, tripod, bracket, or table recommended by the user for future reference. 3. Any mounting of power supply to replace your appliance dealer or local power company. If you are unable to overturn. 9. Power-Cord Protection-Power-supply cords should use liquid cleaners or aerosol cleaners. The openings should...
... still fail to fit, contact your electrician to your home, consult your obsolete outlet. Use only with a cart, stand, tripod, bracket, or table recommended by the user for future reference. 3. Any mounting of power supply to replace your appliance dealer or local power company. If you are unable to overturn. 9. Power-Cord Protection-Power-supply cords should use liquid cleaners or aerosol cleaners. The openings should...
Owner's Manual
Page 3
... overload wall outlets and extension cords as opening or removing covers may result in any service or repairs to the TVNCR, be situatedaway from the wall outlet and disconnect the antenna or cable system. e. PART H) 13. A) i4. This will often require extensive work by following conditions: a. Servicing-Do not attempt to qualified service personnel under the following the operating instructions. Power Lines-An outside antenna system...
... overload wall outlets and extension cords as opening or removing covers may result in any service or repairs to the TVNCR, be situatedaway from the wall outlet and disconnect the antenna or cable system. e. PART H) 13. A) i4. This will often require extensive work by following conditions: a. Servicing-Do not attempt to qualified service personnel under the following the operating instructions. Power Lines-An outside antenna system...
Owner's Manual
Page 4
... the power cord when disconnecti it by the plug. • If, by accident, water is moved from a cold place to strong vibration. • Do not place the unit near strong magnetic fields. • Do not move the unit from an AC wall outlet. We assume no responsibility for the unauthorized duplication, use of broadcast television programming, video tape...
... the power cord when disconnecti it by the plug. • If, by accident, water is moved from a cold place to strong vibration. • Do not place the unit near strong magnetic fields. • Do not move the unit from an AC wall outlet. We assume no responsibility for the unauthorized duplication, use of broadcast television programming, video tape...
Owner's Manual
Page 5
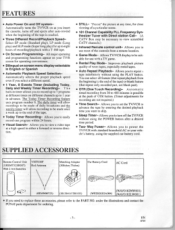
... Antenna Matching Adapter (300ohm-75ohm) Car Battery Cord c- - The Today Timer Recording feature uses program number 8. Improves playback picture quality of recording/playback with Direct station Call- (A CATV Box may be suitable for recording are not required.) • Time Search- Automatic timed recording from the beginning ts) the end of OTR button. (Timer adjustments for use most of the controls from a remote location. • Game Mode- Way Power- FEATURES • Auto Power...
... Antenna Matching Adapter (300ohm-75ohm) Car Battery Cord c- - The Today Timer Recording feature uses program number 8. Improves playback picture quality of recording/playback with Direct station Call- (A CATV Box may be suitable for recording are not required.) • Time Search- Automatic timed recording from the beginning ts) the end of OTR button. (Timer adjustments for use most of the controls from a remote location. • Game Mode- Way Power- FEATURES • Auto Power...
Owner's Manual
Page 6
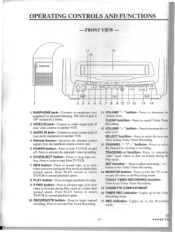
... another VCR. 3 AUDIO IN jack- The size of a tape. 9 F.FWD button- Connect to earphone (not supplied) for viewing or recording. Press to normal playback speed. 10 RECORD/OTR button- Press to begin playback of jack is 1/8" monaural (3.5mm). 2 VIDEO IN Jack- Press PLAY button to return TVNCR to activate the automatic timer recording. 6 STOP/EJECT button- Press to remove tape from the handheld remote control unit. 5 POWER button- SELECT function- select the channel for...
... another VCR. 3 AUDIO IN jack- The size of a tape. 9 F.FWD button- Connect to earphone (not supplied) for viewing or recording. Press to normal playback speed. 10 RECORD/OTR button- Press to begin playback of jack is 1/8" monaural (3.5mm). 2 VIDEO IN Jack- Press PLAY button to return TVNCR to activate the automatic timer recording. 6 STOP/EJECT button- Press to remove tape from the handheld remote control unit. 5 POWER button- SELECT function- select the channel for...

Owner's Manual
Page 8
... mode. 4 VOL buttons- j CHANNEL SPEED RETURN 4'6' 13 O 5 ®REWIND PLAY,. Press to adjust desired volume level by using either A or • button. Press to temporarily stop the tape motion. 9 PAUSE/STILL button- For example, pressing this button once will change channel display from 3 (present channel) to 10 (previously viewed channel), and pressing it a second time will return from the Remote Control (included). Press to activate the automatic timer recording. 20 POWER...
... mode. 4 VOL buttons- j CHANNEL SPEED RETURN 4'6' 13 O 5 ®REWIND PLAY,. Press to adjust desired volume level by using either A or • button. Press to temporarily stop the tape motion. 9 PAUSE/STILL button- For example, pressing this button once will change channel display from 3 (present channel) to 10 (previously viewed channel), and pressing it a second time will return from the Remote Control (included). Press to activate the automatic timer recording. 20 POWER...
Owner's Manual
Page 9
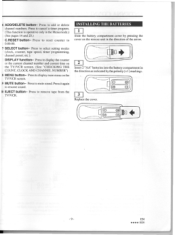
... the Menu mode.) (See pages 14 and 25.) C.RESET button- Press to reset counter to display the counter or the current channel number and current time on the TV/VCR screen. (See "CHECKING THE COUNT, CLOCK AND CHANNEL NUMBER") 8 MENU button- Replace the cover. e - 9 - Press to 0:00:00. 7 SELECT button- Press it again to add or delete channel numbers. EN **** 5E09 Press to resume sound. Press to cancel a timer program. (This function is operative...
... the Menu mode.) (See pages 14 and 25.) C.RESET button- Press to reset counter to display the counter or the current channel number and current time on the TV/VCR screen. (See "CHECKING THE COUNT, CLOCK AND CHANNEL NUMBER") 8 MENU button- Replace the cover. e - 9 - Press to 0:00:00. 7 SELECT button- Press it again to add or delete channel numbers. EN **** 5E09 Press to resume sound. Press to cancel a timer program. (This function is operative...
Owner's Manual
Page 11
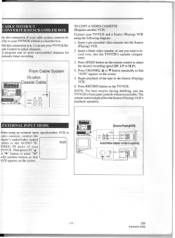
... CONVERTER/DESCRA MBLER BOX se this connection you, 1) can use the TV/VCR's front panel controls whenever possible. Press SPEED button on the screen. 5. The remote control might affect the Source (Playing) VCR's playback operation. "A" N "V" button or enter "00" with number button so that "AUX" appears on the remote control to the AUDIO IN, AUX VIDEO IN jacks of the tape in the Source (Playing) VCR. 6. Source (Playing)VCRJ AudioNldeo adapter cord(not supplied) ==_ EN ***** 5D04...
... CONVERTER/DESCRA MBLER BOX se this connection you, 1) can use the TV/VCR's front panel controls whenever possible. Press SPEED button on the screen. 5. The remote control might affect the Source (Playing) VCR's playback operation. "A" N "V" button or enter "00" with number button so that "AUX" appears on the remote control to the AUDIO IN, AUX VIDEO IN jacks of the tape in the Source (Playing) VCR. 6. Source (Playing)VCRJ AudioNldeo adapter cord(not supplied) ==_ EN ***** 5D04...
Owner's Manual
Page 13
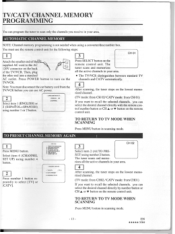
... AGAIN Press MENU button. TWCAT2 ITV I MUSH ON 2 ESAAHOL Press SELECT button on the remote control unit. AcT()Ni,vric NiEmoRy NOTE: Channel memory programming is not needed when using number 2 button. uEHu- supplied AC cord to turn on the TVNCR. Press POWER button to the AC 120V connector on the back of thetils. The tuner scans and memorizes all the active channels in your area. 4 After scanning, the tuner stops on...
... AGAIN Press MENU button. TWCAT2 ITV I MUSH ON 2 ESAAHOL Press SELECT button on the remote control unit. AcT()Ni,vric NiEmoRy NOTE: Channel memory programming is not needed when using number 2 button. uEHu- supplied AC cord to turn on the TVNCR. Press POWER button to the AC 120V connector on the back of thetils. The tuner scans and memorizes all the active channels in your area. 4 After scanning, the tuner stops on...
Owner's Manual
Page 14
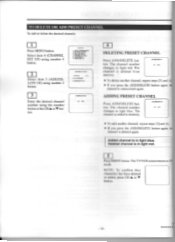
... I TV I TIMER PPOORNMMINO PICTURE CONTROL 3 GE TIING CLOCK • CHANNEL SFr OP S • LrAuNeCSIUEMAIMEESNELECT USPIES SETUP C/UMNEL SETUP - A00.011111 C11 33 17v1 • To add another channel, repeat steps [3] and [41. • If you press the ADD/DELETE button again, channel is deleted from memory. Press MENU button. ADDING PRESET CHANNEL Press ADD/DELETE button. Select item 4 (CHANNEL SET UP) using number 4 button. 2 Select item 3 (ADD/DELETE CH) using number 3 button. 3 Enter...
... I TV I TIMER PPOORNMMINO PICTURE CONTROL 3 GE TIING CLOCK • CHANNEL SFr OP S • LrAuNeCSIUEMAIMEESNELECT USPIES SETUP C/UMNEL SETUP - A00.011111 C11 33 17v1 • To add another channel, repeat steps [3] and [41. • If you press the ADD/DELETE button again, channel is deleted from memory. Press MENU button. ADDING PRESET CHANNEL Press ADD/DELETE button. Select item 4 (CHANNEL SET UP) using number 4 button. 2 Select item 3 (ADD/DELETE CH) using number 3 button. 3 Enter...
Owner's Manual
Page 15
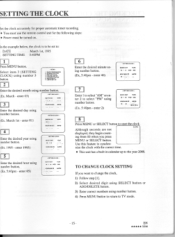
...) using number button. (Ex. 5:40pm - enter 03) IRE - enter 1995) 1430fi MINUTE - - NON - TO CHANGE CLOCK SETTING If you press MENU or SELECT button. MENU - DUES PROCIRAMLONO 2 PICTURE CONTROL 3 SETTING CLOCK CHANNE3 SET LIP 5 LANGUAGE SELECT 0 TIME SEARCH 7 USER'S SETUP I ]. 2) Select desired digit using SELECT button or ADD/DELETE button. 3) Enter correct numbers using number button. (Ex, 5:40pm - MONTH DAY - March 1st - SETT.) CLOG( - 14ONTII DAY 03 / oI YEAR HOUR INNUTE - • KAMA Enter the desired hour using number 3 button...
...) using number button. (Ex. 5:40pm - enter 03) IRE - enter 1995) 1430fi MINUTE - - NON - TO CHANGE CLOCK SETTING If you press MENU or SELECT button. MENU - DUES PROCIRAMLONO 2 PICTURE CONTROL 3 SETTING CLOCK CHANNE3 SET LIP 5 LANGUAGE SELECT 0 TIME SEARCH 7 USER'S SETUP I ]. 2) Select desired digit using SELECT button or ADD/DELETE button. 3) Enter correct numbers using number button. (Ex, 5:40pm - MONTH DAY - March 1st - SETT.) CLOG( - 14ONTII DAY 03 / oI YEAR HOUR INNUTE - • KAMA Enter the desired hour using number 3 button...

Owner's Manual
Page 17
... to make any further adjustments, use the remote control unit for the following steps: 1 Press MENU button. TV OPERATION EJECT Press POWER button to turn on the screen in sequence. 4 Adjust the picture control using number 2 button. Select the desired channel using number button or CH A or • button. 3 Adjust the VOLUME to desired listening level using number 7 button. -MENU- 1 TIMER PROGRAMMING 2 PICTURE CONTROL 3 SETTING 0.00( 4 GUNNEL SET UP LANGUAGE SELECT 4 1•46 SEARCH USERS SET UP 2 Press number 1 button to select (GAME MODE [ON]). 3 Press MENU button to return to...
... to make any further adjustments, use the remote control unit for the following steps: 1 Press MENU button. TV OPERATION EJECT Press POWER button to turn on the screen in sequence. 4 Adjust the picture control using number 2 button. Select the desired channel using number button or CH A or • button. 3 Adjust the VOLUME to desired listening level using number 7 button. -MENU- 1 TIMER PROGRAMMING 2 PICTURE CONTROL 3 SETTING 0.00( 4 GUNNEL SET UP LANGUAGE SELECT 4 1•46 SEARCH USERS SET UP 2 Press number 1 button to select (GAME MODE [ON]). 3 Press MENU button to return to...
Owner's Manual
Page 19
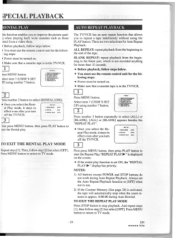
... steps below . • You must use the remote control unit for the following steps: i Power must be turned on. • Make sure that a cassette tape is in the TVNCR. I 'ress number 2 button to select (RENTAL [ON]). • Once you select the Rental Play mode, it stays in the TVNCR. First press MENU button, then press PLAY button to TV mode. is activated, the tape will automatically...
... steps below . • You must use the remote control unit for the following steps: i Power must be turned on. • Make sure that a cassette tape is in the TVNCR. I 'ress number 2 button to select (RENTAL [ON]). • Once you select the Rental Play mode, it stays in the TVNCR. First press MENU button, then press PLAY button to TV mode. is activated, the tape will automatically...
Owner's Manual
Page 24
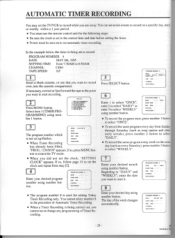
... I button. -MENUI TIAER PROGRAMMING 2 PK TURF CONTROL 3 SETTINO MOM d CHANNEL SET UP L.VIOUACIE SELECT TOM SEARCH 7 USERS SET UP PROD i»Mse 74 SATE The program number which is being carried out, you want to start it. 8 Enter your desired day using number button. The day of Automatic Timer Recording. • When a Timer Recording is set to the correct time and date before setting the timer. • Power must use the remote control...
... I button. -MENUI TIAER PROGRAMMING 2 PK TURF CONTROL 3 SETTINO MOM d CHANNEL SET UP L.VIOUACIE SELECT TOM SEARCH 7 USERS SET UP PROD i»Mse 74 SATE The program number which is being carried out, you want to start it. 8 Enter your desired day using number button. The day of Automatic Timer Recording. • When a Timer Recording is set to the correct time and date before setting the timer. • Power must use the remote control...
Owner's Manual
Page 25
... POWER button to set the end time. 9 Enter your desired channel using number button. PI400AAN Atwell% 4 DATE 0540E SAT VAST TAM 07 30 AY CIT055EI. - Program 4 is in progress; The TIMER REC indicator lights up. • While watching TV, "TIMER REC STANDBY" starts flashing on the TVNCR screen 2 minutes before the end time, timer recording will continued. To set another program, repeat steps [2] to [15]. 16 Press POWER button to turn...
... POWER button to set the end time. 9 Enter your desired channel using number button. PI400AAN Atwell% 4 DATE 0540E SAT VAST TAM 07 30 AY CIT055EI. - Program 4 is in progress; The TIMER REC indicator lights up. • While watching TV, "TIMER REC STANDBY" starts flashing on the TVNCR screen 2 minutes before the end time, timer recording will continued. To set another program, repeat steps [2] to [15]. 16 Press POWER button to turn...
Owner's Manual
Page 27
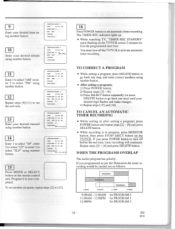
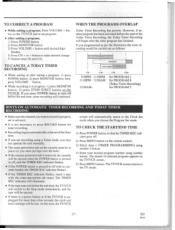
... off . 2) Press MENU button on the remote control. 3) Select item I (TIMER PROGRAMMING) using number I for PROGRAM 8 (Today Timer Recording) for PROGRAM I button. 4) Enter your desired program number using a Timer mode, you may not operate the unit manually. • The erase-prevention tab on the TVNCR screen. 5) Press MENU button. TO CORRECT A PROGRAM • While setting a program; Press VOLUME v button on the TVNCR. If you press POWER button to turn off before the end time, the TVNCR will switch to the Stop mode immediately, and...
... off . 2) Press MENU button on the remote control. 3) Select item I (TIMER PROGRAMMING) using number I for PROGRAM 8 (Today Timer Recording) for PROGRAM I button. 4) Enter your desired program number using a Timer mode, you may not operate the unit manually. • The erase-prevention tab on the TVNCR screen. 5) Press MENU button. TO CORRECT A PROGRAM • While setting a program; Press VOLUME v button on the TVNCR. If you press POWER button to turn off before the end time, the TVNCR will switch to the Stop mode immediately, and...
Owner's Manual
Page 30
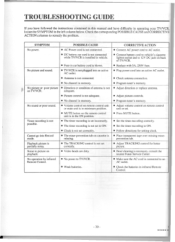
... Remote Control. - 30 - No picture or poor picture • Direction or condition of TV/VCR. • Replace with 5A, 250V fuse. • Plug power cord into an active AC outlet. • Check antenna connection. • Program tuner's memory. • Adjust direction or replace antenna. • Adjust picture controls. • Program tuner's memory. • Adjust volume control on TVNCR. Noise in memory. prevention tab. • Adjust TRACKING control for better picture. • Head cleaning is necessary, consult the nearest Funai Service...
... Remote Control. - 30 - No picture or poor picture • Direction or condition of TV/VCR. • Replace with 5A, 250V fuse. • Plug power cord into an active AC outlet. • Check antenna connection. • Program tuner's memory. • Adjust direction or replace antenna. • Adjust picture controls. • Program tuner's memory. • Adjust volume control on TVNCR. Noise in memory. prevention tab. • Adjust TRACKING control for better picture. • Head cleaning is necessary, consult the nearest Funai Service...
Owner's Manual
Page 31
... interrupted while the TV program reception is clear. This does not mean that the recorded program has been erased. There are no user-serviceable parts inside. Turn off, unplug the power cord, and take the unit to correct the problem by yourself. HEAD CLEANING • Picture playback may cause damage...cause this case, video head cleaning requires highly technical attention, therefore consult the nearest Funai Service Center. Dirt accumulated on the video heads after long periods of the TVNCR with a soft cloth immersed in lukewarm water and wrung dry. • Never use a solvent or ...
... interrupted while the TV program reception is clear. This does not mean that the recorded program has been erased. There are no user-serviceable parts inside. Turn off, unplug the power cord, and take the unit to correct the problem by yourself. HEAD CLEANING • Picture playback may cause damage...cause this case, video head cleaning requires highly technical attention, therefore consult the nearest Funai Service Center. Dirt accumulated on the video heads after long periods of the TVNCR with a soft cloth immersed in lukewarm water and wrung dry. • Never use a solvent or ...
Owner's Manual
Page 32
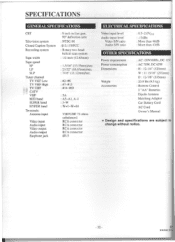
....5 ELECTRICAL SPECIFICATIONS Video input level Audio input level Video S/N ratio Audio S/N ratio : 0.5-2.0Vp.p : - I5dBs : More than 46dB : More than 43dB OTHER SPECIFICATIONS Power requirement Power consumption Dimensions Weight Accessories : AC 120V/60Hz, DC 12V : AC 70W, DC 65W : H : 12-1/4" (320mm) W : II 15/16" (292mm) D : 12-7/8" (335mm) : 20.9 lbs (9.5 kg) : Remote Control 2 "AA" Batteries Dipole Antenna Matching Adaptor Car Battery Cord AC Cord Owner's Manual • Design and specifications are subject to change without notice...
....5 ELECTRICAL SPECIFICATIONS Video input level Audio input level Video S/N ratio Audio S/N ratio : 0.5-2.0Vp.p : - I5dBs : More than 46dB : More than 43dB OTHER SPECIFICATIONS Power requirement Power consumption Dimensions Weight Accessories : AC 120V/60Hz, DC 12V : AC 70W, DC 65W : H : 12-1/4" (320mm) W : II 15/16" (292mm) D : 12-7/8" (335mm) : 20.9 lbs (9.5 kg) : Remote Control 2 "AA" Batteries Dipole Antenna Matching Adaptor Car Battery Cord AC Cord Owner's Manual • Design and specifications are subject to change without notice...


