Owners Manual
Page 2
...occur in a residential installation. CAUTION Changes or modifications to radio communications. DECLARATION OF CONFORMITY We, TEAC EUROPE GmbH. NO USER-SERVICEABLE PARTS INSIDE. Operation is connected. If this manual is in compliance with Part 15 of electric shock...digital device, pursuant to constitute a risk of FCC Rules. b) Increase the separation between the equipment and receiver. c) Connect the equipment into an outlet on , the user is no guarantee that may cause harmful interference to this equipment. IN USA/CANADA, USE ONLY ON 120 V SUPPLY. 2 TASCAM DP-03SD...
...occur in a residential installation. CAUTION Changes or modifications to radio communications. DECLARATION OF CONFORMITY We, TEAC EUROPE GmbH. NO USER-SERVICEABLE PARTS INSIDE. Operation is connected. If this manual is in compliance with Part 15 of electric shock...digital device, pursuant to constitute a risk of FCC Rules. b) Increase the separation between the equipment and receiver. c) Connect the equipment into an outlet on , the user is no guarantee that may cause harmful interference to this equipment. IN USA/CANADA, USE ONLY ON 120 V SUPPLY. 2 TASCAM DP-03SD...

Owners Manual
Page 4
... Mixing the tracks 15 Mastering a stereo track 16 Shutting down 27 Formatting SD cards 27 Recorder modes 28 Connecting other equipment 28 Rear panel 28 Left side panel 29 Adjusting the contrast 29 4 TASCAM DP-03SD 5 - Quick Start Guides 8 Playback and mixing 8 Preparations 8 Listening to the demo song 9 Recording and mastering 10 Creating a new song 10 Connecting and setting the input sources........ 11 Set the guitar as the recording source for TRACK 1 11 Adjusting and monitoring the input level......... 11 Recording a guitar to TRACK 1 12 Playing...
... Mixing the tracks 15 Mastering a stereo track 16 Shutting down 27 Formatting SD cards 27 Recorder modes 28 Connecting other equipment 28 Rear panel 28 Left side panel 29 Adjusting the contrast 29 4 TASCAM DP-03SD 5 - Quick Start Guides 8 Playback and mixing 8 Preparations 8 Listening to the demo song 9 Recording and mastering 10 Creating a new song 10 Connecting and setting the input sources........ 11 Set the guitar as the recording source for TRACK 1 11 Adjusting and monitoring the input level......... 11 Recording a guitar to TRACK 1 12 Playing...
Owners Manual
Page 5
... 70 Control input/output ratings 70 Audio performance 70 Computer requirements 70 General 71 Backup memory 71 17 - Mixing down and mastering tracks........48 Mixing down tracks 48 Levels and balance 48 Stereo position (panning 48 Track EQ (equalizer 48 Reverb 48 Muting tracks 49 Creating a stereo master track 49 Setting the starting and ending points 50 Recording a stereo master track 50 Exiting MIXDOWN mode 50 Checking the stereo master track 51 End stereo master track checking 51 Mastering the stereo master track 51 Mastering procedures 51 Using mastering...
... 70 Control input/output ratings 70 Audio performance 70 Computer requirements 70 General 71 Backup memory 71 17 - Mixing down and mastering tracks........48 Mixing down tracks 48 Levels and balance 48 Stereo position (panning 48 Track EQ (equalizer 48 Reverb 48 Muting tracks 49 Creating a stereo master track 49 Setting the starting and ending points 50 Recording a stereo master track 50 Exiting MIXDOWN mode 50 Checking the stereo master track 51 End stereo master track checking 51 Mastering the stereo master track 51 Mastering procedures 51 Using mastering...
Owners Manual
Page 6
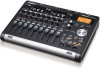
... supply phantom power • Built-in microphones can record mono tracks separately or a stereo track together • High-impedance guitar input supported by foot switches (RC-3F, sold separately) 6 TASCAM DP-03SD Items included with up and connect the unit, as well as F1, F2, F3 and F4 from the TEAC Global Site (http://teac-global.com/). Features This unit uses SD cards for future reference. Using the builtin mixer functions...
... supply phantom power • Built-in microphones can record mono tracks separately or a stereo track together • High-impedance guitar input supported by foot switches (RC-3F, sold separately) 6 TASCAM DP-03SD Items included with up and connect the unit, as well as F1, F2, F3 and F4 from the TEAC Global Site (http://teac-global.com/). Features This unit uses SD cards for future reference. Using the builtin mixer functions...
Owners Manual
Page 7
... to help you record and reproduce sound works to open the Downloads website page for the region where you have obtained the appropriate permission from or connected with or related to clean the unit as a power amplifier. SD cards that are intended only as illustrations of such data and/or information and not as a user online. Precautions for recording and playback...
... to help you record and reproduce sound works to open the Downloads website page for the region where you have obtained the appropriate permission from or connected with or related to clean the unit as a power amplifier. SD cards that are intended only as illustrations of such data and/or information and not as a user online. Precautions for recording and playback...
Owners Manual
Page 10
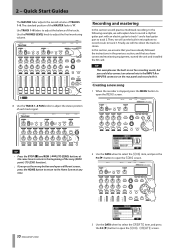
... screen. 8 Use the TRACK 1-8 PAN knobs to track 2. Quick Start Guides The MASTER fader adjusts the overall volume of the tracks. The standard position of each track signal. In the following example, we will explain how to record a rhythm guitar part with it. In this section we assume that you have already followed the instructions in mic for recording vocals, but you have connected monitoring equipment, started the unit and installed the SD card. Use...
... screen. 8 Use the TRACK 1-8 PAN knobs to track 2. Quick Start Guides The MASTER fader adjusts the overall volume of the tracks. The standard position of each track signal. In the following example, we will explain how to record a rhythm guitar part with it. In this section we assume that you have already followed the instructions in mic for recording vocals, but you have connected monitoring equipment, started the unit and installed the SD card. Use...

Owners Manual
Page 11
... INPUT B switch to INTERNAL MIC B to INPUT B ("B"). Guitar 2 Set the INPUT A switch to the Home Screen. 2 - See "Assigning inputs" on the rear panel. In the "Connecting and setting the input sources" section above, we set a guitar as the input source for INPUT B, so the guitar can be recorded to tracks 1, 3, 5 and 7, while INTERNAL MIC B can be recorded to the INPUT A jack on page 34. Adjusting and monitoring the input level 1 Press the HOME button to return to GUITAR. 2 Press the TRACK 1 REC button. Quick Start Guides...
... INPUT B switch to INTERNAL MIC B to INPUT B ("B"). Guitar 2 Set the INPUT A switch to the Home Screen. 2 - See "Assigning inputs" on the rear panel. In the "Connecting and setting the input sources" section above, we set a guitar as the input source for INPUT B, so the guitar can be recorded to tracks 1, 3, 5 and 7, while INTERNAL MIC B can be recorded to the INPUT A jack on page 34. Adjusting and monitoring the input level 1 Press the HOME button to return to GUITAR. 2 Press the TRACK 1 REC button. Quick Start Guides...

Owners Manual
Page 12
... and stays lit. When you play guitar, the input level is shown by the level meters for INPUT A does not light even when the loudest sound to set the stereo position when monitoring. • When the TRACK 1 REC indicator is unlit, the input cannot be recorded is too loud. The TRACK 1 REC indicator stop recording. 3 Press the TRACK 1 REC button to adjust the guitar input level. Quick Start Guides 3 Use the INPUT A TRIM knob to end...
... and stays lit. When you play guitar, the input level is shown by the level meters for INPUT A does not light even when the loudest sound to set the stereo position when monitoring. • When the TRACK 1 REC indicator is unlit, the input cannot be recorded is too loud. The TRACK 1 REC indicator stop recording. 3 Press the TRACK 1 REC button to adjust the guitar input level. Quick Start Guides 3 Use the INPUT A TRIM knob to end...

Owners Manual
Page 16
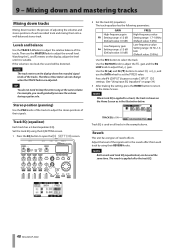
... are not recorded to the stereo master track. (See "Muting tracks" on page 49.) Mastering a stereo track Mastering is the process of the tracks and the overall level. • You can use the track faders to adjust the levels of adjusting a stereo master track to improve the final sound. ªª Confirming the stereo master track 1 In multitrack mode, press the MIXDOWN/MASTERING button to set as the IN point, which is where the mix down will start the stereo master track. If either...
... are not recorded to the stereo master track. (See "Muting tracks" on page 49.) Mastering a stereo track Mastering is the process of the tracks and the overall level. • You can use the track faders to adjust the levels of adjusting a stereo master track to improve the final sound. ªª Confirming the stereo master track 1 In multitrack mode, press the MIXDOWN/MASTERING button to set as the IN point, which is where the mix down will start the stereo master track. If either...

Owners Manual
Page 19
... INTERNAL MIC B when using builtin MIC B. 19 TASCAM DP-03SD The indicator lights when phantom power is too loud, the OL (overload) indicator lights. 2 INPUT A switch Set this button to the signal source input through the INPUT A - Do not supply phantom power to a ribbon microphone if you can turn phantom power ON and OFF. Depending on the mic, a loud noise could break them. Set it to open the INPUT ASSIGN screen on page 35.) If the input source signal is ON. Names and Functions...
... INTERNAL MIC B when using builtin MIC B. 19 TASCAM DP-03SD The indicator lights when phantom power is too loud, the OL (overload) indicator lights. 2 INPUT A switch Set this button to the signal source input through the INPUT A - Do not supply phantom power to a ribbon microphone if you can turn phantom power ON and OFF. Depending on the mic, a loud noise could break them. Set it to open the INPUT ASSIGN screen on page 35.) If the input source signal is ON. Names and Functions...

Owners Manual
Page 20
...-frequency gain on page 48.) o TRACK EDIT button Press this to open the Home Screen. t REVERB knobs (TRACK 1-TRACK 8) Use to adjust the level (volume) sent to the reverb effect of Parts 7 BOUNCE button Press this button to switch between MULTITRACK and BOUNCE modes. 8 MIXDOWN/MASTERING button Press this button to switch between the time counter divisions. (See "Direct locate function" on EQ setting screens, including the EQ SETTING, INPUT EQ and MASTERING EQ screens. y PAN knobs (TRACK 1-TRACK 8) Use to adjust the stereo position of operation...
...-frequency gain on page 48.) o TRACK EDIT button Press this to open the Home Screen. t REVERB knobs (TRACK 1-TRACK 8) Use to adjust the level (volume) sent to the reverb effect of Parts 7 BOUNCE button Press this button to switch between MULTITRACK and BOUNCE modes. 8 MIXDOWN/MASTERING button Press this button to switch between the time counter divisions. (See "Direct locate function" on EQ setting screens, including the EQ SETTING, INPUT EQ and MASTERING EQ screens. y PAN knobs (TRACK 1-TRACK 8) Use to adjust the stereo position of operation...
Owners Manual
Page 22
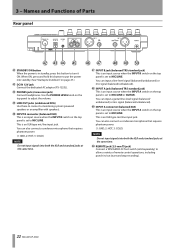
... Parts Rear panel @ STANDBY/ON button When the power is in /out (start and stop recording). 22 TASCAM DP-03SD You can also connect a condenser microphone that requires phantom power. (1: GND, 2: HOT, 3: COLD) NOTE Do not input signals into both the XLR and standard jacks at the same time. ) REMOTE jack (2.5-mm TS jack) Connect a TASCAM RC-3F foot switch (sold separately) to MIC/LINE or GUITAR. Use the PHONES LEVEL knob on the top panel to adjust the volume. % LINE...
... Parts Rear panel @ STANDBY/ON button When the power is in /out (start and stop recording). 22 TASCAM DP-03SD You can also connect a condenser microphone that requires phantom power. (1: GND, 2: HOT, 3: COLD) NOTE Do not input signals into both the XLR and standard jacks at the same time. ) REMOTE jack (2.5-mm TS jack) Connect a TASCAM RC-3F foot switch (sold separately) to MIC/LINE or GUITAR. Use the PHONES LEVEL knob on the top panel to adjust the volume. % LINE...
Owners Manual
Page 24
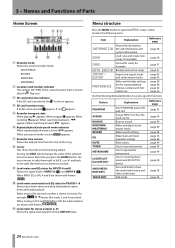
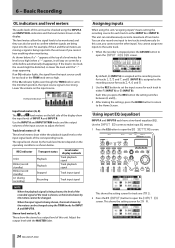
.... Turning the DATA wheel changes the value of Parts Home Screen 1 Recorder mode Shows the current recorder mode. SONG Load, save and create new songs, for the repeat playback interval, contrast and foot switch use. Bounce a track. Press and hold to marks and IN/OUT/TO points. q Level meter for TRACKS 1-8 Shows input levels when recording and playback signal levels when playing back. Button PHANTOM ASSIGN BOUNCE MIXDOWN/ MASTERING REVERB EQ MUTE TUNER METRONOME LOCATE LIST [LOCATE SET] UNDO...
.... Turning the DATA wheel changes the value of Parts Home Screen 1 Recorder mode Shows the current recorder mode. SONG Load, save and create new songs, for the repeat playback interval, contrast and foot switch use. Bounce a track. Press and hold to marks and IN/OUT/TO points. q Level meter for TRACKS 1-8 Shows input levels when recording and playback signal levels when playing back. Button PHANTOM ASSIGN BOUNCE MIXDOWN/ MASTERING REVERB EQ MUTE TUNER METRONOME LOCATE LIST [LOCATE SET] UNDO...

Owners Manual
Page 26
... card Push and insert the card further in to record, erase or otherwise change files on the card. Preparing the power As shown in the LOCK position, files cannot be lost. These data and settings cannot be found on the left side panel of SD cards that can use this product from being disconnected during use with this unit by USB. 26 TASCAM DP-03SD NOTE An SD card...
... card Push and insert the card further in to record, erase or otherwise change files on the card. Preparing the power As shown in the LOCK position, files cannot be lost. These data and settings cannot be found on the left side panel of SD cards that can use this product from being disconnected during use with this unit by USB. 26 TASCAM DP-03SD NOTE An SD card...
Owners Manual
Page 28
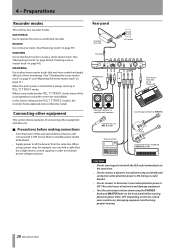
... unit's power is ON. When using the screen are unavailable. Preparations Recorder modes This unit has four recorder modes. Depending on the mic, a loud noise could cause a loud noise and damage equipment. • Turn the unit output volume down tracks" on page 48 and "Creating a stereo master track" on page 49.) MASTERING Use to play stereo master tracks that you will connect with a cable that has a high electric current capacity in standby power mode) beforehand. • Supply power to...
... unit's power is ON. When using the screen are unavailable. Preparations Recorder modes This unit has four recorder modes. Depending on the mic, a loud noise could cause a loud noise and damage equipment. • Turn the unit output volume down tracks" on page 48 and "Creating a stereo master track" on page 49.) MASTERING Use to play stereo master tracks that you will connect with a cable that has a high electric current capacity in standby power mode) beforehand. • Supply power to...
Owners Manual
Page 34
... screen for INPUT A and INPUT B. Track level meters (1-8) These level meters show the input levels of the input sources to confirm whether signals are moving a signal is too loud, the sound might be distorted, so lower the level until the "-" stops appearing. You cannot assign two inputs to the Home Screen. Each time you cannot hear anything when monitoring. Use the INPUT A and INPUT B TRIM knobs and the output volumes of INPUT A and INPUT B. Adjust the output level with the MASTER fader. Use...
... screen for INPUT A and INPUT B. Track level meters (1-8) These level meters show the input levels of the input sources to confirm whether signals are moving a signal is too loud, the sound might be distorted, so lower the level until the "-" stops appearing. You cannot assign two inputs to the Home Screen. Each time you cannot hear anything when monitoring. Use the INPUT A and INPUT B TRIM knobs and the output volumes of INPUT A and INPUT B. Adjust the output level with the MASTER fader. Use...

Owners Manual
Page 35
... level suitably. TIP Use the TO LAST REC function to locate to the last position that you press the REC buttons for recording. 35 TASCAM DP-03SD Use the track faders and MASTER fader to adjust their levels and stereo positions for recording 1 Press the REC buttons of two tracks can record new sounds to them into record standby first will become unlit. Track pan and level settings Use the track faders and PAN knobs of input EQ. Basic Recording...
... level suitably. TIP Use the TO LAST REC function to locate to the last position that you press the REC buttons for recording. 35 TASCAM DP-03SD Use the track faders and MASTER fader to adjust their levels and stereo positions for recording 1 Press the REC buttons of two tracks can record new sounds to them into record standby first will become unlit. Track pan and level settings Use the track faders and PAN knobs of input EQ. Basic Recording...
Owners Manual
Page 48
9 - Mixing down and mastering tracks Mixing down tracks Mixing down tracks is the process of adjusting the volumes and stereo positions of the tracks. Watching the L and R meters on the display, adjust the level until it is applied after the track EQ. 48 TASCAM DP-03SD NOTE The track meters on the Home Screen as in the example above. For example, you could gradually increase the volume during a guitar solo. Set the track EQ using their signals. Use the...
9 - Mixing down and mastering tracks Mixing down tracks Mixing down tracks is the process of adjusting the volumes and stereo positions of the tracks. Watching the L and R meters on the display, adjust the level until it is applied after the track EQ. 48 TASCAM DP-03SD NOTE The track meters on the Home Screen as in the example above. For example, you could gradually increase the volume during a guitar solo. Set the track EQ using their signals. Use the...

Owners Manual
Page 60
... a computer and import audio files on the FAT partition to a computer by the unit. Moreover, you have copied all the data to add additional recordings or mix existing recordings in DP- 03. • The total number of files and folders that created it will cause all the files that meets USB 2.0 standards. 60 TASCAM DP-03SD Connecting with the following screen appears on the...
... a computer and import audio files on the FAT partition to a computer by the unit. Moreover, you have copied all the data to add additional recordings or mix existing recordings in DP- 03. • The total number of files and folders that created it will cause all the files that meets USB 2.0 standards. 60 TASCAM DP-03SD Connecting with the following screen appears on the...
Owners Manual
Page 67
... the INPUT A or INPUT B on page 56.) 67 TASCAM DP-03SD Messages" on the display. Why can't I hear any operation. Why can 't I play back? • Are the track faders of the tracks set to high enough? • Is the MASTER fader set too high? In order to comply with the European ErP standby power regulations. Also, see "Assigning inputs" on the MTR partition cannot directly be read.) Noise occurs if I 'm recording...
... the INPUT A or INPUT B on page 56.) 67 TASCAM DP-03SD Messages" on the display. Why can't I hear any operation. Why can 't I play back? • Are the track faders of the tracks set to high enough? • Is the MASTER fader set too high? In order to comply with the European ErP standby power regulations. Also, see "Assigning inputs" on the MTR partition cannot directly be read.) Noise occurs if I 'm recording...
