Owners Manual
Page 2
... interference that may cause harmful interference to correct the interference by one or more of FCC Rules. IN USA/CANADA, USE ONLY ON 120 V SUPPLY. 2 TASCAM DP-03SD INFORMATION TO THE USER This equipment has been tested and found to this equipment does cause harmful interference to Part 15 of important operating and...
... interference that may cause harmful interference to correct the interference by one or more of FCC Rules. IN USA/CANADA, USE ONLY ON 120 V SUPPLY. 2 TASCAM DP-03SD INFORMATION TO THE USER This equipment has been tested and found to this equipment does cause harmful interference to Part 15 of important operating and...
Owners Manual
Page 3
...) (Cr6+) (PBB) (PBDE) 1 CHASSIS ○ ○ 2 ○ ○ 3 PCB Assy ○ ○ 4 ○ ○ 5 ○ ○ 6 SEAL ○ ○ 7 ○ ○ GB/T26572 GB/T26572 3 TASCAM DP-03SD IMPORTANT SAFETY INSTRUCTIONS 1 Read these instructions. 2 Keep these instructions. 3 Heed all warnings. 4 Follow all servicing to qualified service personnel. A polarized plug has two blades with...
...) (Cr6+) (PBB) (PBDE) 1 CHASSIS ○ ○ 2 ○ ○ 3 PCB Assy ○ ○ 4 ○ ○ 5 ○ ○ 6 SEAL ○ ○ 7 ○ ○ GB/T26572 GB/T26572 3 TASCAM DP-03SD IMPORTANT SAFETY INSTRUCTIONS 1 Read these instructions. 2 Keep these instructions. 3 Heed all warnings. 4 Follow all servicing to qualified service personnel. A polarized plug has two blades with...

Owners Manual
Page 4
... Shutting down 27 Formatting SD cards 27 Recorder modes 28 Connecting other equipment 28 Rear panel 28 Left side panel 29 Adjusting the contrast 29 4 TASCAM DP-03SD 5 - Names and Functions of condensation 7 Cleaning the unit 7 About SD cards 7 Precautions for use 7 Beware of Parts 19 Home Screen 24 Menu structure 24 Screen... 6 Features 6 Items included with this product 6 About this manual 6 Intellectual property rights 6 Precautions for placement and use 7 Using the TEAC Global Site 7 User registration 7 About TASCAM customer support service 7 2 - Contents 1 -
... Shutting down 27 Formatting SD cards 27 Recorder modes 28 Connecting other equipment 28 Rear panel 28 Left side panel 29 Adjusting the contrast 29 4 TASCAM DP-03SD 5 - Names and Functions of condensation 7 Cleaning the unit 7 About SD cards 7 Precautions for use 7 Beware of Parts 19 Home Screen 24 Menu structure 24 Screen... 6 Features 6 Items included with this product 6 About this manual 6 Intellectual property rights 6 Precautions for placement and use 7 Using the TEAC Global Site 7 User registration 7 About TASCAM customer support service 7 2 - Contents 1 -
Owners Manual
Page 5
... EQ (equalizer 52 Using mastering compression 52 Using normalize 53 Copying the stereo master track 53 Exiting MASTERING mode 53 10 - Commonly-used Functions 73 5 TASCAM DP-03SD Editing Tracks 44 Overview of track editing 44 Editing points 44 Basic editing procedures 44 Explanation of mastering compressor presets 66 Masetring compressor parameters list...
... EQ (equalizer 52 Using mastering compression 52 Using normalize 53 Copying the stereo master track 53 Exiting MASTERING mode 53 10 - Commonly-used Functions 73 5 TASCAM DP-03SD Editing Tracks 44 Overview of track editing 44 Editing points 44 Basic editing procedures 44 Explanation of mastering compressor presets 66 Masetring compressor parameters list...
Owners Manual
Page 6
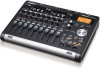
...Owner's manual (this document 1 The warranty is included at the bottom of the screen above the buttons are trademarks of TASCAM's 8-Track Digital Portastudio, the DP-03SD. Using the builtin mixer functions, multiple tracks can be mixed down to a dedicated master track possible • Included ... the unit, as well as "SD card." • Additional information is connected by foot switches (RC-3F, sold separately) 6 TASCAM DP-03SD Items included with backlighting • Independent two-band equalizers can record mono tracks separately or a stereo track together • High-impedance ...
...Owner's manual (this document 1 The warranty is included at the bottom of the screen above the buttons are trademarks of TASCAM's 8-Track Digital Portastudio, the DP-03SD. Using the builtin mixer functions, multiple tracks can be mixed down to a dedicated master track possible • Included ... the unit, as well as "SD card." • Additional information is connected by foot switches (RC-3F, sold separately) 6 TASCAM DP-03SD Items included with backlighting • Independent two-band equalizers can record mono tracks separately or a stereo track together • High-impedance ...
Owners Manual
Page 7
...and/or information shall be free from or connected with or related to the use • The operating temperature should be necessary. 7 TASCAM DP-03SD This product is designed to help you record and reproduce sound works to which you own the copyright, or where you are otherwise unstable ...com/). 1. If you have been confirmed for the consequences of condensation If the unit is mounted in the USA, please visit the TASCAM website (http:// tascam.com/) to open the Downloads website page for that are required. Select and download the Owner's Manual that language. Unless you ...
...and/or information shall be free from or connected with or related to the use • The operating temperature should be necessary. 7 TASCAM DP-03SD This product is designed to help you record and reproduce sound works to which you own the copyright, or where you are otherwise unstable ...com/). 1. If you have been confirmed for the consequences of condensation If the unit is mounted in the USA, please visit the TASCAM website (http:// tascam.com/) to open the Downloads website page for that are required. Select and download the Owner's Manual that language. Unless you ...

Owners Manual
Page 8
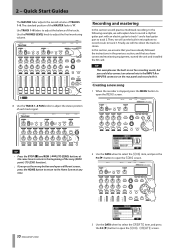
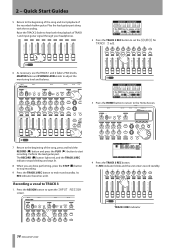
CAUTION Be careful not to turn the power ON. Use of this hook to the PHONES jack on the included SD card. Home Screen 8 TASCAM DP-03SD Quick Start Guides Playback and mixing In this section, we will play back the demo song on the rear panel. When this unit is purchased ... Doing so could cause malfunction, fire or electric shock. Headphones 2 After inserting the SD card, close the card slot cover. 3 Connect the included AC adaptor (TASCAM PS-1225L) to the DC IN 12V connector on the rear panel. 5 Press the STANDBY/ON button on the bottom panel. When using the procedures...
CAUTION Be careful not to turn the power ON. Use of this hook to the PHONES jack on the included SD card. Home Screen 8 TASCAM DP-03SD Quick Start Guides Playback and mixing In this section, we will play back the demo song on the rear panel. When this unit is purchased ... Doing so could cause malfunction, fire or electric shock. Headphones 2 After inserting the SD card, close the card slot cover. 3 Connect the included AC adaptor (TASCAM PS-1225L) to the DC IN 12V connector on the rear panel. 5 Press the STANDBY/ON button on the bottom panel. When using the procedures...

Owners Manual
Page 9
Always turn the power OFF (standby) before removing or inserting a card. • If you can monitor using speakers. Listening to the demo song. 9 TASCAM DP-03SD We will be lost data and settings cannot be recovered. • When the power is ON, do not cut the power to the unit by ...
Always turn the power OFF (standby) before removing or inserting a card. • If you can monitor using speakers. Listening to the demo song. 9 TASCAM DP-03SD We will be lost data and settings cannot be recovered. • When the power is ON, do not cut the power to the unit by ...
Owners Manual
Page 10
... MENU screen. 8 Use the TRACK 1-8 PAN knobs to track 2. The standard position of TRACKS 1-8. Use the PHONES LEVEL knob to open the SONG screen. 10 TASCAM DP-03SD 3 Use the DATA wheel to select the CREATE item, and press the F4 (¥) button to adjust the final monitoring volume. 2 -
... MENU screen. 8 Use the TRACK 1-8 PAN knobs to track 2. The standard position of TRACKS 1-8. Use the PHONES LEVEL knob to open the SONG screen. 10 TASCAM DP-03SD 3 Use the DATA wheel to select the CREATE item, and press the F4 (¥) button to adjust the final monitoring volume. 2 -

Owners Manual
Page 11
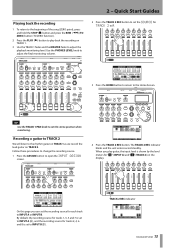
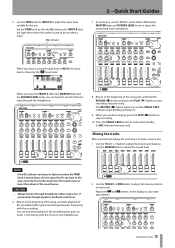
... Home Screen. Adjusting and monitoring the input level 1 Press the HOME button to return to GUITAR. 2 Press the TRACK 1 REC button. TRACK 1 REC indicator 11 TASCAM DP-03SD Set the guitar as necessary. (See "Editing names" on page 34. The TRACK 1 REC indicator blinks and the unit enters record standby. See "Assigning inputs...
... Home Screen. Adjusting and monitoring the input level 1 Press the HOME button to return to GUITAR. 2 Press the TRACK 1 REC button. TRACK 1 REC indicator 11 TASCAM DP-03SD Set the guitar as necessary. (See "Editing names" on page 34. The TRACK 1 REC indicator blinks and the unit enters record standby. See "Assigning inputs...

Owners Manual
Page 12
... play guitar, the input level is shown by the level meters for INPUT A does not light even when the loudest sound to be heard. 12 TASCAM DP-03SD NOTE • Use the TRACK 1 PAN knob to stop blinking and stays lit. Quick Start Guides 3 Use the INPUT A TRIM knob to start recording. TRACK...
... play guitar, the input level is shown by the level meters for INPUT A does not light even when the loudest sound to be heard. 12 TASCAM DP-03SD NOTE • Use the TRACK 1 PAN knob to stop blinking and stays lit. Quick Start Guides 3 Use the INPUT A TRIM knob to start recording. TRACK...
Owners Manual
Page 13
... guitar on TRACK 1 as we record the lead guitar on TRACK 2. TIP Use the TRACK 1 PAN knob to INPUT A or INPUT B. TRACK 2 REC indicator 13 TASCAM DP-03SD On this page you play back the recording on the display. The TRACK 2 REC indicator blinks and the unit enters record standby. Quick Start Guides...
... guitar on TRACK 1 as we record the lead guitar on TRACK 2. TIP Use the TRACK 1 PAN knob to INPUT A or INPUT B. TRACK 2 REC indicator 13 TASCAM DP-03SD On this page you play back the recording on the display. The TRACK 2 REC indicator blinks and the unit enters record standby. Quick Start Guides...
Owners Manual
Page 14
Its REC indicator becomes unlit. TRACK 3 REC indicator 14 TASCAM DP-03SD Perform the lead guitar part. Recording a vocal to open the INPUT ASSIGN screen. 4 Press the TRACK 3 REC button. Press the ASSIGN button to TRACK 3 1. Raise ...
Its REC indicator becomes unlit. TRACK 3 REC indicator 14 TASCAM DP-03SD Perform the lead guitar part. Recording a vocal to open the INPUT ASSIGN screen. 4 Press the TRACK 3 REC button. Press the ASSIGN button to TRACK 3 1. Raise ...
Owners Manual
Page 15
... when the TRIM knob is turned down, the mic signal itself is input. Sing your headphones. 2 Use the TRACK 1-3 PAN knobs to make adjustments. 15 TASCAM DP-03SD In this case, move the mic further away from the sound source or lower the volume of the recorded rhythm guitar and lead guitar parts...
... when the TRIM knob is turned down, the mic signal itself is input. Sing your headphones. 2 Use the TRACK 1-3 PAN knobs to make adjustments. 15 TASCAM DP-03SD In this case, move the mic further away from the sound source or lower the volume of the recorded rhythm guitar and lead guitar parts...

Owners Manual
Page 16
..., which is where the mix down will be affected by the equalizer and/or compressor. (See "Using mastering MIXDOWN appears in the upper left . 16 TASCAM DP-03SD NOTE • Mastering mode cannot be started if you have created. NOTE • Confirm that both the EQ and COMP items are not recorded to...
..., which is where the mix down will be affected by the equalizer and/or compressor. (See "Using mastering MIXDOWN appears in the upper left . 16 TASCAM DP-03SD NOTE • Mastering mode cannot be started if you have created. NOTE • Confirm that both the EQ and COMP items are not recorded to...

Owners Manual
Page 17
... the stereo master track with equalization. 3 Use the DATA wheel to select POP ROCK 1 and press the F4 (EXEC) button to return to ON. 17 TASCAM DP-03SD The word OFF at the top left of the entire song. 1 In mastering mode, press the F2 (COMP) button to open the MASTERING COMP screen...
... the stereo master track with equalization. 3 Use the DATA wheel to select POP ROCK 1 and press the F4 (EXEC) button to return to ON. 17 TASCAM DP-03SD The word OFF at the top left of the entire song. 1 In mastering mode, press the F2 (COMP) button to open the MASTERING COMP screen...

Owners Manual
Page 18
..., for example, all recorded data and settings made since the last time the unit was shut down or a song was saved will be recovered. 18 TASCAM DP-03SD When the unit completes its automatic shutdown procedures, which includes recording various information about the operations that have been conducted until PORTASTUDIO appears on the...
..., for example, all recorded data and settings made since the last time the unit was shut down or a song was saved will be recovered. 18 TASCAM DP-03SD When the unit completes its automatic shutdown procedures, which includes recording various information about the operations that have been conducted until PORTASTUDIO appears on the...

Owners Manual
Page 19
... the rear panel. Set it to MIC/LINE when connecting a microphone or line level signal. Set it to INTERNAL MIC B when using builtin MIC B. 19 TASCAM DP-03SD Set it to INTERNAL MIC A when using a condenser microphone that requires phantom power. • Do not supply phantom power to an unbalanced dynamic microphone. •...
... the rear panel. Set it to MIC/LINE when connecting a microphone or line level signal. Set it to INTERNAL MIC B when using builtin MIC B. 19 TASCAM DP-03SD Set it to INTERNAL MIC A when using a condenser microphone that requires phantom power. • Do not supply phantom power to an unbalanced dynamic microphone. •...

Owners Manual
Page 20
... TUNER screen. (See "Tuner" on page 54.) g MIC A This built-in omnidirectional microphone becomes the input source for recording (REC button ON), the REC 20 TASCAM DP-03SD indicator blinks when the unit is armed for INPUT A when set to that track's REC button. t REVERB knobs (TRACK 1-TRACK 8) Use to adjust the level...
... TUNER screen. (See "Tuner" on page 54.) g MIC A This built-in omnidirectional microphone becomes the input source for recording (REC button ON), the REC 20 TASCAM DP-03SD indicator blinks when the unit is armed for INPUT A when set to that track's REC button. t REVERB knobs (TRACK 1-TRACK 8) Use to adjust the level...

Owners Manual
Page 21
...). (See "Locate and search functions" on page 49.) k STOP (ª) button Press to set the playback position at that moment as the TO point. 21 TASCAM DP-03SD z RECORD (º) button/indicator To start recording, press and hold this button to stop playback, recording and searching forward/ backward. Press and hold this button...
...). (See "Locate and search functions" on page 49.) k STOP (ª) button Press to set the playback position at that moment as the TO point. 21 TASCAM DP-03SD z RECORD (º) button/indicator To start recording, press and hold this button to stop playback, recording and searching forward/ backward. Press and hold this button...
