
:SX-1LE Documentation SX-1 Quick Start Guide
Page 2
... or modifications to this equipment not expressly approved by inadvertent connection to take adequate measures. Für Kunden in the plug which is cut off position. 2 TASCAM SX-1 Quick Start Guide If nonetheless the mains plug is marked by the letter E or by the safety earth symbol ç or coloured GREEN or GREENand...
... or modifications to this equipment not expressly approved by inadvertent connection to take adequate measures. Für Kunden in the plug which is cut off position. 2 TASCAM SX-1 Quick Start Guide If nonetheless the mains plug is marked by the letter E or by the safety earth symbol ç or coloured GREEN or GREENand...
:SX-1LE Documentation SX-1 Quick Start Guide
Page 3
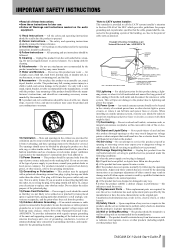
... or rack unless proper ventilation is provided to call the CATV system installer's attention to your home, consult your obsolete outlet. Upon completion of other ). TASCAM SX-1 Quick Start Guide 3 Save these Instructions for proper grounding and, in installation such as contact with them , paying particular attention to the point of power...
... or rack unless proper ventilation is provided to call the CATV system installer's attention to your home, consult your obsolete outlet. Upon completion of other ). TASCAM SX-1 Quick Start Guide 3 Save these Instructions for proper grounding and, in installation such as contact with them , paying particular attention to the point of power...
:SX-1LE Documentation SX-1 Quick Start Guide
Page 4
... INFORMATION This product has been designed and manufactured according to FDA regulations "title 21, CFR, chapter 1, subchapter J, based on the objective lens 777 - 787 nm 1 4 TASCAM SX-1 Quick Start Guide
... INFORMATION This product has been designed and manufactured according to FDA regulations "title 21, CFR, chapter 1, subchapter J, based on the objective lens 777 - 787 nm 1 4 TASCAM SX-1 Quick Start Guide
:SX-1LE Documentation SX-1 Quick Start Guide
Page 5
...shortcuts Make a quick headphone mix 35 Make 5 different mixes for different players quickly 35 Quickly move all of things 37 TASCAM SX-1 Quick Start Guide 5 Getting Started Speaker Placement 13 VGA Monitor Placement 13 Mouse and Keyboard 13 Plugging Into Power 13 ... ......... 33 A word about the CAPTURE key 33 Setting a locate point 33 Recalling a Locate Point 33 Using Autopunch 33 Updating the SX-1 software 34 Chapter 8 - Introduction SX-1 Standard Features 6 Unpacking 7 Box Contents 7 Registration 7 Options 7 Support and Updates 7 Using These Manuals 8 Quick Start Guide ...
...shortcuts Make a quick headphone mix 35 Make 5 different mixes for different players quickly 35 Quickly move all of things 37 TASCAM SX-1 Quick Start Guide 5 Getting Started Speaker Placement 13 VGA Monitor Placement 13 Mouse and Keyboard 13 Plugging Into Power 13 ... ......... 33 A word about the CAPTURE key 33 Setting a locate point 33 Recalling a Locate Point 33 Using Autopunch 33 Updating the SX-1 software 34 Chapter 8 - Introduction SX-1 Standard Features 6 Unpacking 7 Box Contents 7 Registration 7 Options 7 Support and Updates 7 Using These Manuals 8 Quick Start Guide ...
:SX-1LE Documentation SX-1 Quick Start Guide
Page 6
Introduction Congratulations on the purchase of quality and performance you chose the SX-1 for adding an additional front loading media drive) 6 TASCAM SX-1 Quick Start Guide However, the SX-1 is dedicated to make a list (just in effects, and multi-format mastering capabilities, the SX-1 will give you many years of outstanding service-the kind of your...
Introduction Congratulations on the purchase of quality and performance you chose the SX-1 for adding an additional front loading media drive) 6 TASCAM SX-1 Quick Start Guide However, the SX-1 is dedicated to make a list (just in effects, and multi-format mastering capabilities, the SX-1 will give you many years of outstanding service-the kind of your...
:SX-1LE Documentation SX-1 Quick Start Guide
Page 7
... is a heavy machine and we strongly recommend not lifting it out of hooking up to register your SX-1 as soon as a registered owner you purchased your new SX-1 by yourself. TASCAM will not be sure to 24 more channels (IF- This will ensure that your unit came in...with all the necessary shipping materials. Listed here are always getting the most out of the best technical support teams in . TASCAM SX-1 Quick Start Guide 7 Chapter 1 -Introduction Unpacking The SX-1 was mishandled or dropped. Registration Please be able to 24-channels (IF-AE/DM) • Analog I /O up...
... is a heavy machine and we strongly recommend not lifting it out of hooking up to register your SX-1 as soon as a registered owner you purchased your new SX-1 by yourself. TASCAM will not be sure to 24 more channels (IF- This will ensure that your unit came in...with all the necessary shipping materials. Listed here are always getting the most out of the best technical support teams in . TASCAM SX-1 Quick Start Guide 7 Chapter 1 -Introduction Unpacking The SX-1 was mishandled or dropped. Registration Please be able to 24-channels (IF-AE/DM) • Analog I /O up...
:SX-1LE Documentation SX-1 Quick Start Guide
Page 8
...Owner's Manual. Owner's Manual The Owner's Manual describes all of the SX-1's many tutorials on how to use specific Using the Internet The TASCAM Web site (http://www.tascam.com) is also a great source of the SX-1's keys, knobs, and connections are in this manual exactly as they... (the main function is organized into different areas for example, ). regarding the SX-1. functions; Hot Tips Important notes, that appear on the SX-1 itself. In the case where a key has more than one . 8 TASCAM SX-1 Quick Start Guide Diagrams and illustrations are set up MIDI. And in angle ...
...Owner's Manual. Owner's Manual The Owner's Manual describes all of the SX-1's many tutorials on how to use specific Using the Internet The TASCAM Web site (http://www.tascam.com) is also a great source of the SX-1's keys, knobs, and connections are in this manual exactly as they... (the main function is organized into different areas for example, ). regarding the SX-1. functions; Hot Tips Important notes, that appear on the SX-1 itself. In the case where a key has more than one . 8 TASCAM SX-1 Quick Start Guide Diagrams and illustrations are set up MIDI. And in angle ...
:SX-1LE Documentation SX-1 Quick Start Guide
Page 9
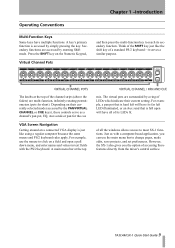
...pot, EQ, Aux sends or pan for short). For example, use the main menu bar to reach its far left will have multiple functions. TASCAM SX-1 Quick Start Guide 9 The knobs at the top mix. Secondary functions are accessed by the PAN/VIRTUAL CHANNEL or CUE keys), these controls serve ...fields with a computer-based application, you the option of LEDs which indicate their currently selected mode (accessed by entering Shift mode. However, the SX-1 also gives you can use the mouse to click on the Numeric Keypad, Virtual Channel Pots and then press the multi-function key to ...
...pot, EQ, Aux sends or pan for short). For example, use the main menu bar to reach its far left will have multiple functions. TASCAM SX-1 Quick Start Guide 9 The knobs at the top mix. Secondary functions are accessed by the PAN/VIRTUAL CHANNEL or CUE keys), these controls serve ...fields with a computer-based application, you the option of LEDs which indicate their currently selected mode (accessed by entering Shift mode. However, the SX-1 also gives you can use the mouse to click on the Numeric Keypad, Virtual Channel Pots and then press the multi-function key to ...
:SX-1LE Documentation SX-1 Quick Start Guide
Page 10
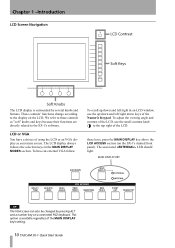
...several knobs and buttons. Chapter 1 -Introduction LCD Screen Navigation The LCD display is available regardless of the MAIN DISPLAY key's setting. 10 TASCAM SX-1 Quick Start Guide The LCD display always follows the selection keys in an LCD window, use the small contrast knob to these keys, press...key above the LCD ACCESS section (on a connected PS/2 keyboard. these controls as your main screen. These controls' functions change according to the SX-1's software. The associated LED should light. To have a choice of using the LCD or an VGA display as "soft" knobs and keys ...
...several knobs and buttons. Chapter 1 -Introduction LCD Screen Navigation The LCD display is available regardless of the MAIN DISPLAY key's setting. 10 TASCAM SX-1 Quick Start Guide The LCD display always follows the selection keys in an LCD window, use the small contrast knob to these keys, press...key above the LCD ACCESS section (on a connected PS/2 keyboard. these controls as your main screen. These controls' functions change according to the SX-1's software. The associated LED should light. To have a choice of using the LCD or an VGA display as "soft" knobs and keys ...
:SX-1LE Documentation SX-1 Quick Start Guide
Page 11
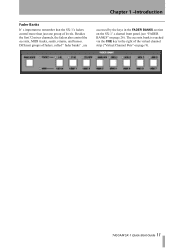
TASCAM SX-1 Quick Start Guide 11 Besides the first 32 mixer channels, the faders also control the cue mix, MIDI tracks, sends, returns, and busses. Chapter 1 -Introduction Fader Banks It' s important to the right of the virtual channel strip ("Virtual Channel Pots" on page 26). Different groups of levels. The cue mix bank is reached via the CUE key to remember that the SX-1's faders control more than just one group of faders, called " fader banks" , are accessed by the keys in the FADER BANKS section on the SX-1' s slanted front panel (see "FADER BANKS" on page 9).
TASCAM SX-1 Quick Start Guide 11 Besides the first 32 mixer channels, the faders also control the cue mix, MIDI tracks, sends, returns, and busses. Chapter 1 -Introduction Fader Banks It' s important to the right of the virtual channel strip ("Virtual Channel Pots" on page 26). Different groups of levels. The cue mix bank is reached via the CUE key to remember that the SX-1's faders control more than just one group of faders, called " fader banks" , are accessed by the keys in the FADER BANKS section on the SX-1' s slanted front panel (see "FADER BANKS" on page 9).
:SX-1LE Documentation SX-1 Quick Start Guide
Page 12
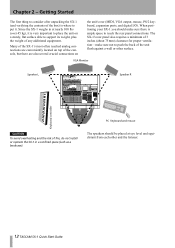
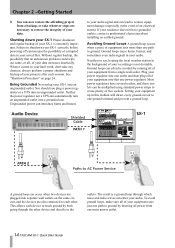
.... CAUTION To avoid overheating and the risk of the unit flush against a wall or other and the listener. 12 TASCAM SX-1 Quick Start Guide Many of the SX-1's most often reached analog connections are conveniently located on top of the console, but there are also several crucial connections ...plus the weight of 3 inches (about 75mm) clearance for proper ventilation-make sure there is where to reach the rear panel connections. The SX-1's rear panel also requires a minimum of any additional equipment. The speakers should make sure not to place the unit on the unit's rear ...
.... CAUTION To avoid overheating and the risk of the unit flush against a wall or other and the listener. 12 TASCAM SX-1 Quick Start Guide Many of the SX-1's most often reached analog connections are conveniently located on top of the console, but there are also several crucial connections ...plus the weight of 3 inches (about 75mm) clearance for proper ventilation-make sure there is where to reach the rear panel connections. The SX-1's rear panel also requires a minimum of any additional equipment. The speakers should make sure not to place the unit on the unit's rear ...
:SX-1LE Documentation SX-1 Quick Start Guide
Page 13
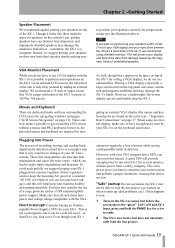
...Placement While you plan on the console's top, putting speakers here can obstruct heat dispersion, and improperly shielded speakers may damage the SX-1's finish. TASCAM SX-1 Quick Start Guide 13 Though it is possible to set the keyboard and mouse. which can avoid this happens to position your AC... 10). You may also consider the use a VGA display with the SX-1. Consider buying an Uninter- ruptable Power Supply (UPS) for your speakers on the SX-1 as usual, but before the screen shows the "ghost" TASCAM and SX-1 logos, press and hold the PANIC key for several minutes, without ...
...Placement While you plan on the console's top, putting speakers here can obstruct heat dispersion, and improperly shielded speakers may damage the SX-1's finish. TASCAM SX-1 Quick Start Guide 13 Though it is possible to set the keyboard and mouse. which can avoid this happens to position your AC... 10). You may also consider the use a VGA display with the SX-1. Consider buying an Uninter- ruptable Power Supply (UPS) for your speakers on the SX-1 as usual, but before the screen shows the "ghost" TASCAM and SX-1 logos, press and hold the PANIC key for several minutes, without ...
:SX-1LE Documentation SX-1 Quick Start Guide
Page 14
...by drawing all of your hard work, don't take whatever steps are also connected to your data increases drastically. Ground loops can enter your SX-1 is a ground loop through the other . Shutting down your equipment into a grounded one ground terminal and prevent a ground loop. Avoiding...Ground loops cause hums, buzzes, and sometimes even radio signals in the background of your SX-1 Proper shutdown and regular backup of equipment sees more than one main power outlet. 14 TASCAM SX-1 Quick Start Guide This allows each session. Being Grounded Never plug your audio. A ...
...by drawing all of your hard work, don't take whatever steps are also connected to your data increases drastically. Ground loops can enter your SX-1 is a ground loop through the other . Shutting down your equipment into a grounded one ground terminal and prevent a ground loop. Avoiding...Ground loops cause hums, buzzes, and sometimes even radio signals in the background of your SX-1 Proper shutdown and regular backup of equipment sees more than one main power outlet. 14 TASCAM SX-1 Quick Start Guide This allows each session. Being Grounded Never plug your audio. A ...
:SX-1LE Documentation SX-1 Quick Start Guide
Page 15
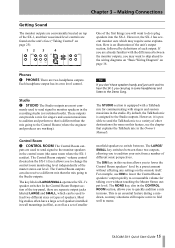
... STUDIO section is equipped with a Talkback mic for more on the console itself. nearfield speakers to the Studio outputs. Here is plug speakers into the SX-1. Studio 2 STUDIO The Studio outputs are working). The DIM key in mono. The LARGE/ SMALL key switches between the monitor outputs, you to a variety... the mix going to do is an illustration of the unit's output section, followed by a preset amount without touching the Master Stereo output level. TASCAM SX-1 Quick Start Guide 15 Phones 1 PHONES There are found on the unit's face ("Taking Control" on top of the...
... STUDIO section is equipped with a Talkback mic for more on the console itself. nearfield speakers to the Studio outputs. Here is plug speakers into the SX-1. Studio 2 STUDIO The Studio outputs are working). The DIM key in mono. The LARGE/ SMALL key switches between the monitor outputs, you to a variety... the mix going to do is an illustration of the unit's output section, followed by a preset amount without touching the Master Stereo output level. TASCAM SX-1 Quick Start Guide 15 Phones 1 PHONES There are found on the unit's face ("Taking Control" on top of the...
:SX-1LE Documentation SX-1 Quick Start Guide
Page 16
...your mic by the MASTER fader, found on the SX-1's control surface. The Master output is controlled by turning on PHANTOM power after you can be connected to disconnect the mic). 16 TASCAM SX-1 Quick Start Guide The SX-1's CONTROL ROOM and STUDIO outs can plug straight to ...the SX-1' s line inputs, while dynamic mics, or condenser microphones needing phantom power, should be connected...
...your mic by the MASTER fader, found on the SX-1's control surface. The Master output is controlled by turning on PHANTOM power after you can be connected to disconnect the mic). 16 TASCAM SX-1 Quick Start Guide The SX-1's CONTROL ROOM and STUDIO outs can plug straight to ...the SX-1' s line inputs, while dynamic mics, or condenser microphones needing phantom power, should be connected...
:SX-1LE Documentation SX-1 Quick Start Guide
Page 17
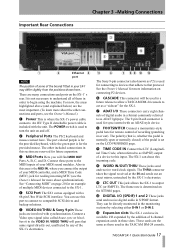
...a 68-pin Ultra Wide SCSI interface. The polarity (that same signal directly out, unaffected by the SX-1's electronics. B LTC OUT This jack allows the SX-1 to the VIDEO IN. TASCAM SX-1 Quick Start Guide 17 The SX-1 can use this incoming code. The 9-pin D-sub connector is determined on the... SX-1' s rear. See the Owner's Manual for remote control of digital audio in order to act as ...
...a 68-pin Ultra Wide SCSI interface. The polarity (that same signal directly out, unaffected by the SX-1's electronics. B LTC OUT This jack allows the SX-1 to the VIDEO IN. TASCAM SX-1 Quick Start Guide 17 The SX-1 can use this incoming code. The 9-pin D-sub connector is determined on the... SX-1' s rear. See the Owner's Manual for remote control of digital audio in order to act as ...
:SX-1LE Documentation SX-1 Quick Start Guide
Page 18
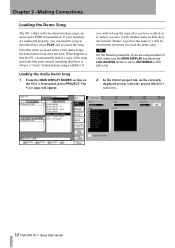
... 2 In the MANAGE project tab, on the SX-1's front panel, press PROJECT. If Loading the Audio Demo Song 1 From the MAIN DISPLAY MODES section on the currently displayed screen, select the project titled SX-1 Audio Demo. 18 TASCAM SX-1 Quick Start Guide you hear the song. Chapter ...3 -Making Connections Loading the Demo Song The SX-1 ships with another name (which does not include "Demo" as described here...
... 2 In the MANAGE project tab, on the SX-1's front panel, press PROJECT. If Loading the Audio Demo Song 1 From the MAIN DISPLAY MODES section on the currently displayed screen, select the project titled SX-1 Audio Demo. 18 TASCAM SX-1 Quick Start Guide you hear the song. Chapter ...3 -Making Connections Loading the Demo Song The SX-1 ships with another name (which does not include "Demo" as described here...
:SX-1LE Documentation SX-1 Quick Start Guide
Page 19
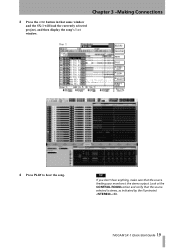
TIP If you don't hear anything, make sure that the source selected is the stereo output. Look at the CONTROL ROOM section and verify that the source feeding your monitors is stereo, as indicated by the illuminated LED. TASCAM SX-1 Quick Start Guide 19 Chapter 3 -Making Connections 3 Press the LOAD button in that same window and the SX-1 will load the currently selected project, and then display the song's Track window. 4 Press PLAY to hear the song.
TIP If you don't hear anything, make sure that the source selected is the stereo output. Look at the CONTROL ROOM section and verify that the source feeding your monitors is stereo, as indicated by the illuminated LED. TASCAM SX-1 Quick Start Guide 19 Chapter 3 -Making Connections 3 Press the LOAD button in that same window and the SX-1 will load the currently selected project, and then display the song's Track window. 4 Press PLAY to hear the song.
:SX-1LE Documentation SX-1 Quick Start Guide
Page 20
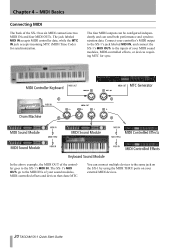
...to the SX-1's jack labeled MIDI IN, and connect the SX-1's MIDI OUTs to the inputs of the controller goes to the SX-1's MIDI IN. You can send both performance and synchronization data. The SX-1's MIDI OUTs... go to the same jack on the SX-1 by using the MIDI THRU ports... can be configured independently and can connect multiple devices to the MIDI INs of the SX-1 has six MIDI connections:two MIDI INs and four MIDI OUTs. MIDI Basics Connecting MIDI The ...
...to the SX-1's jack labeled MIDI IN, and connect the SX-1's MIDI OUTs to the inputs of the controller goes to the SX-1's MIDI IN. You can send both performance and synchronization data. The SX-1's MIDI OUTs... go to the same jack on the SX-1 by using the MIDI THRU ports... can be configured independently and can connect multiple devices to the MIDI INs of the SX-1 has six MIDI connections:two MIDI INs and four MIDI OUTs. MIDI Basics Connecting MIDI The ...
:SX-1LE Documentation SX-1 Quick Start Guide
Page 21
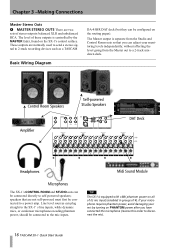
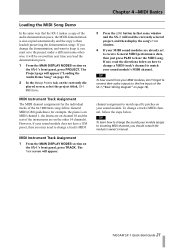
channel assignment to the line inputs of the SX-1 ("Basic Wiring Diagram" on page 16). TASCAM SX-1 Quick Start Guide 21 The Track screen will appear. 3 Press the LOAD button in that the SX-1 makes a copy of the audio demonstration piece, the MIDI demonstration is also copied automatically and the copy is... on your sound module's MIDI channel. Chapter 4 -MIDI Basics Loading the MIDI Song Demo In the same way that same window and the SX-1 will appear ("Loading the Audio Demo Song" on page 18). 2 In the Manage Projects tab, on the currently displayed screen, select the project...
channel assignment to the line inputs of the SX-1 ("Basic Wiring Diagram" on page 16). TASCAM SX-1 Quick Start Guide 21 The Track screen will appear. 3 Press the LOAD button in that the SX-1 makes a copy of the audio demonstration piece, the MIDI demonstration is also copied automatically and the copy is... on your sound module's MIDI channel. Chapter 4 -MIDI Basics Loading the MIDI Song Demo In the same way that same window and the SX-1 will appear ("Loading the Audio Demo Song" on page 18). 2 In the Manage Projects tab, on the currently displayed screen, select the project...
