
Owners Manual
Page 1
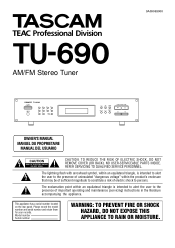
...TU-690 AM/FM Stereo Tuner OWNER'S MANUAL MANUEL DU PROPRIETAIRE MANUAL DEL USUARIO Ü CAUTION: TO REDUCE THE RISK OF ELECTRIC SHOCK, DO NOT REMOVE COVER (OR BACK). Model number Serial number WARNING: TO PREVENT FIRE OR SHOCK HAZARD, DO NOT EXPOSE THIS APPLIANCE TO RAIN OR MOISTURE. NO USER-SERVICEABLE PARTS INSIDE. Please record the model number and serial number... is intended to alert the user to the presence of important operating and maintenance (servicing) instructions in the literature accompanying the appliance. This appliance has a serial number located on the rear panel.
...TU-690 AM/FM Stereo Tuner OWNER'S MANUAL MANUEL DU PROPRIETAIRE MANUAL DEL USUARIO Ü CAUTION: TO REDUCE THE RISK OF ELECTRIC SHOCK, DO NOT REMOVE COVER (OR BACK). Model number Serial number WARNING: TO PREVENT FIRE OR SHOCK HAZARD, DO NOT EXPOSE THIS APPLIANCE TO RAIN OR MOISTURE. NO USER-SERVICEABLE PARTS INSIDE. Please record the model number and serial number... is intended to alert the user to the presence of important operating and maintenance (servicing) instructions in the literature accompanying the appliance. This appliance has a serial number located on the rear panel.
Owners Manual
Page 2
... POWER CORD CONNECTION CAUTION: TO PREVENT ELECTRIC SHOCK, MATCH WIDE BLADE OF PLUG TO WIDE SLOT, FULLY INSERT. If necessary, consult the dealer or an experienced radio/TV technician for a Class B digital device, pursuant to operate this equipment not expressly approved by one or more of the FCC Rules. This device generates and uses radio frequency energy and if not installed...
... POWER CORD CONNECTION CAUTION: TO PREVENT ELECTRIC SHOCK, MATCH WIDE BLADE OF PLUG TO WIDE SLOT, FULLY INSERT. If necessary, consult the dealer or an experienced radio/TV technician for a Class B digital device, pursuant to operate this equipment not expressly approved by one or more of the FCC Rules. This device generates and uses radio frequency energy and if not installed...
Owners Manual
Page 3
... mast and supporting structure, grounding of the leadin wire to an antenna discharge unit, size of grounding conductors, location of antenna-discharge unit, connection to determine that produce heat. 3 Article 810 of the National Electrical Code, ANSI/NFPA 70, provides information with a polarized alternating-current line plug (a plug having one way. Example of the polarized plug. 13) Power-Cord Protection - This will...
... mast and supporting structure, grounding of the leadin wire to an antenna discharge unit, size of grounding conductors, location of antenna-discharge unit, connection to determine that produce heat. 3 Article 810 of the National Electrical Code, ANSI/NFPA 70, provides information with a polarized alternating-current line plug (a plug having one way. Example of the polarized plug. 13) Power-Cord Protection - This will...
Owners Manual
Page 4
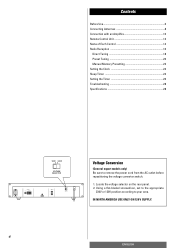
... according to remove the power cord from the AC outlet before repositioning the voltage converter switch. 1. Contents Before Use 6 Connecting Antennas 8 Connection with an Amplifire 10 Remote Control Unit 12 Name of Each Control 14 Radio Reception 16 Direct Tuning 18 Preset Tuning 20 Manual Memory Presetting 22 Setting the Clock 24 Sleep Timer 24 Setting the Timer 26 Troubleshooting 28 Specifications 28 Voltage Conversion (General export models only) Be sure to...
... according to remove the power cord from the AC outlet before repositioning the voltage converter switch. 1. Contents Before Use 6 Connecting Antennas 8 Connection with an Amplifire 10 Remote Control Unit 12 Name of Each Control 14 Radio Reception 16 Direct Tuning 18 Preset Tuning 20 Manual Memory Presetting 22 Setting the Clock 24 Sleep Timer 24 Setting the Timer 26 Troubleshooting 28 Specifications 28 Voltage Conversion (General export models only) Be sure to...
Owners Manual
Page 6
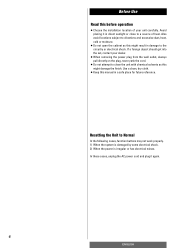
... set, contact your unit carefully. Before Use Read this before operation < Choose the installation location of heat. Avoid placing it again. 6 ENGLISH Resetting the Unit to a source of your dealer. < When removing the power plug from the wall outlet, always pull directly on the plug, never yank the cord. < Do not attempt to clean the unit with chemical solvents as this manual...
... set, contact your unit carefully. Before Use Read this before operation < Choose the installation location of heat. Avoid placing it again. 6 ENGLISH Resetting the Unit to a source of your dealer. < When removing the power plug from the wall outlet, always pull directly on the plug, never yank the cord. < Do not attempt to clean the unit with chemical solvents as this manual...

Owners Manual
Page 8
...tuner via the supplied matching transformer. (No need for the best possible reception. If you are weak, it to the provided matching transformer, as shown. After completing connection, plug the transformer into a "T" shape and connect the two wires at the base of the "T" and fix with thumb tacks, or the like, to use an outdoor antenna with strong FM signals...(75Ω) FM Outdoor Antenna In an area where FM signals are using a 300-ohm antenna, connect it will be necessary to a wall or window frame for it in connecting a 75-ohm antenna.) Matching Transformer(provided) Transformateur...
...tuner via the supplied matching transformer. (No need for the best possible reception. If you are weak, it to the provided matching transformer, as shown. After completing connection, plug the transformer into a "T" shape and connect the two wires at the base of the "T" and fix with thumb tacks, or the like, to use an outdoor antenna with strong FM signals...(75Ω) FM Outdoor Antenna In an area where FM signals are using a 300-ohm antenna, connect it will be necessary to a wall or window frame for it in connecting a 75-ohm antenna.) Matching Transformer(provided) Transformateur...
Owners Manual
Page 10
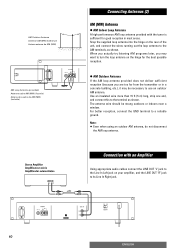
...) (incluida) Connecting Antennas (2) AM (MW) Antenna > AM Indoor Loop Antenna A high-performance AM loop antenna provided with an Amplifier Using appropriate audio cables connect the LINE OUT "L" jack to the Line In Left jack on your amplifier, and the LINE OUT "R" jack to its Line In Right jack. 10 ENGLISH Snap the supplied loop antenna into the hinge on the rear of the unit, and connect the wires running...
...) (incluida) Connecting Antennas (2) AM (MW) Antenna > AM Indoor Loop Antenna A high-performance AM loop antenna provided with an Amplifier Using appropriate audio cables connect the LINE OUT "L" jack to the Line In Left jack on your amplifier, and the LINE OUT "R" jack to its Line In Right jack. 10 ENGLISH Snap the supplied loop antenna into the hinge on the rear of the unit, and connect the wires running...
Owners Manual
Page 12
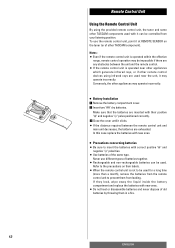
... if other remote control devices using the provided remote control unit, the tuner and some other TASCAM components used . Never use the remote control unit, point it may operate incorrectly. Make sure that the batteries are exhausted. To use different types of old batteries by throwing them from your listening position. Notes: < Even if the remote control unit is operated within the effective range, remote control operation may operate incorrectly. < Battery Installation 1 Remove...
... if other remote control devices using the provided remote control unit, the tuner and some other TASCAM components used . Never use the remote control unit, point it may operate incorrectly. Make sure that the batteries are exhausted. To use different types of old batteries by throwing them from your listening position. Notes: < Even if the remote control unit is operated within the effective range, remote control operation may operate incorrectly. < Battery Installation 1 Remove...
Owners Manual
Page 14
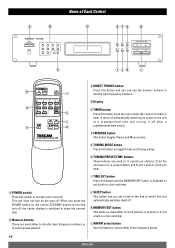
... to turn all the way off. jSLEEP button This button lets you can use the numeric buttons to select preset stations. and 3) set a built-in clock and timer. When you press the POWER switch (or the remote STANDBY button) to a preset station; bNumeric buttons These are used either to directly input frequency numbers or to directly input frequency numbers. kMEMORY/SET button This button is available to select either of automatically switching on and off after a predetermined time period. d Display eTIMER button Press this button...
... to turn all the way off. jSLEEP button This button lets you can use the numeric buttons to select preset stations. and 3) set a built-in clock and timer. When you press the POWER switch (or the remote STANDBY button) to a preset station; bNumeric buttons These are used either to directly input frequency numbers or to directly input frequency numbers. kMEMORY/SET button This button is available to select either of automatically switching on and off after a predetermined time period. d Display eTIMER button Press this button...
Owners Manual
Page 16
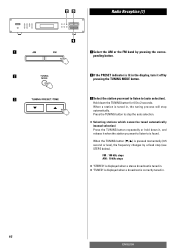
... the display, turn it when the station you want to listen to 2 seconds. When a station is correctly tuned in , the tuning process will stop the auto selection. < Selecting stations which cannot be tuned automatically (manual selection) Press the TUNING button repeatedly or hold down the TUNING button for 0.5 to is found. When the TUNING button (¶/§) is pressed momentarily (0.5 second or less), the frequency changes by pressing the TUNING MODE button. 3 Select the station you...
... the display, turn it when the station you want to listen to 2 seconds. When a station is correctly tuned in , the tuning process will stop the auto selection. < Selecting stations which cannot be tuned automatically (manual selection) Press the TUNING button repeatedly or hold down the TUNING button for 0.5 to is found. When the TUNING button (¶/§) is pressed momentarily (0.5 second or less), the frequency changes by pressing the TUNING MODE button. 3 Select the station you...
Owners Manual
Page 18
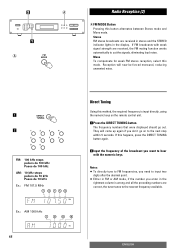
... required frequency is wrong and all the preceding numbers are received in stereo and the STEREO indicator lights in FM or AM mode, if the number you don't go out. The frequency numbers that were displayed should go on the remote control unit. 1 Press the DIRECT TUNING button. ... stereo reception, select this button alternates between Stereo mode and Mono mode. Direct Tuning Using this happens, press the DIRECT TUNING button again. 2 Input the frequency of the broadcast you want to cut the signals, eliminating loud noise. Stereo FM stereo broadcasts are correct, the tuner tunes ...
... required frequency is wrong and all the preceding numbers are received in stereo and the STEREO indicator lights in FM or AM mode, if the number you don't go out. The frequency numbers that were displayed should go on the remote control unit. 1 Press the DIRECT TUNING button. ... stereo reception, select this button alternates between Stereo mode and Mono mode. Direct Tuning Using this happens, press the DIRECT TUNING button again. 2 Input the frequency of the broadcast you want to cut the signals, eliminating loud noise. Stereo FM stereo broadcasts are correct, the tuner tunes ...
Owners Manual
Page 20
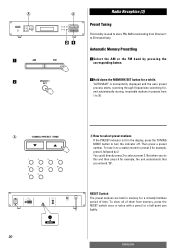
... frequencies searching for, and automatically storing, receivable stations in presets from 1 to select preset 2. RESET Switch The preset stations are held in the display, press the TUNING MODE button to turn the indicator off. You could directly press 2 to 30. a 1 2 a 20 a Radio Reception (3) Preset Tuning This facility is used to store FM, AM broadcasting from Channel 1 to a station stored in preset 2 for example, press 0, followed by pressing the corresponding button. 2 Hold down the MEMORY/SET button...
... frequencies searching for, and automatically storing, receivable stations in presets from 1 to select preset 2. RESET Switch The preset stations are held in the display, press the TUNING MODE button to turn the indicator off. You could directly press 2 to 30. a 1 2 a 20 a Radio Reception (3) Preset Tuning This facility is used to store FM, AM broadcasting from Channel 1 to a station stored in preset 2 for example, press 0, followed by pressing the corresponding button. 2 Hold down the MEMORY/SET button...
Owners Manual
Page 22
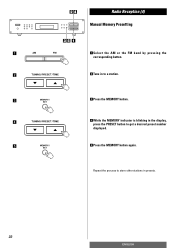
1 2 3 4 5 22 Radio Reception (4) Manual Memory Presetting 1Select the AM or the FM band by pressing the corresponding button. 2 Tune in to a station. 3 Press the MEMORY button. 4 While the MEMORY indicator is blinking in the display, press the PRESET button to store other stations in presets. ENGLISH Repeat the process to get a desired preset number displayed. 5 Press the MEMORY button again.
1 2 3 4 5 22 Radio Reception (4) Manual Memory Presetting 1Select the AM or the FM band by pressing the corresponding button. 2 Tune in to a station. 3 Press the MEMORY button. 4 While the MEMORY indicator is blinking in the display, press the PRESET button to store other stations in presets. ENGLISH Repeat the process to get a desired preset number displayed. 5 Press the MEMORY button again.
Owners Manual
Page 24
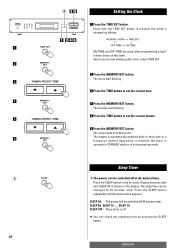
Every time the TIME SET button is pressed, the mode is changed by pressing the SLEEP button. The hours start blinking. 5 Press the TIME button to set the current hour. 4 Press the MEMORY/SET button. Press the SLEEP button in its powered-up the clock, select TIME SET. 2 Press the MEMORY/SET button. The display is currently in STANDBY mode or in the on this later). ENGLISH Since you are used when programming a builtin timer (more...
Every time the TIME SET button is pressed, the mode is changed by pressing the SLEEP button. The hours start blinking. 5 Press the TIME button to set the current hour. 4 Press the MEMORY/SET button. Press the SLEEP button in its powered-up the clock, select TIME SET. 2 Press the MEMORY/SET button. The display is currently in STANDBY mode or in the on this later). ENGLISH Since you are used when programming a builtin timer (more...
Owners Manual
Page 26
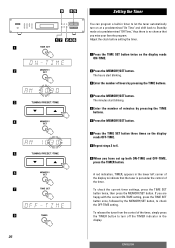
... control of the display to indicate that the tuner is no chance that you have set up both ON-TIME and OFF-TIME, press the TIMER button. The minutes start blinking. 3 Enter the number of the timer. The hours start blinking. 5Enter the number of minutes by the MEMORY/SET button, to turn on at a predetermined "On Time" and shift back to Standby mode at a predetermined "Off Time...
... control of the display to indicate that the tuner is no chance that you have set up both ON-TIME and OFF-TIME, press the TIMER button. The minutes start blinking. 3 Enter the number of the timer. The hours start blinking. 5Enter the number of minutes by the MEMORY/SET button, to turn on at a predetermined "On Time" and shift back to Standby mode at a predetermined "Off Time...
Owners Manual
Page 28
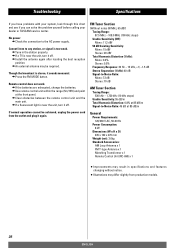
... between the remote control unit and the main unit. Troubleshooting Specifications If you have problems with your system, look through this chart and see if you can solve the problem yourself before calling your dealer or TASCAM service center. ePress the FM MODE button. No power eCheck the connection to -Noise Ratio: 45 dB at the front panel. eUse remote control unit within the range (5m/15ft...
... between the remote control unit and the main unit. Troubleshooting Specifications If you have problems with your system, look through this chart and see if you can solve the problem yourself before calling your dealer or TASCAM service center. ePress the FM MODE button. No power eCheck the connection to -Noise Ratio: 45 dB at the front panel. eUse remote control unit within the range (5m/15ft...

Owners Manual
Page 32
... 280 William Street Melbourne, Victoria 3000, Australia Phone: (03) 9672-2400 Printed in Taiwan . De C.V TEAC UK LIMITED TEAC DEUTSCHLAND GmbH TEAC FRANCE S.A. WD18 8TE, U.K. TU-690 TEAC CORPORATION TEAC AMERICA, INC. TEAC CANADA LTD. TEAC MEXICO, S.A. A.B.N. 80 005 408 462 3-7-3, Nakacho, Musashino-shi, Tokyo 180-8550, Japan Phone: (0422) 52-5082...
... 280 William Street Melbourne, Victoria 3000, Australia Phone: (03) 9672-2400 Printed in Taiwan . De C.V TEAC UK LIMITED TEAC DEUTSCHLAND GmbH TEAC FRANCE S.A. WD18 8TE, U.K. TU-690 TEAC CORPORATION TEAC AMERICA, INC. TEAC CANADA LTD. TEAC MEXICO, S.A. A.B.N. 80 005 408 462 3-7-3, Nakacho, Musashino-shi, Tokyo 180-8550, Japan Phone: (0422) 52-5082...
Technical Documentation
Page 1
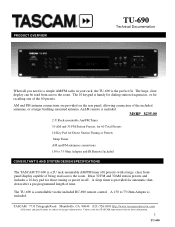
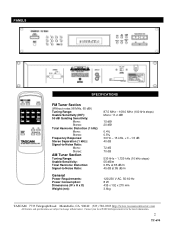
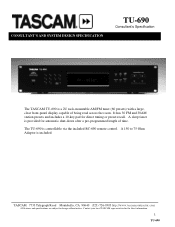
... RC-690 remote control. MSRP $235.00 2-U Rack-mountable Am/FM Tuner 30 AM and 30 FM Station Presets, for 60 Total Presets 10-Key Pad for Direct Station Tuning or Presets Sleep Timer AM and FM antennae connections 150 to 75 Ohm Adapter and IR Remote Included CONSULTANT'S AND SYSTEM DESIGN SPECIFICATIONS The TASCAM TU-690 is a 2U rack-mountable AM/FM tuner (60 presets) with a large, clear frontpanel display capable...
... RC-690 remote control. MSRP $235.00 2-U Rack-mountable Am/FM Tuner 30 AM and 30 FM Station Presets, for 60 Total Presets 10-Key Pad for Direct Station Tuning or Presets Sleep Timer AM and FM antennae connections 150 to 75 Ohm Adapter and IR Remote Included CONSULTANT'S AND SYSTEM DESIGN SPECIFICATIONS The TASCAM TU-690 is a 2U rack-mountable AM/FM tuner (60 presets) with a large, clear frontpanel display capable...
Technical Documentation
Page 2
PANELS SPECIFICATIONS FM Tuner Section (Without notes 98 MHz, 65 dBf) Tuning Range: Usable Sensitivity (IHF): 50 dB Quieting Sensitivity: Mono: Stereo: Total Harmonic Distortion (1 kHz): Mono: Stereo: Frequency Response: Stereo Separation (1 kHz): Signal-to-Noise Ratio: Mono: Stereo: AM Tuner Section Tuning Range: Usable Sensitivity: Total Harmonic Distortion: Signal-to-Noise Ratio: General Power Requirements: Power Consumption: Dimensions (W x H x D) Weight (net): 87.5 MHz - 108.0 MHz (100 kHz steps...
PANELS SPECIFICATIONS FM Tuner Section (Without notes 98 MHz, 65 dBf) Tuning Range: Usable Sensitivity (IHF): 50 dB Quieting Sensitivity: Mono: Stereo: Total Harmonic Distortion (1 kHz): Mono: Stereo: Frequency Response: Stereo Separation (1 kHz): Signal-to-Noise Ratio: Mono: Stereo: AM Tuner Section Tuning Range: Usable Sensitivity: Total Harmonic Distortion: Signal-to-Noise Ratio: General Power Requirements: Power Consumption: Dimensions (W x H x D) Weight (net): 87.5 MHz - 108.0 MHz (100 kHz steps...
Design Specification
Page 1
... latest information. 1 TU-690 TASCAM 7733 Telegraph Road Montebello, CA 90640 (323) 726-0303 http://www.tascamcontractor.com All features and specifications are subject to 75 Ohm Adaptor is controllable via the included RC-690 remote control. A sleep timer is a 2U rack-mountable AM/FM tuner (60 presets) with a large, clear front-panel display capable of time. The TU-690 is included. A 150 to change without notice.
... latest information. 1 TU-690 TASCAM 7733 Telegraph Road Montebello, CA 90640 (323) 726-0303 http://www.tascamcontractor.com All features and specifications are subject to 75 Ohm Adaptor is controllable via the included RC-690 remote control. A sleep timer is a 2U rack-mountable AM/FM tuner (60 presets) with a large, clear front-panel display capable of time. The TU-690 is included. A 150 to change without notice.