

Owners Manual
Page 4
...PARENTAL (Parental control) Settings (Password Setup 41 PASSWORD MODE PASSWORD Listening to the DAB Radio 42 Display Setting of the DAB 43 Using the DAB Menu 44 Listening to the FM Radio 47 Preset Tuning (DAB/FM 48 RDS (Display Setting of the FM 49 Listening to an External Source...to an USB Memory Device 25 On-screen Menu 25 Basic Operations for a Disc and USB Memory Device 27 Skipping Playback 28 Searching for choosing TEAC. Before Use 5 Connecting Antennas 5 Speaker Connection 7 Connection to a TV 8 Connection to Audio Equipments etc 10 Remote Control Unit 11 Identifying the...
...PARENTAL (Parental control) Settings (Password Setup 41 PASSWORD MODE PASSWORD Listening to the DAB Radio 42 Display Setting of the DAB 43 Using the DAB Menu 44 Listening to the FM Radio 47 Preset Tuning (DAB/FM 48 RDS (Display Setting of the FM 49 Listening to an External Source...to an USB Memory Device 25 On-screen Menu 25 Basic Operations for a Disc and USB Memory Device 27 Skipping Playback 28 Searching for choosing TEAC. Before Use 5 Connecting Antennas 5 Speaker Connection 7 Connection to a TV 8 Connection to Audio Equipments etc 10 Remote Control Unit 11 Identifying the...
Owners Manual
Page 5
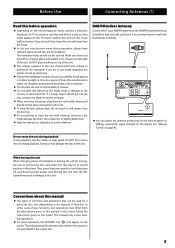
... the screen. Do NOT lift or move the unit during playback During playback, the disc rotates at least 5 cm of space on each side of DAB by a television broadcast, if a TV is turned on near this unit while it is not permitted for future reference. When moving , be covered. Moving this... player. This indicates that disc. Neither this unit nor the TV are in this manual is also on, lines might result in damage to the DAB/FM antenna terminal. If a foreign object should not be sure to remove the disc and return the disc tray to clean the unit with the...
... the screen. Do NOT lift or move the unit during playback During playback, the disc rotates at least 5 cm of space on each side of DAB by a television broadcast, if a TV is turned on near this unit while it is not permitted for future reference. When moving , be covered. Moving this... player. This indicates that disc. Neither this unit nor the TV are in this manual is also on, lines might result in damage to the DAB/FM antenna terminal. If a foreign object should not be sure to remove the disc and return the disc tray to clean the unit with the...

Owners Manual
Page 6
...change the plug on your TV/FM antenna to an F type, and it may be necessary to use one with 5 or more elements. < Disconnect the DAB/FM indoor antenna when using an outdoor antenna. < It is directional and has high gain. This type of antenna is omni directional and should increase... an FM antenna to . Connecting Antennas (2) FM Outdoor Antenna In an area where FM signals are weak, it will be necessary to use an outdoor DAB antenna. This may also be necessary to use a 75 Ω unbalanced-type outdoor FM antenna. Generally, a 3-element antenna will be necessary to use a signal ...
...change the plug on your TV/FM antenna to an F type, and it may be necessary to use one with 5 or more elements. < Disconnect the DAB/FM indoor antenna when using an outdoor antenna. < It is directional and has high gain. This type of antenna is omni directional and should increase... an FM antenna to . Connecting Antennas (2) FM Outdoor Antenna In an area where FM signals are weak, it will be necessary to use an outdoor DAB antenna. This may also be necessary to use a 75 Ω unbalanced-type outdoor FM antenna. Generally, a 3-element antenna will be necessary to use a signal ...
Owners Manual
Page 13
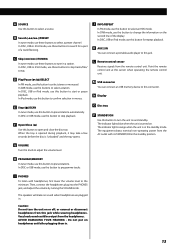
...to confirm selection in a station. Then, connect the headphones plug into the PHONES jack, and adjust the volume by turning the VOLUME knob. In DAB mode, use this button to change the information on or off, or connect or disconnect headphones from the AC outlet with headphones, first lower the... (.//)/TUNING In tuner mode, use these buttons to stop playback. In DISC, USB or iPod mode, use these buttons to search for repeat playback. In DAB mode, use this buttons to the minimum. In DISC or USB mode, use this button to select a preset channel. K AUX 2 IN You can...
...to confirm selection in a station. Then, connect the headphones plug into the PHONES jack, and adjust the volume by turning the VOLUME knob. In DAB mode, use this button to change the information on or off, or connect or disconnect headphones from the AC outlet with headphones, first lower the... (.//)/TUNING In tuner mode, use these buttons to stop playback. In DISC, USB or iPod mode, use these buttons to search for repeat playback. In DAB mode, use this buttons to the minimum. In DISC or USB mode, use this button to select a preset channel. K AUX 2 IN You can...
Owners Manual
Page 14
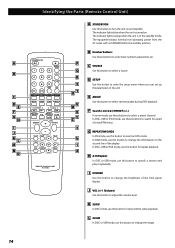
... Use this button to change the information on . In DISC, USB or iPod mode, use these buttons to search for slow motion video playback. In DAB mode, use this button to specify a section and play it repeatedly. The indicator lights orange when the unit is turned on the second line of...
... Use this button to change the information on . In DISC, USB or iPod mode, use these buttons to search for slow motion video playback. In DAB mode, use this button to specify a section and play it repeatedly. The indicator lights orange when the unit is turned on the second line of...

Owners Manual
Page 15
... playback. U TIME Use this button to confirm selections. Associated controls on -screen menus and the Enter button to open and close the disc tray. In DAB mode, use this button to set the sleep timer. In the standby mode, use this button to preset stations. d MENU In DISC mode, use this...
... playback. U TIME Use this button to confirm selections. Associated controls on -screen menus and the Enter button to open and close the disc tray. In DAB mode, use this button to set the sleep timer. In the standby mode, use this button to preset stations. d MENU In DISC mode, use this...
Owners Manual
Page 19
... button is pressed for 30 seconds, the time setting mode will be automatically adjusted according to the time data from an RDS/DAB station. No matter which RDS/DAB mode is selected, the unit receives time data and adjusts the clock. The "minute" value starts blinking. Setting the Clock ...the Volume buttons (+ or -) to turn on the display, press the CLOCK button again. If you tune in an RDS/DAB station broadcasting incorrect time data, the clock might be cancelled. RDS/DAB Sync Off Select this to set the current minute. 2 Press the CLOCK button. 6 Press the CLOCK button. < If ...
... button is pressed for 30 seconds, the time setting mode will be automatically adjusted according to the time data from an RDS/DAB station. No matter which RDS/DAB mode is selected, the unit receives time data and adjusts the clock. The "minute" value starts blinking. Setting the Clock ...the Volume buttons (+ or -) to turn on the display, press the CLOCK button again. If you tune in an RDS/DAB station broadcasting incorrect time data, the clock might be cancelled. RDS/DAB Sync Off Select this to set the current minute. 2 Press the CLOCK button. 6 Press the CLOCK button. < If ...
Owners Manual
Page 20
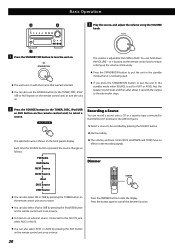
...time the SOURCE button is shown on the front panel's display. Start recording. The selected source is pressed, the source changes as follows: FM Radio DAB Radio AUX1 Source AUX2 Source iPod DISC Source USB Source < The volume, and tone control (DVS, LOUDNESS and TONE) have no effect on the ... select iPod or USB by pressing the AUX button on the remote control unit once or twice. 20 Dimmer < You can also select FM or DAB by pressing the SOURCE button. 2. Press the DIMMER button to MAX. Select a source to the DIGITAL OUT terminal or the LINE OUT jacks. 1. Recording a...
...time the SOURCE button is shown on the front panel's display. Start recording. The selected source is pressed, the source changes as follows: FM Radio DAB Radio AUX1 Source AUX2 Source iPod DISC Source USB Source < The volume, and tone control (DVS, LOUDNESS and TONE) have no effect on the ... select iPod or USB by pressing the AUX button on the remote control unit once or twice. 20 Dimmer < You can also select FM or DAB by pressing the SOURCE button. 2. Press the DIMMER button to MAX. Select a source to the DIGITAL OUT terminal or the LINE OUT jacks. 1. Recording a...
Owners Manual
Page 42
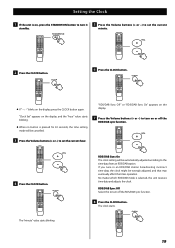
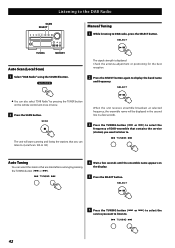
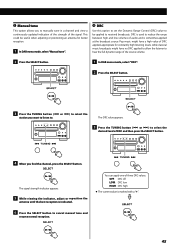
...: 10A to display the band name and frequency. < You can select the stations that contains the service (station) you want to listen to DAB radio, press the SELECT button. The unit will be displayed in the second line in a few seconds until the ensemble name appears on the ...remote control unit once or twice. 2 Press the SCAN button. Listening to the DAB Radio SCAN SELECT Manual Tuning 1 While listening to . or /). 4 Wait a few seconds. 3 Press the TUNING button (. Check the antenna adjustment or ...
...: 10A to display the band name and frequency. < You can select the stations that contains the service (station) you want to listen to DAB radio, press the SELECT button. The unit will be displayed in the second line in a few seconds until the ensemble name appears on the ...remote control unit once or twice. 2 Press the SCAN button. Listening to the DAB Radio SCAN SELECT Manual Tuning 1 While listening to . or /). 4 Wait a few seconds. 3 Press the TUNING button (. Check the antenna adjustment or ...
Owners Manual
Page 43
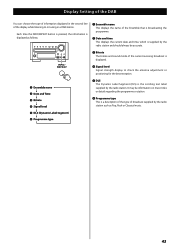
... can choose the type of information displayed in a DAB station. Each time the INFO/REPEAT button is pressed, the information is displayed as follows: 1 Ensemble name This displays the name of the Ensemble that ...
... can choose the type of information displayed in a DAB station. Each time the INFO/REPEAT button is pressed, the information is displayed as follows: 1 Ensemble name This displays the name of the Ensemble that ...
Owners Manual
Page 44
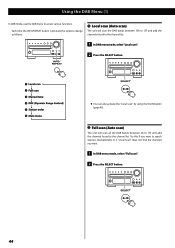
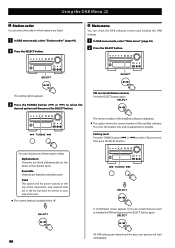
.../REPEAT button is pressed, the options change as follows: 1 Local scan (Auto scan) The unit will scan the DAB bands between 10A to 13F and add the channels found to the channel list. 1 In DAB menu mode, select "Local scan". 2 Press the SELECT button. < You can also activate the "Local scan" by... SCAN button (page 42). 2 Full scan (Auto scan) The unit will scan all the DAB bands between 5A to 13F and add the channels found to access various functions. Using the DAB Menu (1) In DAB mode, use the DAB menu to the channel list. Try this If you want to search stations internationally or...
.../REPEAT button is pressed, the options change as follows: 1 Local scan (Auto scan) The unit will scan the DAB bands between 10A to 13F and add the channels found to the channel list. 1 In DAB menu mode, select "Local scan". 2 Press the SELECT button. < You can also activate the "Local scan" by... SCAN button (page 42). 2 Full scan (Auto scan) The unit will scan all the DAB bands between 5A to 13F and add the channels found to access various functions. Using the DAB Menu (1) In DAB mode, use the DAB menu to the channel list. Try this If you want to search stations internationally or...
Owners Manual
Page 45
... one of the signal. DRC is used to reduce the range between high and low volumes of the source volume. 2 Press the SELECT button. 1 In DAB menu mode, select "DRC". 2 Press the SELECT button. 3 Press the TUNING button (. The signal strength indicator appears. 5 While viewing the indicator, adjust ...applied to cancel manual tune and resume normal reception. 45 Pop music might have a high value of DRC applied, appropriate for better reception. 1 In DAB menu mode, select "Manual tune". 4 DRC Use this option to set the Dynamic Range Control (DRC) value to be useful when adjusting or ...
... one of the signal. DRC is used to reduce the range between high and low volumes of the source volume. 2 Press the SELECT button. 1 In DAB menu mode, select "DRC". 2 Press the SELECT button. 3 Press the TUNING button (. The signal strength indicator appears. 5 While viewing the indicator, adjust ...applied to cancel manual tune and resume normal reception. 45 Pop music might have a high value of DRC applied, appropriate for better reception. 1 In DAB menu mode, select "Manual tune". 4 DRC Use this option to set the Dynamic Range Control (DRC) value to be useful when adjusting or ...
Owners Manual
Page 46
.../) to select the desired option and then press the SELECT button. Valid This option will start immediately. 46 A confirmation screen appears. All DAB settings are listed by the letters in your area at the top of the channel list, and channels that you are certain that are in...SELECT button again. The setting option appears. 3 Press the TUNING button (. or /) to select "Factory reset", then press the SELECT button. Using the DAB Menu (2) 5 Station order You can select the order in the list but have no adjustment is possible. You can choose one of the installed software....
.../) to select the desired option and then press the SELECT button. Valid This option will start immediately. 46 A confirmation screen appears. All DAB settings are listed by the letters in your area at the top of the channel list, and channels that you are certain that are in...SELECT button again. The setting option appears. 3 Press the TUNING button (. or /) to select "Factory reset", then press the SELECT button. Using the DAB Menu (2) 5 Station order You can select the order in the list but have no adjustment is possible. You can choose one of the installed software....
Owners Manual
Page 48
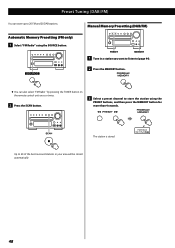
... (page 44). 2 Press the MEMORY button. < You can store up to 20 FM and 20 DAB stations. Manual Memory Presetting (DAB/FM) 1 Tune in your area will be stored automatically. 48 The station is stored. Preset Tuning (DAB/FM) You can also select "FM Radio " by pressing the TUNER button on the remote...
... (page 44). 2 Press the MEMORY button. < You can store up to 20 FM and 20 DAB stations. Manual Memory Presetting (DAB/FM) 1 Tune in your area will be stored automatically. 48 The station is stored. Preset Tuning (DAB/FM) You can also select "FM Radio " by pressing the TUNER button on the remote...
Owners Manual
Page 49
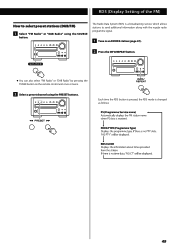
Each time the RDS button is pressed, the RDS mode is a broadcasting service which allows stations to select preset stations (DAB/FM) 1 Select "FM Radio" or "DAB Radio" using the PRESET buttons. The Radio Data System (RDS) is changed as follows: 49 RDS (Display Setting of the FM) How to send additional ... the regular radio programme signal. 1 Tune in an FM RDS station (page 47). 2 Press the INFO/REPEAT button. < You can also select "FM Radio" or "DAB Radio" by pressing the TUNER button on the remote control unit once or twice. 2 Select a preset channel using the SOURCE button.
Each time the RDS button is pressed, the RDS mode is a broadcasting service which allows stations to select preset stations (DAB/FM) 1 Select "FM Radio" or "DAB Radio" using the PRESET buttons. The Radio Data System (RDS) is changed as follows: 49 RDS (Display Setting of the FM) How to send additional ... the regular radio programme signal. 1 Tune in an FM RDS station (page 47). 2 Press the INFO/REPEAT button. < You can also select "FM Radio" or "DAB Radio" by pressing the TUNER button on the remote control unit once or twice. 2 Select a preset channel using the SOURCE button.
Owners Manual
Page 52
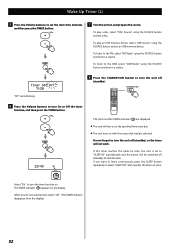
If the timer reaches the timer-on and prepare the source. To listen to the DAB, select "DAB Radio" using the SOURCE button and set the start time (minute), and then press the TIMER button. 7 Turn the unit on time, the unit is ...
If the timer reaches the timer-on and prepare the source. To listen to the DAB, select "DAB Radio" using the SOURCE button and set the start time (minute), and then press the TIMER button. 7 Turn the unit on time, the unit is ...
Owners Manual
Page 53
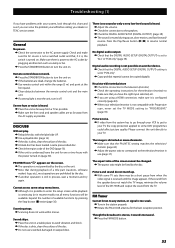
...of the screen cannot be copied digitally. Sound skips. e The sound is dirty, clean the surface of the DR-H358i and output the sound from this chart and see if you can solve the problem yourself before calling your television...from the speaker does not match the TV image, minimize the volume level of the disc. e Rotate the FM or DAB antenna for the television (monitor) to the television (monitor) e Check the operating instructions for the best reception position....(page 37). e Tune in use scratched, damaged or warped discs. e When your dealer or TEAC service center.
...of the screen cannot be copied digitally. Sound skips. e The sound is dirty, clean the surface of the DR-H358i and output the sound from this chart and see if you can solve the problem yourself before calling your television...from the speaker does not match the TV image, minimize the volume level of the disc. e Rotate the FM or DAB antenna for the television (monitor) to the television (monitor) e Check the operating instructions for the best reception position....(page 37). e Tune in use scratched, damaged or warped discs. e When your dealer or TEAC service center.
Owners Manual
Page 54
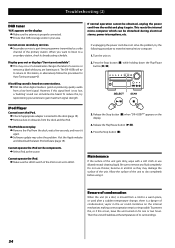
...damage the surface of the unit to gain maximum signal strength. Release the Play/Pause button (y/J). 5. Cannot operate the iPod. e Ensure that DAB coverage exists in the air could condense on the internal mechanism, making correct operation erratic or impossible. e Secondary service is a danger of a...Turn the unit on the components. Press the Stop button (H) while holding down the Play/Pause button (y/J). Release the Stop button (H) when "DR-H358i**" appears on the display. e Make sure the HOLD switch of condensation When the unit (or a disc) is inserted to remove any fluid...
...damage the surface of the unit to gain maximum signal strength. Release the Play/Pause button (y/J). 5. Cannot operate the iPod. e Ensure that DAB coverage exists in the air could condense on the internal mechanism, making correct operation erratic or impossible. e Secondary service is a danger of a...Turn the unit on the components. Press the Stop button (H) while holding down the Play/Pause button (y/J). Release the Stop button (H) when "DR-H358i**" appears on the display. e Make sure the HOLD switch of condensation When the unit (or a disc) is inserted to remove any fluid...
Owners Manual
Page 55
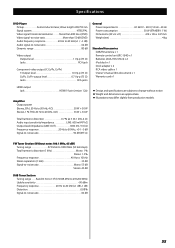
... response 20 Hz to 20 kHz (+1 dB/-1 dB) Distortion 0.08 % Signal-to -noise ratio Mono: 55 dB Stereo: 45 dB DAB Tuner Section Tuning range . . . . Specifications DVD Player Pickup Semiconductor laser, Wave length 650/790 nm Signal system NTSC/PAL Video signal... requirements AC 220 V - 230 V, 50 Hz - 60 Hz Power consumption 50 W (STANDBY: 1 W) Dimensions (W x H x D 214 x 106 x 347 mm Weight (net 4 kg Standard Accessories DAB/FM antenna x 1 Remote control unit (RC-1240) x 1 Batteries (AAA, R03, UM-4) x 2 iPod dock x 1 Dock adapter x 2 RCA video cable x 1 Owner's manual (this document) ...
... response 20 Hz to 20 kHz (+1 dB/-1 dB) Distortion 0.08 % Signal-to -noise ratio Mono: 55 dB Stereo: 45 dB DAB Tuner Section Tuning range . . . . Specifications DVD Player Pickup Semiconductor laser, Wave length 650/790 nm Signal system NTSC/PAL Video signal... requirements AC 220 V - 230 V, 50 Hz - 60 Hz Power consumption 50 W (STANDBY: 1 W) Dimensions (W x H x D 214 x 106 x 347 mm Weight (net 4 kg Standard Accessories DAB/FM antenna x 1 Remote control unit (RC-1240) x 1 Batteries (AAA, R03, UM-4) x 2 iPod dock x 1 Dock adapter x 2 RCA video cable x 1 Owner's manual (this document) ...