Owners Manual
Page 2
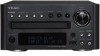
... REMOVE COVER (OR BACK). NO USER-SERVICEABLE PARTS INSIDE. REFER SERVICING TO QUALIFIED SERVICE PERSONNEL. DO NOT USE THE PRODUCT UNTIL IT HAS BEEN REPAIRED. < USE OF CONTROLS OR ADJUSTMENTS ...servicing to ensure reliable operation of product. 20) : CLASS II apparatus with the cart, stand, tripod, bracket, or table specified by placing the product on or pinched particularly at any ventilation openings. Alternate Warnings - If you are provided for long periods of time. 14) Refer all instructions. 5) Do not use this apparatus near any way, such as power-supply cord or plug...
... REMOVE COVER (OR BACK). NO USER-SERVICEABLE PARTS INSIDE. REFER SERVICING TO QUALIFIED SERVICE PERSONNEL. DO NOT USE THE PRODUCT UNTIL IT HAS BEEN REPAIRED. < USE OF CONTROLS OR ADJUSTMENTS ...servicing to ensure reliable operation of product. 20) : CLASS II apparatus with the cart, stand, tripod, bracket, or table specified by placing the product on or pinched particularly at any ventilation openings. Alternate Warnings - If you are provided for long periods of time. 14) Refer all instructions. 5) Do not use this apparatus near any way, such as power-supply cord or plug...
Owners Manual
Page 3
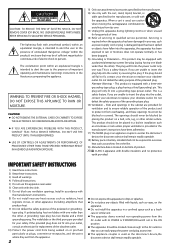
.... Windows Media is a trademark of DVD Format/Logo Licensing Corporation. Bottom of battery. Dolby, Pro Logic and the double-D symbol are trademarks or registered trademarks of HDMI Licensing LLC in the United States and/or other countries. Use or distribution of such technology outside of this device or its compliance with the limits for a Class B digital device, pursuant to Part 15...
.... Windows Media is a trademark of DVD Format/Logo Licensing Corporation. Bottom of battery. Dolby, Pro Logic and the double-D symbol are trademarks or registered trademarks of HDMI Licensing LLC in the United States and/or other countries. Use or distribution of such technology outside of this device or its compliance with the limits for a Class B digital device, pursuant to Part 15...
Owners Manual
Page 4
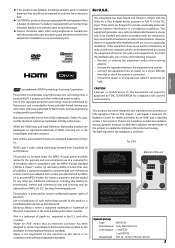
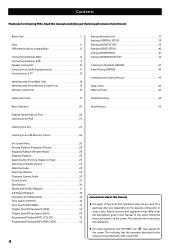
... Use 5 Discs 6 USB memory device compatibility 8 Connecting Antennas (AM 8 Connecting Antennas (FM 9 Speaker Connection 10 Connection to Audio Equipments etc 11 Connection to a TV 12 Identifying the Parts (Main Unit 14 Identifying the Parts (Remote Control Unit 16 Remote Control Unit 18 Setting the Clock 19 Basic Operation 20 Getting Started with an iPod 22 Listening to an iPod 23 Listening to a Disc 25 Listening to an USB Memory Device 26 On-screen Menu 26 Pausing Playback...
... Use 5 Discs 6 USB memory device compatibility 8 Connecting Antennas (AM 8 Connecting Antennas (FM 9 Speaker Connection 10 Connection to Audio Equipments etc 11 Connection to a TV 12 Identifying the Parts (Main Unit 14 Identifying the Parts (Remote Control Unit 16 Remote Control Unit 18 Setting the Clock 19 Basic Operation 20 Getting Started with an iPod 22 Listening to an iPod 23 Listening to a Disc 25 Listening to an USB Memory Device 26 On-screen Menu 26 Pausing Playback...
Owners Manual
Page 5
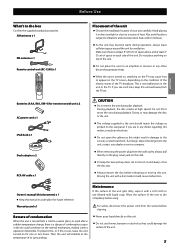
... TV screen, depending on the condition of the electric waves of the unit. Batteries (AAA, R03, UM-4) for remote control unit x 2 AC power cord x 1 iPod dock x 1 Dock adapter x 2 RCA AV cable x 1 CAUTION < Do not move the unit during playback. Warranty card x 1 For safety, disconnect the power cord from the TV set. Do not place anything on the rear panel. If you are in any other device...
... TV screen, depending on the condition of the electric waves of the unit. Batteries (AAA, R03, UM-4) for remote control unit x 2 AC power cord x 1 iPod dock x 1 Dock adapter x 2 RCA AV cable x 1 CAUTION < Do not move the unit during playback. Warranty card x 1 For safety, disconnect the power cord from the TV set. Do not place anything on the rear panel. If you are in any other device...
Owners Manual
Page 6
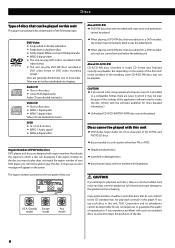
... use such discs in DVD video format or DVD video recording format. Discs Type of discs that can be played on this unit This player can playback discs bearing any consequences or guarantee the quality of reproduction. M This unit can play back correctly in a color system other discs that was edited on a DVD recorder, the screen may be further subdivided into tracks. U.S.A./Canada model Europe model Asia model Copy-protected discs, DualDiscs and other than PAL or NTSC Region Number...
... use such discs in DVD video format or DVD video recording format. Discs Type of discs that can be played on this unit This player can playback discs bearing any consequences or guarantee the quality of reproduction. M This unit can play back correctly in a color system other discs that was edited on a DVD recorder, the screen may be further subdivided into tracks. U.S.A./Canada model Europe model Asia model Copy-protected discs, DualDiscs and other than PAL or NTSC Region Number...

Owners Manual
Page 7
... the effects of Icons used on a CD-R, CD-RW, DVD-R, DVD-RW or USB memory device: M MP3 files M Windows Media-formatted audio files M JPEG files M DivX video files (DivX 5, DivX 4, DivX 3 and DivX VOD video content) < File names should be returned to their cases after use irregular shape discs (octagonal, heart shaped, business card size, etc.). Compact discs can be played or recorded only on one side. < To remove a disc from its storage case...
... the effects of Icons used on a CD-R, CD-RW, DVD-R, DVD-RW or USB memory device: M MP3 files M Windows Media-formatted audio files M JPEG files M DivX video files (DivX 5, DivX 4, DivX 3 and DivX VOD video content) < File names should be returned to their cases after use irregular shape discs (octagonal, heart shaped, business card size, etc.). Compact discs can be played or recorded only on one side. < To remove a disc from its storage case...
Owners Manual
Page 8
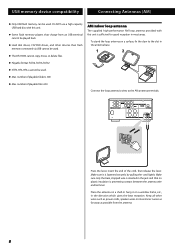
... played back. < Hard disk drives, CD/DVD drives, and other wires such as power cords, speaker wires or interconnect wires as far away as possible from the antenna. 8 number of the cord, then release the lever. Keep all other devices than flash memory connected via USB cannot be used . Press the lever, insert the end of playable folders: 300 < Max. To stand the loop antenna on a window...
... played back. < Hard disk drives, CD/DVD drives, and other wires such as power cords, speaker wires or interconnect wires as far away as possible from the antenna. 8 number of the cord, then release the lever. Keep all other devices than flash memory connected via USB cannot be used . Press the lever, insert the end of playable folders: 300 < Max. To stand the loop antenna on a window...

Owners Manual
Page 11
... power cord from the wall socket. to use the supplied power cord. < If you are complete, connect the power cord's plug to the AC wall socket. < Read the instructions of each plug securely. D Digital audio output terminal Digital audio from DVD-Video, CD and video CD is input or output from this receptacle, then connect the other connections have been made, insert the supplied AC power cord into the wall socket. Connect an amplifiers including a decoder, or digital audio devices such as CD recorders, etc. Connect a cassette tape...
... power cord from the wall socket. to use the supplied power cord. < If you are complete, connect the power cord's plug to the AC wall socket. < Read the instructions of each plug securely. D Digital audio output terminal Digital audio from DVD-Video, CD and video CD is input or output from this receptacle, then connect the other connections have been made, insert the supplied AC power cord into the wall socket. Connect an amplifiers including a decoder, or digital audio devices such as CD recorders, etc. Connect a cassette tape...
Owners Manual
Page 13
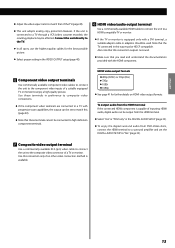
... component terminals. G HDMI video/audio output terminal Use a commercially available HDMI cable to connect the unit to a HDMI compatible TV or monitor. < If the TV or monitor is available. 13 To output audio from the HDMI terminal If the connected HDMI component is connected to a TV through a VCR (video cassette recorder), the resulting playback may be affected. Connect the unit directly to the TV. < In all cases, use the highest quality cables for further details on HDMI video output formats. E Component video output terminals Use commercially available component video cables...
... component terminals. G HDMI video/audio output terminal Use a commercially available HDMI cable to connect the unit to a HDMI compatible TV or monitor. < If the TV or monitor is available. 13 To output audio from the HDMI terminal If the connected HDMI component is connected to a TV through a VCR (video cassette recorder), the resulting playback may be affected. Connect the unit directly to the TV. < In all cases, use the highest quality cables for further details on HDMI video output formats. E Component video output terminals Use commercially available component video cables...
Owners Manual
Page 15
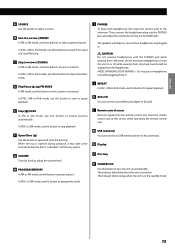
... be output from the remote control unit. F Open/Close ( L) Use this button to open and close the disc tray. When the tray is opened during playback, it may take a few seconds before the disc is turned on and standby. H PROGRAM/MEMORY In FM or AM mode, use this button to select stereo or monaural. Point the remote control unit at this button to turn the unit on headphones until after plugging them . M USB connector You can connect a portable audio player...
... be output from the remote control unit. F Open/Close ( L) Use this button to open and close the disc tray. When the tray is opened during playback, it may take a few seconds before the disc is turned on and standby. H PROGRAM/MEMORY In FM or AM mode, use this button to select stereo or monaural. Point the remote control unit at this button to turn the unit on headphones until after plugging them . M USB connector You can connect a portable audio player...
Owners Manual
Page 16
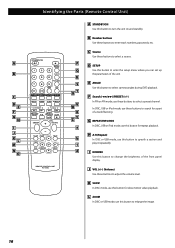
... repeat playback. B Number buttons Use these buttons to select a source. G REPEAT/INFO/RDS In DISC, USB or iPod mode, use this button to select a preset channel. K SLOW In DISC mode, use this button to enlarge the image. 16 C Source Use these buttons to search for a part of a track/file/song. J VOL (+/-) (Volume) Use these buttons to enter track numbers, passwords, etc. In DISC, USB or iPod mode, use these buttons to adjust the volume level. A B C D E F G H I DIMMER Use this button to enter the setup menu where you can set...
... repeat playback. B Number buttons Use these buttons to select a source. G REPEAT/INFO/RDS In DISC, USB or iPod mode, use this button to select a preset channel. K SLOW In DISC mode, use this button to enlarge the image. 16 C Source Use these buttons to search for a part of a track/file/song. J VOL (+/-) (Volume) Use these buttons to enter track numbers, passwords, etc. In DISC, USB or iPod mode, use these buttons to adjust the volume level. A B C D E F G H I DIMMER Use this button to enter the setup menu where you can set...
Owners Manual
Page 17
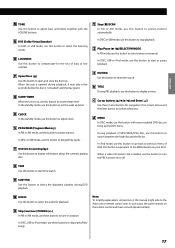
... Virtual Speaker) In DISC or USB mode, use this button to select the audio for playback. T OSD (On Screen Displays) Use this button to preset stations. O LOUDNESS Use this button to compensate for navigation of MP3/WMA/JPEG files, use this button to display information about the currently playing disc. When the tray is opened during DVD playback. This button is "unloaded" and the tray opens. W AUDIO Use this button to the MENU button on the remote control and main unit will operate similarly.
... Virtual Speaker) In DISC or USB mode, use this button to select the audio for playback. T OSD (On Screen Displays) Use this button to preset stations. O LOUDNESS Use this button to compensate for navigation of MP3/WMA/JPEG files, use this button to display information about the currently playing disc. When the tray is opened during DVD playback. This button is "unloaded" and the tray opens. W AUDIO Use this button to the MENU button on the remote control and main unit will operate similarly.
Owners Manual
Page 22
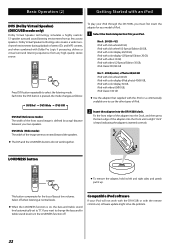
Basic Operation (2) Getting Started with the remote control unit, software update might solve the problem. 22 Each time the DVS button is pressed, the mode changes as two speakers. This button compensate for your model of iPod. 1 Select the Dock Adapter that supplied with the iPod or a commercially available one to use the other types of iPod. 2 Insert the adapter into the Dock, and then press the back...
Basic Operation (2) Getting Started with the remote control unit, software update might solve the problem. 22 Each time the DVS button is pressed, the mode changes as two speakers. This button compensate for your model of iPod. 1 Select the Dock Adapter that supplied with the iPod or a commercially available one to use the other types of iPod. 2 Insert the adapter into the Dock, and then press the back...
Owners Manual
Page 27
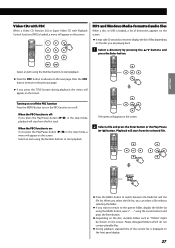
... Number buttons to switch between the folder list and the file list. ENGLISH Video CDs with PBC When a Video CD (Version 2.0) or Super Video CD with Playback Control functions (PBC) is loaded, a menu will appear on the screen. 2 Select a file and press the Enter button or the Play/Pause (y/J) button. Turning on or off the PBC function Press the MENU button to the parent folder, display the folder list using the MENU button, select using the Number buttons...
... Number buttons to switch between the folder list and the file list. ENGLISH Video CDs with PBC When a Video CD (Version 2.0) or Super Video CD with Playback Control functions (PBC) is loaded, a menu will appear on the screen. 2 Select a file and press the Enter button or the Play/Pause (y/J) button. Turning on or off the PBC function Press the MENU button to the parent folder, display the folder list using the MENU button, select using the Number buttons...
Owners Manual
Page 29
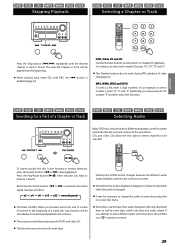
... Audio Many DVD discs include audio in different languages, as well as stereo and multi-channel surround versions of DVD and video CD. < This function may not work during playback. button is found . Pressing the AUDIO button changes between the different audio tracks available, and the result is muted during fast search of the soundtrack. DVD, Video CD and CD Use the Number buttons to be played from the beginning. < When playing back video...
... Audio Many DVD discs include audio in different languages, as well as stereo and multi-channel surround versions of DVD and video CD. < This function may not work during playback. button is found . Pressing the AUDIO button changes between the different audio tracks available, and the result is muted during fast search of the soundtrack. DVD, Video CD and CD Use the Number buttons to be played from the beginning. < When playing back video...
Owners Manual
Page 30
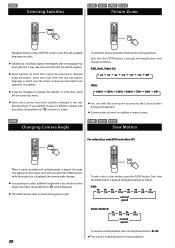
... language, in which no other angle is recorded, the prohibit icon "A" will be removed or changed using the on some discs using this button. Each time the SLOW button is shown on the screen. Some discs may be necessary to select a different subtitle with multiple angles is muted during playback. To play a disc in the way described here. DVD Changing Camera Angle DVD VCD DIVX Slow Motion For video discs only (DVD...
... language, in which no other angle is recorded, the prohibit icon "A" will be removed or changed using the on some discs using this button. Each time the SLOW button is shown on the screen. Some discs may be necessary to select a different subtitle with multiple angles is muted during playback. To play a disc in the way described here. DVD Changing Camera Angle DVD VCD DIVX Slow Motion For video discs only (DVD...
Owners Manual
Page 38
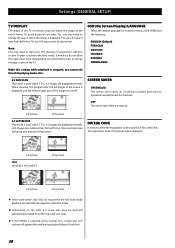
... the Pan Scan mode playback are displayed normally. DIVX(R) CODE In case you will be displayed. 4:3 picture 16:9 Use with a 16:9 wide TV. 16:9 picture 4:3 picture 16:9 picture < Some wide-screen discs that do movies). high-definition TVs use a 4:3 aspect ratio; To avoid distortion on the DVD, 4:3 Letter Box may need the registration code to change the aspect ratio on the TV. OFF The screen saver does not start up if...
... the Pan Scan mode playback are displayed normally. DIVX(R) CODE In case you will be displayed. 4:3 picture 16:9 Use with a 16:9 wide TV. 16:9 picture 4:3 picture 16:9 picture < Some wide-screen discs that do movies). high-definition TVs use a 4:3 aspect ratio; To avoid distortion on the DVD, 4:3 Letter Box may need the registration code to change the aspect ratio on the TV. OFF The screen saver does not start up if...
Owners Manual
Page 40
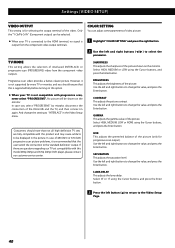
... our TV set compatibility with this option. < When your TV is connected to the HDMI terminal, no signal is recommended that this is supported fully before turning on this model 480p (525p) and 576p (625p) DVD player, please contact our customer service center. If there are fully compatible with this product and may cause artifacts to change the value, and press the Enter button. Select...
... our TV set compatibility with this option. < When your TV is connected to the HDMI terminal, no signal is recommended that this is supported fully before turning on this model 480p (525p) and 576p (625p) DVD player, please contact our customer service center. If there are fully compatible with this product and may cause artifacts to change the value, and press the Enter button. Select...
Owners Manual
Page 41
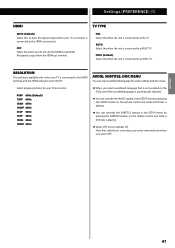
... remote control unit while a DVD disc is playing. < Select OFF to a PAL TV. Select proper resolution for audio, subtitle and disc menu. AUTO Select this when the unit is connected to "AUTO". Note that is not recorded on the DVD, one of the recorded languages is automatically selected. < You can override the AUDIO setting in the SETUP menu by pressing the SUBTITLE button on some discs cannot be removed even when you do not use the HDMI...
... remote control unit while a DVD disc is playing. < Select OFF to a PAL TV. Select proper resolution for audio, subtitle and disc menu. AUTO Select this when the unit is connected to "AUTO". Note that is not recorded on the DVD, one of the recorded languages is automatically selected. < You can override the AUDIO setting in the SETUP menu by pressing the SUBTITLE button on some discs cannot be removed even when you do not use the HDMI...
Owners Manual
Page 48
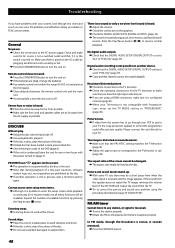
... picture/distorted picture e Check the connection to the TV (monitor) e Check the operating instructions for the TV (monitor) to make sure that the DIGITAL AUDIO SETUP (DIGITAL OUTPUT) setting is turned on (page 5). e Check that you have problems with the label side UP. Troubleshooting If you have the right input selected, etc. e If a strong light is near the unit, turn the unit on a stable place to correct the picture and sound sync problem using a HDMI connection, make...
... picture/distorted picture e Check the connection to the TV (monitor) e Check the operating instructions for the TV (monitor) to make sure that the DIGITAL AUDIO SETUP (DIGITAL OUTPUT) setting is turned on (page 5). e Check that you have problems with the label side UP. Troubleshooting If you have the right input selected, etc. e If a strong light is near the unit, turn the unit on a stable place to correct the picture and sound sync problem using a HDMI connection, make...
