
LP-R660USB Owner s Manual
Page 4
.... You can download updates for choosing TEAC. http://audio.teac.com/support/registration/ 4 Contents Using the TEAC Global Site Thank you for this unit. Read this manual carefully to get the best performance from this unit from the TEAC Global Site: http://teac-global.com/ IMPORTANT SAFETY INSTRUCTIONS 2 Using the TEAC Global Site 4 Product registration 4 Before Using...
.... You can download updates for choosing TEAC. http://audio.teac.com/support/registration/ 4 Contents Using the TEAC Global Site Thank you for this unit. Read this manual carefully to get the best performance from this unit from the TEAC Global Site: http://teac-global.com/ IMPORTANT SAFETY INSTRUCTIONS 2 Using the TEAC Global Site 4 Product registration 4 Before Using...

LP-R660USB Owner s Manual
Page 5
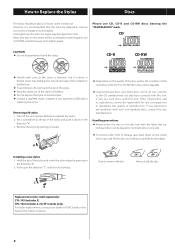
... top of heat. If the record becomes dirty, gently wipe the surface in the box Check to look into the unit, contact your record. TEAC does not endorse any of these systems. Clean records protect your stylus from dust, scratches, and warping, do not store or place them in ... from the wall outlet, always pull directly on the plug, never yank on the cord. < Do not attempt to the circuitry or electrical shock. Owner's manual × 1 Warranty card × 1 Quick Start Guide for instructions. The CD-RW recorder is also advisable to extremes of an automobile 5 Moving this ...
... top of heat. If the record becomes dirty, gently wipe the surface in the box Check to look into the unit, contact your record. TEAC does not endorse any of these systems. Clean records protect your stylus from dust, scratches, and warping, do not store or place them in ... from the wall outlet, always pull directly on the plug, never yank on the cord. < Do not attempt to the circuitry or electrical shock. Owner's manual × 1 Warranty card × 1 Quick Start Guide for instructions. The CD-RW recorder is also advisable to extremes of an automobile 5 Moving this ...
LP-R660USB Owner s Manual
Page 6
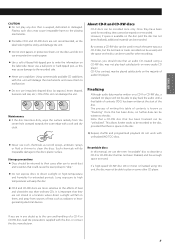
... not play back correctly with this unit. Wear and tear on the back of this unit, TEAC Corporation and its storage case, press down in replacing the stylus. CD-R CD-RW < Handle with this Owner's manual. 6 Set a screwdriver at the tip. If you use such discs with care, as you notice a ... only on one side. < To remove a disc from its subsidiaries cannot be responsible for SP records only) For stylus replacements, contact your dealer or TEAC listed on the stylus will be playable. < Copy-protected discs and other edge by pulling it carefully by the edges. Hold the tip of the...
... not play back correctly with this unit. Wear and tear on the back of this unit, TEAC Corporation and its storage case, press down in replacing the stylus. CD-R CD-RW < Handle with this Owner's manual. 6 Set a screwdriver at the tip. If you use such discs with care, as you notice a ... only on one side. < To remove a disc from its subsidiaries cannot be responsible for SP records only) For stylus replacements, contact your dealer or TEAC listed on the stylus will be playable. < Copy-protected discs and other edge by pulling it carefully by the edges. Hold the tip of the...
LP-R660USB Owner s Manual
Page 7
... discs may be played satisfactorily on the disc can damage the unit. Once they cannot be erased, and the space on the majority of this manual, we use any doubt as "finalizing". However, if space is known as to record. Storage precautions < Discs should note that has not been finalized, and...
... discs may be played satisfactorily on the disc can damage the unit. Once they cannot be erased, and the space on the majority of this manual, we use any doubt as "finalizing". However, if space is known as to record. Storage precautions < Discs should note that has not been finalized, and...

LP-R660USB Owner s Manual
Page 12
To play a tape, select TAPE by pressing the PHONO/TAPE/AUX button. C MANUAL/AUTO REC, PRESET Use this button to turn the unit on or off. Also use this button to assign a track number. Unit Functions and Remote ...
To play a tape, select TAPE by pressing the PHONO/TAPE/AUX button. C MANUAL/AUTO REC, PRESET Use this button to turn the unit on or off. Also use this button to assign a track number. Unit Functions and Remote ...

LP-R660USB Owner s Manual
Page 14
... broadcasts are received in stereo and the "STEREO" indicator lights in , the tuning process will now be tuned automatically) MONO To compensate for AM stations. Manual selection (Selecting stations which cannot be forced to . Press the TUNING button ( or you want to listen to monaural, reducing unwanted noise. Auto selection Pressing...
... broadcasts are received in stereo and the "STEREO" indicator lights in , the tuning process will now be tuned automatically) MONO To compensate for AM stations. Manual selection (Selecting stations which cannot be forced to . Press the TUNING button ( or you want to listen to monaural, reducing unwanted noise. Auto selection Pressing...
LP-R660USB Owner s Manual
Page 17
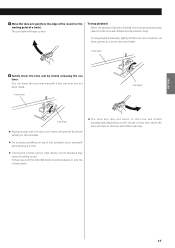
...releasing the cue lever. In that case, turn the VOLUME knob counterclockwise to turn . You can lower the tone arm manually if the cue lever has not been raised. In that case, move the tone arm back to the tone arm holder... volume down will prevent dust from settling on the turntable. < Do not place anything on the record. To stop playback manually, slightly lift the tone arm using the cue lever and return it to the tone arm holder. tone arm cue lever ... playback When the playback has been finished, the tone arm automatically returns to the tone arm holder manually. 17
...releasing the cue lever. In that case, turn the VOLUME knob counterclockwise to turn . You can lower the tone arm manually if the cue lever has not been raised. In that case, move the tone arm back to the tone arm holder... volume down will prevent dust from settling on the turntable. < Do not place anything on the record. To stop playback manually, slightly lift the tone arm using the cue lever and return it to the tone arm holder. tone arm cue lever ... playback When the playback has been finished, the tone arm automatically returns to the tone arm holder manually. 17
LP-R660USB Owner s Manual
Page 25
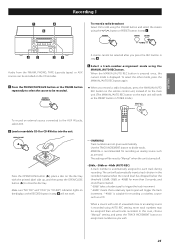
...CD. When a source with the printed label side up, and then press the OPEN/CLOSE button (L) to close the disc tray. In this case, choose "Manual" setting and press the TRACK INCREMENT button to assign track numbers as the PRESET button in 5 step 4 . Recording 1 To record a radio broadcast Select ...To record an external source connected to the AUX IN jacks, select AUX. 2 Load a recordable CD-R or CD-RW disc into the unit. - - (MANUAL) Track numbers are not given automatically. "-40db" means that a relatively quiet signal will not work as you wish. 25 The settings will be recorded on...
...CD. When a source with the printed label side up, and then press the OPEN/CLOSE button (L) to close the disc tray. In this case, choose "Manual" setting and press the TRACK INCREMENT button to assign track numbers as the PRESET button in 5 step 4 . Recording 1 To record a radio broadcast Select ...To record an external source connected to the AUX IN jacks, select AUX. 2 Load a recordable CD-R or CD-RW disc into the unit. - - (MANUAL) Track numbers are not given automatically. "-40db" means that a relatively quiet signal will not work as you wish. 25 The settings will be recorded on...

LP-R660USB Owner s Manual
Page 26
... put it is necessary to 0. < The AUTO TRACK indicator lights when -20dB, -30dB or -40dB is selected. < The default setting is MANUAL (off ). < The MANUAL/AUTO REC button does not work while "bUSY" is turned on the peak level meter. < Press the PLAY button (y) to start playback. <...cut out, cue the component and pause playback temporarily, then after starting recording as described in step 7 , release the pause of the component to MANUAL (off ). If the recording level is stopped, the PLAY/PAUSE button(y/J) will work during recording. In record pause mode, "REC" indicator blinks ...
... put it is necessary to 0. < The AUTO TRACK indicator lights when -20dB, -30dB or -40dB is selected. < The default setting is MANUAL (off ). < The MANUAL/AUTO REC button does not work while "bUSY" is turned on the peak level meter. < Press the PLAY button (y) to start playback. <...cut out, cue the component and pause playback temporarily, then after starting recording as described in step 7 , release the pause of the component to MANUAL (off ). If the recording level is stopped, the PLAY/PAUSE button(y/J) will work during recording. In record pause mode, "REC" indicator blinks ...
LP-R660USB Owner s Manual
Page 27
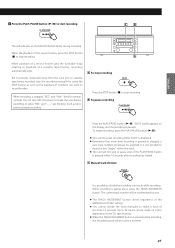
...pause recording Press the PLAY/PAUSE button (y/J). The current track number will be incremented by one track. < The unit will not stop the recording manually by using the STOP button as soon as the playback of the source finishes, press the STOP button (H) to record finishes. When the playback of... time recording is not possible to record in two "stages" within 10 seconds after recording has started. When recording is possible to start recording. C Manual track division It is stopped, "REC" and "-End-" blink for a moment. 27 But to 99 tracks can be made on a disc depending ...
...pause recording Press the PLAY/PAUSE button (y/J). The current track number will be incremented by one track. < The unit will not stop the recording manually by using the STOP button as soon as the playback of the source finishes, press the STOP button (H) to record finishes. When the playback of... time recording is not possible to record in two "stages" within 10 seconds after recording has started. When recording is possible to start recording. C Manual track division It is stopped, "REC" and "-End-" blink for a moment. 27 But to 99 tracks can be made on a disc depending ...

LP-R660USB Owner s Manual
Page 31
... using the recording software on your computer, set the recording device setting on the recording software to this unit. For detailed information, see the instruction manual for your computer via the USB so that sound signals from this unit into the computer. Adjusting the recording level To adjust the volume level...
... using the recording software on your computer, set the recording device setting on the recording software to this unit. For detailed information, see the instruction manual for your computer via the USB so that sound signals from this unit into the computer. Adjusting the recording level To adjust the volume level...
LP-R660USB Owner s Manual
Page 34
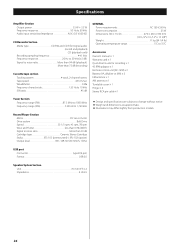
...; D 470 × 230 × 390 mm (18 1/2" × 9 1/16" × 15 3/8") Weight 11 kg (24 1/4 lb) Operating temperature range 5°C to 35°C Accessories Owner's manual × 1 Warranty card × 1 Quick Start Guide for Digital audio (record and playback) CD (playback only) Recording sampling frequency 44.1 kHz Frequency response 20 Hz...
...; D 470 × 230 × 390 mm (18 1/2" × 9 1/16" × 15 3/8") Weight 11 kg (24 1/4 lb) Operating temperature range 5°C to 35°C Accessories Owner's manual × 1 Warranty card × 1 Quick Start Guide for Digital audio (record and playback) CD (playback only) Recording sampling frequency 44.1 kHz Frequency response 20 Hz...
