
CPE510 V1 UG
Page 5
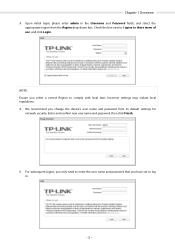
Check the box next to I agree to comply with local laws. Incorrect settings may violate local regulations. 4. For subsequent logins, you only need to enter the user name and password that you have set to log in the Username and Password fields, and select the ... default settings for network security. NOTE: Ensure you change the device's user name and password from the Region drop-down lists. Chapter 1 Overview 3. Upon initial login, please enter admin in . - 2 - We recommend you select a correct Region to these terms of use, and click...
Check the box next to I agree to comply with local laws. Incorrect settings may violate local regulations. 4. For subsequent logins, you only need to enter the user name and password that you have set to log in the Username and Password fields, and select the ... default settings for network security. NOTE: Ensure you change the device's user name and password from the Region drop-down lists. Chapter 1 Overview 3. Upon initial login, please enter admin in . - 2 - We recommend you select a correct Region to these terms of use, and click...

CPE510 V1 UG
Page 76
..., you must log in the MAC field. Click Add PC's MAC, your settings. - 73 - Session Timeout Enter the maximum timeout before the session expires. Remote Login IP Address Configure the IP address that can use the password to access the device's web management page and the others will be blocked. And... access the device's web management page. Enter 0.0.0.0 to visit. MAC Authentication Enable this function to allow all the remote IP to forbid any remote IP's login. By default, the function is not enabled.
..., you must log in the MAC field. Click Add PC's MAC, your settings. - 73 - Session Timeout Enter the maximum timeout before the session expires. Remote Login IP Address Configure the IP address that can use the password to access the device's web management page and the others will be blocked. And... access the device's web management page. Enter 0.0.0.0 to visit. MAC Authentication Enable this function to allow all the remote IP to forbid any remote IP's login. By default, the function is not enabled.

CPE510 V1 UG
Page 78
...right of the device's SNMP information. It can be seen as the shared password of the network hosts group. Server Port SSH Login Remote Management Enter the TCP/IP port of community is 0.0.0.0, which means all the transmission data and prevent the information in the... connection, but essentially the old telnet remote management method is a security protocol established on the SSH client software. Enable the function to let TP-LINK Pharos Control software manage the device remotely. - 75 - Set Community Set Source Chapter 7 Management Tab Set Community has the read /write ...
...right of the device's SNMP information. It can be seen as the shared password of the network hosts group. Server Port SSH Login Remote Management Enter the TCP/IP port of community is 0.0.0.0, which means all the transmission data and prevent the information in the... connection, but essentially the old telnet remote management method is a security protocol established on the SSH client software. Enable the function to let TP-LINK Pharos Control software manage the device remotely. - 75 - Set Community Set Source Chapter 7 Management Tab Set Community has the read /write ...

CPE510 V1 UG
Page 81
... define the device's coordinates. Enter the latitude of device by default. We recommend that you change the user password to protect your device from unauthorized login. Chapter 8 System Tab Device The Device Name is English. Displays the default language in the web management page is the model of the device's location...
... define the device's coordinates. Enter the latitude of device by default. We recommend that you change the user password to protect your device from unauthorized login. Chapter 8 System Tab Device The Device Name is English. Displays the default language in the web management page is the model of the device's location...
CPE510 V1 QIG
Page 11
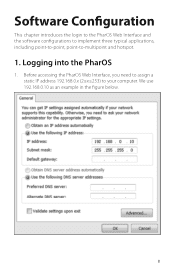
Software Configuration This chapter introduces the login to the PharOS Web Interface and the software configurations to implement three typical applications, including point-to-point, point-to your computer. We use 192.168.0.10 as an example in the figure below. 8 Logging into the PharOS 1. Before accessing the PharOS Web Interface, you need to assign a static IP address 192.168.0.x (2≤x≤253) to -multipoint and hotspot. 1.
Software Configuration This chapter introduces the login to the PharOS Web Interface and the software configurations to implement three typical applications, including point-to-point, point-to your computer. We use 192.168.0.10 as an example in the figure below. 8 Logging into the PharOS 1. Before accessing the PharOS Web Interface, you need to assign a static IP address 192.168.0.x (2≤x≤253) to -multipoint and hotspot. 1.
CPE510 V1 QIG
Page 12
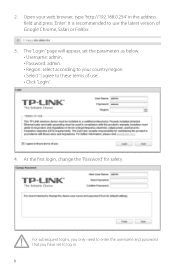
The 'Login' page will appear, set to use '. • Click 'Login'. 4. Open your country/region. • Select 'I agree to these terms of use the latest version of Google Chrome, Safari or Firefox. 3. At the first login, change the 'Password' for safety. For subsequent logins, you only need to enter the username and password that you have set the parameters as below. • Username: admin. • Password: admin. • Region: select according to your web browser, type 'http://192.168.0.254' in . 9 It is recommended to log in the address field and press 'Enter'. 2.
The 'Login' page will appear, set to use '. • Click 'Login'. 4. Open your country/region. • Select 'I agree to these terms of use the latest version of Google Chrome, Safari or Firefox. 3. At the first login, change the 'Password' for safety. For subsequent logins, you only need to enter the username and password that you have set the parameters as below. • Username: admin. • Password: admin. • Region: select according to your web browser, type 'http://192.168.0.254' in . 9 It is recommended to log in the address field and press 'Enter'. 2.


