Deco X55US V1.6 User Guide
Page 2
Contents About This Guide 1 Appearance 2 Set Up Your Deco 3 Dashboard 6 Add More Decos 7 Check Deco Status 8 Set Main Deco 10 Remove/Reboot Deco 11 Manage Connected Devices 12 Sort Devices By Locations 16 Create a New Network 17 Change Network Owner 19 Delete a Network 20 Add Smart Devices 21 Shortcut 22 Automation 24 HomeShield 28 Wi-Fi Settings 29 Guest Network 31 Network Optimization 32 Blacklist 33 Upgrade Your Deco 34 Advanced Features 35 WPS 40 Managers 41 Control Your Deco with Alexa 43 Troubleshooting 44 Authentication 45
Contents About This Guide 1 Appearance 2 Set Up Your Deco 3 Dashboard 6 Add More Decos 7 Check Deco Status 8 Set Main Deco 10 Remove/Reboot Deco 11 Manage Connected Devices 12 Sort Devices By Locations 16 Create a New Network 17 Change Network Owner 19 Delete a Network 20 Add Smart Devices 21 Shortcut 22 Automation 24 HomeShield 28 Wi-Fi Settings 29 Guest Network 31 Network Optimization 32 Blacklist 33 Upgrade Your Deco 34 Advanced Features 35 WPS 40 Managers 41 Control Your Deco with Alexa 43 Troubleshooting 44 Authentication 45

Deco X55US V1.6 User Guide
Page 3
... tp-link.com/homeshield for the Pro Plan. Deco availability may also vary by model and software version. You can still connect to the device. MU-MIMO Disclaimer Use of note might result in a malfunction or damage to Deco for you to smart devices that helps you make better use . Features available in teal and underlined. Other wireless devices can click to redirect to also support MU...
... tp-link.com/homeshield for the Pro Plan. Deco availability may also vary by model and software version. You can still connect to the device. MU-MIMO Disclaimer Use of note might result in a malfunction or damage to Deco for you to smart devices that helps you make better use . Features available in teal and underlined. Other wireless devices can click to redirect to also support MU...
Deco X55US V1.6 User Guide
Page 4
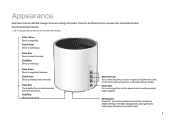
...: Deco is resetting. Reset Button: Press for setup. Pulse Blue: Deco is setting up and connected. Ethernet Ports: For connecting Deco to the power socket via the provided power adapter. Power Slot: For connecting Deco to your modem, the Ethernet outlet, or for other internet services in Wireless Router mode. Appearance Each Deco has an LED that changes color according to solid yellow indicates a successful reset. 2 Solid Blue: Deco is ready for 1 second and release to reset Deco to factory default settings. Pulse Red: The satellite Deco...
...: Deco is resetting. Reset Button: Press for setup. Pulse Blue: Deco is setting up and connected. Ethernet Ports: For connecting Deco to the power socket via the provided power adapter. Power Slot: For connecting Deco to your modem, the Ethernet outlet, or for other internet services in Wireless Router mode. Appearance Each Deco has an LED that changes color according to solid yellow indicates a successful reset. 2 Solid Blue: Deco is ready for 1 second and release to reset Deco to factory default settings. Pulse Red: The satellite Deco...

Deco X55US V1.6 User Guide
Page 5
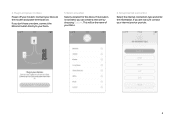
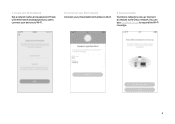
... Home Deco Mesh Wi-Fi 6 System. 1. Follow the steps below or go to Google Play or the App Store to download the Deco app. Download and install the Deco app Scan the QR code below to log in or sign up your Deco model. Use your Android or iOS smartphone or tablet. 2. Install the app on your TP-Link ID to set up with TP-Link ID Open the...
... Home Deco Mesh Wi-Fi 6 System. 1. Follow the steps below or go to Google Play or the App Store to download the Deco app. Download and install the Deco app Scan the QR code below to log in or sign up your Deco model. Use your Android or iOS smartphone or tablet. 2. Install the app on your TP-Link ID to set up with TP-Link ID Open the...
Deco X55US V1.6 User Guide
Page 6
If you don't have a modem, connect the Ethernet outlet directly to the modem and power them both on Deco Power off your Deco. 6. Select a location Select a location for this Deco. This will be the name of your modem. If you can create a new one by choosing Custom. Connect your Deco to your internet service provider. 4 Set up internet connection Select the internet connection type and enter the information. Plug in and power on . 4. If its location is not listed, you are not sure, contact your Deco. 5.
If you don't have a modem, connect the Ethernet outlet directly to the modem and power them both on Deco Power off your Deco. 6. Select a location Select a location for this Deco. This will be the name of your modem. If you can create a new one by choosing Custom. Connect your Deco to your internet service provider. 4 Set up internet connection Select the internet connection type and enter the information. Plug in and power on . 4. If its location is not listed, you are not sure, contact your Deco. 5.
Deco X55US V1.6 User Guide
Page 7
Connect to your Wi-Fi network Connect your phone/tablet to the Deco network. Connect all devices to the Deco's Wi-Fi. 9. Setup complete Your Deco network is now up. These will be the name and password you use to connect your Wi-Fi network Set a network name and a password. 7. Create your devices to expand the Wi-Fi coverage. 5 You can also Add More Decos to Wi-Fi. 8.
Connect to your Wi-Fi network Connect your phone/tablet to the Deco network. Connect all devices to the Deco's Wi-Fi. 9. Setup complete Your Deco network is now up. These will be the name and password you use to connect your Wi-Fi network Set a network name and a password. 7. Create your devices to expand the Wi-Fi coverage. 5 You can also Add More Decos to Wi-Fi. 8.
Deco X55US V1.6 User Guide
Page 12
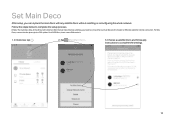
... instructions to the internet. Note: The main Deco links all the others to complete the settings. 10 In Overview, tap . 2. For DSL Deco, connect it . 1. After the main Deco finishes switching, you can replace the main Deco with any satellite Deco without resetting or reconfiguring the whole network. For 4G/5G Deco, insert a nano SIM card to it to complete the setup process. Follow the steps below to the phone...
... instructions to the internet. Note: The main Deco links all the others to complete the settings. 10 In Overview, tap . 2. For DSL Deco, connect it . 1. After the main Deco finishes switching, you can replace the main Deco with any satellite Deco without resetting or reconfiguring the whole network. For 4G/5G Deco, insert a nano SIM card to it to complete the setup process. Follow the steps below to the phone...

Deco X55US V1.6 User Guide
Page 13
Note: If the LED light of Deco does not turns pulsing blue after tapping Remove, press the Reset button on the Deco for 1 second to quickly reset your Deco to reset it. 11 Note: Rebooting your Deco again. Removing your Deco will reset it to factory default settings and you will need to set up your Deco will keep the current settings on the Deco for 1 second to clear cache and enhance running performance easily in...
Note: If the LED light of Deco does not turns pulsing blue after tapping Remove, press the Reset button on the Deco for 1 second to quickly reset your Deco to reset it. 11 Note: Rebooting your Deco again. Removing your Deco will reset it to factory default settings and you will need to set up your Deco will keep the current settings on the Deco for 1 second to clear cache and enhance running performance easily in...
Deco X55US V1.6 User Guide
Page 14
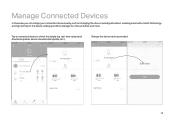
Tap a connected device to manage its online activities, and more. Change the device name as changing the device name/type/location, enabling automation, Mesh Technology and high priority for the device, setting a profile to check the details (e.g. real-time upload and download speeds, device name/location/profile, etc.). Manage Connected Devices In Overview, you can mange your connected devices easily, such as needed. 12
Tap a connected device to manage its online activities, and more. Change the device name as changing the device name/type/location, enabling automation, Mesh Technology and high priority for the device, setting a profile to check the details (e.g. real-time upload and download speeds, device name/location/profile, etc.). Manage Connected Devices In Overview, you can mange your connected devices easily, such as needed. 12
Deco X55US V1.6 User Guide
Page 16
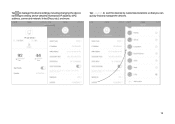
Tap to sort the devices by customized locations so that you can quickly find and manage the devices. 14 Tap Location to manage the device settings, including changing the device name/type, viewing device detailed information (IP address, MAC address, connected network, linked Deco, etc.), and more.
Tap to sort the devices by customized locations so that you can quickly find and manage the devices. 14 Tap Location to manage the device settings, including changing the device name/type, viewing device detailed information (IP address, MAC address, connected network, linked Deco, etc.), and more.
Deco X55US V1.6 User Guide
Page 26
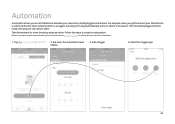
... automations for your smart devices, follow Add Smart Devices to add the devices to boil water. Tap > Automation > CREATE. 2. Select the trigger type. 24 Then the kettle plugged into the living room plug will start to the Deco network first. 1. Follow the steps to the Deco network (which is a trigger), the living room plug automatically turns on (which is connected to create an...
... automations for your smart devices, follow Add Smart Devices to add the devices to boil water. Tap > Automation > CREATE. 2. Select the trigger type. 24 Then the kettle plugged into the living room plug will start to the Deco network first. 1. Follow the steps to the Deco network (which is a trigger), the living room plug automatically turns on (which is connected to create an...
Deco X55US V1.6 User Guide
Page 30
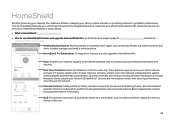
..., thus improving your network performance and security. Set individualized parental controls including when and for Pro users only. Real-Time Protection: Real-Time Protection is HomeShield: tp-link.com/homeshield • How to use HomeShield features and upgrade to HomeShield Pro: go to the product support page at https://www.tp-link.com and refer to TPLink HomeShield User Guide. HomeShield Whether protecting your network from sending sensitive...
..., thus improving your network performance and security. Set individualized parental controls including when and for Pro users only. Real-Time Protection: Real-Time Protection is HomeShield: tp-link.com/homeshield • How to use HomeShield features and upgrade to HomeShield Pro: go to the product support page at https://www.tp-link.com and refer to TPLink HomeShield User Guide. HomeShield Whether protecting your network from sending sensitive...
Deco X55US V1.6 User Guide
Page 37
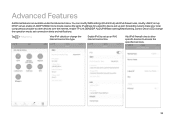
... WAN settings (IPv4 & IPv6), add IPv6 firewall rules, modify LAN IP, set up DHCP server, enable VLAN/IPTV/MAC Clone mode, reserve the same IP address for a specific device, set up an IPv6 internet connection. View IPv4 details or change the operation mode, set up port forwarding rules to make your local computers accessible to access the specified services. 35 Add IPv6 firewall rules to allow specific devices to other devices over the internet, enable TP-Link DDNS/SIP ALG/UPNP/fast roaming/beamforming, control Deco's LED, change the internet connection type. Enable IPv6 to set...
... WAN settings (IPv4 & IPv6), add IPv6 firewall rules, modify LAN IP, set up DHCP server, enable VLAN/IPTV/MAC Clone mode, reserve the same IP address for a specific device, set up an IPv6 internet connection. View IPv4 details or change the operation mode, set up port forwarding rules to make your local computers accessible to access the specified services. 35 Add IPv6 firewall rules to allow specific devices to other devices over the internet, enable TP-Link DDNS/SIP ALG/UPNP/fast roaming/beamforming, control Deco's LED, change the internet connection type. Enable IPv6 to set...
Deco X55US V1.6 User Guide
Page 39
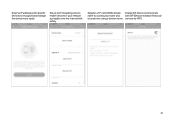
Register a TP-Link DDNS domain Enable SIP ALG to communicate name to access your network accessible over the internet with SIP (Session Initiation Protocol) local servers using a domain name. Set up port forwarding rules to recognize and manage the device more easily. Reserve IP addresses for specific devices to enable devices in your router and with safety. servers via NAT). 37
Register a TP-Link DDNS domain Enable SIP ALG to communicate name to access your network accessible over the internet with SIP (Session Initiation Protocol) local servers using a domain name. Set up port forwarding rules to recognize and manage the device more easily. Reserve IP addresses for specific devices to enable devices in your router and with safety. servers via NAT). 37

Deco X55US V1.6 User Guide
Page 45
... enabling the Guest Network, turning off your Deco network. Follow the steps below to use Alexa voice commands to control your Deco using Amazon's Alexa voice service. In the Deco app, tap to https://www.tp-link.com/support/faq/1571/. Note: This feature is currently available in Alexa app, refer to open the menu, tap Friends of Deco > Alexa > TP-Link Router Skill, then follow the app instructions complete the setup. 43 Control...
... enabling the Guest Network, turning off your Deco network. Follow the steps below to use Alexa voice commands to control your Deco using Amazon's Alexa voice service. In the Deco app, tap to https://www.tp-link.com/support/faq/1571/. Note: This feature is currently available in Alexa app, refer to open the menu, tap Friends of Deco > Alexa > TP-Link Router Skill, then follow the app instructions complete the setup. 43 Control...
Deco X55US V1.6 User Guide
Page 46
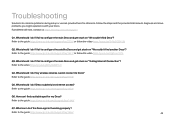
... I do if Deco suddenly lost internet access? If problems still exist, contact us: https://www.tp-link.com/support Q1. Refer to the guide https://www.tp-link.com//support/faq/1446/ Q7. Refer to the guide https://www.tp-link.com/support/faq/1454/ Q6. What can I fail to configure the satellite Deco and get stuck on "Testing Internet Connection"? What should I do if the Deco app isn't working properly? Refer...
... I do if Deco suddenly lost internet access? If problems still exist, contact us: https://www.tp-link.com/support Q1. Refer to the guide https://www.tp-link.com//support/faq/1446/ Q7. Refer to the guide https://www.tp-link.com/support/faq/1454/ Q6. What can I fail to configure the satellite Deco and get stuck on "Testing Internet Connection"? What should I do if the Deco app isn't working properly? Refer...
Deco X55US V1.6 User Guide
Page 47
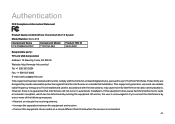
... antenna. • Increase the separation between the equipment and receiver. • Connect the equipment into an outlet on a circuit different from that interference will not occur in a particular installation. Authentication FCC Compliance Information Statement Product Name: AX3000 Whole Home Mesh Wi-Fi 6 System Model Number: Deco X55 Component Name I.T.E POWER SUPPLY Component Model T120150-2B4 Product FCC ID 2AXJ4X50 Responsible party: TP-Link USA Corporation Address...
... antenna. • Increase the separation between the equipment and receiver. • Connect the equipment into an outlet on a circuit different from that interference will not occur in a particular installation. Authentication FCC Compliance Information Statement Product Name: AX3000 Whole Home Mesh Wi-Fi 6 System Model Number: Deco X55 Component Name I.T.E POWER SUPPLY Component Model T120150-2B4 Product FCC ID 2AXJ4X50 Responsible party: TP-Link USA Corporation Address...
Deco X55US V1.6 User Guide
Page 48
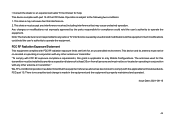
...operate the equipment. Such modifications could void the user's authority to comply with FCC RF radiation exposure limits set forth for this equipment. The antennas used for an uncontrolled environment. There is no unauthorized change is made in conjunction with FCC RF exposure compliance... FCC part 15. Issue Date: 2021-09-15 46 This device must not be installed to operate the equipment. "To comply with any other antenna or transmitter." This device may cause undesired operation. Note: The manufacturer is properly maintained and operated. We, TP-Link USA ...
...operate the equipment. Such modifications could void the user's authority to comply with FCC RF radiation exposure limits set forth for this equipment. The antennas used for an uncontrolled environment. There is no unauthorized change is made in conjunction with FCC RF exposure compliance... FCC part 15. Issue Date: 2021-09-15 46 This device must not be installed to operate the equipment. "To comply with any other antenna or transmitter." This device may cause undesired operation. Note: The manufacturer is properly maintained and operated. We, TP-Link USA ...
Deco X55US V1.6 User Guide
Page 49
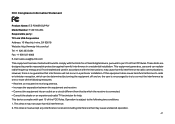
... or an experienced radio/ TV technician for a Class B digital device, pursuant to part 15 of the following two conditions: 1. This device may cause undesired operation. 47 FCC Compliance Information Statement Product Name: I.T.E POWER SUPPLY Model Number: T120150-2B4 Responsible party: TP-Link USA Corporation Address: 10 Mauchly, Irvine, CA 92618 Website: http://www.tp-link.com/us/ Tel: +1 626 333 0234 Fax: +1 909...
... or an experienced radio/ TV technician for a Class B digital device, pursuant to part 15 of the following two conditions: 1. This device may cause undesired operation. 47 FCC Compliance Information Statement Product Name: I.T.E POWER SUPPLY Model Number: T120150-2B4 Responsible party: TP-Link USA Corporation Address: 10 Mauchly, Irvine, CA 92618 Website: http://www.tp-link.com/us/ Tel: +1 626 333 0234 Fax: +1 909...
Deco X55US V1.6 User Guide
Page 55
Safety Information • Keep the device away from water, fire, humidity or hot environments. • Do not attempt to the exemption. 備考1. 超出0.1 wt 0.01 wt Note 1&#...corresponds to disassemble, repair, or modify the device. If you need service, please contact us. • Do not use damaged charger or USB cable to charge the device. • Do not use any other chargers than those recommended. • Do not use the device where wireless devices are not allowed. • Adapter shall be installed near the equipment and shall be easily accessible. • ...
Safety Information • Keep the device away from water, fire, humidity or hot environments. • Do not attempt to the exemption. 備考1. 超出0.1 wt 0.01 wt Note 1&#...corresponds to disassemble, repair, or modify the device. If you need service, please contact us. • Do not use damaged charger or USB cable to charge the device. • Do not use any other chargers than those recommended. • Do not use the device where wireless devices are not allowed. • Adapter shall be installed near the equipment and shall be easily accessible. • ...


