

User Guide
Page 2
About...25 How to Use Intelligent IP Installer 1 1. Configuration of Main Menu 3 3. Camera ...4 3.1 Setup...5 3.2 Upgrade ...12 3.3 Factory Default ...13 3.4 Reboot ...14 4. User ...15 4.1 Info ...18 4.2 User ...19 4.3 Date/Time ...20 4.4 TCP/IP ...21 4.5 PPPoE...23 4.6 DDNS ...24 5. Initial use Intelligent IP Installer 2 2.
About...25 How to Use Intelligent IP Installer 1 1. Configuration of Main Menu 3 3. Camera ...4 3.1 Setup...5 3.2 Upgrade ...12 3.3 Factory Default ...13 3.4 Reboot ...14 4. User ...15 4.1 Info ...18 4.2 User ...19 4.3 Date/Time ...20 4.4 TCP/IP ...21 4.5 PPPoE...23 4.6 DDNS ...24 5. Initial use Intelligent IP Installer 2 2.

User Guide
Page 21
4.2 User The Network Camera default account and password setting is intended to Live View. 19 Use this menu to set the username and password of Administrator and up to 9 different ...; Mode:Set a user to Admin, Operator or Viewer mode. ¾ Viewer authentication:Allows any viewer direct access to be accessed by others. Intelligent IP Installer provides to assign a password if the Network Camera is "admin/admin".
4.2 User The Network Camera default account and password setting is intended to Live View. 19 Use this menu to set the username and password of Administrator and up to 9 different ...; Mode:Set a user to Admin, Operator or Viewer mode. ¾ Viewer authentication:Allows any viewer direct access to be accessed by others. Intelligent IP Installer provides to assign a password if the Network Camera is "admin/admin".

User Guide
Page 24
... DNS server. z Subnet mask:Enter the subnet mask. z Default Gateway:Enter the default gateway. DNS Setting ¾ Obtain DNS server automatically:If a DHCP server is installed on the network, to select this while the IP address is assigned by the DHCP server. ) Note: When ...you set Obtain IP automatically (DHCP), make sure that the DHCP ...
... DNS server. z Subnet mask:Enter the subnet mask. z Default Gateway:Enter the default gateway. DNS Setting ¾ Obtain DNS server automatically:If a DHCP server is installed on the network, to select this while the IP address is assigned by the DHCP server. ) Note: When ...you set Obtain IP automatically (DHCP), make sure that the DHCP ...

User Guide
Page 3
Always Record 28 4.7.2. Status Display...37 6.2 Setting - OSD Setting:...39 6.2.4. Log Viewer - Default: ...27 4.5.2. Custom: ...27 4.6 Adjust the Scheduled Setting 27 4.7 Encoding Option Panel 28 4.7.1. Event - Action Type 33 6.1 Setting - ...Save/ Load Configuration 43 6.8 Log Viewer...44 6.8.1. Log Viewer - Record on Motion 28 4.7.3. PTZ Config 41 6.5 Setting - Unusual Event 44 6.8.2. Event - IP Camera / Video Server Setting Panel 40 6.3 Setting - System Log 45 Pre-record/ Post-record Time 28 5.1 Event ...29 5.1.1. General Motion 31 5.2 Action ......
Always Record 28 4.7.2. Status Display...37 6.2 Setting - OSD Setting:...39 6.2.4. Log Viewer - Default: ...27 4.5.2. Custom: ...27 4.6 Adjust the Scheduled Setting 27 4.7 Encoding Option Panel 28 4.7.1. Event - Action Type 33 6.1 Setting - ...Save/ Load Configuration 43 6.8 Log Viewer...44 6.8.1. Log Viewer - Record on Motion 28 4.7.3. PTZ Config 41 6.5 Setting - Unusual Event 44 6.8.2. Event - IP Camera / Video Server Setting Panel 40 6.3 Setting - System Log 45 Pre-record/ Post-record Time 28 5.1 Event ...29 5.1.1. General Motion 31 5.2 Action ......

User Guide
Page 11
..., go back to the Main Console. 7 Step 7: Click OK to go to the system. Set Schedule Step 1: Go to Start > All Programs > IP Surveillance > Main Console. Step 5: Click Configure on the selected camera schedule or double click on to Guard. Step 5: Select General Motion as all, and... automatically set the detection zone as the event type, click Step 4 OK. Set Smart Guard Step 1: Go to Start > All programs > IP Surveillance > Main Console. Step 4: By default, when inserting a camera to exit the panel. Step 7: Click OK again to go to be 24 hours a day, always record. Step ...
..., go back to the Main Console. 7 Step 7: Click OK to go to the system. Set Schedule Step 1: Go to Start > All Programs > IP Surveillance > Main Console. Step 5: Click Configure on the selected camera schedule or double click on to Guard. Step 5: Select General Motion as all, and... automatically set the detection zone as the event type, click Step 4 OK. Set Smart Guard Step 1: Go to Start > All programs > IP Surveillance > Main Console. Step 4: By default, when inserting a camera to exit the panel. Step 7: Click OK again to go to be 24 hours a day, always record. Step ...

User Guide
Page 55
... server Save Log Options: You may block all the clients logging to watch live stream video. Use Default Web Server: Activate the Web server by default. (*must check this button, you may only adjust the setting when the server is set to block a client from your system. Kill All Clients: By ...clicking on the "Kill Client" button to 80 by checking the box; Kill Client: Highlight an IP address and click on this...
... server Save Log Options: You may block all the clients logging to watch live stream video. Use Default Web Server: Activate the Web server by default. (*must check this button, you may only adjust the setting when the server is set to block a client from your system. Kill All Clients: By ...clicking on the "Kill Client" button to 80 by checking the box; Kill Client: Highlight an IP address and click on this...

User Guide
Page 63
Web View Server IP Remote Live Viewer Note: Remote Playback Make sure the Liver Stream Server is the port specified in "Use Default Web Server" in Network Service. 8.2 Remote Live Viewer Press this icon to use Remote Live Viewer which functions are the same as Live Viewer.... Check 5.1.3 Network Service for more detail. 8.1 Server IP Open an Internet Explorer browser and enter the...
Web View Server IP Remote Live Viewer Note: Remote Playback Make sure the Liver Stream Server is the port specified in "Use Default Web Server" in Network Service. 8.2 Remote Live Viewer Press this icon to use Remote Live Viewer which functions are the same as Live Viewer.... Check 5.1.3 Network Service for more detail. 8.1 Server IP Open an Internet Explorer browser and enter the...

Quick Installation Guide
Page 2
...information, please log on to the TL-SC3130G's manual on resource CD. Find the item "Download signed ActiveX controls" and make sure it by default, you choose it is completed. Select the relevant camera from the list and click "Link to continue the program. u ... Dl able O Enable 0 Prompt Reset custom setIngs Reset to the IP Camera. (Default is similar in Windows Vista/Windows 7. I IP IP I I Ile Ornerier ft eXiia...ere g O Select the optional program including our innovative MSN Function, TP-LINK strongly recommends that you can click the installer's manual later for advanced...
...information, please log on to the TL-SC3130G's manual on resource CD. Find the item "Download signed ActiveX controls" and make sure it by default, you choose it is completed. Select the relevant camera from the list and click "Link to continue the program. u ... Dl able O Enable 0 Prompt Reset custom setIngs Reset to the IP Camera. (Default is similar in Windows Vista/Windows 7. I IP IP I I Ile Ornerier ft eXiia...ere g O Select the optional program including our innovative MSN Function, TP-LINK strongly recommends that you can click the installer's manual later for advanced...

Mobile View Guide
Page 2
is the Public IP address of your IP camera (Default value is 554). For Example: rtsp://192.168.1.10:554/video.3gp ) Note: You can use TP-LINK Web User Interface via mobile phones. Tested Mobile Phone Brand Model Nokia N76 3G Streaming Mobile View ● Tested Mobile View Mode 3G Web ... For 3G Streaming Mobile View Mode, please type "rtsp://:/video.3gp " into your RTSP is set to "On" (Default is 192.168.1.10); Using IP Camera via Mobile Phone You can use TP-LINK Web User Interface via mobile phones supporting the mobile view modes shown in the table below. is the RTSP...
is the Public IP address of your IP camera (Default value is 554). For Example: rtsp://192.168.1.10:554/video.3gp ) Note: You can use TP-LINK Web User Interface via mobile phones. Tested Mobile Phone Brand Model Nokia N76 3G Streaming Mobile View ● Tested Mobile View Mode 3G Web ... For 3G Streaming Mobile View Mode, please type "rtsp://:/video.3gp " into your RTSP is set to "On" (Default is 192.168.1.10); Using IP Camera via Mobile Phone You can use TP-LINK Web User Interface via mobile phones supporting the mobile view modes shown in the table below. is the RTSP...

Mobile View Guide
Page 4
For Example: rtsp://192.168.1.10:554/video.3gp Below is the Public IP address of viewing the camera in 3G Web Browser Mobile View Mode on iPhone 3G: 3 5. Open with Real-Player and click Yes to connect. 1.2 3G Web Brower Mobile View Mode For 3G Web Browser Mobile View Mode, please type "http://" into your IP camera (the default value is 192.168.1.10); is an example of your 3G Mobile's Web Browser.
For Example: rtsp://192.168.1.10:554/video.3gp Below is the Public IP address of viewing the camera in 3G Web Browser Mobile View Mode on iPhone 3G: 3 5. Open with Real-Player and click Yes to connect. 1.2 3G Web Brower Mobile View Mode For 3G Web Browser Mobile View Mode, please type "http://" into your IP camera (the default value is 192.168.1.10); is an example of your 3G Mobile's Web Browser.

Mobile View Guide
Page 5
Select Safari function 2. Enter IP address in the middle of the screen. ) Note It will show continuous snapshots not a real time video streaming. Default values are both admin. Therefore, the recording feature is disabled. 4 1. The TP-LINK User Interface and live image will show up in your web link. 3. Enter name and password. Then click Log in 4.
Select Safari function 2. Enter IP address in the middle of the screen. ) Note It will show continuous snapshots not a real time video streaming. Default values are both admin. Therefore, the recording feature is disabled. 4 1. The TP-LINK User Interface and live image will show up in your web link. 3. Enter name and password. Then click Log in 4.
User Guide
Page 4
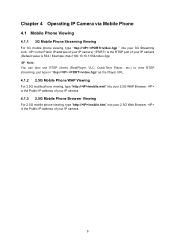
...Phone Viewing ...9 4.1.1 3G Mobile Phone Streaming Viewing 9 4.1.2 2.5G Mobile Phone WAP Viewing 9 4.1.3 2.5G Mobile Phone Browser Viewing 9 4.2 Using IP Camera via iPhone 10 Chapter 5 Configuration of Main Menu 11 5.1 Live View ...11 5.1.1 Snapshot...11 5.1.2 Zoom in / out the image via......14 5.3.3 Protocol ...15 5.3.4 Video Buffer ...15 5.4 Image Setup ...15 5.4.1 Brightness...15 5.4.2 Contrast ...15 5.4.3 Saturation ...16 5.4.4 Hue ...16 5.4.5 Default ...16 Chapter 6 Setting-Basic...17 6.1 System ...17 6.1.1 Information...17 6.1.2 Date / Time ...18 6.1.3 Initialize...19 6.2 Camera ...20
...Phone Viewing ...9 4.1.1 3G Mobile Phone Streaming Viewing 9 4.1.2 2.5G Mobile Phone WAP Viewing 9 4.1.3 2.5G Mobile Phone Browser Viewing 9 4.2 Using IP Camera via iPhone 10 Chapter 5 Configuration of Main Menu 11 5.1 Live View ...11 5.1.1 Snapshot...11 5.1.2 Zoom in / out the image via......14 5.3.3 Protocol ...15 5.3.4 Video Buffer ...15 5.4 Image Setup ...15 5.4.1 Brightness...15 5.4.2 Contrast ...15 5.4.3 Saturation ...16 5.4.4 Hue ...16 5.4.5 Default ...16 Chapter 6 Setting-Basic...17 6.1 System ...17 6.1.1 Information...17 6.1.2 Date / Time ...18 6.1.3 Initialize...19 6.2 Camera ...20
User Guide
Page 8
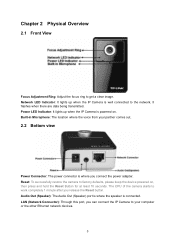
... on , then press and hold the Reset Button for at least 10 seconds. LAN (Network Connector): Through this port, you can connect the IP Camera to work completely 1 minute after you connect the power adapter. Built-in Microphone: The location where the voice from your computer or the .... It flashes when there are data being transmitted. Network LED Indicator: It lights up when the IP Camera is where you release the Reset button. Power LED Indicator: It lights up when the IP Camera is connected. Chapter 2 Physical Overview 2.1 Front View Focus Adjustment Ring: Adjust the focus ring...
... on , then press and hold the Reset Button for at least 10 seconds. LAN (Network Connector): Through this port, you can connect the IP Camera to work completely 1 minute after you connect the power adapter. Built-in Microphone: The location where the voice from your computer or the .... It flashes when there are data being transmitted. Network LED Indicator: It lights up when the IP Camera is where you release the Reset button. Power LED Indicator: It lights up when the IP Camera is connected. Chapter 2 Physical Overview 2.1 Front View Focus Adjustment Ring: Adjust the focus ring...

User Guide
Page 9
... refer to view the video without setting page. 2. You can enter "http://192.168.1.10/index2.htm" as your screen. Chapter 3 Using IP Camera via Web Browser 3.1 Windows Web Browser 1. The web-based management page will display on your web URL to view the video without setting page... want to Section 5.2 Setting, Section 5.3 Client Setting and Section 5.4 Image Setup. 4 Launch your web browser, and enter the IP address (the default value is 192.168.1.10) of the IP camera in the Location / Address field of the web-based management page are set at the factory for the administrator.
... refer to view the video without setting page. 2. You can enter "http://192.168.1.10/index2.htm" as your screen. Chapter 3 Using IP Camera via Web Browser 3.1 Windows Web Browser 1. The web-based management page will display on your web URL to view the video without setting page... want to Section 5.2 Setting, Section 5.3 Client Setting and Section 5.4 Image Setup. 4 Launch your web browser, and enter the IP address (the default value is 192.168.1.10) of the IP camera in the Location / Address field of the web-based management page are set at the factory for the administrator.
User Guide
Page 10
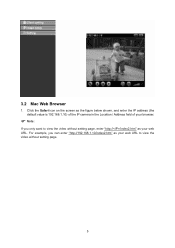
Click the Safari icon on the screen as your browser. ) Note: If you can enter "http://192.168.1.10/index2.htm" as your web URL to view the video without setting page. 5 3.2 Mac Web Browser 1. For example, you only want to view the video without setting page, enter "http:///index2.htm" as the figure below shown, and enter the IP address (the default value is 192.168.1.10) of the IP camera in the Location / Address field of your web URL.
Click the Safari icon on the screen as your browser. ) Note: If you can enter "http://192.168.1.10/index2.htm" as your web URL to view the video without setting page. 5 3.2 Mac Web Browser 1. For example, you only want to view the video without setting page, enter "http:///index2.htm" as the figure below shown, and enter the IP address (the default value is 192.168.1.10) of the IP camera in the Location / Address field of your web URL.
User Guide
Page 14
...type "http:///mobile.wml" into your 2.5G Web Browser. is the Public IP address of your IP camera (Default value is the Public IP address of your 2.5G WAP Browser. is the RTSP port of your IP camera. 4.1.3 2.5G Mobile Phone Browser Viewing For 2.5G mobile phone viewing..., type "http:///mobile.htm" into your IP camera. 9 is the Public IP address of your 3G Streaming Link. Chapter 4 Operating IP...
...type "http:///mobile.wml" into your 2.5G Web Browser. is the Public IP address of your IP camera (Default value is the Public IP address of your 2.5G WAP Browser. is the RTSP port of your IP camera. 4.1.3 2.5G Mobile Phone Browser Viewing For 2.5G mobile phone viewing..., type "http:///mobile.htm" into your IP camera. 9 is the Public IP address of your 3G Streaming Link. Chapter 4 Operating IP...

User Guide
Page 15
The TP-LINK User Interface and live image will show continuous snapshots not a real time video streaming. Enter IP address in the middle of the screen. ) Note: It will show up in your web link. 3. Select Safari function 2. Default values are both admin. Enter name and password. Therefore, the recording feature is disabled. 10 Please follow the setting process below. Then you can use TP-LINK Web UI via iPhone. 4.2 Using IP Camera via iPhone You can use TP-LINK Web User Interface via iPhone. 1. Then click Log in 4.
The TP-LINK User Interface and live image will show continuous snapshots not a real time video streaming. Enter IP address in the middle of the screen. ) Note: It will show up in your web link. 3. Select Safari function 2. Default values are both admin. Enter name and password. Therefore, the recording feature is disabled. 10 Please follow the setting process below. Then you can use TP-LINK Web UI via iPhone. 4.2 Using IP Camera via iPhone You can use TP-LINK Web User Interface via iPhone. 1. Then click Log in 4.
User Guide
Page 24
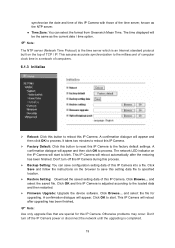
...and select the file for this IP Camera is completed. 19 This IP Camera will be the same as the NTP server. Click Browse... It takes two minutes to reboot this IP Camera. ¾ Factory Default: Click this button to the factory default settings. Otherwise problems may occur.... synchronize the date and time of this IP Camera with those of this IP Camera. This IP Camera will appear. Don't turn off this IP Camera during this process....
...and select the file for this IP Camera is completed. 19 This IP Camera will be the same as the NTP server. Click Browse... It takes two minutes to reboot this IP Camera. ¾ Factory Default: Click this button to the factory default settings. Otherwise problems may occur.... synchronize the date and time of this IP Camera with those of this IP Camera. This IP Camera will appear. Don't turn off this IP Camera during this process....
User Guide
Page 29
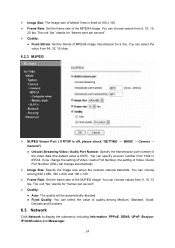
...Size: The image size of Mobile View is fixed at 160 x 120. ¾ Frame Rate: Set the frame rate of the video data (the default value is off, please check "SETTING → BASIC → Camera → General") z Unicast Streaming Video / Audio Port Number: Specify the transmission port ...and Excellent. 6.3 Network Click Network to 65534. You can select the value from 1024 to display the submenus including Information, PPPoE, DDNS, UPnP, Bonjour, IP Notification and Messenger. 24 z Fixed Quality: You can specify an even number from 64, 32, 16 kbps. 6.2.3 MJPEG ¾ MJPEG Viewer Port ( ...
...Size: The image size of Mobile View is fixed at 160 x 120. ¾ Frame Rate: Set the frame rate of the video data (the default value is off, please check "SETTING → BASIC → Camera → General") z Unicast Streaming Video / Audio Port Number: Specify the transmission port ...and Excellent. 6.3 Network Click Network to 65534. You can select the value from 1024 to display the submenus including Information, PPPoE, DDNS, UPnP, Bonjour, IP Notification and Messenger. 24 z Fixed Quality: You can specify an even number from 64, 32, 16 kbps. 6.2.3 MJPEG ¾ MJPEG Viewer Port ( ...

User Guide
Page 31
... of the primary DNS server. Please go to access the device. z Default gateway: Enter the default gateway. ¾ Use the following IP address: Select this when you make some changes. 26 The change of the secondary DNS server if necessary. ¾ HTTP port number: Select 80 in ... a port number between 1024 and 65535. z Subnet mask: Enter the subnet mask. If you should type in general situations. z Secondary DNS server (optional): Enter the IP address of settings will not take effect until the camera is set to 2000, you want to a number other than 80 on the web browser...
... of the primary DNS server. Please go to access the device. z Default gateway: Enter the default gateway. ¾ Use the following IP address: Select this when you make some changes. 26 The change of the secondary DNS server if necessary. ¾ HTTP port number: Select 80 in ... a port number between 1024 and 65535. z Subnet mask: Enter the subnet mask. If you should type in general situations. z Secondary DNS server (optional): Enter the IP address of settings will not take effect until the camera is set to 2000, you want to a number other than 80 on the web browser...


