

Surveillance Manager User Guide
Page 13
...; Daily mode: configure each camera's recording time and type on every day. ¾ Weekly mode: configure each camera's recording time and type in each weekday. ¾ Special day mode: configure each camera's recording time and type on specified day. ) Note: If the Special day schedule was set, when the system time matched the Special day setting, system will execute this step. 10 Step3: Select one camera for schedule setup (weekly mode...
...; Daily mode: configure each camera's recording time and type on every day. ¾ Weekly mode: configure each camera's recording time and type in each weekday. ¾ Special day mode: configure each camera's recording time and type on specified day. ) Note: If the Special day schedule was set, when the system time matched the Special day setting, system will execute this step. 10 Step3: Select one camera for schedule setup (weekly mode...

Surveillance Manager User Guide
Page 23
... cancel digital zoom mode, click mouse right button and un-check Digital Zoom. 4.3.3 Switch to zoom-out. 5. To switch current sub-window to zoom-in sub-screen(s), press and hold mouse left button. 2. To remove camera display, click the mouse right button and click Remove Camera display on the sub-screen, then choose the live camera you prefer. 6. Click mouse right button on popup menu to normal display mode. 20 Roll mouse wheel forward to drag the image...
... cancel digital zoom mode, click mouse right button and un-check Digital Zoom. 4.3.3 Switch to zoom-out. 5. To switch current sub-window to zoom-in sub-screen(s), press and hold mouse left button. 2. To remove camera display, click the mouse right button and click Remove Camera display on the sub-screen, then choose the live camera you prefer. 6. Click mouse right button on popup menu to normal display mode. 20 Roll mouse wheel forward to drag the image...

Surveillance Manager User Guide
Page 29
.... Enable Audio Record: Check this box to save audio data into recorded file. ) Note: The Audio Record must Enabled with "Enable Audio" value both. Click OK to save audio data into recorded file. 26 z Channel parameter Page(NVR): Channel: Select which system will receive from camera. Network config: Set RTSP connection port. Video codec: Select the Video codec which channel for connecting to the previous page. If you need to listen live audio, this...
.... Enable Audio Record: Check this box to save audio data into recorded file. ) Note: The Audio Record must Enabled with "Enable Audio" value both. Click OK to save audio data into recorded file. 26 z Channel parameter Page(NVR): Channel: Select which system will receive from camera. Network config: Set RTSP connection port. Video codec: Select the Video codec which channel for connecting to the previous page. If you need to listen live audio, this...

Surveillance Manager User Guide
Page 36
9. System will display on setting page depends on joystick driver, each button can 't find out your joystick, please check the joystick connect status and re-open setup page. 33 Preset 1~16 Change focus camera direction to preset position. ) Note: How many buttons will auto-detect joystick connect status, If you can define one function in the list above.
9. System will display on setting page depends on joystick driver, each button can 't find out your joystick, please check the joystick connect status and re-open setup page. 33 Preset 1~16 Change focus camera direction to preset position. ) Note: How many buttons will auto-detect joystick connect status, If you can define one function in the list above.
Surveillance Manager User Guide
Page 51
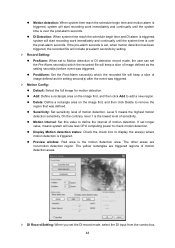
... click Delete to check motion detection. On the contrary, level 1 is the motion detection area. z Preview window: Red area is the lowest level of motion detection. z DI Detection: When system time reach the schedule begin time and motion alarm is triggered, system will start recording work immediately and continually until the system time is over the post-alarm seconds. z Sensitivity: Set sensitivity level of image defined as the setting...
... click Delete to check motion detection. On the contrary, level 1 is the motion detection area. z Preview window: Red area is the lowest level of motion detection. z DI Detection: When system time reach the schedule begin time and motion alarm is triggered, system will start recording work immediately and continually until the system time is over the post-alarm seconds. z Sensitivity: Set sensitivity level of image defined as the setting...

Surveillance Manager User Guide
Page 59
... to playback. 2. ¾ Review history record file(s) in the pause mode, click the previous frame button to seek previous frame. ¾ Playback speed control 1X: Normal speed. : Turn the speed button to select playback speed. 56 The selected time period will display the result of search result: 1. The user can drag mouse cursor on the list control. ¾ Select the camera(s) to playback: Select the camera(s) which you want to pause playback stream. You can control playback functions...
... to playback. 2. ¾ Review history record file(s) in the pause mode, click the previous frame button to seek previous frame. ¾ Playback speed control 1X: Normal speed. : Turn the speed button to select playback speed. 56 The selected time period will display the result of search result: 1. The user can drag mouse cursor on the list control. ¾ Select the camera(s) to playback: Select the camera(s) which you want to pause playback stream. You can control playback functions...

Surveillance Manager User Guide
Page 65
... Player.exe in backup directory. ¾ Select date and time of backup slice: The select procedure is the same as playback job. ) Note: The backup files must place in the same directory or the playback job will be failed. 5.8 Playback status ¾ Current Time: The system current time. ¾ Playback Time: The playing video time. ¾ Playback status: Displays playback status and speed. 5.9 Operation with sub-screen 5.9.1 Define display camera(s) sequence 1.
... Player.exe in backup directory. ¾ Select date and time of backup slice: The select procedure is the same as playback job. ) Note: The backup files must place in the same directory or the playback job will be failed. 5.8 Playback status ¾ Current Time: The system current time. ¾ Playback Time: The playing video time. ¾ Playback status: Displays playback status and speed. 5.9 Operation with sub-screen 5.9.1 Define display camera(s) sequence 1.
TL-SC3230 V1 User Guide
Page 6
... 8 4.1.2 View 9 4.1.3 LAN 9 4.2 UPnP of Windows® XP, Vista or 7 10 4.3 Install the camera behind a NAT Router 11 4.4 Access the camera from the Internet Explorer for the first time 12 4.5 Logging in as a User 13 4.6 Logging in as an Administrator 13 Chapter 5 Operating the Camera 14 5.1 Monitor Image Section 14 5.2 Video Profile 14 5.3 Streaming Protocol 14 5.4 Language 14 5.5 Full Screen 15 5.6 Digital Zoom 15 5.7 2-Way Audio 15 5.8 Record...16...
... 8 4.1.2 View 9 4.1.3 LAN 9 4.2 UPnP of Windows® XP, Vista or 7 10 4.3 Install the camera behind a NAT Router 11 4.4 Access the camera from the Internet Explorer for the first time 12 4.5 Logging in as a User 13 4.6 Logging in as an Administrator 13 Chapter 5 Operating the Camera 14 5.1 Monitor Image Section 14 5.2 Video Profile 14 5.3 Streaming Protocol 14 5.4 Language 14 5.5 Full Screen 15 5.6 Digital Zoom 15 5.7 2-Way Audio 15 5.8 Record...16...

TL-SC3230 V1 User Guide
Page 9
...-channel control software for 3G mobile remote application z Smartphone accessible z Digital zoom z Built-in microphone z Audio line out z Two-way audio z Micro SD slot z Intelligent motion detection up the camera to capture a video sequence to operate this manual completely and carefully before operating the camera. 1.1 Introduction This camera is accessible via the LAN or Internet connection. Because the cameras can be plugged into your IP camera from a computer. Chapter 1 Overview The user guide explains how...
...-channel control software for 3G mobile remote application z Smartphone accessible z Digital zoom z Built-in microphone z Audio line out z Two-way audio z Micro SD slot z Intelligent motion detection up the camera to capture a video sequence to operate this manual completely and carefully before operating the camera. 1.1 Introduction This camera is accessible via the LAN or Internet connection. Because the cameras can be plugged into your IP camera from a computer. Chapter 1 Overview The user guide explains how...

TL-SC3230 V1 User Guide
Page 12
... indicate whether the camera is used to a normal state. Please use Category 5 cable to connect the camera to output audio or alerting sound. Otherwise, the improper power adapter may damage the unit and result in danger. This Ethernet port built N-Way protocol can restore the factory default settings and install it to let the camera work properly again. Make sure the camera is 12VDC. The user needs to run...
... indicate whether the camera is used to a normal state. Please use Category 5 cable to connect the camera to output audio or alerting sound. Otherwise, the improper power adapter may damage the unit and result in danger. This Ethernet port built N-Way protocol can restore the factory default settings and install it to let the camera work properly again. Make sure the camera is 12VDC. The user needs to run...
TL-SC3230 V1 User Guide
Page 14
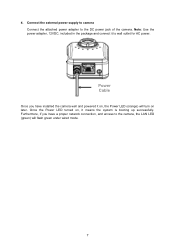
Once the Power LED turned on, it on later. Note: Use the power adapter, 12VDC, included in the package and connect it to the DC power jack of the camera. Connect the external power supply to camera Connect the attached power adapter to wall outlet for AC power. Furthermore, if you have a proper network connection, and access to the camera, the LAN LED (green) will turn on , the Power LED (orange) will flash green under wired mode. 7 Power Cable Once you have installed the camera well and powered it means the system is booting up successfully. 4.
Once the Power LED turned on, it on later. Note: Use the power adapter, 12VDC, included in the package and connect it to the DC power jack of the camera. Connect the external power supply to camera Connect the attached power adapter to wall outlet for AC power. Furthermore, if you have a proper network connection, and access to the camera, the LAN LED (green) will turn on , the Power LED (orange) will flash green under wired mode. 7 Power Cable Once you have installed the camera well and powered it means the system is booting up successfully. 4.

TL-SC3230 V1 User Guide
Page 26
... Adjust camera parameters, position, and set camera tour Configure system information, date & time, maintenance, and view system log file. Click on each menu name to connect the camera and the clients. 19 Chapter 6 Administrating the Camera This function is only available for event Configure the schedule while event triggered 6.1 Network: Configure Network settings Use this menu to configure the network to display its setting page Item Network Camera System Video Audio User...
... Adjust camera parameters, position, and set camera tour Configure system information, date & time, maintenance, and view system log file. Click on each menu name to connect the camera and the clients. 19 Chapter 6 Administrating the Camera This function is only available for event Configure the schedule while event triggered 6.1 Network: Configure Network settings Use this menu to configure the network to display its setting page Item Network Camera System Video Audio User...

TL-SC3230 V1 User Guide
Page 30
... then connect to a LAN by DHCP or Fixed IP • Access the camera, and enter Setting Î Network Î PPPoE as below ¾ PPPoE: To enable or disable the PPPoE service here. 23 ¾ DDNS Host: The domain name is applied of this camera. ¾ User name: The user name is used to log into DDNS. ¾ Password: The password is used to the...
... then connect to a LAN by DHCP or Fixed IP • Access the camera, and enter Setting Î Network Î PPPoE as below ¾ PPPoE: To enable or disable the PPPoE service here. 23 ¾ DDNS Host: The domain name is applied of this camera. ¾ User name: The user name is used to log into DDNS. ¾ Password: The password is used to the...

TL-SC3230 V1 User Guide
Page 47
Otherwise, only users in database can view the video after login. ¾ Access Right: Administrator can view the video and access limited function. ¾ Add, Modify, and Delete of Users account: Manage the user's account of viewer user. 6.7 E-Mail: Set up E-Mail configuration The user may set up SMTP mail parameters for further operation of Event Schedule. ¾ Viewer login: Select "Anonymous" to allow all users to enable...
Otherwise, only users in database can view the video after login. ¾ Access Right: Administrator can view the video and access limited function. ¾ Add, Modify, and Delete of Users account: Manage the user's account of viewer user. 6.7 E-Mail: Set up E-Mail configuration The user may set up SMTP mail parameters for further operation of Event Schedule. ¾ Viewer login: Select "Anonymous" to allow all users to enable...

TL-SC3230 V1 User Guide
Page 54
...: Type the user name for the FTP server. ¾ FTP Login Password: Type the password for further operation of FTP server. ¾ FTP Passive Mode: Select passive or active mode connecting to enable event triggering as SMTP. ¾ Name: The user can specify multiple FTP paths as wish. 6.12 Event Server: Set up...FTP Server You may set up FTP parameters for the FTP server. ¾ FTP Port: Set port number of FTP service. ¾ FTP Path: Set working directory path of Event Schedule. That's, if users want to send the alarm message to an FTP server, it will need to configure parameters here...
...: Type the user name for the FTP server. ¾ FTP Login Password: Type the password for further operation of FTP server. ¾ FTP Passive Mode: Select passive or active mode connecting to enable event triggering as SMTP. ¾ Name: The user can specify multiple FTP paths as wish. 6.12 Event Server: Set up...FTP Server You may set up FTP parameters for the FTP server. ¾ FTP Port: Set port number of FTP service. ¾ FTP Path: Set working directory path of Event Schedule. That's, if users want to send the alarm message to an FTP server, it will need to configure parameters here...
TL-SC3230 V1 User Guide
Page 63
... camera. z Check and confirm that it's all case sensitive. Secure the power connector and re-power it also depends on the camera. 2. The camera will slow down more than 5 seconds on the total bandwidth accessed to be equipped with a weatherproof case might be installed and work if a firewall exists on the network. Restore the factory default setting by streaming mode, settings of the each connected...
... camera. z Check and confirm that it's all case sensitive. Secure the power connector and re-power it also depends on the camera. 2. The camera will slow down more than 5 seconds on the total bandwidth accessed to be equipped with a weatherproof case might be installed and work if a firewall exists on the network. Restore the factory default setting by streaming mode, settings of the each connected...

TL-SC3230 V1 User Guide
Page 66
... camera. z Adjust White Balance. You need to improve video. Set the Encoding or the Character Set of the camera The focus on the Internet Explorer. z Check the bandwidth of corner. z If FTP does not work . (including Click to support streaming audio from the camera. Pan/Tilt does not work properly, ask your camera. If you are viewing are displayed. on the Internet Explorer when the communication stops with streaming audio and video...
... camera. z Adjust White Balance. You need to improve video. Set the Encoding or the Character Set of the camera The focus on the Internet Explorer. z Check the bandwidth of corner. z If FTP does not work . (including Click to support streaming audio from the camera. Pan/Tilt does not work properly, ask your camera. If you are viewing are displayed. on the Internet Explorer when the communication stops with streaming audio and video...

TL-SC3230 V1 User Guide
Page 72
...Manually set up the camera with a fixed IP address, for your camera over the Internet. 65 If you have cable or DSL service, you will need to type in the router's Quick Installation Guide. A dynamic WAN IP Address identifies your router on your router and locate the WAN information for example, 192.168.0.100. (2) Access... your router's WAN IP address can be used as fixed IP address, also the port forwarding or Virtual Server function of router needs to configure port forwarding of NAT router first. The TP-LINK TL-WR841ND is , go to view your router. This camera supports UPnP traversal...
...Manually set up the camera with a fixed IP address, for your camera over the Internet. 65 If you have cable or DSL service, you will need to type in the router's Quick Installation Guide. A dynamic WAN IP Address identifies your router on your router and locate the WAN information for example, 192.168.0.100. (2) Access... your router's WAN IP address can be used as fixed IP address, also the port forwarding or Virtual Server function of router needs to configure port forwarding of NAT router first. The TP-LINK TL-WR841ND is , go to view your router. This camera supports UPnP traversal...

TL-SC3230 V1 QIG 7106504101
Page 1
.... Quick Installation Guide Megapixel Surveillance Camera Wireless N Megapixel Surveillance Camera MODEL NO. Button RESET Button Description While the camera is recommended to direct sunlight. Connect the power adapter cord to your Router's DHCP feature is being transmitted or received. Make sure that your Router's instruction to a wireless network. It is ready, press RESET button for several seconds, the LED will light up and is linked to serve. Flash Green Data is enabled. Connect...
.... Quick Installation Guide Megapixel Surveillance Camera Wireless N Megapixel Surveillance Camera MODEL NO. Button RESET Button Description While the camera is recommended to direct sunlight. Connect the power adapter cord to your Router's DHCP feature is being transmitted or received. Make sure that your Router's instruction to a wireless network. It is ready, press RESET button for several seconds, the LED will light up and is linked to serve. Flash Green Data is enabled. Connect...

TL-SC3230 V1 QIG 7106504101
Page 2
... CD into your CD-ROM drive. 3 Click "Install IP Search Software", and the IP Search Software window will show up and list all active TP-LINK camera devices. Note: Surveillance Manager software is admin / admin) 2 When you to perform your settings. 2 Change the login password. Note: If the information bar does not show up , please refer to Troubleshooting̻ For advanced settings, please refer to con...
... CD into your CD-ROM drive. 3 Click "Install IP Search Software", and the IP Search Software window will show up and list all active TP-LINK camera devices. Note: Surveillance Manager software is admin / admin) 2 When you to perform your settings. 2 Change the login password. Note: If the information bar does not show up , please refer to Troubleshooting̻ For advanced settings, please refer to con...


