Data Sheet
Page 2
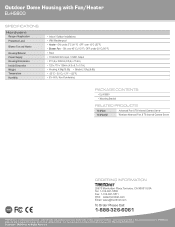
...; Housing: 4.9kg(10.8lb) • Bracket: 3.0kg (6.6lb) • -25°C ~ 50°C (-13°F ~122°F) • 0%~90%, Non-Condensing PACKAGE CONTENTS • EL-HS800 • Mounting Bracket RELATED PRODUCTS TV-IP400 TV-IP400W Advanced Pan & Tilt Internet Camera Server Wireless Advanced Pan & Tilt Internet Camera Server ORDERING INFORMATION 20675 Manhattan Place,Torrance, CA 90501 USA Tel: 1-310-961-5500 Fax: 1-310-961-5511 Web: www.trendnet.com Email...
...; Housing: 4.9kg(10.8lb) • Bracket: 3.0kg (6.6lb) • -25°C ~ 50°C (-13°F ~122°F) • 0%~90%, Non-Condensing PACKAGE CONTENTS • EL-HS800 • Mounting Bracket RELATED PRODUCTS TV-IP400 TV-IP400W Advanced Pan & Tilt Internet Camera Server Wireless Advanced Pan & Tilt Internet Camera Server ORDERING INFORMATION 20675 Manhattan Place,Torrance, CA 90501 USA Tel: 1-310-961-5500 Fax: 1-310-961-5511 Web: www.trendnet.com Email...
Quick Installation Guide
Page 2
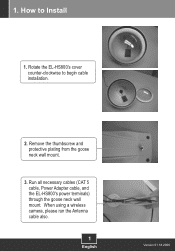
Run all necessary cables (CAT 5 cable, Power Adapter cable, and the EL-HS800's power terminals) through the goose neck wall mount. Rotate the EL-HS800's cover counter-clockwise to Install 1. When using a wireless camera, please run the Antenna cable also. 1 English Version 01.18.2006 1. How to begin cable installation. 2. Remove the thumbscrew and protective plating from the goose neck wall mount. 3.
Run all necessary cables (CAT 5 cable, Power Adapter cable, and the EL-HS800's power terminals) through the goose neck wall mount. Rotate the EL-HS800's cover counter-clockwise to Install 1. When using a wireless camera, please run the Antenna cable also. 1 English Version 01.18.2006 1. How to begin cable installation. 2. Remove the thumbscrew and protective plating from the goose neck wall mount. 3.
Quick Installation Guide
Page 3
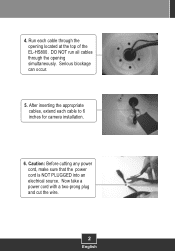
4. Caution: Before cutting any power cord, make sure that the power cord is NOT PLUGGED into an electrical source. DO NOT run all cables through the opening simultaneously. Serious blockage can occur. 5. Run each cable to 6 inches for camera installation. 6. After inserting the appropriate cables, extend each cable through the opening located at the top of the EL-HS800. Now take a power cord with a two-prong plug and cut the wire. 2 English
4. Caution: Before cutting any power cord, make sure that the power cord is NOT PLUGGED into an electrical source. DO NOT run all cables through the opening simultaneously. Serious blockage can occur. 5. Run each cable to 6 inches for camera installation. 6. After inserting the appropriate cables, extend each cable through the opening located at the top of the EL-HS800. Now take a power cord with a two-prong plug and cut the wire. 2 English
Quick Installation Guide
Page 4
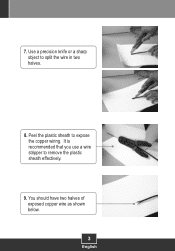
7. Use a precision knife or a sharp object to expose the copper wiring. You should have two halves of exposed copper wire as shown below. 3 English Peel the plastic sheath to split the wire in two halves. 8. It is recommended that you use a wire stripper to remove the plastic sheath effectively. 9.
7. Use a precision knife or a sharp object to expose the copper wiring. You should have two halves of exposed copper wire as shown below. 3 English Peel the plastic sheath to split the wire in two halves. 8. It is recommended that you use a wire stripper to remove the plastic sheath effectively. 9.
Quick Installation Guide
Page 5
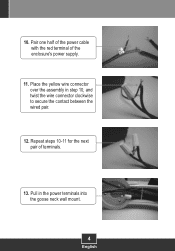
10. Pair one half of the power cable with the red terminal of terminals. 13. Repeat steps 10-11 for the next pair of the enclosure's power supply. 11. Pull in step 10, and twist the wire connector clockwise to secure the contact between the wired pair. 12. Place the yellow wire connector over the assembly in the power terminals into the goose neck wall mount. 4 English
10. Pair one half of the power cable with the red terminal of terminals. 13. Repeat steps 10-11 for the next pair of the enclosure's power supply. 11. Pull in step 10, and twist the wire connector clockwise to secure the contact between the wired pair. 12. Place the yellow wire connector over the assembly in the power terminals into the goose neck wall mount. 4 English
Quick Installation Guide
Page 6
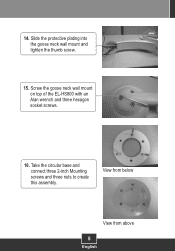
14. Slide the protective plating into the goose neck wall mount and tighten the thumb screw. 15. View from below View from above 5 English Screw the goose neck wall mount on top of the EL-HS800 with an Alan wrench and three hexagon socket screws. 16. Take the circular base and connect three 2-inch Mounting screws and three nuts to create this assembly.
14. Slide the protective plating into the goose neck wall mount and tighten the thumb screw. 15. View from below View from above 5 English Screw the goose neck wall mount on top of the EL-HS800 with an Alan wrench and three hexagon socket screws. 16. Take the circular base and connect three 2-inch Mounting screws and three nuts to create this assembly.
Quick Installation Guide
Page 7
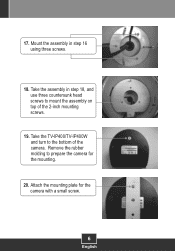
Remove the rubber molding to prepare the camera for the camera with a small screw. 6 English 17. Take the TV-IP400/TV-IP400W and turn to mount the assembly on top of the camera. Take the assembly in step 16 using three screws. 18. Mount the assembly in step 18, and use three countersunk head screws to the bottom of the 2-inch mounting screws. 19. Attach the mounting plate for the mounting. 20.
Remove the rubber molding to prepare the camera for the camera with a small screw. 6 English 17. Take the TV-IP400/TV-IP400W and turn to mount the assembly on top of the camera. Take the assembly in step 16 using three screws. 18. Mount the assembly in step 18, and use three countersunk head screws to the bottom of the 2-inch mounting screws. 19. Attach the mounting plate for the mounting. 20.
Quick Installation Guide
Page 8
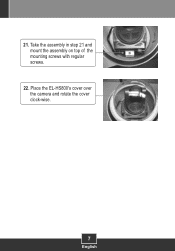
21. Take the assembly in step 21 and mount the assembly on top of the mounting screws with regular screws. 22. Place the EL-HS800's cover over the camera and rotate the cover clock-wise. 7 English
21. Take the assembly in step 21 and mount the assembly on top of the mounting screws with regular screws. 22. Place the EL-HS800's cover over the camera and rotate the cover clock-wise. 7 English
Quick Installation Guide
Page 9
Limited Warranty TRENDnet warrants its option and expense, repair the defective product or part, deliver to customer an equivalent product or part to replace the defective item, or refund to customer the purchase price paid for any software, firmware, information, or memory data of customer contained in the manual. EL-HS800 - 1 Years Warranty If a product does not operate as warranted above during the...
Limited Warranty TRENDnet warrants its option and expense, repair the defective product or part, deliver to customer an equivalent product or part to replace the defective item, or refund to customer the purchase price paid for any software, firmware, information, or memory data of customer contained in the manual. EL-HS800 - 1 Years Warranty If a product does not operate as warranted above during the...

Quick Installation Guide
Page 10
...LIABILITY TO REPAIR, REPLACEMENT, OR REFUND OF THE PURCHASE PRICE PAID, AT TRENDnet'S OPTION. TRENDnet NEITHER ASSUMES NOR AUTHORIZES ANY OTHER PERSON TO ASSUME FOR IT ANY OTHER LIABILITY IN CONNECTION WITH THE SALE, INSTALLATION MAINTENANCE OR USE OF TRENDnet'S PRODUCTS...Power Adapter, Cooling Fan, and Power Supply carry 1 Year Warranty 9 Governing Law: This Limited Warranty shall be governed by the laws of the state of California. WARRANTIES EXCLUSIVE: IF THE TRENDnet PRODUCT DOES NOT OPERATE AS WARRANTED ABOVE, THE CUSTOMER'S SOLE REMEDY SHALL BE, AT TRENDnet'S OPTION, REPAIR OR REPLACEMENT...
...LIABILITY TO REPAIR, REPLACEMENT, OR REFUND OF THE PURCHASE PRICE PAID, AT TRENDnet'S OPTION. TRENDnet NEITHER ASSUMES NOR AUTHORIZES ANY OTHER PERSON TO ASSUME FOR IT ANY OTHER LIABILITY IN CONNECTION WITH THE SALE, INSTALLATION MAINTENANCE OR USE OF TRENDnet'S PRODUCTS...Power Adapter, Cooling Fan, and Power Supply carry 1 Year Warranty 9 Governing Law: This Limited Warranty shall be governed by the laws of the state of California. WARRANTIES EXCLUSIVE: IF THE TRENDnet PRODUCT DOES NOT OPERATE AS WARRANTED ABOVE, THE CUSTOMER'S SOLE REMEDY SHALL BE, AT TRENDnet'S OPTION, REPAIR OR REPLACEMENT...

Quick Installation Guide
Page 11
...USER'S AUTHORITY TO OPERATE THE EQUIPMENT. ADVERTENCIA En todos nuestros equipos se mencionan claramente las caracteristicas del adaptador de alimentacón necesario para su funcionamiento. El adaptador de alimentación debe operar con voltaje y frecuencia de la energia electrica domiciliaria existente en el pais o zona de instalación. El... MODIFICATIONS TO THIS EQUIPMENT. Operation is subject to comply with you Local Authority or Retailer for recycling advice. Waste electrical and electronic products must accept any interference received. Including interference that may ...
...USER'S AUTHORITY TO OPERATE THE EQUIPMENT. ADVERTENCIA En todos nuestros equipos se mencionan claramente las caracteristicas del adaptador de alimentacón necesario para su funcionamiento. El adaptador de alimentación debe operar con voltaje y frecuencia de la energia electrica domiciliaria existente en el pais o zona de instalación. El... MODIFICATIONS TO THIS EQUIPMENT. Operation is subject to comply with you Local Authority or Retailer for recycling advice. Waste electrical and electronic products must accept any interference received. Including interference that may ...

Quick Installation Guide
Page 12
... 20675 Manhattan Place Torrance, CA 90501 USA Copyright ©2006. Go to register your product online. Spain . TRENDnet. All Rights Reserved. Canada Toll Free Telephone: 1(866) 845-3673 24/7 Tech Support Europe (Germany . UK) Toll Free Telephone: +00800 60 76 76 67 English/Espanol - 24/7 Francais/Deutsch - 11am-8pm, Monday - Friday MET Worldwide Telephone...
... 20675 Manhattan Place Torrance, CA 90501 USA Copyright ©2006. Go to register your product online. Spain . TRENDnet. All Rights Reserved. Canada Toll Free Telephone: 1(866) 845-3673 24/7 Tech Support Europe (Germany . UK) Toll Free Telephone: +00800 60 76 76 67 English/Espanol - 24/7 Francais/Deutsch - 11am-8pm, Monday - Friday MET Worldwide Telephone...

