

Data Sheet
Page 1
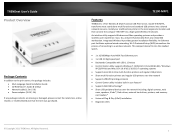
...) TRENDnet's 1-Port Multi-Function USB Print Server, model TE100-MFP1, transforms most stand-alone multi-function and standard USB printers into the smallest spaces. Install your multifunction printer in order to a wired network. Scan, fax, and print functionality from any networked workstation. FEATURES • 1 x 10/100Mbps Auto-MDIX Fast Ethernet port • 1 x USB 2.0 high speed port • Backwards Compatible with USB 1.1 Devices • Control Center utility supports Windows 7 (32/64-bit) / Vista (32/64-bit) / Windows XP(32/64-bit) and Mac...
...) TRENDnet's 1-Port Multi-Function USB Print Server, model TE100-MFP1, transforms most stand-alone multi-function and standard USB printers into the smallest spaces. Install your multifunction printer in order to a wired network. Scan, fax, and print functionality from any networked workstation. FEATURES • 1 x 10/100Mbps Auto-MDIX Fast Ethernet port • 1 x USB 2.0 high speed port • Backwards Compatible with USB 1.1 Devices • Control Center utility supports Windows 7 (32/64-bit) / Vista (32/64-bit) / Windows XP(32/64-bit) and Mac...

Data Sheet
Page 2
...Copyright ©TRENDnet.All Rights Reserved. 1-Port Multi-Function USB Print Server TE100-MFP1 (V1.0R) SPECIFICATIONS HARDWARE Standards LAN Port USB Ports LED Indicators TCP/IP Protocol Supported Control Center Utility Supported OS USB Devices Supported Button Power Power Consumption Dimensions (LxWxH) Weight Temperature Humidity Certifications • IEEE 802.3 (10Base-T), IEEE 802.3u (100Base-TX), USB 1.1/2.0 • 1 x 10/100Mbps Auto-MDIX Ethernet port • 1 x USB 2.0 Type-A • Power, Link, ACT, USB • DHCP • Windows: 7(32/64-bit) / Vista (32/64-bit) / XP(32...
...Copyright ©TRENDnet.All Rights Reserved. 1-Port Multi-Function USB Print Server TE100-MFP1 (V1.0R) SPECIFICATIONS HARDWARE Standards LAN Port USB Ports LED Indicators TCP/IP Protocol Supported Control Center Utility Supported OS USB Devices Supported Button Power Power Consumption Dimensions (LxWxH) Weight Temperature Humidity Certifications • IEEE 802.3 (10Base-T), IEEE 802.3u (100Base-TX), USB 1.1/2.0 • 1 x 10/100Mbps Auto-MDIX Ethernet port • 1 x USB 2.0 Type-A • Power, Link, ACT, USB • DHCP • Windows: 7(32/64-bit) / Vista (32/64-bit) / XP(32...

User's Guide
Page 2
... to Connect 9 Connect to a Printer...10 Auto-Connect Printer 10 Connect to a Scanner 11 Advance Configuration 12 Access the management page 12 Change device IP address 12 Change Device Information 13 UPnP ...13 Change Language...13 © Copyright 2011 TRENDnet. All Rights Reserved. Table of Contents Change Admin Account Setting 13 Change User Account Setting 14 Maintenance 14 Restart device ...14 Reset device...15 Upgrade Firmware...15 Device Status 15 System Status ...15 Network Status ...16 Management Page Structure 17 Technical Specifications 18 Troubleshooting 19...
... to Connect 9 Connect to a Printer...10 Auto-Connect Printer 10 Connect to a Scanner 11 Advance Configuration 12 Access the management page 12 Change device IP address 12 Change Device Information 13 UPnP ...13 Change Language...13 © Copyright 2011 TRENDnet. All Rights Reserved. Table of Contents Change Admin Account Setting 13 Change User Account Setting 14 Maintenance 14 Restart device ...14 Reset device...15 Upgrade Firmware...15 Device Status 15 System Status ...15 Network Status ...16 Management Page Structure 17 Technical Specifications 18 Troubleshooting 19...
User's Guide
Page 3
... port • Backwards Compatible with USB 1.1 Devices • Control Center utility supports Windows 7 (32/64-bit) / Vista (32/64-bit) / Windows XP(32/64-bit) and Mac OS X 10.4/10.5/10.6/10.7 operating systems • Supports most ergonomic location and then connect the compact TEW-MFP1 to a wireless network. TRENDnet User's Guide Product Overview Package Contents In addition to the print server, the package includes: • Muti-Language Quick Installation Guide • CD-ROM (User's Guide & Utility) • Network cable (1.5m / 5ft) • Power adapter...
... port • Backwards Compatible with USB 1.1 Devices • Control Center utility supports Windows 7 (32/64-bit) / Vista (32/64-bit) / Windows XP(32/64-bit) and Mac OS X 10.4/10.5/10.6/10.7 operating systems • Supports most ergonomic location and then connect the compact TEW-MFP1 to a wireless network. TRENDnet User's Guide Product Overview Package Contents In addition to the print server, the package includes: • Muti-Language Quick Installation Guide • CD-ROM (User's Guide & Utility) • Network cable (1.5m / 5ft) • Power adapter...

User's Guide
Page 5
...-function printer through a network. Move the On/Off switch to share your router power port and to its print server functionality the TE100-MFP1 can also allow you to power "On" (Left position) or "Off" (Outer position) the device. • Reset Button - In addition to its factory default setting. It is typically placed in the same location of your router. • On/Off Power Switch - TRENDnet User's Guide Side...
...-function printer through a network. Move the On/Off switch to share your router power port and to its print server functionality the TE100-MFP1 can also allow you to power "On" (Left position) or "Off" (Outer position) the device. • Reset Button - In addition to its factory default setting. It is typically placed in the same location of your router. • On/Off Power Switch - TRENDnet User's Guide Side...
User's Guide
Page 6
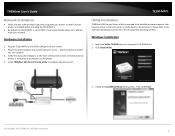
... printer server are fully functional (Power is solid green and LAN port is required to configure the print server. Click Install Utility 3. Follow the InstallShield Wizard instructions. Then click Finish. © Copyright 2011 TRENDnet. All Rights Reserved. 4 Hardware Installation 1. Plug the TE100-MFP1 to DHCP, it . Please refer to the "On" position. 3. Move the power switch to the Technical Specification section for a list of supported operating systems. Windows Installation 1. TE100-MFP1 Utility Installation TRENDnet USB Control Center utility is solid green). 4. Install...
... printer server are fully functional (Power is solid green and LAN port is required to configure the print server. Click Install Utility 3. Follow the InstallShield Wizard instructions. Then click Finish. © Copyright 2011 TRENDnet. All Rights Reserved. 4 Hardware Installation 1. Plug the TE100-MFP1 to DHCP, it . Please refer to the "On" position. 3. Move the power switch to the Technical Specification section for a list of supported operating systems. Windows Installation 1. TE100-MFP1 Utility Installation TRENDnet USB Control Center utility is solid green). 4. Install...

User's Guide
Page 7
... the installation. TRENDnet User's Guide 4. MAC OS X Installation 1. Open the CD contents and locate the "TRENDnet USB Control Center Utility Installer" (.dmg) file. The utility will be prompted to the print server, insert the Utility CD-ROM into your password and click OK. © Copyright 2011 TRENDnet. You will be prompted for your password to start the installation. 5. You will automatically find the TE100-MFP1 and the USB device you have connected. 3. Double click on the TRENDnet USB Control Center Utility...
... the installation. TRENDnet User's Guide 4. MAC OS X Installation 1. Open the CD contents and locate the "TRENDnet USB Control Center Utility Installer" (.dmg) file. The utility will be prompted to the print server, insert the Utility CD-ROM into your password and click OK. © Copyright 2011 TRENDnet. You will be prompted for your password to start the installation. 5. You will automatically find the TE100-MFP1 and the USB device you have connected. 3. Double click on the TRENDnet USB Control Center Utility...

User's Guide
Page 8
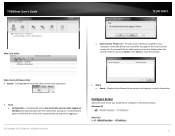
... will find the TEW-MFP1 when it is recommended to restart your network Using the Utility The TRENDnet USB Control Center utility is used to communicate with the TE100-MFP1 and any USB device that is still running . The utility will see the model name and IP address of the print server. Utility Main Window In the utility window, you can right-click the notification icon and select Exit or click System > Exit in your print server listed.
... will find the TEW-MFP1 when it is recommended to restart your network Using the Utility The TRENDnet USB Control Center utility is used to communicate with the TE100-MFP1 and any USB device that is still running . The utility will see the model name and IP address of the print server. Utility Main Window In the utility window, you can right-click the notification icon and select Exit or click System > Exit in your print server listed.
User's Guide
Page 9
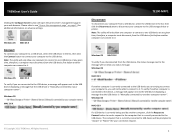
... o Configuration - Unchecking the option will close the window. Clicking Exit will disable the utility from this listing, select the printer in the utility window. Provides a list of printers installed on . TRENDnet User's Guide TE100-MFP1 MAC OS X Utility o Auto-Connect Printer List - Click Close to delete printers from automatically starting when logging on. © Copyright 2011 TRENDnet. Menu Items (Windows Only) • System - All Rights Reserved. • About o About - Configure Server Select the print server you would like to the Auto-Connect printer list...
... o Configuration - Unchecking the option will close the window. Clicking Exit will disable the utility from this listing, select the printer in the utility window. Provides a list of printers installed on . TRENDnet User's Guide TE100-MFP1 MAC OS X Utility o Auto-Connect Printer List - Click Close to delete printers from automatically starting when logging on. © Copyright 2011 TRENDnet. Menu Items (Windows Only) • System - All Rights Reserved. • About o About - Configure Server Select the print server you would like to the Auto-Connect printer list...
User's Guide
Page 10
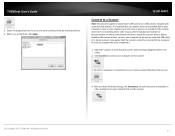
TRENDnet User's Guide Clicking the Configure Server button will not show any status message. To verify if another computer can connect to it. Note: The utility will not be prompted to the USB device displaying a message that is "Manually connected by ". Windows OS MAC OS X To verify if you disconnected from the USB device, the status message next to the message will open the print server's management page in your computer...
TRENDnet User's Guide Clicking the Configure Server button will not show any status message. To verify if another computer can connect to it. Note: The utility will not be prompted to the USB device displaying a message that is "Manually connected by ". Windows OS MAC OS X To verify if you disconnected from the USB device, the status message next to the message will open the print server's management page in your computer...
User's Guide
Page 12
TE100-MFP1 connect your computer, 1. Once the printer drivers are installed properly on your network. Once your computer to the printer using the USB utility first. After you can send print jobs to install the printer drivers. Please ensure the printer drivers are sending print jobs to stand-alone USB printers or USB multi-function printers. Once the print job from the printer for each computer when multiple computers are installed. Click Auto-Connect Printer. 10 TRENDnet User's Guide • Reject - Click...
TE100-MFP1 connect your computer, 1. Once the printer drivers are installed properly on your network. Once your computer to the printer using the USB utility first. After you can send print jobs to install the printer drivers. Please ensure the printer drivers are sending print jobs to stand-alone USB printers or USB multi-function printers. Once the print job from the printer for each computer when multiple computers are installed. Click Auto-Connect Printer. 10 TRENDnet User's Guide • Reject - Click...
User's Guide
Page 13
... printing, click Disconnect, to make the scanner available to other computers on where to download and how to scan. If the scanner drivers are installed. TE100-MFP1 Connect to a Scanner Note: This function applies to stand-alone USB scanners or USB scanners included with scanning capability listed in order to use the scanner. © Copyright 2011 TRENDnet. Select the assigned printer to complete the driver installation. 1. TRENDnet User's Guide...
... printing, click Disconnect, to make the scanner available to other computers on where to download and how to scan. If the scanner drivers are installed. TE100-MFP1 Connect to a Scanner Note: This function applies to stand-alone USB scanners or USB scanners included with scanning capability listed in order to use the scanner. © Copyright 2011 TRENDnet. Select the assigned printer to complete the driver installation. 1. TRENDnet User's Guide...
User's Guide
Page 14
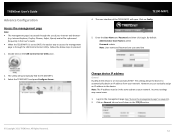
... Password and then click Login. Change device IP address General By default the device is through the use of the TE100-MFP1 will automatically find the TE100-MFP1. 3. Note: The IP address must be referenced frequently in the same subnet as your network. Double click on page 11). 2. All Rights Reserved. 12 TRENDnet User's Guide Advance Configuration Access the management page Note: • The management page is accessed through the USB Control...
... Password and then click Login. Change device IP address General By default the device is through the use of the TE100-MFP1 will automatically find the TE100-MFP1. 3. Note: The IP address must be referenced frequently in the same subnet as your network. Double click on page 11). 2. All Rights Reserved. 12 TRENDnet User's Guide Advance Configuration Access the management page Note: • The management page is accessed through the USB Control...
User's Guide
Page 15
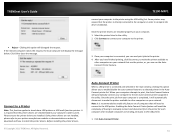
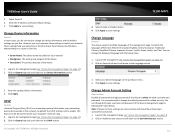
..., and Thai. TRENDnet User's Guide 3. Select Static IP 4. Click Apply to enable. By default the UPnP setting is a networking protocol that makes your computer's network map 1. The device can change the device information and the default settings are just fine. Select Enable or Disable option 4. Change Language General The device supports multiple languages of the device management page by following the steps below steps. 1. Change Admin Account Setting Administrator By default username and login password of the device 1. You...
..., and Thai. TRENDnet User's Guide 3. Select Static IP 4. Click Apply to enable. By default the UPnP setting is a networking protocol that makes your computer's network map 1. The device can change the device information and the default settings are just fine. Select Enable or Disable option 4. Change Language General The device supports multiple languages of the device management page by following the steps below steps. 1. Change Admin Account Setting Administrator By default username and login password of the device 1. You...

User's Guide
Page 17
Click on Status © Copyright 2011 TRENDnet. Follow the steps below . 1. Click the Download New Firmware button, this will set the device back to factory default settings. Download and save .zip firmware file to perform a firmware upgrade. This information can be used when troubleshooting your network. Click on Maintenance tab 3. TRENDnet User's Guide Reset device Maintenance A device reset will automatically open a web browser to TRENDnet.com TE100-MFP1 4. The other way is to Factory Default button 4. Click the Reset to follow the steps below on how...
Click on Status © Copyright 2011 TRENDnet. Follow the steps below . 1. Click the Download New Firmware button, this will set the device back to factory default settings. Download and save .zip firmware file to perform a firmware upgrade. This information can be used when troubleshooting your network. Click on Maintenance tab 3. TRENDnet User's Guide Reset device Maintenance A device reset will automatically open a web browser to TRENDnet.com TE100-MFP1 4. The other way is to Factory Default button 4. Click the Reset to follow the steps below on how...

User's Guide
Page 20
... Ethernet port 1 x USB 2.0 Type-A Power, WLAN, LAN, USB DHCP Control Center Utility Supported OS USB Devices Supported Windows: 7(32/64-bit) / Vista (32/64-bit) / XP(32/64-bit) Mac OS X: 10.4/ 10.5/10.6/10.7 127 Max. All Rights Reserved. 18 Button Power Power Consumption Init button: restores factory default settings (press over 10 seconds), Activates WPS Function (press for 2~9 seconds) Input: 120~ 240V Output: 12V DC, 1.5A 2.04 Watts (max.) Dimensions (LxWxH) Weight Temperature Humidity Certifications TE100-MFP1...
... Ethernet port 1 x USB 2.0 Type-A Power, WLAN, LAN, USB DHCP Control Center Utility Supported OS USB Devices Supported Windows: 7(32/64-bit) / Vista (32/64-bit) / XP(32/64-bit) Mac OS X: 10.4/ 10.5/10.6/10.7 127 Max. All Rights Reserved. 18 Button Power Power Consumption Init button: restores factory default settings (press over 10 seconds), Activates WPS Function (press for 2~9 seconds) Input: 120~ 240V Output: 12V DC, 1.5A 2.04 Watts (max.) Dimensions (LxWxH) Weight Temperature Humidity Certifications TE100-MFP1...
User's Guide
Page 21
... minimum requirements. 2. Q: I connect a USB Hub to the print server to be installed on your computer. Please note these drivers and software are required to add additional USB devices? Q: I have completed the utility installation but an error message says "The page cannot be using the printer behind the print server. 2. Click Change Adapter Settings, right-click the Local Area Connection icon. Windows Vista a. c. d. Close the utility and re-open it directly to my printer. Make sure...
... minimum requirements. 2. Q: I connect a USB Hub to the print server to be installed on your computer. Please note these drivers and software are required to add additional USB devices? Q: I have completed the utility installation but an error message says "The page cannot be using the printer behind the print server. 2. Click Change Adapter Settings, right-click the Local Area Connection icon. Windows Vista a. c. d. Close the utility and re-open it directly to my printer. Make sure...
User's Guide
Page 22
.... TRENDnet User's Guide Appendix How to display your IP address settings. Go into the Control Panel, click Network and Sharing Center. b. Command Prompt Method Windows 2000/XP/Vista/7 1. In the command prompt, type ipconfig /all to find your network settings can be used as general guidelines, however, it is typically the wireless Airport interface. Go into the Control Panel, double-click the Network Connections icon b. Double-click on configuring your...
.... TRENDnet User's Guide Appendix How to display your IP address settings. Go into the Control Panel, click Network and Sharing Center. b. Command Prompt Method Windows 2000/XP/Vista/7 1. In the command prompt, type ipconfig /all to find your network settings can be used as general guidelines, however, it is typically the wireless Airport interface. Go into the Control Panel, double-click the Network Connections icon b. Double-click on configuring your...
Quick Installation Guide
Page 2
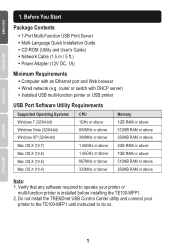
... with an Ethernet port and Web browser ŸWired network (e.g. Do not install the TRENDnet USB Control Center utility and connect your printer or multi-function printer is installed before installing the TE100-MFP1. 2. Before You Start Package Contents Ÿ1-Port Multi-Function USB Print Server ŸMulti-Language Quick Installation Guide ŸCD-ROM (Utility and User's Guide) ŸNetwork Cable (1.5 m / 5 ft.) ŸPower Adapter (12V DC, 1A) Minimum Requirements ŸComputer with DHCP server) ŸInstalled USB multi-function printer or USB printer USB Port Software Utility...
... with an Ethernet port and Web browser ŸWired network (e.g. Do not install the TRENDnet USB Control Center utility and connect your printer or multi-function printer is installed before installing the TE100-MFP1. 2. Before You Start Package Contents Ÿ1-Port Multi-Function USB Print Server ŸMulti-Language Quick Installation Guide ŸCD-ROM (Utility and User's Guide) ŸNetwork Cable (1.5 m / 5 ft.) ŸPower Adapter (12V DC, 1A) Minimum Requirements ŸComputer with DHCP server) ŸInstalled USB multi-function printer or USB printer USB Port Software Utility...
Quick Installation Guide
Page 3
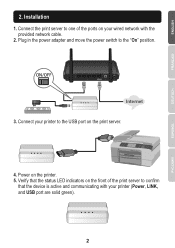
Installation 1. Power on the print server. 4. Verify that the device is active and communicating with the provided network cable. 2. Connect your printer (Power, LINK, and USB port are solid green). 2 Connect the print server to one of the print server to confirm that the status LED indicators on the front of the ports on your wired network with your printer to the "On" position. ON/OFF WAN Internet 3. 2. Plug in the power adapter and move the power switch to the USB port on the printer. 5.
Installation 1. Power on the print server. 4. Verify that the device is active and communicating with the provided network cable. 2. Connect your printer (Power, LINK, and USB port are solid green). 2 Connect the print server to one of the print server to confirm that the status LED indicators on the front of the ports on your wired network with your printer to the "On" position. ON/OFF WAN Internet 3. 2. Plug in the power adapter and move the power switch to the USB port on the printer. 5.


