Manual
Page 5
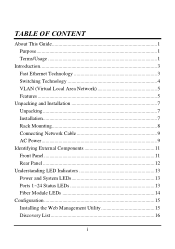
TABLE OF CONTENT About This Guide 1 Purpose 1 Terms/Usage 1 Introduction 3 Fast Ethernet Technology 3 Switching Technology 4 VLAN (Virtual Local Area Network 5 Features 5 Unpacking and Installation 7 Unpacking 7 Installation 7 Rack Mounting 8 Connecting Network Cable 9 AC Power 9 Identifying External Components 11 Front Panel 11 Rear Panel 12 Understanding LED Indicators 13 Power and System LEDs 13 Ports 1~24 Status LEDs 13 Fiber Module LEDs 14 Configuration 15 Installing the Web Management Utility 15 Discovery List 16 i
TABLE OF CONTENT About This Guide 1 Purpose 1 Terms/Usage 1 Introduction 3 Fast Ethernet Technology 3 Switching Technology 4 VLAN (Virtual Local Area Network 5 Features 5 Unpacking and Installation 7 Unpacking 7 Installation 7 Rack Mounting 8 Connecting Network Cable 9 AC Power 9 Identifying External Components 11 Front Panel 11 Rear Panel 12 Understanding LED Indicators 13 Power and System LEDs 13 Ports 1~24 Status LEDs 13 Fiber Module LEDs 14 Configuration 15 Installing the Web Management Utility 15 Discovery List 16 i
Manual
Page 6
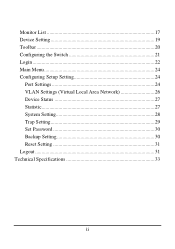
Monitor List 17 Device Setting 19 Toolbar 20 Configuring the Switch 21 Login 22 Main Menu 24 Configuring Setup Setting 24 Port Settings 24 VLAN Settings (Virtual Local Area Network 26 Device Status 27 Statistic 27 System Setting 28 Trap Setting 29 Set Password 30 Backup Setting 30 Reset Setting 31 Logout 31 Technical Specifications 33 ii
Monitor List 17 Device Setting 19 Toolbar 20 Configuring the Switch 21 Login 22 Main Menu 24 Configuring Setup Setting 24 Port Settings 24 VLAN Settings (Virtual Local Area Network 26 Device Status 27 Statistic 27 System Setting 28 Trap Setting 29 Set Password 30 Backup Setting 30 Reset Setting 31 Logout 31 Technical Specifications 33 ii
Manual
Page 7
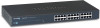
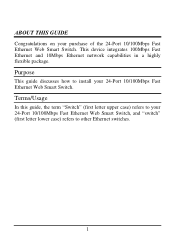
This device integrates 100Mbps Fast Ethernet and 10Mbps Ethernet network capabilities in a highly flexible package. Purpose This guide discusses how to install your 24-Port 10/100Mbps Fast Ethernet Web Smart Switch, and "switch" (first letter lower case) refers to your 24-Port 10/100Mbps Fast Ethernet Web Smart Switch. Terms/Usage In this guide, the term "Switch" (first letter upper case) refers to other Ethernet switches. 1 ABOUT THIS GUIDE Congratulations on your purchase of the 24-Port 10/100Mbps Fast Ethernet Web Smart Switch.
This device integrates 100Mbps Fast Ethernet and 10Mbps Ethernet network capabilities in a highly flexible package. Purpose This guide discusses how to install your 24-Port 10/100Mbps Fast Ethernet Web Smart Switch, and "switch" (first letter lower case) refers to your 24-Port 10/100Mbps Fast Ethernet Web Smart Switch. Terms/Usage In this guide, the term "Switch" (first letter upper case) refers to other Ethernet switches. 1 ABOUT THIS GUIDE Congratulations on your purchase of the 24-Port 10/100Mbps Fast Ethernet Web Smart Switch.
Manual
Page 9
... other 10Mbps Ethernet environments, it provides a straightforward upgrade and takes advantage of the 24-Port 10/100Mbps Fast Ethernet Web Smart Switch and some background information about Ethernet/Fast Ethernet switching technology. Since the 100Mbps Fast Ethernet is compatible with the ability to provide greater bandwidth and improve client/server response times...
... other 10Mbps Ethernet environments, it provides a straightforward upgrade and takes advantage of the 24-Port 10/100Mbps Fast Ethernet Web Smart Switch and some background information about Ethernet/Fast Ethernet switching technology. Since the 100Mbps Fast Ethernet is compatible with the ability to provide greater bandwidth and improve client/server response times...
Manual
Page 10
...local area network congestion problems. 4 The switch acts as a high-speed selective bridge between the individual segments. Switching is a cost-effective way of a router, the setup and maintenance required make routers relatively impractical. The switch, without interfering with each other segments, ... of increasing the total network capacity available to users on a local area network. A switch bridges Ethernet packets at the MAC address level of switching technology. Switching Technology Another approach to pushing beyond the limits of Ethernet technology is the development of the...
...local area network congestion problems. 4 The switch acts as a high-speed selective bridge between the individual segments. Switching is a cost-effective way of a router, the setup and maintenance required make routers relatively impractical. The switch, without interfering with each other segments, ... of increasing the total network capacity available to users on a local area network. A switch bridges Ethernet packets at the MAC address level of switching technology. Switching Technology Another approach to pushing beyond the limits of Ethernet technology is the development of the...
Manual
Page 11
... routers, using VLAN is no need for full-duplex mode ports 5 Port-based (or port-group) VLAN is the common method of opportunity in the Switch. Cost Reduction, VLANs can communicate as if a common broadcast domain, a LAN. VLAN (Virtual Local Area Network) A VLAN is a group of expensive ...cables or an up-link port u Full/half duplex transfer mode for each port u Wire speed reception and transmission u Store-and-Forward switching scheme capability to support rate adaptation and ensure data integrity u Up to create multiple broadcast domains, thus eliminating the need of end-stations ...
... routers, using VLAN is no need for full-duplex mode ports 5 Port-based (or port-group) VLAN is the common method of opportunity in the Switch. Cost Reduction, VLANs can communicate as if a common broadcast domain, a LAN. VLAN (Virtual Local Area Network) A VLAN is a group of expensive ...cables or an up-link port u Full/half duplex transfer mode for each port u Wire speed reception and transmission u Store-and-Forward switching scheme capability to support rate adaptation and ensure data integrity u Up to create multiple broadcast domains, thus eliminating the need of end-stations ...

Manual
Page 13
...humidity operating ranges. Unpacking Open the shipping cartons of the hub for ventilation. 7 The carton should contain the following pointers: Install the Switch in a site free from strong electromagnetic field generators (such as motors), vibration, dust, and direct exposure to be used for shock ...u One 24-Port 10/100Mbps Fast Ethernet Web Smart Switch u One AC power cord, suitable for replacement. See Technical Specifications for the Switch. Leave at least 10cm of space at the front and rear of the Switch and carefully unpacks its performance. Installation The site where...
...humidity operating ranges. Unpacking Open the shipping cartons of the hub for ventilation. 7 The carton should contain the following pointers: Install the Switch in a site free from strong electromagnetic field generators (such as motors), vibration, dust, and direct exposure to be used for shock ...u One 24-Port 10/100Mbps Fast Ethernet Web Smart Switch u One AC power cord, suitable for replacement. See Technical Specifications for the Switch. Leave at least 10cm of space at the front and rear of the Switch and carefully unpacks its performance. Installation The site where...
Manual
Page 14
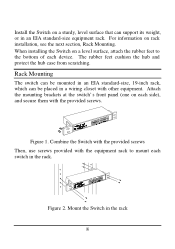
... panel (one on each side), and secure them with other equipment. Figure 2. For information on rack installation, see the next section, Rack Mounting. Install the Switch on a sturdy, level surface that can be mounted in an EIA standard-size, 19-inch rack, which can support its weight, or in an EIA... standard-size equipment rack. The rubber feet cushion the hub and protect the hub case from scratching. Mount the Switch in the rack 8 Combine the Switch with the provided screws Then, use screws provided with the equipment rack to the bottom of each...
... panel (one on each side), and secure them with other equipment. Figure 2. For information on rack installation, see the next section, Rack Mounting. Install the Switch on a sturdy, level surface that can be mounted in an EIA standard-size, 19-inch rack, which can support its weight, or in an EIA... standard-size equipment rack. The rubber feet cushion the hub and protect the hub case from scratching. Mount the Switch in the rack 8 Combine the Switch with the provided screws Then, use screws provided with the equipment rack to the bottom of each...
Manual
Page 15
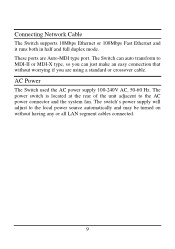
... just make an easy connection that without having any or all LAN segment cables connected. 9 The power switch is located at the rear of the unit adjacent to the local power source automatically and may be turned on without worrying if you can ...auto transform to MDI-II or MDI-X type, so you are Auto-MDI type port. Connecting Network Cable The Switch supports 10Mbps Ethernet or 100Mbps Fast Ethernet and it runs both in half and full duplex mode. These ports are using a standard or crossover cable...
... just make an easy connection that without having any or all LAN segment cables connected. 9 The power switch is located at the rear of the unit adjacent to the local power source automatically and may be turned on without worrying if you can ...auto transform to MDI-II or MDI-X type, so you are Auto-MDI type port. Connecting Network Cable The Switch supports 10Mbps Ethernet or 100Mbps Fast Ethernet and it runs both in half and full duplex mode. These ports are using a standard or crossover cable...
Manual
Page 17
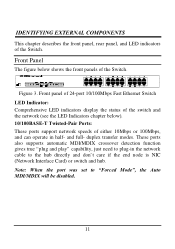
... was set to "Forced Mode", the Auto MDI/MDIX will be disabled. 11 and full- Front panel of 24-port 10/100Mbps Fast Ethernet Switch LED Indicator: Comprehensive LED indicators display the status of the switch and the network (see the LED Indicators chapter below shows the front panels of the... transfer modes. Front Panel The figure below ). 10/100BASE-T Twisted-Pair Ports: These ports support network speeds of the Switch. These ports also supports automatic MDI/MDIX crossover detection function gives true "plug and play" capability, just need to plug-in half- Figure 3. IDENTIFYING ...
... was set to "Forced Mode", the Auto MDI/MDIX will be disabled. 11 and full- Front panel of 24-port 10/100Mbps Fast Ethernet Switch LED Indicator: Comprehensive LED indicators display the status of the switch and the network (see the LED Indicators chapter below shows the front panels of the... transfer modes. Front Panel The figure below ). 10/100BASE-T Twisted-Pair Ports: These ports support network speeds of the Switch. These ports also supports automatic MDI/MDIX crossover detection function gives true "plug and play" capability, just need to plug-in half- Figure 3. IDENTIFYING ...

Manual
Page 18
... cord into this connector, and the male into the slot. Rear Panel Fiber Module Slot Reset Button AC Power Connector Figure 4. Rear panel of the Switch 100Base-FX Fiber Module Slot This is a three-pronged connector that you can use the optional 100Base-FX Fiber Module to the factory default.
... cord into this connector, and the male into the slot. Rear Panel Fiber Module Slot Reset Button AC Power Connector Figure 4. Rear panel of the Switch 100Base-FX Fiber Module Slot This is a three-pronged connector that you can use the optional 100Base-FX Fiber Module to the factory default.
Manual
Page 19
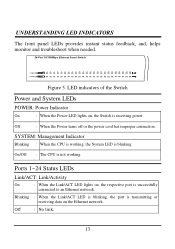
... power. UNDERSTANDING LED INDICATORS The front panel LEDs provides instant status feedback, and, helps monitor and troubleshoot when needed. 24-Port 10/100Mbps Ethernet Smart Switch POWER SYSTEM FX 1 2 3 4 Link/ACT FDX 56 78 9 10 11 12 13 14 15 16 17 18 19 20 21 22 23 24 Figure 5. LED... indicators of the Switch Power and System LEDs POWER: Power Indicator On : When the Power LED lights on, the Switch is blinking. SYSTEM: Management Indicator Blinking : When the CPU is working . On/Off : The CPU is successfully...
... power. UNDERSTANDING LED INDICATORS The front panel LEDs provides instant status feedback, and, helps monitor and troubleshoot when needed. 24-Port 10/100Mbps Ethernet Smart Switch POWER SYSTEM FX 1 2 3 4 Link/ACT FDX 56 78 9 10 11 12 13 14 15 16 17 18 19 20 21 22 23 24 Figure 5. LED... indicators of the Switch Power and System LEDs POWER: Power Indicator On : When the Power LED lights on, the Switch is blinking. SYSTEM: Management Indicator Blinking : When the CPU is working . On/Off : The CPU is successfully...

Manual
Page 21
...where your CD-Rom drive is located) and click OK. 4. Installing the Web Management Utility The following gives instructions guiding you can configure the Switch such as VLAN, Port Setting, and System Setting ...etc. Insert the Utility CD in the CD-Rom Drive. 2. From the Start menu.... 5. Follow the on the Windows desktop, choose Run. 3. CONFIGURATION Through the Web Browser you can easily discover all the Web Management Switch, assign the IP Address, changing the password and upgrading the new firmware. With the attached Web Management Utility, you through the installations of...
...where your CD-Rom drive is located) and click OK. 4. Installing the Web Management Utility The following gives instructions guiding you can configure the Switch such as VLAN, Port Setting, and System Setting ...etc. Insert the Utility CD in the CD-Rom Drive. 2. From the Start menu.... 5. Follow the on the Windows desktop, choose Run. 3. CONFIGURATION Through the Web Browser you can easily discover all the Web Management Switch, assign the IP Address, changing the password and upgrading the new firmware. With the attached Web Management Utility, you through the installations of...

Manual
Page 24
... record. Figure 8. Delete Item: To delete the device in the Trap Setting Menu (see Page 33 for detail). Note: In order to receive Trap information, switch has to be configured with Trap IP and Trap Events in Web browser, which are available in the Monitor List. 18 When the "View Trap... pop out, it will disappear after you want to monitor. View Trap: The Trap function can receive the events that happen from the Web Management Switch in red, it means that there is new trap transmitted, and this symbol will show the trap information including the Symbol, Time, Device IP and...
... record. Figure 8. Delete Item: To delete the device in the Trap Setting Menu (see Page 33 for detail). Note: In order to receive Trap information, switch has to be configured with Trap IP and Trap Events in Web browser, which are available in the Monitor List. 18 When the "View Trap... pop out, it will disappear after you want to monitor. View Trap: The Trap function can receive the events that happen from the Web Management Switch in red, it means that there is new trap transmitted, and this symbol will show the trap information including the Symbol, Time, Device IP and...

Manual
Page 27
... 24-Port 10/100Mbps Fast Ethernet Web Smart Switch has a Web GUI interface for smart switch configuration. The Switch can manage, control and monitor the switch from the local LAN. Choose 15 secs, 30 secs, 1 min, 2 min and 5 min to clear the log. In the "Help TAB", there is About ... the event of the Web Management Utility and the device. Clear Log: to select the time of monitoring. This section indicates how to configure the Switch to enable its smart functions including: u Port Setting (Speed, duplex mode, flow control and QoS) u Virtual LAN Group setting (VLAN) u System IP address and...
... 24-Port 10/100Mbps Fast Ethernet Web Smart Switch has a Web GUI interface for smart switch configuration. The Switch can manage, control and monitor the switch from the local LAN. Choose 15 secs, 30 secs, 1 min, 2 min and 5 min to clear the log. In the "Help TAB", there is About ... the event of the Web Management Utility and the device. Clear Log: to select the time of monitoring. This section indicates how to configure the Switch to enable its smart functions including: u Port Setting (Speed, duplex mode, flow control and QoS) u Virtual LAN Group setting (VLAN) u System IP address and...
Manual
Page 28
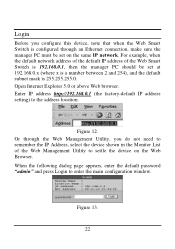
....168.0.1 (the factory-default IP address setting) to enter the main configuration window. Login Before you configure this device, note that when the Web Smart Switch is configured through the Web Management Utility, you do not need to remember the IP Address, select the device shown in the Monitor List of... the Web Smart Switch is 192.168.0.1, then the manager PC should be set at 192.168.0.x (where x is a number between 2 and 254), and the default subnet mask is...
....168.0.1 (the factory-default IP address setting) to enter the main configuration window. Login Before you configure this device, note that when the Web Smart Switch is configured through the Web Management Utility, you do not need to remember the IP Address, select the device shown in the Monitor List of... the Web Smart Switch is 192.168.0.1, then the manager PC should be set at 192.168.0.x (where x is a number between 2 and 254), and the default subnet mask is...
Manual
Page 32
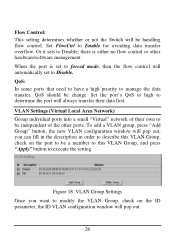
... Local Area Network) Group individual ports into a small "Virtual" network of the other hardware/software management. Flow Control: This setting determines whether or not the Switch will be independent of their own to determine the port will always transfer their data first. Set the port's QoS to high to be handling...
... Local Area Network) Group individual ports into a small "Virtual" network of the other hardware/software management. Flow Control: This setting determines whether or not the Switch will be independent of their own to determine the port will always transfer their data first. Set the port's QoS to high to be handling...

Manual
Page 36
...tools help you need to backup the setting, press the "Backup" button to restore the setting of the Switch, the current setting includes VLAN, Port Setting ... will be lost and the Switch will restore to change the password. u Copper Port Events: Monitoring the copper port status. Figure 24. ... the password, press the "Reset" button in copper port. Set Password Password is the invaluable tool for the manager to secure Web Management Switch, use this function to the default setting. To restore a current setting file to sent a trap when there are receive data error in the...
...tools help you need to backup the setting, press the "Backup" button to restore the setting of the Switch, the current setting includes VLAN, Port Setting ... will be lost and the Switch will restore to change the password. u Copper Port Events: Monitoring the copper port status. Figure 24. ... the password, press the "Reset" button in copper port. Set Password Password is the invaluable tool for the manager to secure Web Management Switch, use this function to the default setting. To restore a current setting file to sent a trap when there are receive data error in the...
