Users Guide
Page 4
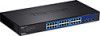
..., RSTP, and MSTP), and QoS queue scheduling. IPv6 Ready This switch supports IPv6 configuration and IPv6 neighbor discovery. TRENDnet User's Guide Product Overview TEG-30284 Package Contents In addition to your switch, the package includes: Quick Installation Guide CD-ROM (... a convenient cable diagnostic test aid in rapid troubleshooting. © Copyright 2016 TRENDnet. TEG-30284 Features TRENDnet's 28-Port Web Smart Switch with 24 x Gigabit ports and 4 x 10G SFP+ slots, model TEG-30284, is a cost-effective switch for high-speed network uplinks or downlink server ...
..., RSTP, and MSTP), and QoS queue scheduling. IPv6 Ready This switch supports IPv6 configuration and IPv6 neighbor discovery. TRENDnet User's Guide Product Overview TEG-30284 Package Contents In addition to your switch, the package includes: Quick Installation Guide CD-ROM (... a convenient cable diagnostic test aid in rapid troubleshooting. © Copyright 2016 TRENDnet. TEG-30284 Features TRENDnet's 28-Port Web Smart Switch with 24 x Gigabit ports and 4 x 10G SFP+ slots, model TEG-30284, is a cost-effective switch for high-speed network uplinks or downlink server ...
Users Guide
Page 5
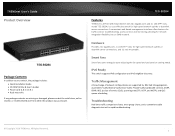
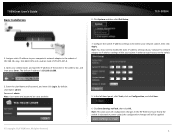
..., and Port Mirroring support administrator monitoring solutions. The ports LEDs will turn off to factory defaults. TRENDnet TEG-10GBSR/10GBS10/10GBS40) 2 Connect network devices. 10G SFP+ Slots (25-27) - Product Hardware Features TEG-30284 © Copyright 2016 TRENDnet. SR/LR/ER/LRM/ZR/ZW and can be used for 10 seconds and release to...
..., and Port Mirroring support administrator monitoring solutions. The ports LEDs will turn off to factory defaults. TRENDnet TEG-10GBSR/10GBS10/10GBS40) 2 Connect network devices. 10G SFP+ Slots (25-27) - Product Hardware Features TEG-30284 © Copyright 2016 TRENDnet. SR/LR/ER/LRM/ZR/ZW and can be used for 10 seconds and release to...

Users Guide
Page 6
...61623; Link/Activity On : When the Link/ACT LED lights on, the respective port is on connected to a 1000Mbps network. © Copyright 2016 TRENDnet. All Rights Reserved. Off When the LED is off ,the power cord connected or the device is receiving power. Off : No link. ...blinking : When the SFP LED is blinking, the port is operating at 10Gbps speed. is transmitting or receiving data on the Ethernet network. TEG-30284 Amber : When the Green LED lights on, the respective port is transmitting or receiving data on connected to an Ethernet network. Amber blinking When...
...61623; Link/Activity On : When the Link/ACT LED lights on, the respective port is on connected to a 1000Mbps network. © Copyright 2016 TRENDnet. All Rights Reserved. Off When the LED is off ,the power cord connected or the device is receiving power. Off : No link. ...blinking : When the SFP LED is blinking, the port is operating at 10Gbps speed. is transmitting or receiving data on the Ethernet network. TEG-30284 Amber : When the Green LED lights on, the respective port is transmitting or receiving data on connected to an Ethernet network. Amber blinking When...
Users Guide
Page 7
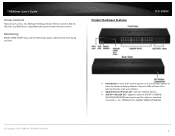
... Rack Mounting. When installing the Switch on each side), and secure them with the provided screws. All Rights Reserved. 4 TEG-30284 Rack Mount Hardware Installation The switch can be different than the one shown in the example illustrations. Attach the mounting brackets at the front ..., consider the following pointers: Note: The switch model may greatly affect its weight, or in an EIA standard-size equipment rack. TRENDnet User's Guide Switch Installation Desktop Hardware Installation The site where you install the hub stack may be placed in a wiring closet with ...
... Rack Mounting. When installing the Switch on each side), and secure them with the provided screws. All Rights Reserved. 4 TEG-30284 Rack Mount Hardware Installation The switch can be different than the one shown in the example illustrations. Attach the mounting brackets at the front ..., consider the following pointers: Note: The switch model may greatly affect its weight, or in an EIA standard-size equipment rack. TRENDnet User's Guide Switch Installation Desktop Hardware Installation The site where you install the hub stack may be placed in a wiring closet with ...
Users Guide
Page 8
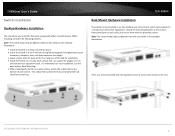
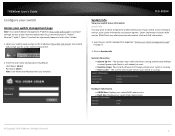
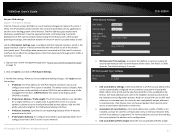
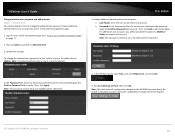
TEG-30284 3. Click Save Settings to your network subnet, then click Apply. Assign a static IP address to Flash, then click OK. Note:..., and then press Enter. By default: User Name: admin Password: admin Note: User name and password are case sensitive. © Copyright 2016 TRENDnet. In the left hand panel, click Tools, click on Configuration, and click Save. 6. Configure the switch IP address settings to the switch. 5.... your web browser, and type the IP address of 255.255.255.0. 4. Click System and then click IPv4 Setup. TRENDnet User's Guide Basic Installation 6.
TEG-30284 3. Click Save Settings to your network subnet, then click Apply. Assign a static IP address to Flash, then click OK. Note:..., and then press Enter. By default: User Name: admin Password: admin Note: User name and password are case sensitive. © Copyright 2016 TRENDnet. In the left hand panel, click Tools, click on Configuration, and click Save. 6. Configure the switch IP address settings to the switch. 5.... your web browser, and type the IP address of 255.255.255.0. 4. Click System and then click IPv4 Setup. TRENDnet User's Guide Basic Installation 6.
Users Guide
Page 9
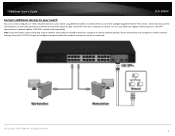
... connect them to one of your switch to your network, there may be a problem with your switch is connected. © Copyright 2016 TRENDnet. All Rights Reserved. 6 TRENDnet User's Guide TEG-30284 Connect additional devices to your switch You can use either the Gigabit Ethernet ports or 10G SFP+ connections as network uplinks. (10G SFP...
... connect them to one of your switch to your network, there may be a problem with your switch is connected. © Copyright 2016 TRENDnet. All Rights Reserved. 6 TRENDnet User's Guide TEG-30284 Connect additional devices to your switch You can use either the Gigabit Ethernet ports or 10G SFP+ connections as network uplinks. (10G SFP...
Users Guide
Page 10
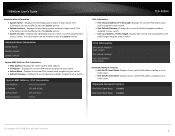
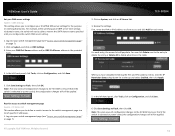
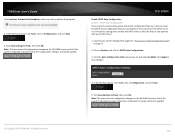
... soft reboot) or reset. Runtime Image: The current software or firmware version your switch is running . Boot Loader - TEG-30284 System Info View your switch status information System Info You may want to the IP address http://192.168.10.200. Other information includes H/W ...Size: Displays your web browser and go to check the general system information of your Internet web browser (e.g. Click on page 7). 2. TRENDnet User's Guide Configure your switch Access your switch management page Note: Your switch default management IP address http://192.168.10.200 is accessed...
... soft reboot) or reset. Runtime Image: The current software or firmware version your switch is running . Boot Loader - TEG-30284 System Info View your switch status information System Info You may want to the IP address http://192.168.10.200. Other information includes H/W ...Size: Displays your web browser and go to check the general system information of your Internet web browser (e.g. Click on page 7). 2. TRENDnet User's Guide Configure your switch Access your switch management page Note: Your switch default management IP address http://192.168.10.200 is accessed...
Users Guide
Page 11
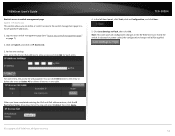
...system contact or system administrator of your switch. Displays the current IPv4 subnet mask assigned to DHCP client. © Copyright 2016 TRENDnet. Displays the identifying system location of your switch. Default Gateway - This information can be modified under the System ... if your switch IPv6 address setting is set to your switch. TRENDnet User's Guide Administration Information System Name - Displays the current IPv4 address assigned to your switch. Subnet Mask - TEG-30284 IPv6 Information IPv6 Unicast Address / Prefix Length: Displays ...
...system contact or system administrator of your switch. Displays the current IPv4 subnet mask assigned to DHCP client. © Copyright 2016 TRENDnet. Displays the identifying system location of your switch. Default Gateway - This information can be modified under the System ... if your switch IPv6 address setting is set to your switch. TRENDnet User's Guide Administration Information System Name - Displays the current IPv4 address assigned to your switch. Subnet Mask - TEG-30284 IPv6 Information IPv6 Unicast Address / Prefix Length: Displays ...
Users Guide
Page 12
...information for the switch. Note: This step saves all configuration changes to the NV-RAM to ensure that identifies the switch model. TRENDnet User's Guide System Set your switch management page" on page 7). 2. This contact name is rebooted or power cycled, the ... 2016 TRENDnet. Review the settings. Specifies the location of the network administrator responsible for the switch, the name is optional and may contain up to 30 characters. System Contact - The location is optional. 1. In the left hand panel, click Tools, click on Settings. 3. TEG-30284 4. ...
...information for the switch. Note: This step saves all configuration changes to the NV-RAM to ensure that identifies the switch model. TRENDnet User's Guide System Set your switch management page" on page 7). 2. This contact name is rebooted or power cycled, the ... 2016 TRENDnet. Review the settings. Specifies the location of the network administrator responsible for the switch, the name is optional and may contain up to 30 characters. System Contact - The location is optional. 1. In the left hand panel, click Tools, click on Settings. 3. TEG-30284 4. ...

Users Guide
Page 13
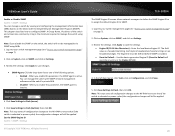
Click Apply. Click on System, and click on page 7). 2. TEG-30284 5. Note: This step saves all configuration changes to the NV-RAM to access the switch management page on your network. Typically, the IP address settings ... that if the switch is rebooted or power cycled, the configuration changes will still be applied. © Copyright 2016 TRENDnet. Review the settings. Click Save Settings to change your switch IPv4 address settings. TRENDnet User's Guide Set your IPv4 settings System > IPv4 Setup This section allows you have completed making changes, click...
Click Apply. Click on System, and click on page 7). 2. TEG-30284 5. Note: This step saves all configuration changes to the NV-RAM to access the switch management page on your network. Typically, the IP address settings ... that if the switch is rebooted or power cycled, the configuration changes will still be applied. © Copyright 2016 TRENDnet. Review the settings. Click Save Settings to change your switch IPv4 address settings. TRENDnet User's Guide Set your IPv4 settings System > IPv4 Setup This section allows you have completed making changes, click...
Users Guide
Page 14
Use the IPv6 System Settings page to configure the IPv6 network interface, which traffic is supported. Review the settings. TEG-30284 NS Retransmit Time Settings: A constant that can be automatically configured on a local link can be enabled only when DHCPv6 is ...: A link local address has a prefix of the IP address entered into your switch management page (see "Access your network. © Copyright 2016 TRENDnet. Log into the field. IPv6 Dynamic Gateway: To configure the switch to the IPv6 System Settings interface. IPv6 Static Gateway: Specifies...
Use the IPv6 System Settings page to configure the IPv6 network interface, which traffic is supported. Review the settings. TEG-30284 NS Retransmit Time Settings: A constant that can be automatically configured on a local link can be enabled only when DHCPv6 is ...: A link local address has a prefix of the IP address entered into your switch management page (see "Access your network. © Copyright 2016 TRENDnet. Log into the field. IPv6 Dynamic Gateway: To configure the switch to the IPv6 System Settings interface. IPv6 Static Gateway: Specifies...

Users Guide
Page 15
All Rights Reserved. 4. In the left hand panel, click Tools, click on page 7). 2. TEG-30284 Neighbor IPv6 Address: Specifies the neighbor IPv6 address. Link Layer MAC Address: Specifies the link layer MAC address. Add IPv6 neighbors System > IPv6 ... or delete the address. In the left hand panel, click Tools, click on IPv6 Neighbor Settings. 3. Click Add to save the settings. © Copyright 2016 TRENDnet. If the entries span multiple pages, you can navigate page number in the Page field and click Go or you can type in the specific...
All Rights Reserved. 4. In the left hand panel, click Tools, click on page 7). 2. TEG-30284 Neighbor IPv6 Address: Specifies the neighbor IPv6 address. Link Layer MAC Address: Specifies the link layer MAC address. Add IPv6 neighbors System > IPv6 ... or delete the address. In the left hand panel, click Tools, click on IPv6 Neighbor Settings. 3. Click Add to save the settings. © Copyright 2016 TRENDnet. If the entries span multiple pages, you can navigate page number in the Page field and click Go or you can type in the specific...
Users Guide
Page 16
... all configuration changes to the NV-RAM to ensure that if the switch is rebooted or power cycled, the configuration changes will populate. TEG-30284 2. Review the settings. All Rights Reserved. First, enter the IPv4 or IPv6 address to allow access and click Add for the purpose.... 5. In the left hand panel, click Tools, click on DNS Settings. 3. Enter your switch management page" on page 7). © Copyright 2016 TRENDnet. Click on System, and click on Configuration, and click Save. 6. Note: This step saves all entries in the provided fields. Click Save Settings to...
... all configuration changes to the NV-RAM to ensure that if the switch is rebooted or power cycled, the configuration changes will populate. TEG-30284 2. Review the settings. All Rights Reserved. First, enter the IPv4 or IPv6 address to allow access and click Add for the purpose.... 5. In the left hand panel, click Tools, click on DNS Settings. 3. Enter your switch management page" on page 7). © Copyright 2016 TRENDnet. Click on System, and click on Configuration, and click Save. 6. Note: This step saves all entries in the provided fields. Click Save Settings to...
Users Guide
Page 17
... IPv4 and IPv6 address entries, click the IP Restriction Status drop-down list at the top and select Enabled, then click Apply. © Copyright 2016 TRENDnet. Review the settings. Note: This step saves all entries in the table. Click on System, and click on page 7). 2. First, enter the IPv4 ... page (see "Access your switch management page" on IP Access List. 3. In the left hand panel, click Tools, click on Configuration, and click Save. 5. TEG-30284 4. You can click Delete next to the entry to delete the entry or Delete All to delete all configuration changes to the NV-RAM to...
... IPv4 and IPv6 address entries, click the IP Restriction Status drop-down list at the top and select Enabled, then click Apply. © Copyright 2016 TRENDnet. Review the settings. Note: This step saves all entries in the table. Click on System, and click on page 7). 2. First, enter the IPv4 ... page (see "Access your switch management page" on IP Access List. 3. In the left hand panel, click Tools, click on Configuration, and click Save. 5. TEG-30284 4. You can click Delete next to the entry to delete the entry or Delete All to delete all configuration changes to the NV-RAM to...
Users Guide
Page 18
...left hand panel, click Tools, click on Administration. 3. Then, click Apply. Click Save Settings to the switch management page. 1. TRENDnet User's Guide Change administrator password and add accounts System > Administration This section explains how to change the administrator password, in the "... Save. 5. Note: The password consists of the new account. Password: Enter the password for access to Flash, then click OK. TEG-30284 To create additional administrative user accounts: User Name: Enter the user name of up to verify. Note: The password consists of up to...
...left hand panel, click Tools, click on Administration. 3. Then, click Apply. Click Save Settings to the switch management page. 1. TRENDnet User's Guide Change administrator password and add accounts System > Administration This section explains how to change the administrator password, in the "... Save. 5. Note: The password consists of the new account. Password: Enter the password for access to Flash, then click OK. TEG-30284 To create additional administrative user accounts: User Name: Enter the user name of up to verify. Note: The password consists of up to...

Users Guide
Page 19
... page" on page 7). 2. Log into your switch management page (see "Access your time settings (HH:MM:SS) © Copyright 2016 TRENDnet. Displays if system time and date is rebooted or power cycled, the configuration changes will automatically log out a user from an network time server.... Click Save Settings to modify the switch management page idle timeout settings. 1. TRENDnet User's Guide Change web idle login timeout settings System > Timeout This section explains how to Flash, then click OK. TEG-30284 Set the switch date and time System > System Time 1. Click on System, ...
... page" on page 7). 2. Log into your switch management page (see "Access your time settings (HH:MM:SS) © Copyright 2016 TRENDnet. Displays if system time and date is rebooted or power cycled, the configuration changes will automatically log out a user from an network time server.... Click Save Settings to modify the switch management page idle timeout settings. 1. TRENDnet User's Guide Change web idle login timeout settings System > Timeout This section explains how to Flash, then click OK. TEG-30284 Set the switch date and time System > System Time 1. Click on System, ...

Users Guide
Page 20
...time server. Note: This step saves all access to configure your switch will still be accessed using secure encryption communication only. 1. TEG-30284 Enable HTTPS/SSL (Secure Socket Layer) management access System > SSL Settings By default, your time server settings. Click Apply to ...enable this option, under Simple Network Time Protocol (SNTP) Settings, enter your switch management page can set your Daylight Savings Time. 4. TRENDnet User's Guide o SNTP - Allows you can be applied. It is unsecure. Enter the primary network time server IPv4 address, IPv6 ...
...time server. Note: This step saves all access to configure your switch will still be accessed using secure encryption communication only. 1. TEG-30284 Enable HTTPS/SSL (Secure Socket Layer) management access System > SSL Settings By default, your time server settings. Click Apply to ...enable this option, under Simple Network Time Protocol (SNTP) Settings, enter your switch management page can set your Daylight Savings Time. 4. TRENDnet User's Guide o SNTP - Allows you can be applied. It is unsecure. Enter the primary network time server IPv4 address, IPv6 ...
Users Guide
Page 21
...to the NV-RAM to this purpose via the DHCP server. Log into your switch management page (see "Access your DHCP server. 1. TEG-30284 Enable DHCP Auto Configuration System > DHCP Auto Configuration If you need to save changes. 4. Click the Auto Configuration State drop-down list...this website, and accept the certificate if prompted. 4. In the left hand panel, click Tools, click on Configuration, and click Save. 5. TRENDnet User's Guide Click Continue, Proceed to ensure that if the switch is rebooted or power cycled, the configuration changes will still be applied. &#...
...to the NV-RAM to this purpose via the DHCP server. Log into your switch management page (see "Access your DHCP server. 1. TEG-30284 Enable DHCP Auto Configuration System > DHCP Auto Configuration If you need to save changes. 4. Click the Auto Configuration State drop-down list...this website, and accept the certificate if prompted. 4. In the left hand panel, click Tools, click on Configuration, and click Save. 5. TRENDnet User's Guide Click Continue, Proceed to ensure that if the switch is rebooted or power cycled, the configuration changes will still be applied. &#...

Users Guide
Page 22
...normal operation. Enter the message buffer size. (Range: 1-200) Syslog - Debug-level messages are displayed. 6 Informational - TRENDnet User's Guide View and setup your external syslog server. Click on System, and click on your switch logging System > System Log Settings The .... 3 Error - Click Apply to Flash, then click OK. No time stamp will have separate logging sections for troubleshooting or monitoring. TEG-30284 o Logging Level - o Facility - local7) Note: You can help in the Syslog Server IP section, enter the IPv4 or IPv6 address of...
...normal operation. Enter the message buffer size. (Range: 1-200) Syslog - Debug-level messages are displayed. 6 Informational - TRENDnet User's Guide View and setup your external syslog server. Click on System, and click on your switch logging System > System Log Settings The .... 3 Error - Click Apply to Flash, then click OK. No time stamp will have separate logging sections for troubleshooting or monitoring. TEG-30284 o Logging Level - o Facility - local7) Note: You can help in the Syslog Server IP section, enter the IPv4 or IPv6 address of...
Users Guide
Page 23
... by viewing and configuring the management information base (MIB) objects on the device with SNMP network management software and the switch's private MIB. TEG-30284 The SNMP Engine ID screen allows network managers to define the SNMP Engine ID or to assign the default Engine ID to Flash (menu).... that if the switch is rebooted or power cycled, the configuration changes will still be applied. 20 Click Save Settings to configure SNMP. TRENDnet User's Guide Enable or Disable SNMP System > SNMP > Settings You can manage the switch with the Simple Network Management Program (SNMP). ...
... by viewing and configuring the management information base (MIB) objects on the device with SNMP network management software and the switch's private MIB. TEG-30284 The SNMP Engine ID screen allows network managers to define the SNMP Engine ID or to assign the default Engine ID to Flash (menu).... that if the switch is rebooted or power cycled, the configuration changes will still be applied. 20 Click Save Settings to configure SNMP. TRENDnet User's Guide Enable or Disable SNMP System > SNMP > Settings You can manage the switch with the Simple Network Management Program (SNMP). ...


