
Users Guide
Page 2
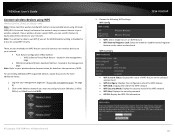
... 32 Access Point: Wireless Profile (SSID 34 Client Bridge 35 Client Bridge: Wireless Network 35 Client Bridge: Scan for your wireless network 24 General Configuration 25 Secure your access point 7 Initial Setup 8 Access the management page 8 Setup Wizard ...8 Using the Utility ...9 Status 11 Main...11 Wireless Client List...12 System Log ...13 IPv6 Status ...13 System 14 Wizard...14 Operation Mode ...14 IP Settings ...15 Spanning Tree Settings 16 Band Steering...16 © Copyright 2018 TRENDnet. TRENDnet User's Guide Table of security for wireless networks 36 WDS 38 WDS Link...
... 32 Access Point: Wireless Profile (SSID 34 Client Bridge 35 Client Bridge: Wireless Network 35 Client Bridge: Scan for your wireless network 24 General Configuration 25 Secure your access point 7 Initial Setup 8 Access the management page 8 Setup Wizard ...8 Using the Utility ...9 Status 11 Main...11 Wireless Client List...12 System Log ...13 IPv6 Status ...13 System 14 Wizard...14 Operation Mode ...14 IP Settings ...15 Spanning Tree Settings 16 Band Steering...16 © Copyright 2018 TRENDnet. TRENDnet User's Guide Table of security for wireless networks 36 WDS 38 WDS Link...
Users Guide
Page 3
... Automatically set using NTP 48 Daylight Saving Time 48 NTP Settings:...48 Date and Time Settings (manually set 48 Schedules ...49 SSH Management ...50 Log ...50 Diagnostics...51 Ping Test Parameter 51 Traceroute Parameter 51 Download Technical Support Data 51 LED Control ...52 Table of contents AP utility 53 Installation ...53 Device Settings ...53 Add and Delete Device 54 Add device: ...54 Delete Device:...54 Upgrade Firmware...55 Load configuration...55 Access Points ...56 Clients ...57 Statistics...57 Technical Specifications 59 Troubleshooting...
... Automatically set using NTP 48 Daylight Saving Time 48 NTP Settings:...48 Date and Time Settings (manually set 48 Schedules ...49 SSH Management ...50 Log ...50 Diagnostics...51 Ping Test Parameter 51 Traceroute Parameter 51 Download Technical Support Data 51 LED Control ...52 Table of contents AP utility 53 Installation ...53 Device Settings ...53 Add and Delete Device 54 Add device: ...54 Delete Device:...54 Upgrade Firmware...55 Load configuration...55 Access Points ...56 Clients ...57 Statistics...57 Technical Specifications 59 Troubleshooting...
Users Guide
Page 5
... increases real-time WiFi performance Pre-Encrypted Wireless For your convenience, the WiFi access point's WiFi bands are pre-encrypted with unique passwords Band Steering Band steering alleviates network congestion by automatically directing wireless devices from IEEE 802.11 theoretical specifications. For maximum performance of up to 867Mbps use of multiple MU-MIMO enabled wireless adapters. © Copyright 2018 TRENDnet. All Rights Reserved. 2 For maximum performance of up to 400Mbps, use with cable guard TEW-826DAP Disclaimer *Maximum wireless signal rates are...
... increases real-time WiFi performance Pre-Encrypted Wireless For your convenience, the WiFi access point's WiFi bands are pre-encrypted with unique passwords Band Steering Band steering alleviates network congestion by automatically directing wireless devices from IEEE 802.11 theoretical specifications. For maximum performance of up to 867Mbps use of multiple MU-MIMO enabled wireless adapters. © Copyright 2018 TRENDnet. All Rights Reserved. 2 For maximum performance of up to 400Mbps, use with cable guard TEW-826DAP Disclaimer *Maximum wireless signal rates are...
Users Guide
Page 6
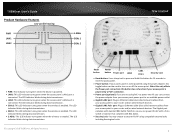
... turns green when the wireless is connected. Reset button Power button Power port LAN2 LAN1 (PoE) Security Lock Reset button: Use a sharp tool to press and hold this only affects the Power port connection; The LED indicator blinks during data transmission. © Copyright 2018 TRENDnet. TRENDnet User's Guide Product Hardware Features Low-profile housing PWR LAN1 LAN2 2.4GHz 5GHz 1 5GHz 2 TEW-826DAP PWR: This indicator turns green when the device is powered. LAN1: This LED indicator turns green when the access point...
... turns green when the wireless is connected. Reset button Power button Power port LAN2 LAN1 (PoE) Security Lock Reset button: Use a sharp tool to press and hold this only affects the Power port connection; The LED indicator blinks during data transmission. © Copyright 2018 TRENDnet. TRENDnet User's Guide Product Hardware Features Low-profile housing PWR LAN1 LAN2 2.4GHz 5GHz 1 5GHz 2 TEW-826DAP PWR: This indicator turns green when the device is powered. LAN1: This LED indicator turns green when the access point...
Users Guide
Page 9
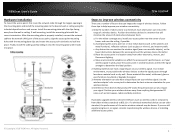
... correct orientation. If you are a number of obstructions between the access point and the wireless device, the better. In an indoor environment, try to position the wireless devices so that will minimize the amount of factors that produce RF (radio frequency) noise can have a large impact on your wireless connectivity: 1. TRENDnet User's Guide Hardware Installation To mount the access point, first route the network cable through less dense material such...
... correct orientation. If you are a number of obstructions between the access point and the wireless device, the better. In an indoor environment, try to position the wireless devices so that will minimize the amount of factors that produce RF (radio frequency) noise can have a large impact on your wireless connectivity: 1. TRENDnet User's Guide Hardware Installation To mount the access point, first route the network cable through less dense material such...
Users Guide
Page 12
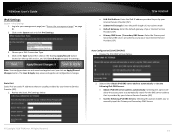
...://www.trendnet.com/support and selecting model TEW-826DAP within the Product Download drop-down list. 2. Once the utility is installed click on Discover to refresh the list of the .zip file and run the .exe installer to the login screen. Extract the contents of access points. 4. Select the access point you will need to use the new login password to proceed. All Rights Reserved. 9 TEW-826DAP Using the Utility For additional information on Device settings to utility section...
...://www.trendnet.com/support and selecting model TEW-826DAP within the Product Download drop-down list. 2. Once the utility is installed click on Discover to refresh the list of the .zip file and run the .exe installer to the login screen. Extract the contents of access points. 4. Select the access point you will need to use the new login password to proceed. All Rights Reserved. 9 TEW-826DAP Using the Utility For additional information on Device settings to utility section...
Users Guide
Page 13
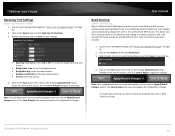
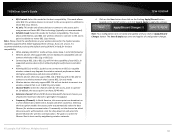
... to restrict wireless client devices from accessing other client devices connected to this network(s). Enable: Select this option to enable the selected wireless interface Visible: Select this option to wireless broadcast the selected wireless interface SSID: Enter the SSID (Wireless Network Name) of the selected wireless interface Security: Select the wireless encryption security for to assign the selected wireless interface Key: Enter the wireless encryption security key or password Password: Enter the login password of the device and...
... to restrict wireless client devices from accessing other client devices connected to this network(s). Enable: Select this option to enable the selected wireless interface Visible: Select this option to wireless broadcast the selected wireless interface SSID: Enter the SSID (Wireless Network Name) of the selected wireless interface Security: Select the wireless encryption security for to assign the selected wireless interface Key: Enter the wireless encryption security key or password Password: Enter the login password of the device and...
Users Guide
Page 18
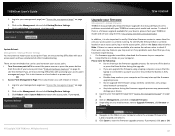
... DHCP server o STATIC: Select this mode to allow the access point the ability to wireless connect to use another access point in your network with one bridge can be changed, if you do not need to reach. TEW-826DAP IP Settings System > IP Settings In most cases, you plan to your root or connecting wireless access points, same SSID, channel and wireless encryption settings. 4. This is selected the access point connects ONLY to other WDS bridge enabled devices and local networks (the other wireless interface and Ethernet interface) as a wireless backbone bridge...
... DHCP server o STATIC: Select this mode to allow the access point the ability to wireless connect to use another access point in your network with one bridge can be changed, if you do not need to reach. TEW-826DAP IP Settings System > IP Settings In most cases, you plan to your root or connecting wireless access points, same SSID, channel and wireless encryption settings. 4. This is selected the access point connects ONLY to other WDS bridge enabled devices and local networks (the other wireless interface and Ethernet interface) as a wireless backbone bridge...
Users Guide
Page 19
.... 16 The Save & Apply step saves and applies all configuration changes. TRENDnet User's Guide Spanning Tree Settings System > Spanning Tree Settings 1. This allows your management page (see "Access the management page" on Apply/Discard Changes button. Select enable to use both bands more efficiently and making sure clients capable of the 11AC standard for faster speeds are establish WiFi links at 11AC connectivity whenever possible. 1. The Save & Apply step saves and...
.... 16 The Save & Apply step saves and applies all configuration changes. TRENDnet User's Guide Spanning Tree Settings System > Spanning Tree Settings 1. This allows your management page (see "Access the management page" on Apply/Discard Changes button. Select enable to use both bands more efficiently and making sure clients capable of the 11AC standard for faster speeds are establish WiFi links at 11AC connectivity whenever possible. 1. The Save & Apply step saves and...
Users Guide
Page 20
... management page (see "Access the management page" on the top left section, and click Save & Apply to apply the settings. TRENDnet User's Guide IPv6 Settings System > IPv6 Settings 1. Click on Apply/Discard Changes button. Note: Your configurations are usually provided by your IPv6 Connection Type. 4. Choose your local Internet Service Provider (ISP) Auto Configuration (SLAAC/DHCPv6) 1. Review the IPv6 DNS Settings below . 2. Select either Obtain IPv6 DNS server address automatically or Use the following IPv6 DNS Servers...
... management page (see "Access the management page" on the top left section, and click Save & Apply to apply the settings. TRENDnet User's Guide IPv6 Settings System > IPv6 Settings 1. Click on Apply/Discard Changes button. Note: Your configurations are usually provided by your IPv6 Connection Type. 4. Choose your local Internet Service Provider (ISP) Auto Configuration (SLAAC/DHCPv6) 1. Review the IPv6 DNS Settings below . 2. Select either Obtain IPv6 DNS server address automatically or Use the following IPv6 DNS Servers...

Users Guide
Page 22
.../ admin). Enter the port number used to allow the CoovaChilli server to allow the access point to authentication RADIUS authentication requests. UAM Portal URL - Enter the UAM portal web URL address of the following. User name and password - First, enable Captive Portal, enter user name and password accounts for authentication to connect to authenticate and set an authentication timeout value. Requires users to enter a user name and password for users to your captive portal WiFi network. TRENDnet User's Guide Secondary RADIUS Server - The default port...
.../ admin). Enter the port number used to allow the CoovaChilli server to allow the access point to authentication RADIUS authentication requests. UAM Portal URL - Enter the UAM portal web URL address of the following. User name and password - First, enable Captive Portal, enter user name and password accounts for authentication to connect to authenticate and set an authentication timeout value. Requires users to enter a user name and password for users to your captive portal WiFi network. TRENDnet User's Guide Secondary RADIUS Server - The default port...
Users Guide
Page 27
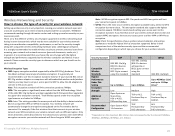
... access point to WEP to allow the old adapters to connect to the access point. Much of the older 802.11g hardware was been upgraded (with the ability to detect wireless devices using older wireless networking hardware (also called legacy hardware). For example, if the first wireless client that one you should use WPA encryption. TEW-826DAP Note: WPA2 encryption supports 802.11n speeds and WPA encryption will limit connection speeds to either WPA or WPA2 encryption. Below is significantly more robust. TRENDnet User's Guide Wireless Networking...
... access point to WEP to allow the old adapters to connect to the access point. Much of the older 802.11g hardware was been upgraded (with the ability to detect wireless devices using older wireless networking hardware (also called legacy hardware). For example, if the first wireless client that one you should use WPA encryption. TEW-826DAP Note: WPA2 encryption supports 802.11n speeds and WPA encryption will limit connection speeds to either WPA or WPA2 encryption. Below is significantly more robust. TRENDnet User's Guide Wireless Networking...

Users Guide
Page 29
... address of the RADIUS server. (e.g. 192.168.10.250) Port: Enter the port your RADIUS server is configured to use AES. Pre-Shared Key: Enter the passphrase or password o This is the password or key that consists of more secure to use TKIP + AES. Personal, WPA2- Note: This security type requires an external RADIUS server, PSK only requires you enter the WEP key needed for RADIUS authentication. TRENDnet User's Guide Network Key 1-4 o This is where you to create a passphrase. WPA...
... address of the RADIUS server. (e.g. 192.168.10.250) Port: Enter the port your RADIUS server is configured to use AES. Pre-Shared Key: Enter the passphrase or password o This is the password or key that consists of more secure to use TKIP + AES. Personal, WPA2- Note: This security type requires an external RADIUS server, PSK only requires you enter the WEP key needed for RADIUS authentication. TRENDnet User's Guide Network Key 1-4 o This is where you to create a passphrase. WPA...
Users Guide
Page 32
... or deny specific wireless clients using AP mode. Review the settings and Save then click on the flashing Apply/Discard button located on the top left section, and click Save & Apply to apply the settings. Filter Mode: Select from the MAC Filter List 29 TRENDnet User's Guide 1. Log into your management page (see "Access the management page" on page 8). 2. Every network device has a unique, 12-digit MAC (Media Access Control) address. Log into your management page (see "Access the management page...
... or deny specific wireless clients using AP mode. Review the settings and Save then click on the flashing Apply/Discard button located on the top left section, and click Save & Apply to apply the settings. Filter Mode: Select from the MAC Filter List 29 TRENDnet User's Guide 1. Log into your management page (see "Access the management page" on page 8). 2. Every network device has a unique, 12-digit MAC (Media Access Control) address. Log into your management page (see "Access the management page...
Users Guide
Page 33
... the WPS network WPS Key: Displays the security password AP PIN: Display the WPS PIN information. All Rights Reserved. 30 Log into your management page (see "Access the management page" on the selected wireless band WPS Configure: Displays the configured mode of the WPS feature WPS SSID: Displays the SSID of the WPS network WPS Security Mode: Display the security mode of WPS. If your wireless devices support WPS, you can use WPS if you set the SSID Broadcast setting to Disabled or if you want to configure button (Wireless...
... the WPS network WPS Key: Displays the security password AP PIN: Display the WPS PIN information. All Rights Reserved. 30 Log into your management page (see "Access the management page" on the selected wireless band WPS Configure: Displays the configured mode of the WPS feature WPS SSID: Displays the SSID of the WPS network WPS Security Mode: Display the security mode of WPS. If your wireless devices support WPS, you can use WPS if you set the SSID Broadcast setting to Disabled or if you want to configure button (Wireless...
Users Guide
Page 34
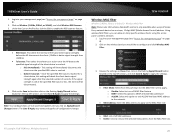
TRENDnet User's Guide PIN: Enter the PIN information of WPS. PBC: Click Start Push Button to activate WPS PBC configuration. 4. Click Start PIN button to the network. Note: Your configurations are not saved and applied until you enter the client's PIN information Note: You may need to initiate the WPS PIN on your wireless device documentation for details on the operation of the wireless client you want to connect to activate WPS once you click on the top...
TRENDnet User's Guide PIN: Enter the PIN information of WPS. PBC: Click Start Push Button to activate WPS PBC configuration. 4. Click Start PIN button to the network. Note: Your configurations are not saved and applied until you enter the client's PIN information Note: You may need to initiate the WPS PIN on your wireless device documentation for details on the operation of the wireless client you want to connect to activate WPS once you click on the top...
Users Guide
Page 36
... & Apply to apply the settings. To manually set to 802.11g only mode. Channel Width: Select the channel width for the access point to automatically select the best Channel for the best compatibility. TEW-826DAP 4. Selecting the Auto option enables the access point to operate on. Click on the Save button then click on the flashing Apply/Discard button located on your 802.11n supported wireless devices from obtaining higher performance and...
... & Apply to apply the settings. To manually set to 802.11g only mode. Channel Width: Select the channel width for the access point to automatically select the best Channel for the best compatibility. TEW-826DAP 4. Selecting the Auto option enables the access point to operate on. Click on the Save button then click on the flashing Apply/Discard button located on your 802.11n supported wireless devices from obtaining higher performance and...
Users Guide
Page 50
... TRENDnet access point model and version. Do not turn off disconnect the power source or press the power button from the side of your management page (see "Product Hardware Features" on the Status tab and select Main. Navigate to start the firmware upgrade process. Click Open to the folder on your computer where the unzipped firmware file (.bin) is located and select it is fully charged. Disable sleep mode...
... TRENDnet access point model and version. Do not turn off disconnect the power source or press the power button from the side of your management page (see "Product Hardware Features" on the Status tab and select Main. Navigate to start the firmware upgrade process. Click Open to the folder on your computer where the unzipped firmware file (.bin) is located and select it is fully charged. Disable sleep mode...
Users Guide
Page 62
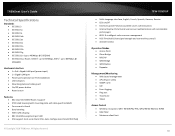
... (client signal strength and connectivity control) Airtime Fairness Operation Modes Access Point Client Bridge WDS AP WDS Bridge WDS Station Repeater Management/Monitoring Web based management AP software utility SNMP v1/v3 STP Event logging Ping test Traceroute Telnet Access Control Wireless encryption: WEP, WPA/WPA2-PSK, WPA/WPA2-RADIUS, WPA3 MAC filter Maximum client limit 59 TRENDnet User's Guide Technical Specifications...
... (client signal strength and connectivity control) Airtime Fairness Operation Modes Access Point Client Bridge WDS AP WDS Bridge WDS Station Repeater Management/Monitoring Web based management AP software utility SNMP v1/v3 STP Event logging Ping test Traceroute Telnet Access Control Wireless encryption: WEP, WPA/WPA2-PSK, WPA/WPA2-RADIUS, WPA3 MAC filter Maximum client limit 59 TRENDnet User's Guide Technical Specifications...
Users Guide
Page 65
... that the LAN light on the factory reset button for assistance. Press on the access point is enabled, login to the access point management page, click on page 4. 2. Go into the Control Panel, click Network and Internet. Go into the Control Panel, double-click the Network Connections icon b. Answer: 1. d. Then click Obtain an IP address automatically and click OK. c. TEW-826DAP Q: I access the access point management page? Windows Vista a. TRENDnet User's Guide Troubleshooting Q: I do? How can I cannot connect wirelessly to the access point. Answer...
... that the LAN light on the factory reset button for assistance. Press on the access point is enabled, login to the access point management page, click on page 4. 2. Go into the Control Panel, click Network and Internet. Go into the Control Panel, double-click the Network Connections icon b. Answer: 1. d. Then click Obtain an IP address automatically and click OK. c. TEW-826DAP Q: I access the access point management page? Windows Vista a. TRENDnet User's Guide Troubleshooting Q: I do? How can I cannot connect wirelessly to the access point. Answer...


