User Guide
Page 1
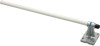
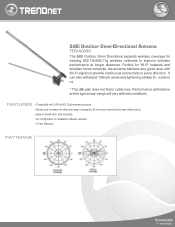
...; Easy-to improve wireless performance at longer distances. range will vary with site conditions FEATURES • Compatible with Wi-Fi signals to provide continuous connectivity in every direction. Perfect for existing 802.11b/802.11g wireless networks to -install wall / pole mounting • No configuration or installation software required • 3-Year Warranty PATTERNS TEW-503PI (07-28-2005) TEW-AO08O rev:10.28...
...; Easy-to improve wireless performance at longer distances. range will vary with site conditions FEATURES • Compatible with Wi-Fi signals to provide continuous connectivity in every direction. Perfect for existing 802.11b/802.11g wireless networks to -install wall / pole mounting • No configuration or installation software required • 3-Year Warranty PATTERNS TEW-503PI (07-28-2005) TEW-AO08O rev:10.28...
User Guide
Page 2
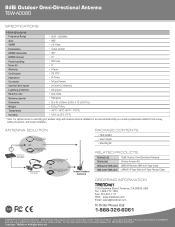
... TEW-AO10O TEW-ASAK TEW-L202/TEW-L208 TEW-L406/TEW-L412 10dBi Outdoor Omni-Directional Antenna Outdoor Arrestor Kit LMR200 Reverse SMA to N-Type Cable LMR400 N-Type Male to change at 25°C (77°F) * Note: For optimal results in extending your wireless range with wireless antenna installations, we recommended that you consult a professional installer for site survey, safety precautions, and proper installation. 8dBi Outdoor Omni-Directional Antenna TEW-AO08O SPECIFICATIONS Hardware Frequency Range...
... TEW-AO10O TEW-ASAK TEW-L202/TEW-L208 TEW-L406/TEW-L412 10dBi Outdoor Omni-Directional Antenna Outdoor Arrestor Kit LMR200 Reverse SMA to N-Type Cable LMR400 N-Type Male to change at 25°C (77°F) * Note: For optimal results in extending your wireless range with wireless antenna installations, we recommended that you consult a professional installer for site survey, safety precautions, and proper installation. 8dBi Outdoor Omni-Directional Antenna TEW-AO08O SPECIFICATIONS Hardware Frequency Range...

Quick Installation Guide
Page 2
Weatherproof tape for outdoor installations 5 4. Indoor Antenna Installation 6 Version 02.23.2006 Table of Contents English ...1 1. Outdoor Antenna Installation 1 2. How to install the surge arrestor 4 3.
Weatherproof tape for outdoor installations 5 4. Indoor Antenna Installation 6 Version 02.23.2006 Table of Contents English ...1 1. Outdoor Antenna Installation 1 2. How to install the surge arrestor 4 3.
Quick Installation Guide
Page 3
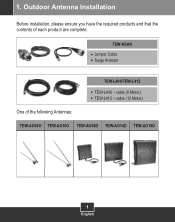
Outdoor Antenna Installation Before installation, please ensure you have the required products and that the contents of the following Antennas: TEW-AO08O TEW-AO10O TEW-AO09D TEW-AO14D TEW-AO19D 1 English cable (12 Meter) One of each product are complete. cable (6 Meter) TEW-L412 - 1. TEW-ASAK Jumper Cable Surge Arrestor TEW-L406/TEW-L412 TEW-L406 -
Outdoor Antenna Installation Before installation, please ensure you have the required products and that the contents of the following Antennas: TEW-AO08O TEW-AO10O TEW-AO09D TEW-AO14D TEW-AO19D 1 English cable (12 Meter) One of each product are complete. cable (6 Meter) TEW-L412 - 1. TEW-ASAK Jumper Cable Surge Arrestor TEW-L406/TEW-L412 TEW-L406 -

Quick Installation Guide
Page 4
1. Disconnect the default dipole antenna from your Wi-Fi Device. 3. Attach the blue sleeve (Reverse SMA) of the jumper cable to the surge arrestor. (Please refer to Section 2: "How to your indoor access point or router. 2. Connect the black sleeve (N-Type) of the jumper cable to install the surge arrestor" 2 English
1. Disconnect the default dipole antenna from your Wi-Fi Device. 3. Attach the blue sleeve (Reverse SMA) of the jumper cable to the surge arrestor. (Please refer to Section 2: "How to your indoor access point or router. 2. Connect the black sleeve (N-Type) of the jumper cable to install the surge arrestor" 2 English

Quick Installation Guide
Page 5
Connect the Green wire to the Antenna. 7. Grounded Electrical System 3. Connect the remaining black sleeve (N-Type) of the antenna cable (TEW-L406/ TEW-L412) 5. Your Outdoor Antenna installation is now complete. 3 English 4. e.g. 1. Building frame 6. Connect remaining surge arrestor connector to the blue sleeve (N-Type) of the Antenna Cable to grounding object. Earth Driven rod 2.
Connect the Green wire to the Antenna. 7. Grounded Electrical System 3. Connect the remaining black sleeve (N-Type) of the antenna cable (TEW-L406/ TEW-L412) 5. Your Outdoor Antenna installation is now complete. 3 English 4. e.g. 1. Building frame 6. Connect remaining surge arrestor connector to the blue sleeve (N-Type) of the Antenna Cable to grounding object. Earth Driven rod 2.
Quick Installation Guide
Page 6
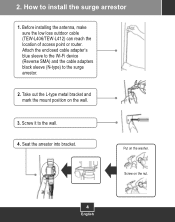
How to the surge arrestor. 2. Take out the L-type metal bracket and mark the mount position on the nut. 4 English Seat the arrestor into bracket. Attach the enclosed cable adapter's blue sleeve to the Wi-Fi device (Reverse SMA) and the cable adapters black sleeve (N-type) to install the surge arrestor 1. Screw on the wall. 3. Before installing the antenna, make sure the low loss outdoor cable (TEW-L406/TEW-L412) can reach the location of access point or router. Put on the washer. 2. Screw it to the wall. 4.
How to the surge arrestor. 2. Take out the L-type metal bracket and mark the mount position on the nut. 4 English Seat the arrestor into bracket. Attach the enclosed cable adapter's blue sleeve to the Wi-Fi device (Reverse SMA) and the cable adapters black sleeve (N-type) to install the surge arrestor 1. Screw on the wall. 3. Before installing the antenna, make sure the low loss outdoor cable (TEW-L406/TEW-L412) can reach the location of access point or router. Put on the washer. 2. Screw it to the wall. 4.

Quick Installation Guide
Page 7
3. Weatherproof tape for outdoor installations If your surge arrestor is installed outdoors, remember to wrap both connectors tightly with the enclosed weatherproofing tape. 5 English
3. Weatherproof tape for outdoor installations If your surge arrestor is installed outdoors, remember to wrap both connectors tightly with the enclosed weatherproofing tape. 5 English

Quick Installation Guide
Page 8
cable (8 Meter) One of each product are required: TEW-AI86D TEW-AI86DB TEW-AI75O TEW-AI75OB 6 English cable (2 meter) TEW-L208 - TEW-L202/TEW-L208 TEW-L202 - No additional cable assemblies are complete. 4. Indoor Antenna Installation Before installation, please ensure you have the required products and that the contents of the following Antennas: TEW-AO08O TEW-AO10O TEW-AO09D TEW-AO14D TEW-AO19D Note: The following Indoor Antennas come with cables or connect directly to your Wi-Fi Device.
cable (8 Meter) One of each product are required: TEW-AI86D TEW-AI86DB TEW-AI75O TEW-AI75OB 6 English cable (2 meter) TEW-L208 - TEW-L202/TEW-L208 TEW-L202 - No additional cable assemblies are complete. 4. Indoor Antenna Installation Before installation, please ensure you have the required products and that the contents of the following Antennas: TEW-AO08O TEW-AO10O TEW-AO09D TEW-AO14D TEW-AO19D Note: The following Indoor Antennas come with cables or connect directly to your Wi-Fi Device.

Quick Installation Guide
Page 9
Your Indoor Antenna installation is now complete. 7 English 1. Disconnect the dipole antenna from your access point or router. 2. Connect the remaining black sleeve (N-Type) of the (N-type) antenna. 4. Attach the blue sleeve (Reverse SMA) of the indoor cable (TEW-L202/ TEW-L208) directly to the blue sleeve of the antenna cable to the Wi-Fi Device. 3.
Your Indoor Antenna installation is now complete. 7 English 1. Disconnect the dipole antenna from your access point or router. 2. Connect the remaining black sleeve (N-Type) of the (N-type) antenna. 4. Attach the blue sleeve (Reverse SMA) of the indoor cable (TEW-L202/ TEW-L208) directly to the blue sleeve of the antenna cable to the Wi-Fi Device. 3.

Quick Installation Guide
Page 10
... that are no user serviceable parts inside the product. Warranty service may be responsible for a Return Material Authorization (RMA) number, accompanied by a copy of the dated proof of TRENDnet. TRENDnet shall not be new or reconditioned. This warranty is voided if (i) the product has been modified or repaired by TRENDnet with any products returned to TRENDnet pursuant to any software, firmware, information, or...
... that are no user serviceable parts inside the product. Warranty service may be responsible for a Return Material Authorization (RMA) number, accompanied by a copy of the dated proof of TRENDnet. TRENDnet shall not be new or reconditioned. This warranty is voided if (i) the product has been modified or repaired by TRENDnet with any products returned to TRENDnet pursuant to any software, firmware, information, or...

Quick Installation Guide
Page 11
...OUT OF OR IN CONNECTION WITH THE SALE, INSTALLATION, MAINTENANCE, USE, PERFORMANCE, FAILURE, OR INTERRUPTION OF THE POSSIBILITY OF SUCH DAMAGES, AND LIMITS ITS LIABILITY TO REPAIR, REPLACEMENT, OR REFUND OF THE PURCHASE PRICE PAID, AT TRENDnet'S OPTION. WARRANTIES EXCLUSIVE: IF THE TRENDnet PRODUCT DOES NOT ... FOR IT ANY OTHER LIABILITY IN CONNECTION WITH THE SALE, INSTALLATION MAINTENANCE OR USE OF TRENDnet'S PRODUCTS. Governing Law: This Limited Warranty shall be governed by the laws of the state of California. AC/DC Power Adapter, Cooling Fan, and Power Supply carry 1 Year Warranty 9 THE ...
...OUT OF OR IN CONNECTION WITH THE SALE, INSTALLATION, MAINTENANCE, USE, PERFORMANCE, FAILURE, OR INTERRUPTION OF THE POSSIBILITY OF SUCH DAMAGES, AND LIMITS ITS LIABILITY TO REPAIR, REPLACEMENT, OR REFUND OF THE PURCHASE PRICE PAID, AT TRENDnet'S OPTION. WARRANTIES EXCLUSIVE: IF THE TRENDnet PRODUCT DOES NOT ... FOR IT ANY OTHER LIABILITY IN CONNECTION WITH THE SALE, INSTALLATION MAINTENANCE OR USE OF TRENDnet'S PRODUCTS. Governing Law: This Limited Warranty shall be governed by the laws of the state of California. AC/DC Power Adapter, Cooling Fan, and Power Supply carry 1 Year Warranty 9 THE ...

Quick Installation Guide
Page 12
All Rights Reserved. TRENDnet. Go to register your product online. TRENDnet Technical Support Product Warranty Registration Please take a moment to TRENDnet's website at http://www.trendnet.com 3135 Kashiwa Street Torrance, CA 90505 USA Copyright ©2006.
All Rights Reserved. TRENDnet. Go to register your product online. TRENDnet Technical Support Product Warranty Registration Please take a moment to TRENDnet's website at http://www.trendnet.com 3135 Kashiwa Street Torrance, CA 90505 USA Copyright ©2006.


