

Quick Installation Guide
Page 3
...section. TRENDware International, Inc. If you have everything in the box: TEW-OA14DK TEW-OA14DK 14dBi Directional Outdoor Antenna Quick Installation Guide Antenne extérieure directionnelle 14dBi Guide d'installation rapide ...Antenna. All Rights Reserved. Following the installations should be quick and easy. This guide will help you need further technical support, please visit www.TRENDNET.com or call technical support by phone. Quick Installation Guide 1 English Prepare for Installation Thank you for purchasing the TRENDnet TEW-OA14DK 14dBi Directional Outdoor Antenna...
...section. TRENDware International, Inc. If you have everything in the box: TEW-OA14DK TEW-OA14DK 14dBi Directional Outdoor Antenna Quick Installation Guide Antenne extérieure directionnelle 14dBi Guide d'installation rapide ...Antenna. All Rights Reserved. Following the installations should be quick and easy. This guide will help you need further technical support, please visit www.TRENDNET.com or call technical support by phone. Quick Installation Guide 1 English Prepare for Installation Thank you for purchasing the TRENDnet TEW-OA14DK 14dBi Directional Outdoor Antenna...
Quick Installation Guide
Page 7
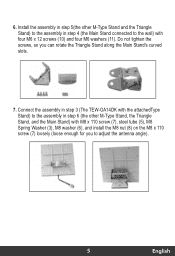
Connect the assembly in step 3 (The TEW-OA14DK with the attachedType Stand) to the assembly in step 6 (the other M-Type Stand and the Triangle Stand) to the assembly in step 5(the other M-Type ... Main Stand) with four M6 x 12 screws (10) and four M6 washers (11). Install the assembly in step 4 (the Main Stand connected to adjust the antenna angle). 5 English 6. Do not tighten the screws, so you to the wall) with M8 x 110 screw (7), steel tube (5), M8 Spring Washer (3), M8 washer (6), and install...
Connect the assembly in step 3 (The TEW-OA14DK with the attachedType Stand) to the assembly in step 6 (the other M-Type Stand and the Triangle Stand) to the assembly in step 5(the other M-Type ... Main Stand) with four M6 x 12 screws (10) and four M6 washers (11). Install the assembly in step 4 (the Main Stand connected to adjust the antenna angle). 5 English 6. Do not tighten the screws, so you to the wall) with M8 x 110 screw (7), steel tube (5), M8 Spring Washer (3), M8 washer (6), and install...
Quick Installation Guide
Page 9
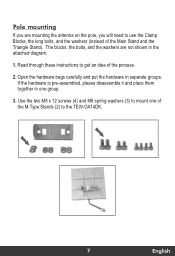
Pole mounting If you are not shown in the attached diagram. 1. Read through these instructions to the TEW-OA14DK. 7 English If the hardware is pre-assembled, please disassemble it and place them together in separate groups. Open the hardware bags carefully and put the ... (3) to use the Clamp Blocks, the long bolts, and the washers (instead of the process. 2. The blocks, the bolts, and the washers are mounting the antenna on the pole, you will need to mount one group. 3.
Pole mounting If you are not shown in the attached diagram. 1. Read through these instructions to the TEW-OA14DK. 7 English If the hardware is pre-assembled, please disassemble it and place them together in separate groups. Open the hardware bags carefully and put the ... (3) to use the Clamp Blocks, the long bolts, and the washers (instead of the process. 2. The blocks, the bolts, and the washers are mounting the antenna on the pole, you will need to mount one group. 3.
Quick Installation Guide
Page 10
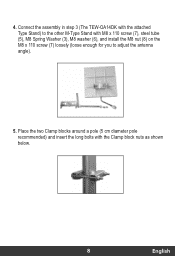
Place the two Clamp blocks around a pole (5 cm diameter pole recommended) and insert the long bolts with M8 x 110 screw (7), steel tube (5), M8 Spring Washer (3), M8 washer (6), and install the M8 nut (8) on the M8 x 110 screw (7) loosely (loose enough for you to adjust the antenna angle). 5. 4. Connect the assembly in step 3 (The TEW-OA14DK with the attached Type Stand) to the other M-Type Stand with the Clamp block nuts as shown below. 8 English
Place the two Clamp blocks around a pole (5 cm diameter pole recommended) and insert the long bolts with M8 x 110 screw (7), steel tube (5), M8 Spring Washer (3), M8 washer (6), and install the M8 nut (8) on the M8 x 110 screw (7) loosely (loose enough for you to adjust the antenna angle). 5. 4. Connect the assembly in step 3 (The TEW-OA14DK with the attached Type Stand) to the other M-Type Stand with the Clamp block nuts as shown below. 8 English

Quick Installation Guide
Page 11
... with the other side of the nuts from the Clamp Block and insert the bolt into the M-Type Stand in the TEW-OA14DK. Be careful not to help in step 4 (THE TEW-OA14DK with two attached M-Type Stands) with the nuts that you use two people to over the Clamp block washer. Remove one... of the pole. 7. It is now complete. 9 English Adjust the antenna angles and then tighten all the nuts/bolts. 6. Repeat the same steps...
... with the other side of the nuts from the Clamp Block and insert the bolt into the M-Type Stand in the TEW-OA14DK. Be careful not to help in step 4 (THE TEW-OA14DK with two attached M-Type Stands) with the nuts that you use two people to over the Clamp block washer. Remove one... of the pole. 7. It is now complete. 9 English Adjust the antenna angles and then tighten all the nuts/bolts. 6. Repeat the same steps...

Quick Installation Guide
Page 13
... I go behind the antenna? A3: The TEW-OA14DK is a directional antenna and can adjust the position of the TEW-OA14DK. If you connected the antenna to comply with FCC and CE Rules. Contact Technical Support Telephone: +1-310-626-6252 Fax: +1-310-626-6267 Website: www.TRENDNET.com E-mail: [email protected] for IEEE 802.11b or 802.11g Wireless Access Points. A2: Make sure that you have any questions regarding the TEW-OA14DK 14dBi Directional Outdoor Antenna, please contact Trendware Technical Support Department. Troubleshooting Q1: How come I cannot get a Wi-Fi signal when I am ...
... I go behind the antenna? A3: The TEW-OA14DK is a directional antenna and can adjust the position of the TEW-OA14DK. If you connected the antenna to comply with FCC and CE Rules. Contact Technical Support Telephone: +1-310-626-6252 Fax: +1-310-626-6267 Website: www.TRENDNET.com E-mail: [email protected] for IEEE 802.11b or 802.11g Wireless Access Points. A2: Make sure that you have any questions regarding the TEW-OA14DK 14dBi Directional Outdoor Antenna, please contact Trendware Technical Support Department. Troubleshooting Q1: How come I cannot get a Wi-Fi signal when I am ...


