
User's Guide
Page 3
... PCS AND PERIPHERALS TO SINGLE KVM SWITCH 13 2.4. TABLE OF CONTENTS TABLE OF CONTENTS ...3 LIST OF FIGURES ...5 LIST OF TABLES ...5 1. KVM SWITCH TECHNOLOGY OVERVIEW 11 2. Reset without disconnecting or powering down your computers 16 3. OPERATE THE SWITCH...21 ...21 ...22 ...22 Table of Contents EXTERNAL VIEWS ...9 1.3.1. FEATURES ...7 General features...7 Connector Interface...
... PCS AND PERIPHERALS TO SINGLE KVM SWITCH 13 2.4. TABLE OF CONTENTS TABLE OF CONTENTS ...3 LIST OF FIGURES ...5 LIST OF TABLES ...5 1. KVM SWITCH TECHNOLOGY OVERVIEW 11 2. Reset without disconnecting or powering down your computers 16 3. OPERATE THE SWITCH...21 ...21 ...22 ...22 Table of Contents EXTERNAL VIEWS ...9 1.3.1. FEATURES ...7 General features...7 Connector Interface...
User's Guide
Page 4
(when daisy-chained 22 (when daisy-chained 23
(when daisy-chained 22 (when daisy-chained 23

User's Guide
Page 7
TK-802R_TK-1602R Rack Mount KVM Switch User's Guide July,2004 1.1. Cascaded Application ▪ Auto-detect daisy-chain configuration without setting any dipswitch ▪ Cascadable up to 16 ... instant port status monitoring Control features ▪ Control multiple PCs from a single keyboard, monitor and mouse ▪ Front-panel buttons for direct channel selection ▪ Reset and Autoscan activated by front-panel key press and keyboard hotkey ▪ Keyboard hotkeys for quick operation commands ▪ OSD Menu options for more convenient...
TK-802R_TK-1602R Rack Mount KVM Switch User's Guide July,2004 1.1. Cascaded Application ▪ Auto-detect daisy-chain configuration without setting any dipswitch ▪ Cascadable up to 16 ... instant port status monitoring Control features ▪ Control multiple PCs from a single keyboard, monitor and mouse ▪ Front-panel buttons for direct channel selection ▪ Reset and Autoscan activated by front-panel key press and keyboard hotkey ▪ Keyboard hotkeys for quick operation commands ▪ OSD Menu options for more convenient...

User's Guide
Page 9
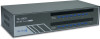
...display(s) and LED indicators on or powered-off sate. Front View Figure 1-2a TK-802R Front Panel Figure 1-2b TK-1602R Front Panel 1.3.1.1. It does not indicate whether that the specific port is currently selected as reset or autoscan. 1.3.1.2. one red and the other green. The green LED is... lit when the computer is selected to perform specific function such as the active channel to the KVM Switch and feeding power through its PS/2 interface. TK-802R_TK-1602R Rack Mount KVM...
...display(s) and LED indicators on or powered-off sate. Front View Figure 1-2a TK-802R Front Panel Figure 1-2b TK-1602R Front Panel 1.3.1.1. It does not indicate whether that the specific port is currently selected as reset or autoscan. 1.3.1.2. one red and the other green. The green LED is... lit when the computer is selected to perform specific function such as the active channel to the KVM Switch and feeding power through its PS/2 interface. TK-802R_TK-1602R Rack Mount KVM...

User's Guide
Page 15
...KVM Switch has to be turned off for your multiple daisy-chained KVM Switches should be turned on the rear of the second switch. TK-802R_TK-1602R Rack Mount KVM Switch User's Guide July,2004 Before connecting any PC or peripherals to your KVM Switch, make sure that : while ...your keyboard and mouse and consequently gets response from the slave switch on which you perform a reset. Step 5. Then power on each connected PC. Daisy-...
...KVM Switch has to be turned off for your multiple daisy-chained KVM Switches should be turned on the rear of the second switch. TK-802R_TK-1602R Rack Mount KVM Switch User's Guide July,2004 Before connecting any PC or peripherals to your KVM Switch, make sure that : while ...your keyboard and mouse and consequently gets response from the slave switch on which you perform a reset. Step 5. Then power on each connected PC. Daisy-...

User's Guide
Page 16
... number being displayed on the 7-segement LED displays. Note that the first (master) switch will occur. Reset without disconnecting or powering down your computers The KVM Switch can be reset without disconnecting or powering down your KVM Switch 2.5.1. Also remember to turn on any of no more than...this daisy-chain of multiple cascaded KVM Switches for 2 seconds, or by its next keystroke within a delay of the connected computer. 2.5. TK-802R_TK-1602R Rack Mount KVM Switch User's Guide July,2004 Now the KVM Switches are ready to operate as soon as you turn on all the other...
... number being displayed on the 7-segement LED displays. Note that the first (master) switch will occur. Reset without disconnecting or powering down your computers The KVM Switch can be reset without disconnecting or powering down your KVM Switch 2.5.1. Also remember to turn on any of no more than...this daisy-chain of multiple cascaded KVM Switches for 2 seconds, or by its next keystroke within a delay of the connected computer. 2.5. TK-802R_TK-1602R Rack Mount KVM Switch User's Guide July,2004 Now the KVM Switches are ready to operate as soon as you turn on all the other...

User's Guide
Page 17
... and then followed by the shared keyboard, mouse and monitor. Pressing the key during normal operation will need 5 strokes (such as a reset/initialization button when you begin operation of the KVM switch, it will take at least three keystrokes to complete one. The last button, ...key sequence: Hotkey control command = ScrLk + ScrLk + Command key (sequence) Within 2 seconds In most convenient and quickest way to operate your TK-802R/TK-1602R KVM Switch: Frontpanel buttons, keyboard hotkeys and OSD Menu options. In certain case, it down for over 2 seconds, could also serve as in ...
... and then followed by the shared keyboard, mouse and monitor. Pressing the key during normal operation will need 5 strokes (such as a reset/initialization button when you begin operation of the KVM switch, it will take at least three keystrokes to complete one. The last button, ...key sequence: Hotkey control command = ScrLk + ScrLk + Command key (sequence) Within 2 seconds In most convenient and quickest way to operate your TK-802R/TK-1602R KVM Switch: Frontpanel buttons, keyboard hotkeys and OSD Menu options. In certain case, it down for over 2 seconds, could also serve as in ...

User's Guide
Page 18
... z each denotes a number key. (ab) = 01 ~ 16 ; (yz) = 01 ~ 04 or 01 ~ 08 or 01 ~ 16. Table 3-1 Summary for your convenience. TK-802R_TK-1602R Rack Mount KVM Switch User's Guide July,2004 All the available hotkey commands are summarized in the following table for Hotkey Sequences Page 18 Chapter... 3 Operation Reset KVM ScrLk + ScrLk + End Show OSD Menu ScrLk + ScrLk + Space Bar Autoscan ScrLk + ScrLk + S Stop Autoscan ...
... z each denotes a number key. (ab) = 01 ~ 16 ; (yz) = 01 ~ 04 or 01 ~ 08 or 01 ~ 16. Table 3-1 Summary for your convenience. TK-802R_TK-1602R Rack Mount KVM Switch User's Guide July,2004 All the available hotkey commands are summarized in the following table for Hotkey Sequences Page 18 Chapter... 3 Operation Reset KVM ScrLk + ScrLk + End Show OSD Menu ScrLk + ScrLk + Space Bar Autoscan ScrLk + ScrLk + S Stop Autoscan ...

User's Guide
Page 25
... press Enter to terminate autoscanning immediately. TO STOP Autoscanning, just press any button on the front panel or hit any key on your switch. Hotkeys Reset KVM = Scr Scr End Lk Lk Hotkey Show OSD Menu = Scr Scr Lk Lk (space bar) Front-panel button Press and hold down the... scans through each connected channel and stay for a specific time period that is to change, and then press Enter or Insert key for TK-802R/TK-1602R. TK-802R_TK-1602R Rack Mount KVM Switch User's Guide July,2004 OSD Navigate to the PC Name you desire to provide you with a quick browsing of ...
... press Enter to terminate autoscanning immediately. TO STOP Autoscanning, just press any button on the front panel or hit any key on your switch. Hotkeys Reset KVM = Scr Scr End Lk Lk Hotkey Show OSD Menu = Scr Scr Lk Lk (space bar) Front-panel button Press and hold down the... scans through each connected channel and stay for a specific time period that is to change, and then press Enter or Insert key for TK-802R/TK-1602R. TK-802R_TK-1602R Rack Mount KVM Switch User's Guide July,2004 OSD Navigate to the PC Name you desire to provide you with a quick browsing of ...

User's Guide
Page 26
... within the range of your own by other hand, if the password protection is enabled, it means every time when the KVM Switch is reset, it will ensure further security over local console security, you can adjust the scan delay time according to their needs. Enter SESLEELCECTT ENTER PASSWORD... the password configuration, you want to suit their needs. OSD: 99 SEC. If you have a great concern over local console to 00000000. TK-802R_TK-1602R Rack Mount KVM Switch User's Guide July,2004 OSD Use cursor keys to navigate to the SCAN option on the OSD Menu, and then hit...
... within the range of your own by other hand, if the password protection is enabled, it means every time when the KVM Switch is reset, it will ensure further security over local console security, you can adjust the scan delay time according to their needs. Enter SESLEELCECTT ENTER PASSWORD... the password configuration, you want to suit their needs. OSD: 99 SEC. If you have a great concern over local console to 00000000. TK-802R_TK-1602R Rack Mount KVM Switch User's Guide July,2004 OSD Use cursor keys to navigate to the SCAN option on the OSD Menu, and then hit...

User's Guide
Page 27
... security cannot be asked for over 2 seconds). Then next time when you are not present. Then the KVM Switch will go reset and next user will appear on screen to request for confirmation. OSD Navigate with cursor keys downward to the PWD CHANGE option and...ESC QQUUITIT Enter SESLEELCECTT ENTER NEW PASSWORD ESC QQUUITIT Enter SESLEELCECTT RETYPE NEW PASSWORD ESC QQUUITIT Enter SESLEELCECTT Page 27 Chapter 3 Operation TK-802R_TK-1602R Rack Mount KVM Switch User's Guide July,2004 enabled by pressing the last button for correct password to gain access to KVM ...
... security cannot be asked for over 2 seconds). Then next time when you are not present. Then the KVM Switch will go reset and next user will appear on screen to request for confirmation. OSD Navigate with cursor keys downward to the PWD CHANGE option and...ESC QQUUITIT Enter SESLEELCECTT ENTER NEW PASSWORD ESC QQUUITIT Enter SESLEELCECTT RETYPE NEW PASSWORD ESC QQUUITIT Enter SESLEELCECTT Page 27 Chapter 3 Operation TK-802R_TK-1602R Rack Mount KVM Switch User's Guide July,2004 enabled by pressing the last button for correct password to gain access to KVM ...

User's Guide
Page 31
... According to feedbacks from plugging the keyboard/mouse cable while the PC is required by your KVM Switch. Page 31 Appendix C Troubleshooting TK-802R_TK-1602R Rack Mount KVM Switch User's Guide July,2004 APPENDIX C TROUBLESHOOTING Keyboard and Mouse problems Problem: Keyboard/mouse won't move the cursor ...problem: (1) Connect your local technical support. If you have checked all the above requirements for a proper keyboard/mouse connection are met, then reset your KVM Switch again by pressing the hotkey sequence: ScrLk + ScrLk + End (or push the last port button for the latter to ...
... According to feedbacks from plugging the keyboard/mouse cable while the PC is required by your KVM Switch. Page 31 Appendix C Troubleshooting TK-802R_TK-1602R Rack Mount KVM Switch User's Guide July,2004 APPENDIX C TROUBLESHOOTING Keyboard and Mouse problems Problem: Keyboard/mouse won't move the cursor ...problem: (1) Connect your local technical support. If you have checked all the above requirements for a proper keyboard/mouse connection are met, then reset your KVM Switch again by pressing the hotkey sequence: ScrLk + ScrLk + End (or push the last port button for the latter to ...