Data Sheet
Page 1
..., up to control two computer • 2-Port PS/2 KVM switch with just one keyboard, monitor, mouse, microphone, and a set of cable swapping and switching between PCs. • LED display for managing 2 PCs. With it's Hot-Plug, Auto-Scan, and Hot-Key operating features, the TK-208K is the perfect choice for easy status monitoring • PS/2 Interface Power method • 2-Year Warranty Console Port PC Port PS/2 Mic...
..., up to control two computer • 2-Port PS/2 KVM switch with just one keyboard, monitor, mouse, microphone, and a set of cable swapping and switching between PCs. • LED display for managing 2 PCs. With it's Hot-Plug, Auto-Scan, and Hot-Key operating features, the TK-208K is the perfect choice for easy status monitoring • PS/2 Interface Power method • 2-Year Warranty Console Port PC Port PS/2 Mic...
Data Sheet
Page 2
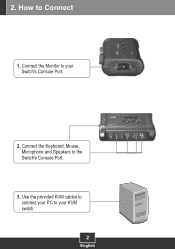
... to change at any time, without notice. Copyright © TRENDnet. Other Brands and product names are trademarks of their respective holders. 2-Port PS/2 Audio KVM Switch TK-208K SPECIFICATIONS Hardware Computer Connections KVM Cable Cable Connectors KVM Audio Console Connectors (All Female) Port Selection Auto-Scan Interval Keyboard State Power Type Dimensions Weight Temperature Humidity Certifications • 2 • 2 Sets of 1.2M (4ft) KVM & Audio Cables • To Console: 1 x 15-pin HDB type...
... to change at any time, without notice. Copyright © TRENDnet. Other Brands and product names are trademarks of their respective holders. 2-Port PS/2 Audio KVM Switch TK-208K SPECIFICATIONS Hardware Computer Connections KVM Cable Cable Connectors KVM Audio Console Connectors (All Female) Port Selection Auto-Scan Interval Keyboard State Power Type Dimensions Weight Temperature Humidity Certifications • 2 • 2 Sets of 1.2M (4ft) KVM & Audio Cables • To Console: 1 x 15-pin HDB type...

User's Guide
Page 2
TTaabblleeoof Cf oCnotennttesnts English ...1 1. How to Connect 2 3. Before You Start 1 2. Using the KVM Switch 4 Specifications 6 Troubleshooting 7 Version 10.31.05
TTaabblleeoof Cf oCnotennttesnts English ...1 1. How to Connect 2 3. Before You Start 1 2. Using the KVM Switch 4 Specifications 6 Troubleshooting 7 Version 10.31.05
User's Guide
Page 4
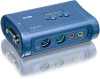
How to your KVM switch. 2 English Use the provided KVM cables to connect your Switch's Console Port. 2. Connect the Keyboard, Mouse, Microphone and Speakers to your PC to Connect 1. Connect the Monitor to the Switch's Console Port. 3. 2.
How to your KVM switch. 2 English Use the provided KVM cables to connect your Switch's Console Port. 2. Connect the Keyboard, Mouse, Microphone and Speakers to your PC to Connect 1. Connect the Monitor to the Switch's Console Port. 3. 2.
User's Guide
Page 5
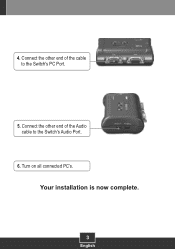
Turn on all connected PC's. Connect the other end of the Audio cable to the Switch's PC Port. 5. 4. Connect the other end of the cable to the Switch's Audio Port. 6. Your installation is now complete. 3 English
Turn on all connected PC's. Connect the other end of the Audio cable to the Switch's PC Port. 5. 4. Connect the other end of the cable to the Switch's Audio Port. 6. Your installation is now complete. 3 English
User's Guide
Page 6
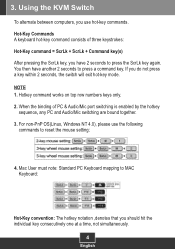
... individual key consecutively one at a time, not simultaneously. 4 English Hot-Key Commands A keyboard hot-key command consists of PC & Audio/Mic port switching is enabled by the hotkey sequence, any PC and Audio/Mic switching are bound together. 3. NOTE 1. For non-PnP OS(Linux, Windows NT 4.0), please use hot-key commands. Using the KVM Switch To alternate between computers, you have another 2 seconds to reset the mouse setting...
... individual key consecutively one at a time, not simultaneously. 4 English Hot-Key Commands A keyboard hot-key command consists of PC & Audio/Mic port switching is enabled by the hotkey sequence, any PC and Audio/Mic switching are bound together. 3. NOTE 1. For non-PnP OS(Linux, Windows NT 4.0), please use hot-key commands. Using the KVM Switch To alternate between computers, you have another 2 seconds to reset the mouse setting...
User's Guide
Page 7
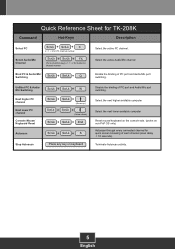
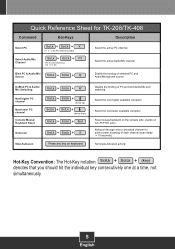
.../Mic Switching ScrLk + ScrLk + Q Enable the binding of PC port and Audio/Mic port switching. Select the next higher available computer Select the next lower available computer Reset mouse/keyboard on the console side. (works on keyboard Disable the binding of PC port and Audio/Mic port switching. Quick Reference Sheet for TK-208K Command Hot-Keys Description Select PC Select Audio/Mic Channel ScrLk + ScrLk + X x = 1 ~ 2 for PC channel number ScrLk...
.../Mic Switching ScrLk + ScrLk + Q Enable the binding of PC port and Audio/Mic port switching. Select the next higher available computer Select the next lower available computer Reset mouse/keyboard on the console side. (works on keyboard Disable the binding of PC port and Audio/Mic port switching. Quick Reference Sheet for TK-208K Command Hot-Keys Description Select PC Select Audio/Mic Channel ScrLk + ScrLk + X x = 1 ~ 2 for PC channel number ScrLk...
User's Guide
Page 8
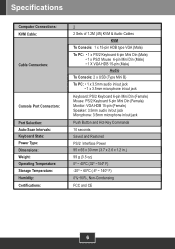
Specifications Computer Connections: KVM Cable: Cable Connectors: Console Port Connectors: Port Selection: Auto-Scan Intervals: Keyboard State: Power Type: Dimensions: Weight: Operating Temperature: Storage Temperature: Humidity: Certifications: 2 2 Sets of 1.2M (4ft) KVM & Audio Cables KVM To Console: 1 x 15-pin HDB type VGA (Male) To PC: • 1 x PS/2 Keyboard 6-pin Mini Din (Male) • 1 x PS/2 Mouse 6-pin Mini Din (Male) • 1 X VGA HDB 15-pin (Male) Audio To Console: 2 x USB (Type Mini...
Specifications Computer Connections: KVM Cable: Cable Connectors: Console Port Connectors: Port Selection: Auto-Scan Intervals: Keyboard State: Power Type: Dimensions: Weight: Operating Temperature: Storage Temperature: Humidity: Certifications: 2 2 Sets of 1.2M (4ft) KVM & Audio Cables KVM To Console: 1 x 15-pin HDB type VGA (Male) To PC: • 1 x PS/2 Keyboard 6-pin Mini Din (Male) • 1 x PS/2 Mouse 6-pin Mini Din (Male) • 1 X VGA HDB 15-pin (Male) Audio To Console: 2 x USB (Type Mini...

User's Guide
Page 9
... Push button on ? If you confirm that may switch between PCs by testing it will remember the keyboard settings when switching between computers? Once you have the KVM switch connected properly, but my keyboard and mouse don't work. SUCH MODIFICATIONS COULD VOID THE USER'S AUTHORITY TO OPERATE THE EQUIPMENT. 7 As long as your KVM switch is the power supply? A1: The TK-208K does...
... Push button on ? If you confirm that may switch between PCs by testing it will remember the keyboard settings when switching between computers? Once you have the KVM switch connected properly, but my keyboard and mouse don't work. SUCH MODIFICATIONS COULD VOID THE USER'S AUTHORITY TO OPERATE THE EQUIPMENT. 7 As long as your KVM switch is the power supply? A1: The TK-208K does...

User's Guide
Page 10
There are replaced will become the property of the purchase. Do not remove or attempt to service the product by any software, firmware, information, or memory data of customer contained in the manual. All products that are no user serviceable parts inside the product. TRENDnet shall not be new or reconditioned. TK-208K - 2 Years Warranty If a product does not operate as warranted above...
There are replaced will become the property of the purchase. Do not remove or attempt to service the product by any software, firmware, information, or memory data of customer contained in the manual. All products that are no user serviceable parts inside the product. TRENDnet shall not be new or reconditioned. TK-208K - 2 Years Warranty If a product does not operate as warranted above...

User's Guide
Page 11
...CONNECTION WITH THE SALE, INSTALLATION MAINTENANCE OR USE OF TRENDnet'S PRODUCTS. THIS DISCLAIMER OF LIABILITY FOR DAMAGES WILL NOT BE AFFECTED IF ANY REMEDY PROVIDED HEREIN SHALL FAIL OF ITS ESSENTIAL PURPOSE. AC/DC Power Adapter, Cooling Fan, and Power Supply carry 1 Year Warranty 9 WARRANTIES EXCLUSIVE: IF THE TRENDnet...OR WAS CAUSED BY CUSTOMER'S OR ANY THIRD PERSON'S MISUSE, NEGLECT, IMPROPER INSTALLATION OR TESTING, UNAUTHORIZED ATTEMPTS TO REPAIR OR MODIFY, OR ANY OTHER CAUSE BEYOND THE RANGE OF THE INTENDED USE, OR BY ACCIDENT, FIRE, LIGHTNING, OR OTHER HAZARD. THE FOREGOING WARRANTIES...
...CONNECTION WITH THE SALE, INSTALLATION MAINTENANCE OR USE OF TRENDnet'S PRODUCTS. THIS DISCLAIMER OF LIABILITY FOR DAMAGES WILL NOT BE AFFECTED IF ANY REMEDY PROVIDED HEREIN SHALL FAIL OF ITS ESSENTIAL PURPOSE. AC/DC Power Adapter, Cooling Fan, and Power Supply carry 1 Year Warranty 9 WARRANTIES EXCLUSIVE: IF THE TRENDnet...OR WAS CAUSED BY CUSTOMER'S OR ANY THIRD PERSON'S MISUSE, NEGLECT, IMPROPER INSTALLATION OR TESTING, UNAUTHORIZED ATTEMPTS TO REPAIR OR MODIFY, OR ANY OTHER CAUSE BEYOND THE RANGE OF THE INTENDED USE, OR BY ACCIDENT, FIRE, LIGHTNING, OR OTHER HAZARD. THE FOREGOING WARRANTIES...

Quick Installation Guide
Page 2
Operation 4 Troubleshooting 6 Version 03.19.2007 How to Connect 2 3. Before You Start 1 2. TTaabblleeoof Cf oCnotennttesnts English ...1 1.
Operation 4 Troubleshooting 6 Version 03.19.2007 How to Connect 2 3. Before You Start 1 2. TTaabblleeoof Cf oCnotennttesnts English ...1 1.
Quick Installation Guide
Page 4
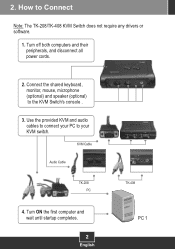
2. KVM Cable Audio Cable TK-208 PC 4. Turn off both computers and their peripherals, and disconnect all power cords. 2. Turn ON the first computer and wait until startup completes. 2 English TK-408 PC 1 How to your PC to Connect Note: The TK-208/TK-408 KVM Switch does not require any drivers or software. 1. Use the provided KVM and audio cables to connect your KVM switch. Connect the shared keyboard, monitor, mouse, microphone (optional) and speaker (optional) to the KVM Switch's console . 3.
2. KVM Cable Audio Cable TK-208 PC 4. Turn off both computers and their peripherals, and disconnect all power cords. 2. Turn ON the first computer and wait until startup completes. 2 English TK-408 PC 1 How to your PC to Connect Note: The TK-208/TK-408 KVM Switch does not require any drivers or software. 1. Use the provided KVM and audio cables to connect your KVM switch. Connect the shared keyboard, monitor, mouse, microphone (optional) and speaker (optional) to the KVM Switch's console . 3.

Quick Installation Guide
Page 5
Register Your Product To ensure the highest level of customer service and support, please take a moment to select the second computer (Optional). 6. Turn ON the second computer and wait until startup completes. 5. Press the face panel button on the KVM Switch to register your product Online at: www.TRENDnet.com/register Thank you for choosing TRENDnet 3 English PC 2 (TK-208) PC2, PC 3, PC4 (TK-408) Your installation is now complete.
Register Your Product To ensure the highest level of customer service and support, please take a moment to select the second computer (Optional). 6. Turn ON the second computer and wait until startup completes. 5. Press the face panel button on the KVM Switch to register your product Online at: www.TRENDnet.com/register Thank you for choosing TRENDnet 3 English PC 2 (TK-208) PC2, PC 3, PC4 (TK-408) Your installation is now complete.

Quick Installation Guide
Page 6
Face-Panel Buttons Press the corresponding face-panel button to reset the mouse setting: 2-key mouse setting: ScrLk + ScrLk + M + 1 3-key wheel mouse setting: ScrLk + ScrLk + M + 2 5-key wheel mouse setting: ScrLk + ScrLk + M + 3 4 English If you have 2 seconds to press the ScrLk key again. NOTE 1. For non-PnP OS(Linux, Windows NT 4.0), please use the face-panel buttons of PC & Audio/Microphone port switching is enabled by the Hot-Key sequence, any PC and...
Face-Panel Buttons Press the corresponding face-panel button to reset the mouse setting: 2-key mouse setting: ScrLk + ScrLk + M + 1 3-key wheel mouse setting: ScrLk + ScrLk + M + 2 5-key wheel mouse setting: ScrLk + ScrLk + M + 3 4 English If you have 2 seconds to press the ScrLk key again. NOTE 1. For non-PnP OS(Linux, Windows NT 4.0), please use the face-panel buttons of PC & Audio/Microphone port switching is enabled by the Hot-Key sequence, any PC and...
Quick Installation Guide
Page 7
... computer Reset mouse/keyboard on the console side. (works on keyboard Disable the binding of PC port and Audio/Mic port switching. Terminate Autoscan activity. Hot-Key Convention: The Hot-Key notation ScrLk + ScrLk + (key) denotes that you should hit the individual key consecutively one at a time, not simultaneously. 5 English Select the active Audio/Mic channel Bind PC & Audio/Mic Source ScrLk + ScrLk + Q Enable...
... computer Reset mouse/keyboard on the console side. (works on keyboard Disable the binding of PC port and Audio/Mic port switching. Terminate Autoscan activity. Hot-Key Convention: The Hot-Key notation ScrLk + ScrLk + (key) denotes that you should hit the individual key consecutively one at a time, not simultaneously. 5 English Select the active Audio/Mic channel Bind PC & Audio/Mic Source ScrLk + ScrLk + Q Enable...
Quick Installation Guide
Page 8
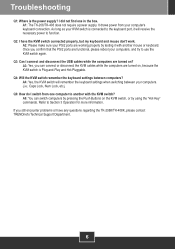
... cables while the computers are turned on the KVM switch, or by using the "Hot-Key" commands. A1: The TK-208/TK-408 does not require a power supply. A2: Please make sure your PS/2 ports are functional, please reboot your computer's keyboard connection. Q3: Can I have any questions regarding the TK-208K/TK-408K, please contact TRENDnet's Technical Support Department. 6 A4: Yes, the KVM switch will receive the necessary power...
... cables while the computers are turned on the KVM switch, or by using the "Hot-Key" commands. A1: The TK-208/TK-408 does not require a power supply. A2: Please make sure your PS/2 ports are functional, please reboot your computer's keyboard connection. Q3: Can I have any questions regarding the TK-208K/TK-408K, please contact TRENDnet's Technical Support Department. 6 A4: Yes, the KVM switch will receive the necessary power...

Quick Installation Guide
Page 9
... Material Authorization (RMA) number, accompanied by TRENDnet with any unauthorized service center. All products that are no user serviceable parts inside the product. This warranty is voided if (i) the product has been modified or repaired by any products returned to TRENDnet pursuant to TRENDnet must be new or reconditioned. Replacement products may be responsible for any software, firmware, information, or memory data...
... Material Authorization (RMA) number, accompanied by TRENDnet with any unauthorized service center. All products that are no user serviceable parts inside the product. This warranty is voided if (i) the product has been modified or repaired by any products returned to TRENDnet pursuant to TRENDnet must be new or reconditioned. Replacement products may be responsible for any software, firmware, information, or memory data...

Quick Installation Guide
Page 10
... LIABILITY IN CONNECTION WITH THE SALE, INSTALLATION MAINTENANCE OR USE OF TRENDnet'S PRODUCTS. Governing Law: This Limited Warranty shall be governed by the laws of the state of California. WARRANTIES EXCLUSIVE: IF THE TRENDnet PRODUCT DOES NOT OPERATE AS WARRANTED ABOVE, THE CUSTOMER'S SOLE REMEDY SHALL BE, AT TRENDnet'S OPTION, REPAIR OR REPLACEMENT. AC/DC Power Adapter, Cooling Fan, Cables and Power Supply carry...
... LIABILITY IN CONNECTION WITH THE SALE, INSTALLATION MAINTENANCE OR USE OF TRENDnet'S PRODUCTS. Governing Law: This Limited Warranty shall be governed by the laws of the state of California. WARRANTIES EXCLUSIVE: IF THE TRENDnet PRODUCT DOES NOT OPERATE AS WARRANTED ABOVE, THE CUSTOMER'S SOLE REMEDY SHALL BE, AT TRENDnet'S OPTION, REPAIR OR REPLACEMENT. AC/DC Power Adapter, Cooling Fan, Cables and Power Supply carry...

Quick Installation Guide
Page 11
...TV INTERFERENCE CAUSED BY UNAUTHORIZED MODIFICATIONS TO THIS EQUIPMENT. Certifications This equipment has been tested and found to the following two conditions: (1) This device may cause undesired operation. SUCH MODIFICATIONS COULD VOID THE USER'S AUTHORITY TO OPERATE THE EQUIPMENT. ADVERTENCIA En todos nuestros equipos se mencionan claramente... electrica domiciliaria existente en el pais o zona de instalación. Including interference that may not cause harmful interference. (2) This device must not be disposed of with household waste. Check with FCC and CE Rules.
...TV INTERFERENCE CAUSED BY UNAUTHORIZED MODIFICATIONS TO THIS EQUIPMENT. Certifications This equipment has been tested and found to the following two conditions: (1) This device may cause undesired operation. SUCH MODIFICATIONS COULD VOID THE USER'S AUTHORITY TO OPERATE THE EQUIPMENT. ADVERTENCIA En todos nuestros equipos se mencionan claramente... electrica domiciliaria existente en el pais o zona de instalación. Including interference that may not cause harmful interference. (2) This device must not be disposed of with household waste. Check with FCC and CE Rules.


