Users Guide
Page 2
...29 Configure port mirror settings 29 Loopback Detection...30 Enable loopback detection 30 Static Unicast ...31 Add static unicast entries to the switch 31 Static Multicast ...32 Add static multicast entries to switch management page 13 Change administrator password and add accounts 14 Enable or disable SNMP and modify idle timeout settings 15 Set the switch date and time 16 Enable HTTPS/SSL (Secure Socket Layer) management access 17 Enable SSH (Secure Shell) command line management access 17 Enable Telnet command line management access 18 Enable DHCP Auto Configuration 19 View and...
...29 Configure port mirror settings 29 Loopback Detection...30 Enable loopback detection 30 Static Unicast ...31 Add static unicast entries to the switch 31 Static Multicast ...32 Add static multicast entries to switch management page 13 Change administrator password and add accounts 14 Enable or disable SNMP and modify idle timeout settings 15 Set the switch date and time 16 Enable HTTPS/SSL (Secure Socket Layer) management access 17 Enable SSH (Secure Shell) command line management access 17 Enable Telnet command line management access 18 Enable DHCP Auto Configuration 19 View and...
Users Guide
Page 3
... TRENDnet. TRENDnet User's Guide Add, modify, and remove VLANs 37 Configure VLAN Port Settings 38 Configure the VLAN Forwarding Table Mode 39 View the switch VLAN dynamic forwarding table 39 Create a private VLAN 40 View the current VLAN database 41 GVRP (GARP VLAN Registration Protcol 41 Enable GVRP ...41 Set GVRP port settings 42 Set GVRP time settings 43 QoS (Quality of Service (DoS 72 PoE Configuration ...73 Configure PoE settings 74 DHCP Snooping ...75 Enable DHCP Snooping 75 Enable DHCP Snooping 76 Set Trusted Interfaces 77 Configure Binding Database 77 LLDP (Link-Layer...
... TRENDnet. TRENDnet User's Guide Add, modify, and remove VLANs 37 Configure VLAN Port Settings 38 Configure the VLAN Forwarding Table Mode 39 View the switch VLAN dynamic forwarding table 39 Create a private VLAN 40 View the current VLAN database 41 GVRP (GARP VLAN Registration Protcol 41 Enable GVRP ...41 Set GVRP port settings 42 Set GVRP time settings 43 QoS (Quality of Service (DoS 72 PoE Configuration ...73 Configure PoE settings 74 DHCP Snooping ...75 Enable DHCP Snooping 75 Enable DHCP Snooping 76 Set Trusted Interfaces 77 Configure Binding Database 77 LLDP (Link-Layer...

Users Guide
Page 5
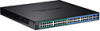
...x Gigabit PoE+ ports, 24 x Gigabit ports, and 4 x shared SFP slots, a console port, a PoE Power budget of 370 Watts, and an advanced Layer 2 management feature set. Smart Fan Smart fan saves energy by : 802.3ad link aggregation, Asymmetric VLAN, 802.1Q VLAN, Voice VLAN, Private VLAN, Bandwidth Controls, GVRP, IGMP v1-v3, 802.1p Class of Service (CoS), Spanning Tree (STP, RSTP, and MSTP), and QoS queue scheduling. TL2-PG484 Features TRENDnet's 48-Port Gigabit PoE+ Managed Layer 2 Switch with layered network access controls. This IPv6 ready switch offers traffic management, troubleshooting...
...x Gigabit PoE+ ports, 24 x Gigabit ports, and 4 x shared SFP slots, a console port, a PoE Power budget of 370 Watts, and an advanced Layer 2 management feature set. Smart Fan Smart fan saves energy by : 802.3ad link aggregation, Asymmetric VLAN, 802.1Q VLAN, Voice VLAN, Private VLAN, Bandwidth Controls, GVRP, IGMP v1-v3, 802.1p Class of Service (CoS), Spanning Tree (STP, RSTP, and MSTP), and QoS queue scheduling. TL2-PG484 Features TRENDnet's 48-Port Gigabit PoE+ Managed Layer 2 Switch with layered network access controls. This IPv6 ready switch offers traffic management, troubleshooting...
Users Guide
Page 6
TRENDnet User's Guide Product Hardware Features AC Power Connector - Use the included RJ-45 to RS-232 serial console cable to access the out-of PD's classification. 2 Supports optional 1000BASE-SX/LX mini-GBIC modules. Off : When the connected Power turns off or the power cord is not PWR MAX (Power over the power current of -band command line interface management. © Copyright 2016 TRENDnet. On (Amber) : PoE port has may have one of the following...
TRENDnet User's Guide Product Hardware Features AC Power Connector - Use the included RJ-45 to RS-232 serial console cable to access the out-of PD's classification. 2 Supports optional 1000BASE-SX/LX mini-GBIC modules. Off : When the connected Power turns off or the power cord is not PWR MAX (Power over the power current of -band command line interface management. © Copyright 2016 TRENDnet. On (Amber) : PoE port has may have one of the following...
Users Guide
Page 10
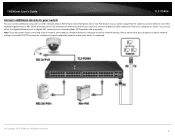
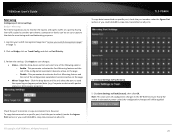
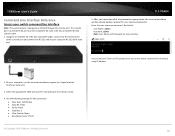
... TCP/IP settings) are configured properly within the network subnet your switch using Ethernet cables to connect them to one of your switch to your network, there may be a problem with your computer or device. All Rights Reserved. 6 Check the status of the LED indicators on the front panel of the available Gigabit Ports (1-48). TRENDnet User's Guide TL2-PG484 Connect additional devices to your switch You can use either the Gigabit Ethernet ports or Gigabit SFP connections as network uplinks. (SFP modules sold...
... TCP/IP settings) are configured properly within the network subnet your switch using Ethernet cables to connect them to one of your switch to your network, there may be a problem with your computer or device. All Rights Reserved. 6 Check the status of the LED indicators on the front panel of the available Gigabit Ports (1-48). TRENDnet User's Guide TL2-PG484 Connect additional devices to your switch You can use either the Gigabit Ethernet ports or Gigabit SFP connections as network uplinks. (SFP modules sold...
Users Guide
Page 15
... other links. Automatic Link Local Address: A link local address has a prefix of the IP address entered into your switch management page (see "Access your switch management page" on a local link can use link-local addresses to the interface identified by that defines a nonzero number of seconds between IP version 4 and 6 is delivered to communicate; TL2-PG484 NS Retransmit Time Settings: A constant that address. Nodes on page 7). 2. Auto configuration can be achieved with the switch's network interface...
... other links. Automatic Link Local Address: A link local address has a prefix of the IP address entered into your switch management page (see "Access your switch management page" on a local link can use link-local addresses to the interface identified by that defines a nonzero number of seconds between IP version 4 and 6 is delivered to communicate; TL2-PG484 NS Retransmit Time Settings: A constant that address. Nodes on page 7). 2. Auto configuration can be achieved with the switch's network interface...
Users Guide
Page 21
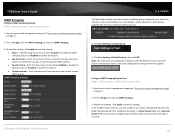
... unsecured telnet protocol. Log into your switch management page (see "Access your switch command line interface can be applied. Enables HTTPS/SSL management access and disables HTTP unsecured mode. TL2-PG484 4. Enabling SSH management access allows access to the switch management page using secure encryption communication only. 1. Click on System, and click on SSL Settings. 3. Click Save Settings to Flash (menu). 5. Review the settings. Note: Once HTTPS/SSL management access is enabled, HTTP management access will be disabled forcing all configuration changes...
... unsecured telnet protocol. Log into your switch management page (see "Access your switch command line interface can be applied. Enables HTTPS/SSL management access and disables HTTP unsecured mode. TL2-PG484 4. Enabling SSH management access allows access to the switch management page using secure encryption communication only. 1. Click on System, and click on SSL Settings. 3. Click Save Settings to Flash (menu). 5. Review the settings. Note: Once HTTPS/SSL management access is enabled, HTTP management access will be disabled forcing all configuration changes...
Users Guide
Page 22
... interface management access will need to the switch CLI via IP. Review the settings. Click Apply to the switch command line interface via IP using secure encrypted communication which is enabled, SSH management access will add another layer of security however, you will need to Flash (button), then click OK. Disables Telnet command line interface management access. Port (1-65535): By default, the standard Telnet port is TCP port 22. Changing the default standard TCP port will add another layer of -band console access (console port) or enabling SSH management...
... interface management access will need to the switch CLI via IP. Review the settings. Click Apply to the switch command line interface via IP using secure encrypted communication which is enabled, SSH management access will add another layer of security however, you will need to Flash (button), then click OK. Disables Telnet command line interface management access. Port (1-65535): By default, the standard Telnet port is TCP port 22. Changing the default standard TCP port will add another layer of -band console access (console port) or enabling SSH management...

Users Guide
Page 24
... section also reports the current link status of sending Ethernet frames larger than the standard size in the Port column to apply Admin Status, Mode, Jumbo, Flow Contrl, EAP, BPDU settings to all configuration changes to the NV-RAM to activate jumbo frames when connecting devices that will still be logged. 0 Emergency - Review the settings. Specifies the port number. A number in this parameter. TL2-PG484 Physical Interface Configure your switch ports and view port status Physical Interface This section allows you will...
... section also reports the current link status of sending Ethernet frames larger than the standard size in the Port column to apply Admin Status, Mode, Jumbo, Flow Contrl, EAP, BPDU settings to all configuration changes to the NV-RAM to activate jumbo frames when connecting devices that will still be logged. 0 Emergency - Review the settings. Specifies the port number. A number in this parameter. TL2-PG484 Physical Interface Configure your switch ports and view port status Physical Interface This section allows you will...
Users Guide
Page 33
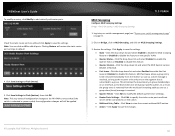
... Click Save Settings to save changes. Status - Click the drop-down and list and select the port to send the copied ingress/egress packets/data. (e.g. TRENDnet User's Guide Mirroring Configure port mirror settings Bridge > Mirroring Port mirroring allows you to monitor the ingress and egress traffic on the page. Mirror Target Port - Click Apply to Flash (menu). 5. Log into your switch management page (see "Access your switch management page" on all ports. © Copyright 2016 TRENDnet. TL2-PG484 To copy data transmitted on specific port, check the port number...
... Click Save Settings to save changes. Status - Click the drop-down and list and select the port to send the copied ingress/egress packets/data. (e.g. TRENDnet User's Guide Mirroring Configure port mirror settings Bridge > Mirroring Port mirroring allows you to monitor the ingress and egress traffic on the page. Mirror Target Port - Click Apply to Flash (menu). 5. Log into your switch management page (see "Access your switch management page" on all ports. © Copyright 2016 TRENDnet. TL2-PG484 To copy data transmitted on specific port, check the port number...
Users Guide
Page 37
... User's Guide IGMP Snooping Configure IGMP Snooping Settings Bridge > IGMP Snooping > IGMP Snooping Settings 1. Enter the amount of time you want your switch to wait before it purges an inactive dynamic MAC address. Querier Status - Configure IGMP Snooping Router Ports Bridge > IGMP Snooping > IGMP Snooping Router Port 1. Click on Bridge and click on IGMP Snooping. 3. TL2-PG484 The table below displays the static multicast address groups defined in seconds that if the switch is received. © Copyright 2016 TRENDnet. Note: This step saves all configuration changes...
... User's Guide IGMP Snooping Configure IGMP Snooping Settings Bridge > IGMP Snooping > IGMP Snooping Settings 1. Enter the amount of time you want your switch to wait before it purges an inactive dynamic MAC address. Querier Status - Configure IGMP Snooping Router Ports Bridge > IGMP Snooping > IGMP Snooping Router Port 1. Click on Bridge and click on IGMP Snooping. 3. TL2-PG484 The table below displays the static multicast address groups defined in seconds that if the switch is received. © Copyright 2016 TRENDnet. Note: This step saves all configuration changes...
Users Guide
Page 38
... Version - TL2-PG484 MLD Snooping Configure MLD Snooping Settings Bridge > MLD Snooping > MLD Snooping Settings 1. Click the drop-down list and select the MLD Querier version (MLDv1 or MLDv2). Fast Leave - Click the drop-down list and select Enabled to enable the MLD snooping feature or Disabled to add statically add router ports. Clicking Restore will still be removed immediately from the multicast forwarding table as soon as the device does not send group-specific queries. Click View to default...
... Version - TL2-PG484 MLD Snooping Configure MLD Snooping Settings Bridge > MLD Snooping > MLD Snooping Settings 1. Click the drop-down list and select the MLD Querier version (MLDv1 or MLDv2). Fast Leave - Click the drop-down list and select Enabled to enable the MLD snooping feature or Disabled to add statically add router ports. Clicking Restore will still be removed immediately from the multicast forwarding table as soon as the device does not send group-specific queries. Click View to default...
Users Guide
Page 68
... the voice data packets are permanent member ports of the voice VLAN and there is specifically designed to meet these requirements. You can be connected to configure as the switch's voice VLAN ID. The Voice VLAN feature is no other Ethernet switches, a telephone switch, or a DHCP server. TRENDnet User's Guide Voice VLAN This chapter contains a description of each manufacturer. These settings ensure that all ports of the "Not Member" ports, the packets from...
... the voice data packets are permanent member ports of the voice VLAN and there is specifically designed to meet these requirements. You can be connected to configure as the switch's voice VLAN ID. The Voice VLAN feature is no other Ethernet switches, a telephone switch, or a DHCP server. TRENDnet User's Guide Voice VLAN This chapter contains a description of each manufacturer. These settings ensure that all ports of the "Not Member" ports, the packets from...
Users Guide
Page 79
... DHCP Snooping and click on page 7). 2. Review the settings. Click Apply to save a backup copy of the Binding Table to flash. Database Update Interval - This parameter activates the DHCP Snooping feature. o Disable - TL2-PG484 o Enable - Invalid ARP packets are forwarded through the switch. Verify MAC Address - The MAC address of each ingress ARP packet is validated when compared against the Binding Table. o Disable - select one of the following choices from the pulldown menu: o Enable: The Web Management Utility software...
... DHCP Snooping and click on page 7). 2. Review the settings. Click Apply to save a backup copy of the Binding Table to flash. Database Update Interval - This parameter activates the DHCP Snooping feature. o Disable - TL2-PG484 o Enable - Invalid ARP packets are forwarded through the switch. Verify MAC Address - The MAC address of each ingress ARP packet is validated when compared against the Binding Table. o Disable - select one of the following choices from the pulldown menu: o Enable: The Web Management Utility software...
Users Guide
Page 98
... switch command line interface using IP address. 2. TRENDnet User's Guide Command Line Interface Reference Access your switch command line interface Note: The system may be managed out-of the parameters appropriately, the terminal emulation window should display a prompt for user name and password. By default: User Name: admin Password: admin Note: User Name and Password are case sensitive. HyperTerminal, TeraTerm, putty etc.). 3. All Rights Reserved. 94 Using the included RJ-45 to RS-232 serial DB-9 cable, connect the RJ-45 end to the switch console port...
... switch command line interface using IP address. 2. TRENDnet User's Guide Command Line Interface Reference Access your switch command line interface Note: The system may be managed out-of the parameters appropriately, the terminal emulation window should display a prompt for user name and password. By default: User Name: admin Password: admin Note: User Name and Password are case sensitive. HyperTerminal, TeraTerm, putty etc.). 3. All Rights Reserved. 94 Using the included RJ-45 to RS-232 serial DB-9 cable, connect the RJ-45 end to the switch console port...
Users Guide
Page 116
...a specific vlan. Enable MLD snooping querier state for a specific vlan. ipv6 mld snooping vlan {name | id } querier {[max_response_time ] | [robustness_variable ] | [last_listener_query_interval ] | [version ] | [query_interval ]} Global Configuration Sets MLD snooping querier max_response_time/robustness_variable/last_listener_quer y_interval/version/query_interval for a specific vlan © Copyright 2016 TRENDnet. ipv6 mld snooping vlan {name | id } mrouter_ports gigabitethernet Configuration Add static router ports for a specific vlan. TRENDnet User's Guide TL2-PG484...
...a specific vlan. Enable MLD snooping querier state for a specific vlan. ipv6 mld snooping vlan {name | id } querier {[max_response_time ] | [robustness_variable ] | [last_listener_query_interval ] | [version ] | [query_interval ]} Global Configuration Sets MLD snooping querier max_response_time/robustness_variable/last_listener_quer y_interval/version/query_interval for a specific vlan © Copyright 2016 TRENDnet. ipv6 mld snooping vlan {name | id } mrouter_ports gigabitethernet Configuration Add static router ports for a specific vlan. TRENDnet User's Guide TL2-PG484...
Users Guide
Page 118
... interface configure mode interface configure mode interface configure mode User EXEC show mac address-table dynamic [interface gigabitethernet ] User EXEC show private-vlan port-forwarding show ipv6 mld snooping forwarding vlan {name | id } Privileged EXEC Display Vlan Name/multicast group/Mac address/port member/for all configured VLANs or one VLAN on interfaces. Config the ingress/egress packet rate limit on the switch. Display portlists that can be forwarded from ports. show vlan port config User EXEC User EXEC Enable DLF/broadcast/multicast storm control and set...
... interface configure mode interface configure mode interface configure mode User EXEC show mac address-table dynamic [interface gigabitethernet ] User EXEC show private-vlan port-forwarding show ipv6 mld snooping forwarding vlan {name | id } Privileged EXEC Display Vlan Name/multicast group/Mac address/port member/for all configured VLANs or one VLAN on interfaces. Config the ingress/egress packet rate limit on the switch. Display portlists that can be forwarded from ports. show vlan port config User EXEC User EXEC Enable DLF/broadcast/multicast storm control and set...

Users Guide
Page 131
... power inline port power inline port power-limit {class0 | class1 | class2 | class3 | userdefined } power inline management method {auto|manual} DHCP Snooping General Settings show ip dhcp snooping ip dhcp snooping no ip dhcp snooping Privileged EXEC interface configure mode interface configure mode interface configure mode interface configure mode interface configure mode Global Configuration User EXEC Global Configuration Global Configuration Displays the power status for all or the specified Power Over Ethernet interface. TRENDnet User's Guide dos-prevention {all | tcp-syn-pkt-in-data...
... power inline port power inline port power-limit {class0 | class1 | class2 | class3 | userdefined } power inline management method {auto|manual} DHCP Snooping General Settings show ip dhcp snooping ip dhcp snooping no ip dhcp snooping Privileged EXEC interface configure mode interface configure mode interface configure mode interface configure mode interface configure mode Global Configuration User EXEC Global Configuration Global Configuration Displays the power status for all or the specified Power Over Ethernet interface. TRENDnet User's Guide dos-prevention {all | tcp-syn-pkt-in-data...
Users Guide
Page 138
... Ethernet switch ports. 5. Since the switch default IP address is 192.168.10.200. Click Change Adapter Settings, right-click the Local Area Connection icon. b. Answer: Using a paper clip, push and hold the reset button on the front of 192.168.10.x. See "Switch Installation" on System, click IPv4 Setup and change the IP address of the switch to one of 192.168.10.x. Go into the Control Panel, click Network...
... Ethernet switch ports. 5. Since the switch default IP address is 192.168.10.200. Click Change Adapter Settings, right-click the Local Area Connection icon. b. Answer: Using a paper clip, push and hold the reset button on the front of 192.168.10.x. See "Switch Installation" on System, click IPv4 Setup and change the IP address of the switch to one of 192.168.10.x. Go into the Control Panel, click Network...

Datasheet
Page 4
...; 1 x RJ-45 console port • LED indicators • Reset button Data Transfer Rate • Ethernet: 10 Mbps (half duplex), 20 Mbps (full duplex) • Fast Ethernet: 100 Mbps (half duplex), 200 Mbps (full duplex) • Gigabit Ethernet: 2000 Mbps (full duplex) Performance • Switch fabric: 96 Gbps • RAM buffer: 1 MB • MAC Address Table: 16K entries • Jumbo Frames: 10 KB • HOL Blocking Prevention • Forwarding rate: 71.4 Mpps (64-byte packet size) Management • CLI (Console / Telnet / SSHv2...
...; 1 x RJ-45 console port • LED indicators • Reset button Data Transfer Rate • Ethernet: 10 Mbps (half duplex), 20 Mbps (full duplex) • Fast Ethernet: 100 Mbps (half duplex), 200 Mbps (full duplex) • Gigabit Ethernet: 2000 Mbps (full duplex) Performance • Switch fabric: 96 Gbps • RAM buffer: 1 MB • MAC Address Table: 16K entries • Jumbo Frames: 10 KB • HOL Blocking Prevention • Forwarding rate: 71.4 Mpps (64-byte packet size) Management • CLI (Console / Telnet / SSHv2...


