Data Sheet
Page 1
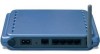
... 12 clients support • Wireless Range of 30 ~ 100 meters Indoor (depends on the environment) • Wireless Range of 50 ~ 300 meters Outdoor (depends on the environment) • Connect to network several wireless workstations. Secure file sharing, an Internet connection, or other network resources by using existing power lines in 1 x 10/100Mbps Auto-MDIX WAN Port (Internet) • Supports Cable/DSL Modems with Dynamic IP, Static IP, PPPoE, or PPTP Connection Types • Supports Access Point and Wireless Distribution System (WDS) Bridge/Repeater Modes •...
... 12 clients support • Wireless Range of 30 ~ 100 meters Indoor (depends on the environment) • Wireless Range of 50 ~ 300 meters Outdoor (depends on the environment) • Connect to network several wireless workstations. Secure file sharing, an Internet connection, or other network resources by using existing power lines in 1 x 10/100Mbps Auto-MDIX WAN Port (Internet) • Supports Cable/DSL Modems with Dynamic IP, Static IP, PPPoE, or PPTP Connection Types • Supports Access Point and Wireless Distribution System (WDS) Bridge/Repeater Modes •...

Data Sheet
Page 2
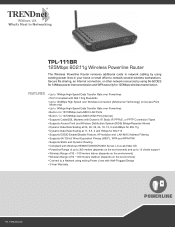
...Universal Domain Support (Channel 1~14) NETWORKING SOLUTIONS Powerline USB Adapter (TPL-101U) 125Mbps 11g Wireless Powerline Access Point (TPL-110AP) Outlet Outlet Workstation USB Cable Powerline 10/100Mbps Ethernet Bridge (TPL-102E) Notebook with Wireless PC Card (TEW-421PC) Powerline Powerline Internet Outlet Powerline Cat.5 Cable Workstation with Fast Ethernet PCI Adapter (TE100-PCIWN) Powerline USB Cable Cat.5 Cable 54Mbps Cable/DSL Modem Outlet 125Mbps 802.11g Wireless Powerline Router (TPL-111BR) PACKAGE CONTENTS • TPL-111BR • Quick Installation Guide •...
...Universal Domain Support (Channel 1~14) NETWORKING SOLUTIONS Powerline USB Adapter (TPL-101U) 125Mbps 11g Wireless Powerline Access Point (TPL-110AP) Outlet Outlet Workstation USB Cable Powerline 10/100Mbps Ethernet Bridge (TPL-102E) Notebook with Wireless PC Card (TEW-421PC) Powerline Powerline Internet Outlet Powerline Cat.5 Cable Workstation with Fast Ethernet PCI Adapter (TE100-PCIWN) Powerline USB Cable Cat.5 Cable 54Mbps Cable/DSL Modem Outlet 125Mbps 802.11g Wireless Powerline Router (TPL-111BR) PACKAGE CONTENTS • TPL-111BR • Quick Installation Guide •...

Quick Installation Guide
Page 2
Prepare for Installation 1 2. Powerline Configuration 10 6. Configure LAN Settings 11 7. Accessing the Powerline Router 12 8. Table of Contents English ...1 1. Test your Powerline AP/Router 4 4. Wireless Configuration 8 5. Install Hardware 3 3 Configure your Connection 14 Troubleshooting ...16
Prepare for Installation 1 2. Powerline Configuration 10 6. Configure LAN Settings 11 7. Accessing the Powerline Router 12 8. Table of Contents English ...1 1. Test your Powerline AP/Router 4 4. Wireless Configuration 8 5. Install Hardware 3 3 Configure your Connection 14 Troubleshooting ...16
Quick Installation Guide
Page 3
... securely share your powerline network. 1 English English QIG 1. If you for Installation Thank you run into problems, please refer to the Troubleshooting section or the more detailed installation procedures on the User's Guide CD-ROM. All Rights Reserved. An installed Cable/DSL Modem with multiple users. A computer with the TCP/IP Protocol and Client for each computer 5. Following the installation instructions should have everything in the box: TPL-111BRP TPL-111BR Powerline 802.11g Wireless Router Quick Installation Guide Guide d'installation...
... securely share your powerline network. 1 English English QIG 1. If you for Installation Thank you run into problems, please refer to the Troubleshooting section or the more detailed installation procedures on the User's Guide CD-ROM. All Rights Reserved. An installed Cable/DSL Modem with multiple users. A computer with the TCP/IP Protocol and Client for each computer 5. Following the installation instructions should have everything in the box: TPL-111BRP TPL-111BR Powerline 802.11g Wireless Router Quick Installation Guide Guide d'installation...
Quick Installation Guide
Page 4
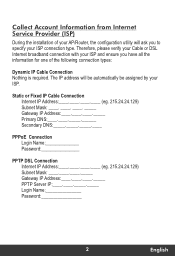
... from Internet Service Provider (ISP) During the installation of the following connection types: Dynamic IP Cable Connection Nothing is required. The IP address will ask you to specify your ISP. Static or Fixed IP Cable Connection Internet IP Address eg. 215.24.24.129) Subnet Mask Gateway IP Address Primary DNS Secondary DNS PPPoE Connection Login Name Password PPTP DSL Connection Internet IP Address eg. 215.24.24.129) Subnet Mask Gateway IP Address PPTP Server IP Login Name Password...
... from Internet Service Provider (ISP) During the installation of the following connection types: Dynamic IP Cable Connection Nothing is required. The IP address will ask you to specify your ISP. Static or Fixed IP Cable Connection Internet IP Address eg. 215.24.24.129) Subnet Mask Gateway IP Address Primary DNS Secondary DNS PPPoE Connection Login Name Password PPTP DSL Connection Internet IP Address eg. 215.24.24.129) Subnet Mask Gateway IP Address PPTP Server IP Login Name Password...
Quick Installation Guide
Page 5
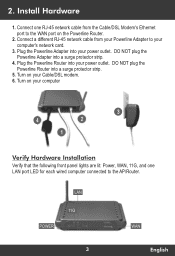
Connect a different RJ-45 network cable from the Cable/DSL Modem's Ethernet port to the WAN port on the Powerline Router. 2. Plug the Powerline Router into your power outlet. Turn on your power outlet. 2. Plug the Powerline Adapter into your Cable/DSL modem. 6. Turn on your computer 3 4 2 1 Verify Hardware Installation Verify that the following front panel lights are lit: Power, WAN, 11G, and one RJ-45 network cable from your computer's network card. 3. Connect one LAN port LED for each wired computer connected to your Powerline Adapter to the AP/Router. DO...
Connect a different RJ-45 network cable from the Cable/DSL Modem's Ethernet port to the WAN port on the Powerline Router. 2. Plug the Powerline Router into your power outlet. Turn on your power outlet. 2. Plug the Powerline Adapter into your Cable/DSL modem. 6. Turn on your computer 3 4 2 1 Verify Hardware Installation Verify that the following front panel lights are lit: Power, WAN, 11G, and one RJ-45 network cable from your computer's network card. 3. Connect one LAN port LED for each wired computer connected to your Powerline Adapter to the AP/Router. DO...
Quick Installation Guide
Page 6
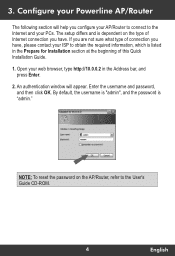
... will appear. The setup differs and is "admin." By default, the username is "admin", and the password is dependent on the AP/Router, refer to the Internet and your web browser, type http://10.0.0.2 in the Prepare for Installation section at the beginning of Internet connection you configure your AP/Router to connect to the User's Guide CD-ROM. 4 English Open your PCs. NOTE: To reset the password on the type of this Quick Installation Guide. 1.
... will appear. The setup differs and is "admin." By default, the username is "admin", and the password is dependent on the AP/Router, refer to the Internet and your web browser, type http://10.0.0.2 in the Prepare for Installation section at the beginning of Internet connection you configure your AP/Router to connect to the User's Guide CD-ROM. 4 English Open your PCs. NOTE: To reset the password on the type of this Quick Installation Guide. 1.
Quick Installation Guide
Page 7
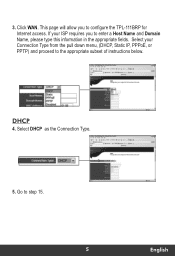
3. Select your ISP requires you to enter a Host Name and Domain Name, please type this information in the appropriate fields. Go to the appropriate subset of instructions below. This page will allow you to configure the TPL-111BRP for Internet access. Click WAN. Select DHCP as the Connection Type. 5. DHCP 4. If your Connection Type from the pull down menu, (DHCP, Static IP, PPPoE, or PPTP) and proceed to step 15. 5 English
3. Select your ISP requires you to enter a Host Name and Domain Name, please type this information in the appropriate fields. Go to the appropriate subset of instructions below. This page will allow you to configure the TPL-111BRP for Internet access. Click WAN. Select DHCP as the Connection Type. 5. DHCP 4. If your Connection Type from the pull down menu, (DHCP, Static IP, PPPoE, or PPTP) and proceed to step 15. 5 English
Quick Installation Guide
Page 8
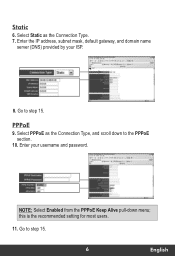
PPPoE 9. this is the recommended setting for most users. 11. Go to step 15. 6 English Go to step 15. Enter your ISP. 8. Select Static as the Connection Type, and scroll down menu; Select PPPoE as the Connection Type. 7. NOTE: Select Enabled from the PPPoE Keep Alive pull-down to the PPPoE section. 10. Enter the IP address, subnet mask, default gateway, and domain name server (DNS) provided by your username and password. Static 6.
PPPoE 9. this is the recommended setting for most users. 11. Go to step 15. 6 English Go to step 15. Enter your ISP. 8. Select Static as the Connection Type, and scroll down menu; Select PPPoE as the Connection Type. 7. NOTE: Select Enabled from the PPPoE Keep Alive pull-down to the PPPoE section. 10. Enter the IP address, subnet mask, default gateway, and domain name server (DNS) provided by your username and password. Static 6.
Quick Installation Guide
Page 10
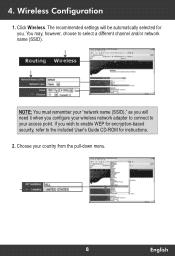
You may, however, choose to the included User's Guide CD-ROM for you will be automatically selected for instructions. 2. The recommended settings will need it when you configure your wireless network adapter to connect to your access point. Click Wireless. If you wish to enable WEP for encryption-based security, refer to select a different channel and/or network name (SSID). Choose your "network name (SSID)," as you . 4. Wireless Configuration 1. NOTE: You must remember your country from the pull-down menu. 8 English
You may, however, choose to the included User's Guide CD-ROM for you will be automatically selected for instructions. 2. The recommended settings will need it when you configure your wireless network adapter to connect to your access point. Click Wireless. If you wish to enable WEP for encryption-based security, refer to select a different channel and/or network name (SSID). Choose your "network name (SSID)," as you . 4. Wireless Configuration 1. NOTE: You must remember your country from the pull-down menu. 8 English
Quick Installation Guide
Page 14
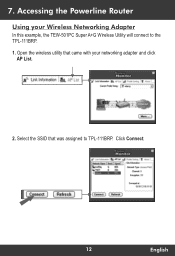
Open the wireless utility that was assigned to the TPL-111BRP. 1. Click Connect. 12 English Select the SSID that came with your Wireless Networking Adapter In this example, the TEW-501PC Super A+G Wireless Utility will connect to TPL-111BRP. 7. Accessing the Powerline Router Using your networking adapter and click AP List. 2.
Open the wireless utility that was assigned to the TPL-111BRP. 1. Click Connect. 12 English Select the SSID that came with your Wireless Networking Adapter In this example, the TEW-501PC Super A+G Wireless Utility will connect to TPL-111BRP. 7. Accessing the Powerline Router Using your networking adapter and click AP List. 2.
Quick Installation Guide
Page 15
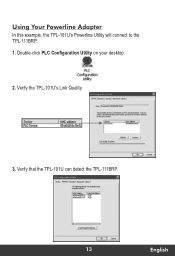
Double-click PLC Configuration Utility on your desktop. 2. Using Your Powerline Adapter In this example, the TPL-101U's Powerline Utility will connect to the TPL-111BRP. 1. Verify that the TPL-101U can detect the TPL-111BRP. 13 English Verify the TPL-101U's Link Quality. 3.
Double-click PLC Configuration Utility on your desktop. 2. Using Your Powerline Adapter In this example, the TPL-101U's Powerline Utility will connect to the TPL-111BRP. 1. Verify that the TPL-101U can detect the TPL-111BRP. 13 English Verify the TPL-101U's Link Quality. 3.
Quick Installation Guide
Page 16
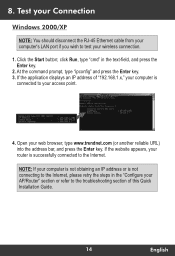
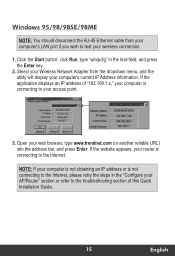
... the text-field, and press the Enter key. 2. Test your Connection Windows 2000/XP NOTE: You should disconnect the RJ-45 Ethernet cable from your computer's LAN port if you wish to test your AP/Router" section or refer to the troubleshooting section of "192.168.1.x," your computer is not connecting to your access point. 4. If the application displays an IP address of this Quick Installation Guide. 14 English
... the text-field, and press the Enter key. 2. Test your Connection Windows 2000/XP NOTE: You should disconnect the RJ-45 Ethernet cable from your computer's LAN port if you wish to test your AP/Router" section or refer to the troubleshooting section of "192.168.1.x," your computer is not connecting to your access point. 4. If the application displays an IP address of this Quick Installation Guide. 14 English
Quick Installation Guide
Page 17
... computer's current IP Address information. Click the Start button; Select your Wireless Network Adapter from your computer's LAN port if you wish to the Internet. NOTE: If your access point. 3. Open your computer is not connecting to the Internet, please retry the steps in the text-field, and press the Enter key. 2. click Run, type "winipcfg" in the "Configure your AP/Router" section or refer to your computer is...
... computer's current IP Address information. Click the Start button; Select your Wireless Network Adapter from your computer's LAN port if you wish to the Internet. NOTE: If your access point. 3. Open your computer is not connecting to the Internet, please retry the steps in the text-field, and press the Enter key. 2. click Run, type "winipcfg" in the "Configure your AP/Router" section or refer to your computer is...
Quick Installation Guide
Page 18
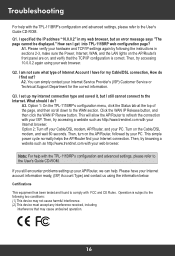
... with the TPL-111BRP's configuration and advanced settings, please refer to the User's Guide CD-ROM. How can I still cannot connect to the following the instructions in my web browser, but I get into TPL-111BRP web configuration page? Q3. Option 2: Turn off your Cable/DSL modem, AP/Router, and your Internet connection. This simple power cycle normally helps the AP/Router find out? Note: For help . Operation is subject to the Internet. Q2...
... with the TPL-111BRP's configuration and advanced settings, please refer to the User's Guide CD-ROM. How can I still cannot connect to the following the instructions in my web browser, but I get into TPL-111BRP web configuration page? Q3. Option 2: Turn off your Cable/DSL modem, AP/Router, and your Internet connection. This simple power cycle normally helps the AP/Router find out? Note: For help . Operation is subject to the Internet. Q2...
User Guide
Page 2
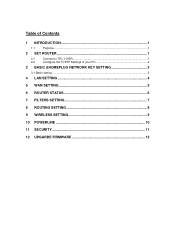
Table of Contents 1 INTRODUCTION 1 1.1 Purpose...1 2 SET ROUTER 1 2.1 Connect to TPL-111BR 1 2.2 Configure the TCP/IP Settings of your PC 2 3 BASIC &HOMEPLUG NETWORK KEY SETTING 3 3.1 Basic setting...3 4 LAN SETTING 4 5 WAN SETTING 5 6 ROUTER STATUS 6 7 FILTERS SETTING 7 8 ROUTING SETTING 8 9 WIRELESS SETTING 9 10 POWERLINE 10 11 SECURITY 11 12 UPGARDE FIRMWARE 12
Table of Contents 1 INTRODUCTION 1 1.1 Purpose...1 2 SET ROUTER 1 2.1 Connect to TPL-111BR 1 2.2 Configure the TCP/IP Settings of your PC 2 3 BASIC &HOMEPLUG NETWORK KEY SETTING 3 3.1 Basic setting...3 4 LAN SETTING 4 5 WAN SETTING 5 6 ROUTER STATUS 6 7 FILTERS SETTING 7 8 ROUTING SETTING 8 9 WIRELESS SETTING 9 10 POWERLINE 10 11 SECURITY 11 12 UPGARDE FIRMWARE 12
User Guide
Page 3
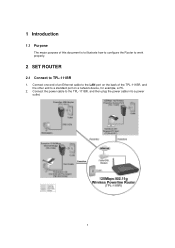
1 Introduction 1.1 Purpose The major purpose of the TPL-111BR, and the other end to a standard port on the back of this document is to illustrate how to configure the Router to work properly. 2 SET ROUTER 2.1 Connect to TPL-111BR 1. Connect the power cable to the LAN port on a network device, for example, a PC. 2. Connect one end of an Ethernet cable to the TPL-111BR, and then plug the power cable into a power outlet. 1
1 Introduction 1.1 Purpose The major purpose of the TPL-111BR, and the other end to a standard port on the back of this document is to illustrate how to configure the Router to work properly. 2 SET ROUTER 2.1 Connect to TPL-111BR 1. Connect the power cable to the LAN port on a network device, for example, a PC. 2. Connect one end of an Ethernet cable to the TPL-111BR, and then plug the power cable into a power outlet. 1
User Guide
Page 4
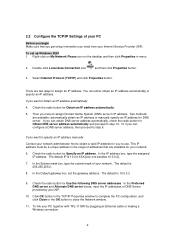
... your PC together with TPL-111BR by your ISP. 10. This IP address must be a unique address in menu. 2. In the Preferred DNS server and Alternate DNS server boxes, input the IP addresses of DNS Server provided by plugging an Ethernet cable or making a Wireless connection. 2 The default is 255.255.255.0. 8. To set the gateway address. Check the radio button for Specify an IP address. 2.2 Configure the TCP/IP Settings of your PC...
... your PC together with TPL-111BR by your ISP. 10. This IP address must be a unique address in menu. 2. In the Preferred DNS server and Alternate DNS server boxes, input the IP addresses of DNS Server provided by plugging an Ethernet cable or making a Wireless connection. 2 The default is 255.255.255.0. 8. To set the gateway address. Check the radio button for Specify an IP address. 2.2 Configure the TCP/IP Settings of your PC...
User Guide
Page 5
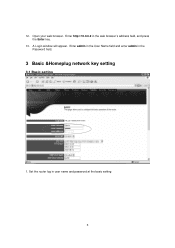
Set the router log in the web browser's address field, and press the Enter key. 13. 12. Enter http://10.0.0.2 in user name and password at the basic setting 3 Enter admin in the User Name field and enter admin in the Password field. 3 Basic &Homeplug network key setting 3.1 Basic setting 1. A Login window will appear. Open your web browser.
Set the router log in the web browser's address field, and press the Enter key. 13. 12. Enter http://10.0.0.2 in user name and password at the basic setting 3 Enter admin in the User Name field and enter admin in the Password field. 3 Basic &Homeplug network key setting 3.1 Basic setting 1. A Login window will appear. Open your web browser.
User Guide
Page 6
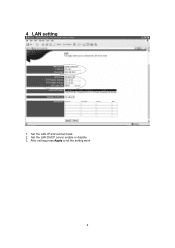
4 LAN setting 1. Set the LAN DHCP server enable or disable 3. After setting press Apply to let the setting work 4 Set the LAN IP and subnet mask 2.
4 LAN setting 1. Set the LAN DHCP server enable or disable 3. After setting press Apply to let the setting work 4 Set the LAN IP and subnet mask 2.


