
User's Guide
Page 2
Customers should ensure that their respective companies. 2 USB Server User Manual Copyright Notice Copyright Incorporated 2009. Incorporated reserves the right to change without notice. Trademarks mentioned in this product does not infringe upon any patent rights. ...
Customers should ensure that their respective companies. 2 USB Server User Manual Copyright Notice Copyright Incorporated 2009. Incorporated reserves the right to change without notice. Trademarks mentioned in this product does not infringe upon any patent rights. ...
User's Guide
Page 3
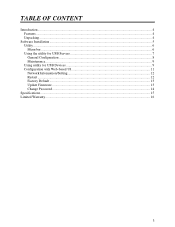
USB Server User Manual TABLE OF CONTENT Introduction...4 Features ...4 Unpacking ...4 Software Installation ...5 Utility ...6 Menu bar ...6 Using the utility for USB Servers 7 General Configuration ...8 Maintenance ...9 Using utility for USB Devices ...9 Configuration with Web-based UI 11 Network Information/Setting 12 Restart ...12 Factory Default ...13 Update Firmware ...13 Change Password ...14 Specifications ...15 Limited Warranty...16 3
USB Server User Manual TABLE OF CONTENT Introduction...4 Features ...4 Unpacking ...4 Software Installation ...5 Utility ...6 Menu bar ...6 Using the utility for USB Servers 7 General Configuration ...8 Maintenance ...9 Using utility for USB Devices ...9 Configuration with Web-based UI 11 Network Information/Setting 12 Restart ...12 Factory Default ...13 Update Firmware ...13 Change Password ...14 Specifications ...15 Limited Warranty...16 3

User's Guide
Page 4
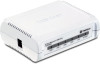
...) If any item is found missing or damaged, please contact your local reseller for fast network-wide file sharing. USB Server User Manual Introduction The 4-Port Network USB Hub (model TU2-NU4) provides access to most USB printers and all-in USB devices and start sharing content across your Local Area Network •...
...) If any item is found missing or damaged, please contact your local reseller for fast network-wide file sharing. USB Server User Manual Introduction The 4-Port Network USB Hub (model TU2-NU4) provides access to most USB printers and all-in USB devices and start sharing content across your Local Area Network •...

User's Guide
Page 5
USB Server User Manual Software Installation 1) Insert the Utility CD-ROM into your computer's CD_ROM Drive and click Install Utility. 2) Follow the InstallShield Wizard Instructions 3) Click Finish to restart the computer. 5
USB Server User Manual Software Installation 1) Insert the Utility CD-ROM into your computer's CD_ROM Drive and click Install Utility. 2) Follow the InstallShield Wizard Instructions 3) Click Finish to restart the computer. 5
User's Guide
Page 6
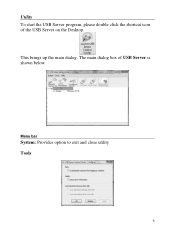
The main dialog box of the USB Server on the Desktop. Menu bar System: Provides option to exit and close utility Tools 6 USB Server User Manual Utility To start the USB Server program, please double click the shortcut icon of USB Server is shown below. This brings up the main dialog.
The main dialog box of the USB Server on the Desktop. Menu bar System: Provides option to exit and close utility Tools 6 USB Server User Manual Utility To start the USB Server program, please double click the shortcut icon of USB Server is shown below. This brings up the main dialog.
User's Guide
Page 7
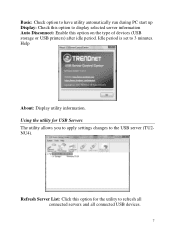
Help About: Display utility information. Refresh Server List: Click this option for USB Servers The utility allows you to apply settings changes to 3 minutes. USB Server User Manual Basic: Check option to have utility automatically run during PC start up Display: Check this option on the type of devices (USB storage or USB printers) after idle period. Using the utility for the utility to display selected server information Auto Disconnect: Enable this option to refresh all connected servers and all connected USB devices. 7 Idle period is set to the USB server (TU2NU4).
Help About: Display utility information. Refresh Server List: Click this option for USB Servers The utility allows you to apply settings changes to 3 minutes. USB Server User Manual Basic: Check option to have utility automatically run during PC start up Display: Check this option on the type of devices (USB storage or USB printers) after idle period. Using the utility for the utility to display selected server information Auto Disconnect: Enable this option to refresh all connected servers and all connected USB devices. 7 Idle period is set to the USB server (TU2NU4).

User's Guide
Page 8
Restart Server: Click this option to configure the TU2-NU4 through the utility General Configuration Server Name: Assign the name of the selected USB server and click OK. Configure Server: Click this option to reboot ... OK: Click to confirm settings Apply: Click to apply settings Cancel: Click to close window 8 When option is useful when your networks. USB Server User Manual Go to Homepage: Click this option to allow the USB server to obtain DHCP from a DHCP server. DHCP: Enable this option to your network has...
Restart Server: Click this option to configure the TU2-NU4 through the utility General Configuration Server Name: Assign the name of the selected USB server and click OK. Configure Server: Click this option to reboot ... OK: Click to confirm settings Apply: Click to apply settings Cancel: Click to close window 8 When option is useful when your networks. USB Server User Manual Go to Homepage: Click this option to allow the USB server to obtain DHCP from a DHCP server. DHCP: Enable this option to your network has...

User's Guide
Page 9
Maintenance USB Server User Manual Server Password New Password: Enter a new password for the TU2-NU4 Confirm Password: Re-enter the new password for the TU2-NU4 Submit: Click Submit when new password information has been entered System Firmware: Update File: Click this option to update the firmware on ...the tree view. Inaccessible server will not show up on the TU-NU4 Cancel: Click to close window Using ...
Maintenance USB Server User Manual Server Password New Password: Enter a new password for the TU2-NU4 Confirm Password: Re-enter the new password for the TU2-NU4 Submit: Click Submit when new password information has been entered System Firmware: Update File: Click this option to update the firmware on ...the tree view. Inaccessible server will not show up on the TU-NU4 Cancel: Click to close window Using ...
User's Guide
Page 10
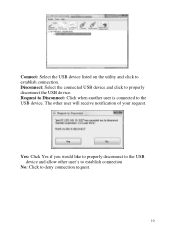
Disconnect: Select the connected USB device and click to establish connection. The other user's to establish connection No: Click to deny connection request. 10 USB Server User Manual Connect: Select the USB device listed on the utility and click to properly disconnect the USB device. Request to Disconnect: Click when another user is connected to the USB device and allow other user will receive notification of your request. Yes: Click Yes if you would like to properly disconnect to the USB device.
Disconnect: Select the connected USB device and click to establish connection. The other user's to establish connection No: Click to deny connection request. 10 USB Server User Manual Connect: Select the USB device listed on the utility and click to properly disconnect the USB device. Request to Disconnect: Click when another user is connected to the USB device and allow other user will receive notification of your request. Yes: Click Yes if you would like to properly disconnect to the USB device.

User's Guide
Page 11
You can see the important information about the USB Server and the device(s) connected to pages with Web-based UI Your default web browser will pop up and take you into the web-based configuration UI of the configuration UI. Clicking on "Device Status" brings you back to this page, and the 5 other links take you to it. USB Server User Manual Configuration with different functions. 11 This is the main page of the server. The 6 links at the left-hand side each represents a function.
You can see the important information about the USB Server and the device(s) connected to pages with Web-based UI Your default web browser will pop up and take you into the web-based configuration UI of the configuration UI. Clicking on "Device Status" brings you back to this page, and the 5 other links take you to it. USB Server User Manual Configuration with different functions. 11 This is the main page of the server. The 6 links at the left-hand side each represents a function.
User's Guide
Page 12
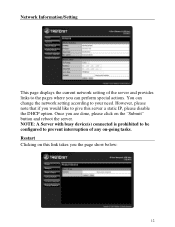
You can perform special actions. Once you can change the network setting according to your need. Network Information/Setting USB Server User Manual This page displays the current network setting of any on this link takes you would like to give this server a static IP, please disable the ...
You can perform special actions. Once you can change the network setting according to your need. Network Information/Setting USB Server User Manual This page displays the current network setting of any on this link takes you would like to give this server a static IP, please disable the ...
User's Guide
Page 13
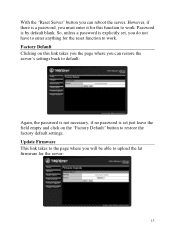
... the field empty and click on this function to upload the lat firmware for the server: 13 Password is by default blank. USB Server User Manual With the "Reset Server" button you can restore the server's settings back to default: Again, the password is not necessary, if no password is set...
... the field empty and click on this function to upload the lat firmware for the server: 13 Password is by default blank. USB Server User Manual With the "Reset Server" button you can restore the server's settings back to default: Again, the password is not necessary, if no password is set...

User's Guide
Page 14
..., you must enter current password, input new password and re-input new password for this operation if there is not password set. USB Server User Manual Please first click on the "Browse" button to browse to the firmware you would like to upload and then click on "Save". You do not...
..., you must enter current password, input new password and re-input new password for this operation if there is not password set. USB Server User Manual Please first click on the "Browse" button to browse to the firmware you would like to upload and then click on "Save". You do not...

User's Guide
Page 15
...: ‐10~70°C (14‐158 °F) Operating: 10%~90% (non‐condensing) Storage: 5%~90% (non‐condensing) CE, FCC 15 USB Server User Manual Specifications Hardware Standards LAN Port USB Ports LED Indicators TCP/IP Protocol Supported Supported OS Buttons Power Supply Power Consumption Dimensions (LxWxH) Weight Temperature Humidity...
...: ‐10~70°C (14‐158 °F) Operating: 10%~90% (non‐condensing) Storage: 5%~90% (non‐condensing) CE, FCC 15 USB Server User Manual Specifications Hardware Standards LAN Port USB Ports LED Indicators TCP/IP Protocol Supported Supported OS Buttons Power Supply Power Consumption Dimensions (LxWxH) Weight Temperature Humidity...
User's Guide
Page 16
... from the original date of TRENDnet. TU2-NU4- 2 Years Warranty AC/DC Power Adapter, Cooling Fan, and Power Supply carry 1 year warranty. The repair/replacement unit's warranty continues from the date of -purchase for their return policies. Please contact the point-of purchase. USB Server User Manual Limited Warranty TRENDnet warrants its expense, to repair...
... from the original date of TRENDnet. TU2-NU4- 2 Years Warranty AC/DC Power Adapter, Cooling Fan, and Power Supply carry 1 year warranty. The repair/replacement unit's warranty continues from the date of -purchase for their return policies. Please contact the point-of purchase. USB Server User Manual Limited Warranty TRENDnet warrants its expense, to repair...

User's Guide
Page 17
..., OR OTHER HAZARD. Customers shipping from outside of the USA are responsible for custom charges, including but not limited to TRENDnet prepaid, insured and packaged appropriately for safe shipment. USB Server User Manual TRENDnet products. Customers shipping from outside of the USA and Canada are responsible for return shipping fees. WARRANTIES EXCLUSIVE: IF...
..., OR OTHER HAZARD. Customers shipping from outside of the USA are responsible for custom charges, including but not limited to TRENDnet prepaid, insured and packaged appropriately for safe shipment. USB Server User Manual TRENDnet products. Customers shipping from outside of the USA and Canada are responsible for return shipping fees. WARRANTIES EXCLUSIVE: IF...
User's Guide
Page 18
THIS DISCLAIMER OF LIABILITY FOR DAMAGES WILL NOT BE AFFECTED IF ANY REMEDY PROVIDED HEREIN SHALL FAIL OF ITS ESSENTIAL PURPOSE. Governing Law: This Limited Warranty shall be governed by the laws of the state of California. 18 USB Server User Manual PROFITS, LOSS OF BUSINESS, LOSS OF INFORMATION OR DATE, OR OTHER FINANCIAL LOSS ARISING OUT OF OR IN CONNECTION WITH THE SALE, INSTALLATION, MAINTENANCE, USE, PERFORMANCE, FAILURE, OR INTERRUPTION OF THE POSSIBILITY OF SUCH DAMAGES, AND LIMITS ITS LIABILITY TO REPAIR, REPLACEMENT, OR REFUND OF THE PURCHASE PRICE PAID, AT TRENDNET'S OPTION.
THIS DISCLAIMER OF LIABILITY FOR DAMAGES WILL NOT BE AFFECTED IF ANY REMEDY PROVIDED HEREIN SHALL FAIL OF ITS ESSENTIAL PURPOSE. Governing Law: This Limited Warranty shall be governed by the laws of the state of California. 18 USB Server User Manual PROFITS, LOSS OF BUSINESS, LOSS OF INFORMATION OR DATE, OR OTHER FINANCIAL LOSS ARISING OUT OF OR IN CONNECTION WITH THE SALE, INSTALLATION, MAINTENANCE, USE, PERFORMANCE, FAILURE, OR INTERRUPTION OF THE POSSIBILITY OF SUCH DAMAGES, AND LIMITS ITS LIABILITY TO REPAIR, REPLACEMENT, OR REFUND OF THE PURCHASE PRICE PAID, AT TRENDNET'S OPTION.

Quick Installation Guide
Page 4
How to a power outlet. 3. Note: Please refer to your USB device. Connect a RJ-45 network cable from a Router to operate your USB device's manual for installation instructions. 2. Connect the AC Power Adapter to the TU2-NU4 and then to Install 1. Verify the Power and the LAN LEDs are lit on the TU2-NU4. 4. ENGLISH FRANÇAIS DEUTSCH 2. Install any software required to the LAN port on the TU2-NU4. 2 ESPAÑOL
How to a power outlet. 3. Note: Please refer to your USB device. Connect a RJ-45 network cable from a Router to operate your USB device's manual for installation instructions. 2. Connect the AC Power Adapter to the TU2-NU4 and then to Install 1. Verify the Power and the LAN LEDs are lit on the TU2-NU4. 4. ENGLISH FRANÇAIS DEUTSCH 2. Install any software required to the LAN port on the TU2-NU4. 2 ESPAÑOL