
Datasheet
Page 2
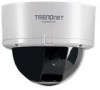
.../audio out; SecurView PoE Dome Internet Camera TV-IP252P (A1.0R) SPECIFICATIONS Camera General Audio Image & Video Frequency Manual Pan/Tilt/Rotate GPIO TV-out Hardware Network LED Reset Button Power Consumption Power Dimension Weight Temperature Certifications Requirements To View To Run Software SecurView™ Software Network Protocols Setting Image...detection • Action: send alert email and/or upload to FTP • HTTP port: 80 (default) • RTSP port: 554 (default) • 3x • Yes • Synchronize with NTP server or set time/date manually TV-IP252P rev: 10.05.2009
.../audio out; SecurView PoE Dome Internet Camera TV-IP252P (A1.0R) SPECIFICATIONS Camera General Audio Image & Video Frequency Manual Pan/Tilt/Rotate GPIO TV-out Hardware Network LED Reset Button Power Consumption Power Dimension Weight Temperature Certifications Requirements To View To Run Software SecurView™ Software Network Protocols Setting Image...detection • Action: send alert email and/or upload to FTP • HTTP port: 80 (default) • RTSP port: 554 (default) • 3x • Yes • Synchronize with NTP server or set time/date manually TV-IP252P rev: 10.05.2009
User's Guide
Page 22
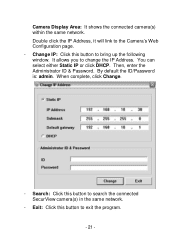
Change IP: Click this button to search the connected SecurView camera(s) in the same network. - Then, enter the Administrator ID & Password. You can select either Static IP or click DHCP. Double click the IP Address, it will link to change the IP Address. It allows you to the Camera's Web Configuration page. - By default the ID/Password is: admin. When complete, click Change. - Search: Click this button to exit the program. - 21 - Exit: Click this button to bring up the following window. Camera Display Area: It shows the connected camera(s) within the same network.
Change IP: Click this button to search the connected SecurView camera(s) in the same network. - Then, enter the Administrator ID & Password. You can select either Static IP or click DHCP. Double click the IP Address, it will link to change the IP Address. It allows you to the Camera's Web Configuration page. - By default the ID/Password is: admin. When complete, click Change. - Search: Click this button to exit the program. - 21 - Exit: Click this button to bring up the following window. Camera Display Area: It shows the connected camera(s) within the same network.
User's Guide
Page 23
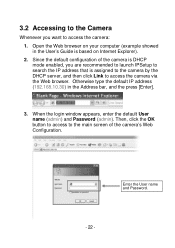
... name and Password. - 22 - When the login window appears, enter the default User name (admin) and Password (admin). Otherwise type the default IP address (192.168.10.30) in the User's Guide is assigned to the camera by the DHCP server, and then click Link to the main screen of the... camera's Web Configuration. 3.2 Accessing to the Camera Whenever you are recommended to launch IPSetup to search the IP address that is based on Internet ...
... name and Password. - 22 - When the login window appears, enter the default User name (admin) and Password (admin). Otherwise type the default IP address (192.168.10.30) in the User's Guide is assigned to the camera by the DHCP server, and then click Link to the main screen of the... camera's Web Configuration. 3.2 Accessing to the Camera Whenever you are recommended to launch IPSetup to search the IP address that is based on Internet ...

User's Guide
Page 34
You need to change the default administrator - 33 - Synchronize with PC: Select this option and the date & time settings of the server and select the update interval in the following two .... - - Synchronize with NTP Server: Select this option to set the Date and Time manually. Basic >> User Administrator: To prevent unauthorized access to the camera's Web Configuration, you are strongly recommended to enter the IP address of the camera will be synchronized with the NTP Server.
You need to change the default administrator - 33 - Synchronize with PC: Select this option and the date & time settings of the server and select the update interval in the following two .... - - Synchronize with NTP Server: Select this option to set the Date and Time manually. Basic >> User Administrator: To prevent unauthorized access to the camera's Web Configuration, you are strongly recommended to enter the IP address of the camera will be synchronized with the NTP Server.
User's Guide
Page 39
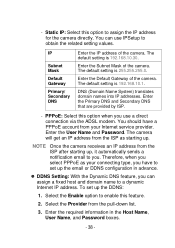
..., and Password boxes. - 38 - Static IP: Select this option when you use IPSetup to a dynamic Internet IP address. Enter the Subnet Mask of the camera. Select the Provider from your connecting type, you . The default setting is 192.168.10.30. You should... have to assign the IP address for the camera directly. The default setting is 255.255.255.0. Enter the Default Gateway of the camera. The default...
..., and Password boxes. - 38 - Static IP: Select this option when you use IPSetup to a dynamic Internet IP address. Enter the Subnet Mask of the camera. Select the Provider from your connecting type, you . The default setting is 192.168.10.30. You should... have to assign the IP address for the camera directly. The default setting is 255.255.255.0. Enter the Default Gateway of the camera. The default...
User's Guide
Page 40
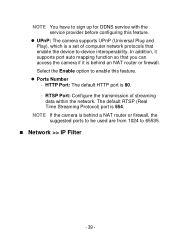
... 65535. Network >> IP Filter - 39 - NOTE If the camera is behind an NAT router or firewall. Select the Enable option to enable this feature. UPnP: The camera supports UPnP (Universal Plug and Play), which is a set of streaming data within the network. The default RTSP (Real Time ...Streaming Protocol) port is 80. - HTTP Port: The default HTTP port is 554. In addition, it supports port ...
... 65535. Network >> IP Filter - 39 - NOTE If the camera is behind an NAT router or firewall. Select the Enable option to enable this feature. UPnP: The camera supports UPnP (Universal Plug and Play), which is a set of streaming data within the network. The default RTSP (Real Time ...Streaming Protocol) port is 80. - HTTP Port: The default HTTP port is 554. In addition, it supports port ...

User's Guide
Page 46
...function, so that you can also view the real-time streaming image captured by the camera on your phone (with the default player on -site sound and voice from the camera. Camera Speaker Out: Select the Enable option to transfer the video clips without or with audio... by entering the RTSP link: rtsp://(IP address of the camera)/3gp. Video & Audio >> Audio Camera Microphone In: Select the Enable option to enable the camera's audio function, so that the connected speaker can play the sound and voice through the camera. The default setting is 90. Video ...
...function, so that you can also view the real-time streaming image captured by the camera on your phone (with the default player on -site sound and voice from the camera. Camera Speaker Out: Select the Enable option to transfer the video clips without or with audio... by entering the RTSP link: rtsp://(IP address of the camera)/3gp. Video & Audio >> Audio Camera Microphone In: Select the Enable option to enable the camera's audio function, so that the connected speaker can play the sound and voice through the camera. The default setting is 90. Video ...
User's Guide
Page 75
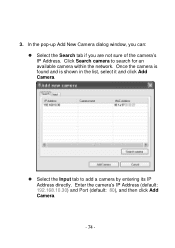
3. Once the camera is found and is shown in the list, select it and click Add Camera. Select the Input tab to search for an available camera within the network. Enter the camera's IP Address (default: 192.168.10.30) and Port (default: 80), and then click Add Camera. - 74 - Click Search camera to add a camera by entering its IP Address directly. In the pop-up Add New Camera dialog window, you can: Select the Search tab if you are not sure of the camera's IP Address.
3. Once the camera is found and is shown in the list, select it and click Add Camera. Select the Input tab to search for an available camera within the network. Enter the camera's IP Address (default: 192.168.10.30) and Port (default: 80), and then click Add Camera. - 74 - Click Search camera to add a camera by entering its IP Address directly. In the pop-up Add New Camera dialog window, you can: Select the Search tab if you are not sure of the camera's IP Address.
Quick Installation Guide
Page 6
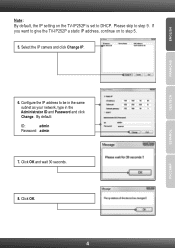
Click OK. 4 Please skip to be in the same subnet as your network, type in the Administrator ID and Password and click Change. By default: ID: admin Password: admin 7. FRANÇAIS DEUTSCH ESPAÑOL 6. Select the IP camera and click Change IP. Configure the IP address to step 9. ENGLISH Note: By default, the IP setting on to DHCP. Click OK and wait 30 seconds. 8. If you want to give the TV-IP252P a static IP address, continue on the TV-IP252P is set to step 5. 5.
Click OK. 4 Please skip to be in the same subnet as your network, type in the Administrator ID and Password and click Change. By default: ID: admin Password: admin 7. FRANÇAIS DEUTSCH ESPAÑOL 6. Select the IP camera and click Change IP. Configure the IP address to step 9. ENGLISH Note: By default, the IP setting on to DHCP. Click OK and wait 30 seconds. 8. If you want to give the TV-IP252P a static IP address, continue on the TV-IP252P is set to step 5. 5.
Quick Installation Guide
Page 7
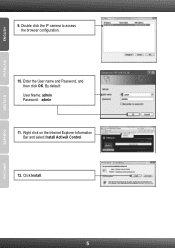
Enter the User name and Password, and then click OK. By default: User Name: admin Password: admin 11. Right click on the Internet Explorer Information Bar and select Install ActiveX Control. 12. Click Install. 5 Double click the IP camera to access the browser configuration. 10. ENGLISH FRANÇAIS DEUTSCH ESPAÑOL 9.
Enter the User name and Password, and then click OK. By default: User Name: admin Password: admin 11. Right click on the Internet Explorer Information Bar and select Install ActiveX Control. 12. Click Install. 5 Double click the IP camera to access the browser configuration. 10. ENGLISH FRANÇAIS DEUTSCH ESPAÑOL 9.
Quick Installation Guide
Page 11
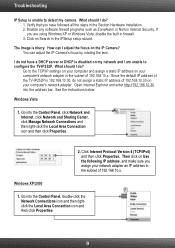
... should I am unable to configure the TV-IP252P. Disable any software firewall programs such as ZoneAlarm or Norton Internet Security. How can adjust the IP Camera's focus by rotating the lens. Since the default IP address of the TV-IP252P is disabled on my network and I do not have followed all ...the steps in the IPSetup setup wizard. Open Internet Explorer and enter http...
... should I am unable to configure the TV-IP252P. Disable any software firewall programs such as ZoneAlarm or Norton Internet Security. How can adjust the IP Camera's focus by rotating the lens. Since the default IP address of the TV-IP252P is disabled on my network and I do not have followed all ...the steps in the IPSetup setup wizard. Open Internet Explorer and enter http...

