User's Guide
Page 2
TRENDnet User's Guide Contents Product Overview 2 Package Contents ...2 Features ...2 Product Hardware Features 3 Application Diagram 4 Installation 5 Hardware Installation 5 Camera Installation 6 Starting IPSetup 9 Configuration 12 Viewing Camera Basic Function 12 Configuring the Camera Setting 13 Smart Wizard...14 Basic ...15 Network ...17 Video & Audio ...20 Event Server ...23 Motion Detect ...26 Event Config ...27 Tools ...29 SD Card ...29 Device Info ...31 How to setup/access the camera behind a Router 32 Technical Specifications 35 Table of Contents Troubleshooting 36 &#...
TRENDnet User's Guide Contents Product Overview 2 Package Contents ...2 Features ...2 Product Hardware Features 3 Application Diagram 4 Installation 5 Hardware Installation 5 Camera Installation 6 Starting IPSetup 9 Configuration 12 Viewing Camera Basic Function 12 Configuring the Camera Setting 13 Smart Wizard...14 Basic ...15 Network ...17 Video & Audio ...20 Event Server ...23 Motion Detect ...26 Event Config ...27 Tools ...29 SD Card ...29 Device Info ...31 How to setup/access the camera behind a Router 32 Technical Specifications 35 Table of Contents Troubleshooting 36 &#...

User's Guide
Page 3
...received through a single Ethernet cable using Power over Ethernet (PoE) technology. For future updates, please check www.trendnet.com/App for H.264, MPEG-4, and MJPEG compression types. Scheduled recording sessions and define video storage location with the included complimentary camera management software**. TRENDnet User's Guide Product Overview TV-IP262P Package Contents TV-IP262P Multi-Language Quick Installation Guide CD-ROM (Utility &User's Guide) Network cable (1.5m / 5ft) Power adapter (12V DC, 1.5A) Camera mounting...
...received through a single Ethernet cable using Power over Ethernet (PoE) technology. For future updates, please check www.trendnet.com/App for H.264, MPEG-4, and MJPEG compression types. Scheduled recording sessions and define video storage location with the included complimentary camera management software**. TRENDnet User's Guide Product Overview TV-IP262P Package Contents TV-IP262P Multi-Language Quick Installation Guide CD-ROM (Utility &User's Guide) Network cable (1.5m / 5ft) Power adapter (12V DC, 1.5A) Camera mounting...
User's Guide
Page 4
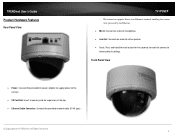
TRENDnet User's Guide Product Hardware Features Rear Panel View TV-IP262P - The connector supports Power over Ethernet standard, enabling the camera to factory default settings. Front Panel View Power : Connect the provided AC power adapter to supply power to the camera. SD Card Slot: Insert a memory card for five seconds to reset the camera to be powered by the Ethernet. Mic In: Connect an external microphone. Line Out: Connects an external active speaker. Reset: Press and hold...
TRENDnet User's Guide Product Hardware Features Rear Panel View TV-IP262P - The connector supports Power over Ethernet standard, enabling the camera to factory default settings. Front Panel View Power : Connect the provided AC power adapter to supply power to the camera. SD Card Slot: Insert a memory card for five seconds to reset the camera to be powered by the Ethernet. Mic In: Connect an external microphone. Line Out: Connects an external active speaker. Reset: Press and hold...
User's Guide
Page 7
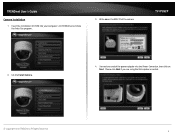
lick the Install Camera. 4. All Rights Reserved. 6 Please click Next if you are using the PoE injector or switch. © Copyright 2012 TRENDnet. Insert the Installation CD-ROM into the Power Connector, then click on Next. Connect one end of the camera TV-IP262P 2. TRENDnet User's Guide Camera Installation 1. Write down the MAC ID of the power adapter into your computer's CD-ROM drive to initiate the Auto-Run program. 3.
lick the Install Camera. 4. All Rights Reserved. 6 Please click Next if you are using the PoE injector or switch. © Copyright 2012 TRENDnet. Insert the Installation CD-ROM into the Power Connector, then click on Next. Connect one end of the camera TV-IP262P 2. TRENDnet User's Guide Camera Installation 1. Write down the MAC ID of the power adapter into your computer's CD-ROM drive to initiate the Auto-Run program. 3.
User's Guide
Page 11
... set to DHCP. By default the ID/Password is automatically installed to bring up the following window. TRENDnet User's Guide 4. Click Start>Programs>TRENDnet>IPSetup, and then click IPSetup. If you to Camera's Web Configuration page. - Change IP: Click this button to your network, it will show the default IP as 192.168.10.30. Then, enter the Administrator ID & Password. When complete, click Change. © Copyright 2012 TRENDnet. Camera Display Area TV-IP262P...
... set to DHCP. By default the ID/Password is automatically installed to bring up the following window. TRENDnet User's Guide 4. Click Start>Programs>TRENDnet>IPSetup, and then click IPSetup. If you to Camera's Web Configuration page. - Change IP: Click this button to your network, it will show the default IP as 192.168.10.30. Then, enter the Administrator ID & Password. When complete, click Change. © Copyright 2012 TRENDnet. Camera Display Area TV-IP262P...
User's Guide
Page 13
...: Live View/Setup Switch: Click the Click the view image. All Rights Reserved. Permission request depends on the Internet Explorer). The Main screen of the Web Configuration provides you will appear as below: When the login window appears, enter the default User name (admin) and Password (admin) and press OK to access to the main screen of your computer (example showed in the User's Guide is based on the Internet security settings of the camera's Web Configuration...
...: Live View/Setup Switch: Click the Click the view image. All Rights Reserved. Permission request depends on the Internet Explorer). The Main screen of the Web Configuration provides you will appear as below: When the login window appears, enter the default User name (admin) and Password (admin) and press OK to access to the main screen of your computer (example showed in the User's Guide is based on the Internet security settings of the camera's Web Configuration...
User's Guide
Page 14
... one user is displayed above the Live View Image window. Click the Zoom In buttons ( for SXGA ) or ( for the camera in the left menu bar, including Smart Wizard, Basic, Network, Video/Audio, Event Server, Motion detect, Event Config, Tools, SD Card, and Information. 13 You will start from the camera. Multicast allows you to change the camera's transmission type on the Main screen of Web Configuration. TRENDnet User's Guide Manual Record allows you manually record and save a video clip...
... one user is displayed above the Live View Image window. Click the Zoom In buttons ( for SXGA ) or ( for the camera in the left menu bar, including Smart Wizard, Basic, Network, Video/Audio, Event Server, Motion detect, Event Config, Tools, SD Card, and Information. 13 You will start from the camera. Multicast allows you to change the camera's transmission type on the Main screen of Web Configuration. TRENDnet User's Guide Manual Record allows you manually record and save a video clip...
User's Guide
Page 15
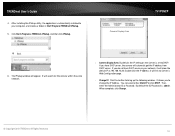
... necessary settings with image. Google Gmail®, Yahoo®, Hotmail®), please enter the SMTP server address and the corresponding information from the service provider. IP Setting Select the IP setting according to send email with detailed instructions on each step. If you are using a free mail service (e.g. Enter the location and administrator password twice. TRENDnet User's Guide Smart Wizard The camera's Smart Wizard lets you configure your network...
... necessary settings with image. Google Gmail®, Yahoo®, Hotmail®), please enter the SMTP server address and the corresponding information from the service provider. IP Setting Select the IP setting according to send email with detailed instructions on each step. If you are using a free mail service (e.g. Enter the location and administrator password twice. TRENDnet User's Guide Smart Wizard The camera's Smart Wizard lets you configure your network...
User's Guide
Page 17
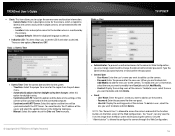
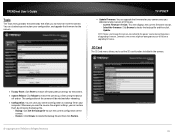
... Server. When you are strongly recommend to modify from UserList and click Add/Modify. - To delete a user, select the one you want to change the default administrator password. the "Guest" can only view the live view image from the pull-down menu. - TRENDnet User's Guide Basic: This item allows you to configure the camera through the Web Configuration. 16 Type the administrator password twice to set the Date and Time manually...
... Server. When you are strongly recommend to modify from UserList and click Add/Modify. - To delete a user, select the one you want to change the default administrator password. the "Guest" can only view the live view image from the pull-down menu. - TRENDnet User's Guide Basic: This item allows you to configure the camera through the Web Configuration. 16 Type the administrator password twice to set the Date and Time manually...
User's Guide
Page 19
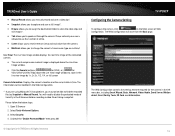
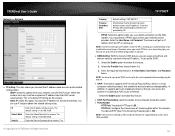
... streaming data within the network. The © Copyright 2012 TRENDnet. To set up the related configuration. - The default setting is 192.168.10.1. You should have the port forward to router. Ports Number - TV-IP262P Gateway Primary/ Secondary DNS default setting is 255.255.255.0. The default RTSP (Real Time Streaming Protocol) port is 192.168.10.30. TRENDnet User's Guide Network >> Network IP Setting: This item allows you to select the IP address mode and set up the DDNS...
... streaming data within the network. The © Copyright 2012 TRENDnet. To set up the related configuration. - The default setting is 192.168.10.1. You should have the port forward to router. Ports Number - TV-IP262P Gateway Primary/ Secondary DNS default setting is 255.255.255.0. The default RTSP (Real Time Streaming Protocol) port is 192.168.10.30. TRENDnet User's Guide Network >> Network IP Setting: This item allows you to select the IP address mode and set up the DDNS...
User's Guide
Page 20
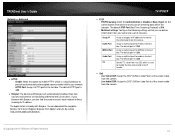
... from the camera. - TRENDnet User's Guide Network >> Advanced HTTPS - The default HTTPS port is 1238. The Apple Safari is 554. - TV-IP262P RTSP - RTSP Streaming: Select the Authentication as Disable or Basic, Digest for MPEG4 in the text box. Live Audio DSCP: Assign the DSCP (DiffServ Code Point) of IP addresses to a set of streaming data within your local network without knowing its IP address. The default RTSP Port (Real Time Streaming Protocol) is...
... from the camera. - TRENDnet User's Guide Network >> Advanced HTTPS - The default HTTPS port is 1238. The Apple Safari is 554. - TV-IP262P RTSP - RTSP Streaming: Select the Authentication as Disable or Basic, Digest for MPEG4 in the text box. Live Audio DSCP: Assign the DSCP (DiffServ Code Point) of IP addresses to a set of streaming data within your local network without knowing its IP address. The default RTSP Port (Real Time Streaming Protocol) is...
User's Guide
Page 23
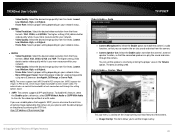
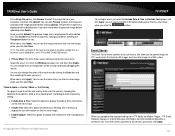
... to enable the camera's external speaker function, so that the connected speaker can play the sound and voice through the setting options above. 3GPP: The camera supports 3GPP specification. Video & Audio >> Audio TV-IP262P Camera Microphone In: Select the Enable option to enable the camera's audio function, so that supports 3GPP, you to transfer the video clips without or with the default player on your network. - Video Quality: Select the desired image quality...
... to enable the camera's external speaker function, so that the connected speaker can play the sound and voice through the setting options above. 3GPP: The camera supports 3GPP specification. Video & Audio >> Audio TV-IP262P Camera Microphone In: Select the Enable option to enable the camera's audio function, so that supports 3GPP, you to transfer the video clips without or with the default player on your network. - Video Quality: Select the desired image quality...
User's Guide
Page 24
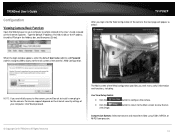
... Event Server menu contains three sub-menus that include still images, and store the images to remove the preview image before clicking Upload. Once the camera connects to set the transparency setting by clicking the Color box and then selecting the color you click Live View. TRENDnet User's Guide In the Image File option, click Browse to select the image file from the Window pull-down list, and then click Enable...
... Event Server menu contains three sub-menus that include still images, and store the images to remove the preview image before clicking Upload. Once the camera connects to set the transparency setting by clicking the Color box and then selecting the color you click Live View. TRENDnet User's Guide In the Image File option, click Browse to select the image file from the Window pull-down list, and then click Enable...
User's Guide
Page 27
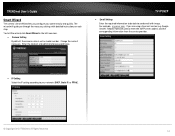
... service. - File Format: Select MP4 or AVI as the encode format while recording. - Event Server Setting >> Instant Message TV-IP262P - Manually Specify Server Host/Port: Select the Enable option to secure the connection. - Receiver: Enter the receiver's information. - Jabber Password: Enter the password to be sent. Encode Format: Select MPEG4 or H.264 as the file format while recording. Encrypt Connection: Select the Enable option to manually configure the Jabber server settings. - The camera provides three detecting...
... service. - File Format: Select MP4 or AVI as the encode format while recording. - Event Server Setting >> Instant Message TV-IP262P - Manually Specify Server Host/Port: Select the Enable option to secure the connection. - Receiver: Enter the receiver's information. - Jabber Password: Enter the password to be sent. Encode Format: Select MPEG4 or H.264 as the file format while recording. Encrypt Connection: Select the Enable option to manually configure the Jabber server settings. - The camera provides three detecting...
User's Guide
Page 30
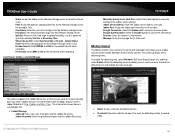
TV-IP262P Update Firmware: You can upgrade the firmware for your camera once you to set the SD card function installed in the camera. Factory Reset: Click Reset to restore all factory default settings for the camera. Otherwise, the camera might be retained after rebooting. Configuration: You can save the current configuration of upgrading firmware. Whenever you want to resume the original settings, you to the power source during the process of the camera. - Current...
TV-IP262P Update Firmware: You can upgrade the firmware for your camera once you to set the SD card function installed in the camera. Factory Reset: Click Reset to restore all factory default settings for the camera. Otherwise, the camera might be retained after rebooting. Configuration: You can save the current configuration of upgrading firmware. Whenever you want to resume the original settings, you to the power source during the process of the camera. - Current...
User's Guide
Page 33
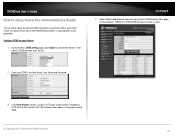
... the camera. The default HTTP Port on your Router's Web Configuration page. (In the example, TRENDnet's TEW-651BR Wireless N router is using port number 9000. © Copyright 2012 TRENDnet. An account from the list. Go to Camera's DDNS Setting page, click Enable to activate the feature. TV-IP262P 4. Open another web browser and go to your Camera 1. TRENDnet User's Guide How to setup/access the camera behind a Router You can either setup the Dynamic DNS connection via camera itself or your DDNS's the...
... the camera. The default HTTP Port on your Router's Web Configuration page. (In the example, TRENDnet's TEW-651BR Wireless N router is using port number 9000. © Copyright 2012 TRENDnet. An account from the list. Go to Camera's DDNS Setting page, click Enable to activate the feature. TV-IP262P 4. Open another web browser and go to your Camera 1. TRENDnet User's Guide How to setup/access the camera behind a Router You can either setup the Dynamic DNS connection via camera itself or your DDNS's the...
User's Guide
Page 36
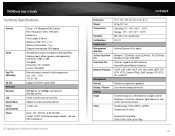
... illumination: 1 Lux Diagonal viewing angle: 69.3 degree Microphone out port (microphone sold separately) Audio out port: Mono (speakers sold separately) Sensitivity: -42dB +/- 3dB S/N: 65dB Frequency: 100~10,000Hz Format: PCM/AMR Manually adjust camera to final fixed position: Pan: -175° ~ +175° Tilt: 20 ~ 90° Supports SD/SDHC (up to factory default 7 watts max. TRENDnet User's Guide Technical Specifications General Audio Pan/Tilt (Manually) SD Slot Hardware Network LED Reset Button Power Consumption Power Sensor: 1/4" Megapixel CMOS...
... illumination: 1 Lux Diagonal viewing angle: 69.3 degree Microphone out port (microphone sold separately) Audio out port: Mono (speakers sold separately) Sensitivity: -42dB +/- 3dB S/N: 65dB Frequency: 100~10,000Hz Format: PCM/AMR Manually adjust camera to final fixed position: Pan: -175° ~ +175° Tilt: 20 ~ 90° Supports SD/SDHC (up to factory default 7 watts max. TRENDnet User's Guide Technical Specifications General Audio Pan/Tilt (Manually) SD Slot Hardware Network LED Reset Button Power Consumption Power Sensor: 1/4" Megapixel CMOS...
User's Guide
Page 37
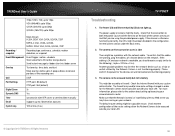
... the camera is reachable, you are secure and that the configuration of the recording area QoS DSCP Port Settings HTTP port: 80 (default) RTSP port: 554 (default) Digital Zoom 3x Dynamic DNS Yes Time Synchronize with the network cable. If the cabling is OK and your network is otherwise functioning correctly, the LEDs might be a problem with NTP server or set time/date manually Email Supports up to 2 destination accounts System Log 100 entries (max.) TV-IP262P Troubleshooting 1. For...
... the camera is reachable, you are secure and that the configuration of the recording area QoS DSCP Port Settings HTTP port: 80 (default) RTSP port: 554 (default) Digital Zoom 3x Dynamic DNS Yes Time Synchronize with the network cable. If the cabling is OK and your network is otherwise functioning correctly, the LEDs might be a problem with NTP server or set time/date manually Email Supports up to 2 destination accounts System Log 100 entries (max.) TV-IP262P Troubleshooting 1. For...

Quick Installation Guide
Page 3
... install or mount the IP camera until after you complete the installation steps below. Click Install Camera and follow the instructions. 5. Congratulations! To connect the IP camera to your desired location. Temporarily place the IP camera next to the management interface. 2 Once the management interface has opened in your network. See the User's Guide for ease of the following methods: 4. 2. Click TV-IP262P to confirm access...
... install or mount the IP camera until after you complete the installation steps below. Click Install Camera and follow the instructions. 5. Congratulations! To connect the IP camera to your desired location. Temporarily place the IP camera next to the management interface. 2 Once the management interface has opened in your network. See the User's Guide for ease of the following methods: 4. 2. Click TV-IP262P to confirm access...
Quick Installation Guide
Page 5
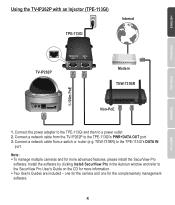
Connect a network cable from the TV-IP262P to the SecurView Pro User's Guide on the CD for more information. Two User's Guides are included - Install the software by clicking Install SecurView Pro in the Autorun window and refer to the TPE-113GI's PWR+DATA OUT port 3. TEW-731BR) to a power outlet 2. Using the TV-IP262P with an Injector (TPE-113GI) Internet TPE-113GI TV-IP262P PWR+DATA OUT DATA IN Modem TEW-731BR 1-100m PoE WAN...
Connect a network cable from the TV-IP262P to the SecurView Pro User's Guide on the CD for more information. Two User's Guides are included - Install the software by clicking Install SecurView Pro in the Autorun window and refer to the TPE-113GI's PWR+DATA OUT port 3. TEW-731BR) to a power outlet 2. Using the TV-IP262P with an Injector (TPE-113GI) Internet TPE-113GI TV-IP262P PWR+DATA OUT DATA IN Modem TEW-731BR 1-100m PoE WAN...


