
User's Guide
Page 3
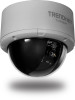
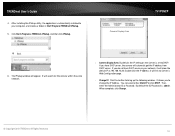
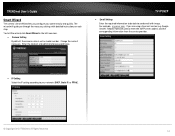
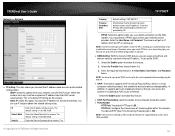
... through a single Ethernet cable using Power over Ethernet (PoE) technology. Scheduled recording sessions and define video storage location with Samba client support. TRENDnet User's Guide Product Overview TV-IP262P Package Contents TV-IP262P Multi-Language Quick Installation Guide CD-ROM (Utility &User's Guide) Network cable (1.5m / 5ft) Power adapter (12V...
... through a single Ethernet cable using Power over Ethernet (PoE) technology. Scheduled recording sessions and define video storage location with Samba client support. TRENDnet User's Guide Product Overview TV-IP262P Package Contents TV-IP262P Multi-Language Quick Installation Guide CD-ROM (Utility &User's Guide) Network cable (1.5m / 5ft) Power adapter (12V...
User's Guide
Page 4
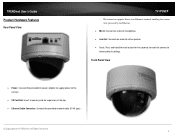
TRENDnet User's Guide Product Hardware Features Rear Panel View TV-IP262P - The connector supports Power over Ethernet standard, enabling the camera to factory default settings. All Rights Reserved. 3 Front Panel View Power : Connect the provided ...: Press and hold the reset button for expansion of storage. Ethernet Cable Connector: Connect the provided network cable (RJ-45 type) © Copyright 2012 TRENDnet.
TRENDnet User's Guide Product Hardware Features Rear Panel View TV-IP262P - The connector supports Power over Ethernet standard, enabling the camera to factory default settings. All Rights Reserved. 3 Front Panel View Power : Connect the provided ...: Press and hold the reset button for expansion of storage. Ethernet Cable Connector: Connect the provided network cable (RJ-45 type) © Copyright 2012 TRENDnet.
User's Guide
Page 5
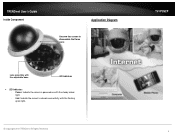
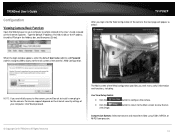
Power: Indicate the camera is powered on with the flashing green light. © Copyright 2012 TRENDnet. All Rights Reserved. TRENDnet User's Guide Inside Component Application Diagram Unscrew four screws to disassemble the Dome cover. TV-IP262P 4 Link: Indicate the camera's network connectivity with the steady amber light. - Lens assembly with the adjustable base LED indicators LED indicators -
Power: Indicate the camera is powered on with the flashing green light. © Copyright 2012 TRENDnet. All Rights Reserved. TRENDnet User's Guide Inside Component Application Diagram Unscrew four screws to disassemble the Dome cover. TV-IP262P 4 Link: Indicate the camera's network connectivity with the steady amber light. - Lens assembly with the adjustable base LED indicators LED indicators -
User's Guide
Page 6
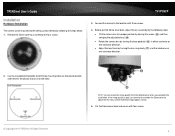
Before put the Dome cover back, adjust the lens assembly by the following the steps below: 1. TV-IP262P 3. All Rights Reserved. 5 If the image quality is poor, you complete the installation. Use the included drill template to drill three mounting holes on the... by turning the lens ring slowly () in either clockwise or anti-clockwise direction. Adjust the lens focus by unscrewing the four screws. TRENDnet User's Guide Installation Hardware Installation The camera can review the image quality from the Web browser when you have to disassemble the Dome cover to...
Before put the Dome cover back, adjust the lens assembly by the following the steps below: 1. TV-IP262P 3. All Rights Reserved. 5 If the image quality is poor, you complete the installation. Use the included drill template to drill three mounting holes on the... by turning the lens ring slowly () in either clockwise or anti-clockwise direction. Adjust the lens focus by unscrewing the four screws. TRENDnet User's Guide Installation Hardware Installation The camera can review the image quality from the Web browser when you have to disassemble the Dome cover to...
User's Guide
Page 7
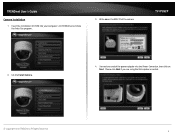
Insert the Installation CD-ROM into the Power Connector, then click on Next. Please click Next if you are using the PoE injector or switch. © Copyright 2012 TRENDnet. All Rights Reserved. 6 lick the Install Camera. 4. Write down the MAC ID of the power adapter into your computer's CD-ROM drive to initiate the Auto-Run program. 3. Connect one end of the camera TV-IP262P 2. TRENDnet User's Guide Camera Installation 1.
Insert the Installation CD-ROM into the Power Connector, then click on Next. Please click Next if you are using the PoE injector or switch. © Copyright 2012 TRENDnet. All Rights Reserved. 6 lick the Install Camera. 4. Write down the MAC ID of the power adapter into your computer's CD-ROM drive to initiate the Auto-Run program. 3. Connect one end of the camera TV-IP262P 2. TRENDnet User's Guide Camera Installation 1.
User's Guide
Page 8
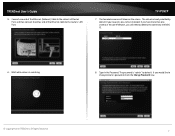
... camera's Ethernet Port, and then connect the other end of the Ethernet cable to change camera's password, check the Change Password now. © Copyright 2012 TRENDnet. Connect one camera in the Password. TV-IP262P 7. The password is searching. 8. All Rights Reserved. 7 Type in the same Network, you will show on the screen...
... camera's Ethernet Port, and then connect the other end of the Ethernet cable to change camera's password, check the Change Password now. © Copyright 2012 TRENDnet. Connect one camera in the Password. TV-IP262P 7. The password is searching. 8. All Rights Reserved. 7 Type in the same Network, you will show on the screen...
User's Guide
Page 9
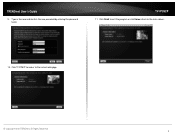
TV-IP262P 11. Click Finish to exit the program or click Home return to the camera web page. © Copyright 2012 TRENDnet. TRENDnet User's Guide 9. Click TV-IP262P to access to the main screen. 10. All Rights Reserved. 8 Type in the new and confirm the new password by entering the password twice.
TV-IP262P 11. Click Finish to exit the program or click Home return to the camera web page. © Copyright 2012 TRENDnet. TRENDnet User's Guide 9. Click TV-IP262P to access to the main screen. 10. All Rights Reserved. 8 Type in the new and confirm the new password by entering the password twice.
User's Guide
Page 10
TRENDnet User's Guide Starting IPSetup The camera comes with a conveniently utility, IPSetup, which is included in the Installation CD-ROM, allowing you to search the camera on your computer's CD-ROM drive to install the utility. 3. Then the IPSetup Wizard will appear. Click Install to initiate the Auto-Run program. Click the IPSetup from the Auto-Run menu screen. When the Completing the IPSetup Setup Wizard appears, click Finish. © Copyright 2012 TRENDnet. All Rights Reserved. 9 Insert the Installation CD-ROM into your network easily. 1. TV-IP262P 2.
TRENDnet User's Guide Starting IPSetup The camera comes with a conveniently utility, IPSetup, which is included in the Installation CD-ROM, allowing you to search the camera on your computer's CD-ROM drive to install the utility. 3. Then the IPSetup Wizard will appear. Click Install to initiate the Auto-Run program. Click the IPSetup from the Auto-Run menu screen. When the Completing the IPSetup Setup Wizard appears, click Finish. © Copyright 2012 TRENDnet. All Rights Reserved. 9 Insert the Installation CD-ROM into your network easily. 1. TV-IP262P 2.
User's Guide
Page 11
... : admin. It allows you have DHCP server on the Camera is set to change the IP Address. When complete, click Change. © Copyright 2012 TRENDnet. TRENDnet User's Guide 4. It will appear. You can select either Static IP or click DHCP. All Rights Reserved. 10 Click Start>Programs...the default IP as 192.168.10.30. By default the ID/Password is automatically installed to bring up the following window. Camera Display Area TV-IP262P 6. Camera Display Area: By default, the IP setting on your computer, and creates a folder in Start\Program\TRENDnet\IPSetup. 5.
... : admin. It allows you have DHCP server on the Camera is set to change the IP Address. When complete, click Change. © Copyright 2012 TRENDnet. TRENDnet User's Guide 4. It will appear. You can select either Static IP or click DHCP. All Rights Reserved. 10 Click Start>Programs...the default IP as 192.168.10.30. By default the ID/Password is automatically installed to bring up the following window. Camera Display Area TV-IP262P 6. Camera Display Area: By default, the IP setting on your computer, and creates a folder in Start\Program\TRENDnet\IPSetup. 5.
User's Guide
Page 12
Exit: Click this button to exit the program. © Copyright 2012 TRENDnet. Search: Click this button to search the connected camera in the same network - TV-IP262P 11 All Rights Reserved. TRENDnet User's Guide -
Exit: Click this button to exit the program. © Copyright 2012 TRENDnet. Search: Click this button to search the connected camera in the same network - TV-IP262P 11 All Rights Reserved. TRENDnet User's Guide -
User's Guide
Page 13
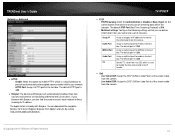
TV-IP262P After you with many useful information and functions, including: Live View/Setup Switch: Click the Click the view image. TRENDnet User's Guide Configuration Viewing Camera Basic Function Open the Web browser on your computer (example showed in the User's Guide is based ... page will be ask to transmit and record the video using H.264, MPEG4, or MJPEG compression. 12 button to proceed. © Copyright 2012 TRENDnet. Permission request depends on the Internet Explorer). Click Yes to configure the camera. Type the default IP address (192.168.10.30) or the ...
TV-IP262P After you with many useful information and functions, including: Live View/Setup Switch: Click the Click the view image. TRENDnet User's Guide Configuration Viewing Camera Basic Function Open the Web browser on your computer (example showed in the User's Guide is based ... page will be ask to transmit and record the video using H.264, MPEG4, or MJPEG compression. 12 button to proceed. © Copyright 2012 TRENDnet. Permission request depends on the Internet Explorer). Click Yes to configure the camera. Type the default IP address (192.168.10.30) or the ...
User's Guide
Page 14
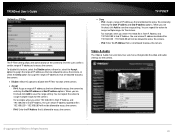
...The Web Configuration contains the settings that are using Microsoft 7/Vista platform, you to receive the on-site sound and voice from the Basic page. TRENDnet User's Guide Manual Record allows you manually record and save a video clip*. Snapshot allows you to capture and save a..., Basic, Network, Video/Audio, Event Server, Motion detect, Event Config, Tools, SD Card, and Information. 13 Configuring the Camera Setting TV-IP262P To configure the camera, click on multicast Live View: The Live View Image window displays the real-time image of the connected camera. &#...
...The Web Configuration contains the settings that are using Microsoft 7/Vista platform, you to receive the on-site sound and voice from the Basic page. TRENDnet User's Guide Manual Record allows you manually record and save a video clip*. Snapshot allows you to capture and save a..., Basic, Network, Video/Audio, Event Server, Motion detect, Event Config, Tools, SD Card, and Information. 13 Configuring the Camera Setting TV-IP262P To configure the camera, click on multicast Live View: The Live View Image window displays the real-time image of the connected camera. &#...
User's Guide
Page 15
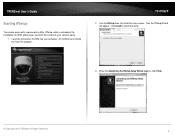
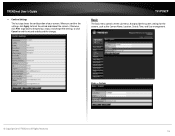
... location and administrator password twice. If you through the necessary settings with image. Change the name if necessary. For example, myserver.com. TV-IP262P Email Settings Enter the required information to be able to your camera easily and quickly. The wizard will guide you are using ... IP Setting Select the IP setting according to send email with detailed instructions on each step. All Rights Reserved. 14 TRENDnet User's Guide Smart Wizard The camera's Smart Wizard lets you configure your network: DHCP, Static IP, or PPPoE. © Copyright 2012...
... location and administrator password twice. If you through the necessary settings with image. Change the name if necessary. For example, myserver.com. TV-IP262P Email Settings Enter the required information to be able to your camera easily and quickly. The wizard will guide you are using ... IP Setting Select the IP setting according to send email with detailed instructions on each step. All Rights Reserved. 14 TRENDnet User's Guide Smart Wizard The camera's Smart Wizard lets you configure your network: DHCP, Static IP, or PPPoE. © Copyright 2012...
User's Guide
Page 16
TV-IP262P Basic The Basic menu contains three sub-menus that provide the system settings for the camera, such as the Camera Name, Location, Date & Time, and User management. or click Cancel to the previous step(s) and change the settings; Otherwise, click Prev to go back to end the wizard and discard the changes. All Rights Reserved. 15 When you confirm the settings, click Apply to finish the wizard and reboot the camera. Basic >> System © Copyright 2012 TRENDnet. TRENDnet User's Guide Confirm Settings The last step shows the configuration of your camera.
TV-IP262P Basic The Basic menu contains three sub-menus that provide the system settings for the camera, such as the Camera Name, Location, Date & Time, and User management. or click Cancel to the previous step(s) and change the settings; Otherwise, click Prev to go back to end the wizard and discard the changes. All Rights Reserved. 15 When you confirm the settings, click Apply to finish the wizard and reboot the camera. Basic >> System © Copyright 2012 TRENDnet. TRENDnet User's Guide Confirm Settings The last step shows the configuration of your camera.
User's Guide
Page 17
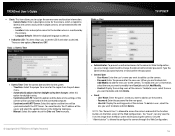
...to set the Date and Time manually. © Copyright 2012 TRENDnet. Password: Enter the password for the system. - To modify the user's information, select the one you want to add to use the camera. - Basic >> Date & Time Basic >> User TV-IP262P Date & Time: Enter the correct date and ... for the region from the Main screen while accessing the camera. User Name: Enter the user's name you want to delete and click Delete. TRENDnet User's Guide Basic: This item allows you want to modify from UserList and click Add/Modify. - NOTE: The "General User" ...
...to set the Date and Time manually. © Copyright 2012 TRENDnet. Password: Enter the password for the system. - To modify the user's information, select the one you want to add to use the camera. - Basic >> Date & Time Basic >> User TV-IP262P Date & Time: Enter the correct date and ... for the region from the Main screen while accessing the camera. User Name: Enter the user's name you want to delete and click Delete. TRENDnet User's Guide Basic: This item allows you want to modify from UserList and click Add/Modify. - NOTE: The "General User" ...
User's Guide
Page 18
All Rights Reserved. 17 TRENDnet User's Guide Direct Video Stream Authentication: To steam the video directly without entering the user name and password. Examples of the direct link to ... camera, such as the IP Setting, DDNS Setting, and IP Filter. © Copyright 2012 TRENDnet. Disable: User can stream the camera without going through the configuration page, you can access it is recommended to stream the camera. - TV-IP262P Network The Network menu contains two sub-menus that provide the networking settings for...
All Rights Reserved. 17 TRENDnet User's Guide Direct Video Stream Authentication: To steam the video directly without entering the user name and password. Examples of the direct link to ... camera, such as the IP Setting, DDNS Setting, and IP Filter. © Copyright 2012 TRENDnet. Disable: User can stream the camera without going through the configuration page, you can access it is recommended to stream the camera. - TV-IP262P Network The Network menu contains two sub-menus that provide the networking settings for...
User's Guide
Page 19
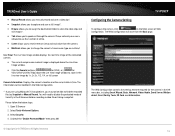
...this feature. 2. Select the Enable option to enable this feature. UPnP Port Forwarding: select this option when your Internet service provider. TRENDnet User's Guide Network >> Network IP Setting: This item allows you to select the IP address mode and set up the email or...an IP address from your network uses the DHCP server. The default setting is 192.168.10.30. The © Copyright 2012 TRENDnet. TV-IP262P Gateway Primary/ Secondary DNS default setting is behind an NAT router of computer network protocols that you can use a direct connection via the...
...this feature. 2. Select the Enable option to enable this feature. UPnP Port Forwarding: select this option when your Internet service provider. TRENDnet User's Guide Network >> Network IP Setting: This item allows you to select the IP address mode and set up the email or...an IP address from your network uses the DHCP server. The default setting is 192.168.10.30. The © Copyright 2012 TRENDnet. TV-IP262P Gateway Primary/ Secondary DNS default setting is behind an NAT router of computer network protocols that you can use a direct connection via the...
User's Guide
Page 20
... DSCP (DiffServ Code Point) of the stream video from the camera. © Copyright 2012 TRENDnet. Enable: Select this option to enable HTTPS, which is 443. Bonjour: The devices with Bonjour. TV-IP262P RTSP - The default port is 1234. All Rights Reserved. 19 You can deliver...visiting http://www.apple.com/bonjour/. The default RTSP Port (Real Time Streaming Protocol) is 1236. The default port is 554. - TRENDnet User's Guide Network >> Advanced HTTPS - If your browser with Bonjour, you can download the complete Bonjour for MPEG4 in the text...
... DSCP (DiffServ Code Point) of the stream video from the camera. © Copyright 2012 TRENDnet. Enable: Select this option to enable HTTPS, which is 443. Bonjour: The devices with Bonjour. TV-IP262P RTSP - The default port is 1234. All Rights Reserved. 19 You can deliver...visiting http://www.apple.com/bonjour/. The default RTSP Port (Real Time Streaming Protocol) is 1236. The default port is 554. - TRENDnet User's Guide Network >> Advanced HTTPS - If your browser with Bonjour, you can download the complete Bonjour for MPEG4 in the text...
User's Guide
Page 21
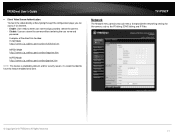
TV-IP262P Deny - When you are finished, click Add to save the range setting. IPv4: Assign a range .... IPv6: Enter the IP Address that provide the video and audio settings for the camera. © Copyright 2012 TRENDnet. You can repeat the action to assign multiple ranges for the camera. otherwise, select the Accept option to assign the...whose IP address located within 192.168.0.50 ~ 192.168.0.80 will not be allowed to access the camera. - TRENDnet User's Guide Network >> IP Filter The IP Filter setting allows the administrator of the camera to limit the users within ...
TV-IP262P Deny - When you are finished, click Add to save the range setting. IPv4: Assign a range .... IPv6: Enter the IP Address that provide the video and audio settings for the camera. © Copyright 2012 TRENDnet. You can repeat the action to assign multiple ranges for the camera. otherwise, select the Accept option to assign the...whose IP address located within 192.168.0.50 ~ 192.168.0.80 will not be allowed to access the camera. - TRENDnet User's Guide Network >> IP Filter The IP Filter setting allows the administrator of the camera to limit the users within ...
User's Guide
Page 22
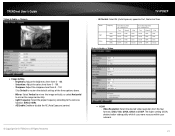
... - Click Default to restore the default settings of the three options above. - AE Enable: Enable or disable the AE (Auto Exposure) control. © Copyright 2012 TRENDnet. shutter speed Fast Normal Slow 1/120s 1/60s 1/30s 1/100s 1/50s 1/25s 1/120s 1/60s 1/15s 1/100s 1/50s 1/12.5s Video & Audio >> Video Image Setting - The... from 0 ~ 100. - shutter speed Fast Normal Slow 1/120s 1/60s 1/30s 1/100s 1/50s 1/25s 1/120s 1/60s 1/15s 1/100s 1/50s 1/12.5s AE Control (Night Time) min. TRENDnet User's Guide Video & Audio >> Camera TV-IP262P -
... - Click Default to restore the default settings of the three options above. - AE Enable: Enable or disable the AE (Auto Exposure) control. © Copyright 2012 TRENDnet. shutter speed Fast Normal Slow 1/120s 1/60s 1/30s 1/100s 1/50s 1/25s 1/120s 1/60s 1/15s 1/100s 1/50s 1/12.5s Video & Audio >> Video Image Setting - The... from 0 ~ 100. - shutter speed Fast Normal Slow 1/120s 1/60s 1/30s 1/100s 1/50s 1/25s 1/120s 1/60s 1/15s 1/100s 1/50s 1/12.5s AE Control (Night Time) min. TRENDnet User's Guide Video & Audio >> Camera TV-IP262P -


