
Data Sheet
Page 1
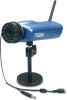
... Supports Night Vision with IR Lens • Supports Audio Monitoring and RS-485 Port for PAN & TILT Control • Supports CCD Image Sensor and DC-Iris Control • Supports DirectX 9.0 Control for Internet Explorer • Allows for Remote Access from Web Browser for Live Image Viewing • Supports TCP/IP networking, SMTP e-mail, HTTP and other Internet related protocols • Supports Web configuration with password protection • Powerful Windows IPView SP Application Software for remote monitoring and transmitting real-time events over the Internet. This Internet Camera...
... Supports Night Vision with IR Lens • Supports Audio Monitoring and RS-485 Port for PAN & TILT Control • Supports CCD Image Sensor and DC-Iris Control • Supports DirectX 9.0 Control for Internet Explorer • Allows for Remote Access from Web Browser for Live Image Viewing • Supports TCP/IP networking, SMTP e-mail, HTTP and other Internet related protocols • Supports Web configuration with password protection • Powerful Windows IPView SP Application Software for remote monitoring and transmitting real-time events over the Internet. This Internet Camera...
Data Sheet
Page 2
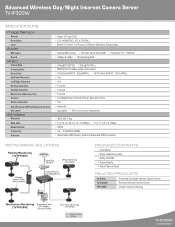
...(Reversed SMA Connector) NETWORKING SOLUTIONS Parking Monitoring (TV-IP300W) Internet Cable/DSL Modem Office Monitoring (TV-IP300) Wireless Access Point (TEW-430APB) Firewall Router (TW100-BRF114) PACKAGE CONTENTS • TV-IP300W • Quick Installation Guide • Utility CD-ROM • Power Adapter • Metal Camera Stand RELATED PRODUCTS TV-IP300 TV-IP200W TPH-5000 Advanced Day/Night Internet Camera Server Wireless Internet Camera Server Outdoor Camera Housing Warehouse Monitoring Workstation with (TV-IP300W) PCI Adapter (TE100-PCIWN) Front Gate Monitoring (TV-IP300...
...(Reversed SMA Connector) NETWORKING SOLUTIONS Parking Monitoring (TV-IP300W) Internet Cable/DSL Modem Office Monitoring (TV-IP300) Wireless Access Point (TEW-430APB) Firewall Router (TW100-BRF114) PACKAGE CONTENTS • TV-IP300W • Quick Installation Guide • Utility CD-ROM • Power Adapter • Metal Camera Stand RELATED PRODUCTS TV-IP300 TV-IP200W TPH-5000 Advanced Day/Night Internet Camera Server Wireless Internet Camera Server Outdoor Camera Housing Warehouse Monitoring Workstation with (TV-IP300W) PCI Adapter (TE100-PCIWN) Front Gate Monitoring (TV-IP300...
Data Sheet
Page 3
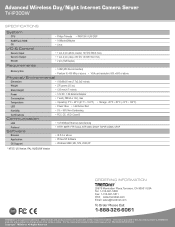
... • Operating: 5°C ~ 40°C (41°F ~ 104°F) • Storage: -25°C ~ 50°C (-13°F ~ 122°F) LED • Power: Blue • Link/Active: Red Humidity • 5% ~ 95% Non-Condensing Certifications • FCC. Other Brands and product names are trademarks of their respective holders. Copyright © TRENDnet. All Rights Reserved. Advanced Wireless Day/Night Internet Camera Server TV-IP300W SPECIFICATIONS System CPU...
... • Operating: 5°C ~ 40°C (41°F ~ 104°F) • Storage: -25°C ~ 50°C (-13°F ~ 122°F) LED • Power: Blue • Link/Active: Red Humidity • 5% ~ 95% Non-Condensing Certifications • FCC. Other Brands and product names are trademarks of their respective holders. Copyright © TRENDnet. All Rights Reserved. Advanced Wireless Day/Night Internet Camera Server TV-IP300W SPECIFICATIONS System CPU...

Quick Installation Guide
Page 2
Configure the Internet Camera 4 4. Using the Internet Camera Wirelessly 5 Troubleshooting 7 Prepare for Installation 1 2. Table of Contents English ...1 1. Install Hardware 2 3.
Configure the Internet Camera 4 4. Using the Internet Camera Wirelessly 5 Troubleshooting 7 Prepare for Installation 1 2. Table of Contents English ...1 1. Install Hardware 2 3.
Quick Installation Guide
Page 3
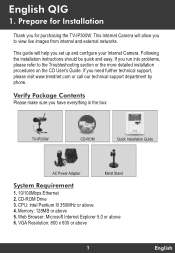
... purchasing the TV-IP300W. If you for Installation Thank you run into problems, please refer to view live images from internal and external networks. This guide will allow you need further technical support, please visit www.trendnet.com or call our technical support department by phone. Web Browser: Microsoft Internet Explorer 5.0 or above 1 English English QIG 1. Verify Package Contents Please make sure you set up and configure your Internet Camera. CD-ROM...
... purchasing the TV-IP300W. If you for Installation Thank you run into problems, please refer to view live images from internal and external networks. This guide will allow you need further technical support, please visit www.trendnet.com or call our technical support department by phone. Web Browser: Microsoft Internet Explorer 5.0 or above 1 English English QIG 1. Verify Package Contents Please make sure you set up and configure your Internet Camera. CD-ROM...
Quick Installation Guide
Page 4
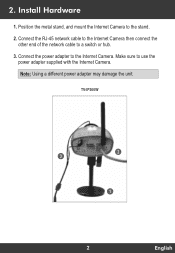
Make sure to a switch or hub. 3. 2. Connect the RJ-45 network cable to the Internet Camera then connect the other end of the network cable to use the power adapter supplied with the Internet Camera. TV-IP300W 2 3 1 2 English Connect the power adapter to the stand. 2. Position the metal stand, and mount the Internet Camera to the Internet Camera. Install Hardware 1. Note: Using a different power adapter may damage the unit.
Make sure to a switch or hub. 3. 2. Connect the RJ-45 network cable to the Internet Camera then connect the other end of the network cable to use the power adapter supplied with the Internet Camera. TV-IP300W 2 3 1 2 English Connect the power adapter to the stand. 2. Position the metal stand, and mount the Internet Camera to the Internet Camera. Install Hardware 1. Note: Using a different power adapter may damage the unit.
Quick Installation Guide
Page 5
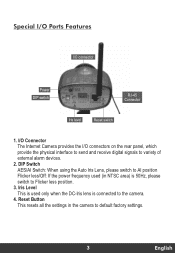
... level Reset switch 1. Special I/O Ports Features I /O connectors on the rear panel, which provide the physical interface to send and receive digital signals to default factory settings. 3 English DIP Switch AES/AI Switch: When using the Auto Iris Lens, please switch to AI position Flicker less/Off: If the power frequency used only when the DC-Iris lens is 50Hz, please switch to the camera. 4. Reset Button This resets all the settings in NTSC area) is connected...
... level Reset switch 1. Special I/O Ports Features I /O connectors on the rear panel, which provide the physical interface to send and receive digital signals to default factory settings. 3 English DIP Switch AES/AI Switch: When using the Auto Iris Lens, please switch to AI position Flicker less/Off: If the power frequency used only when the DC-Iris lens is 50Hz, please switch to the camera. 4. Reset Button This resets all the settings in NTSC area) is connected...
Quick Installation Guide
Page 6
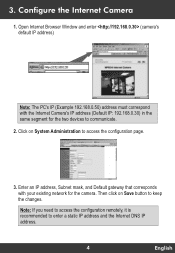
... Save button to access the configuration page. 3. Then click on System Administration to keep the changes. Open Internet Browser Window and enter (camera's default IP address) Note: The PC's IP (Example 192.168.0.50) address must correspond with your existing network for the two devices to enter a static IP address and the Internet DNS IP address. 4 English Enter an IP address, Subnet mask, and Default gateway that...
... Save button to access the configuration page. 3. Then click on System Administration to keep the changes. Open Internet Browser Window and enter (camera's default IP address) Note: The PC's IP (Example 192.168.0.50) address must correspond with your existing network for the two devices to enter a static IP address and the Internet DNS IP address. 4 English Enter an IP address, Subnet mask, and Default gateway that...
Quick Installation Guide
Page 7
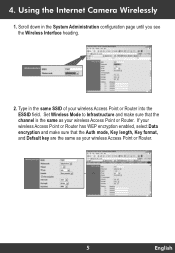
If your wireless Access Point or Router has WEP encryption enabled, select Data encryption and make sure that the Auth mode, Key length, Key format, and Default key are the same as your wireless Access Point or Router. Type in the System Administration configuration page until you see the Wireless Interface heading. 2. 4. Using the Internet Camera Wirelessly 1. Set Wireless Mode to Infrastructure and make sure that the channel is...
If your wireless Access Point or Router has WEP encryption enabled, select Data encryption and make sure that the Auth mode, Key length, Key format, and Default key are the same as your wireless Access Point or Router. Type in the System Administration configuration page until you see the Wireless Interface heading. 2. 4. Using the Internet Camera Wirelessly 1. Set Wireless Mode to Infrastructure and make sure that the channel is...
Quick Installation Guide
Page 8
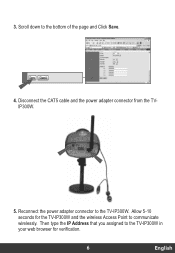
Allow 5-10 seconds for verification. 6 English Disconnect the CAT5 cable and the power adapter connector from the TVIP300W. 5. 3. Reconnect the power adapter connector to the bottom of the page and Click Save. 4. Then type the IP Address that you assigned to the TV-IP300W in your web browser for the TV-IP300W and the wireless Access Point to communicate wirelessly. Scroll down to the TV-IP300W.
Allow 5-10 seconds for verification. 6 English Disconnect the CAT5 cable and the power adapter connector from the TVIP300W. 5. 3. Reconnect the power adapter connector to the bottom of the page and Click Save. 4. Then type the IP Address that you assigned to the TV-IP300W in your web browser for the TV-IP300W and the wireless Access Point to communicate wirelessly. Scroll down to the TV-IP300W.

Quick Installation Guide
Page 9
... Internet Camera will appear. How do I replace the camera lens? When I view the Internet Camera's live images within my Local Network? Open a web browser (Internet Explorer or Netscape), type your Internet Explorer. 1. A1. The Welcome page of the camera, the image does not load, why? You can adjust the Internet Camera's focus by rotating the lens. Q3. Troubleshooting Q1. Can I fix this? A4. A2. Please make sure all the Active X features are enabled for your Wireless Internet Camera's IP address...
... Internet Camera will appear. How do I replace the camera lens? When I view the Internet Camera's live images within my Local Network? Open a web browser (Internet Explorer or Netscape), type your Internet Explorer. 1. A1. The Welcome page of the camera, the image does not load, why? You can adjust the Internet Camera's focus by rotating the lens. Q3. Troubleshooting Q1. Can I fix this? A4. A2. Please make sure all the Active X features are enabled for your Wireless Internet Camera's IP address...
Quick Installation Guide
Page 10
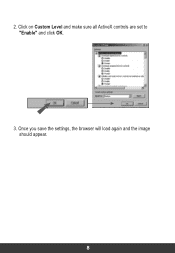
2. Click on Custom Level and make sure all ActiveX controls are set to "Enable" and click OK. 3. Once you save the settings, the browser will load again and the image should appear. 8
2. Click on Custom Level and make sure all ActiveX controls are set to "Enable" and click OK. 3. Once you save the settings, the browser will load again and the image should appear. 8
Quick Installation Guide
Page 11
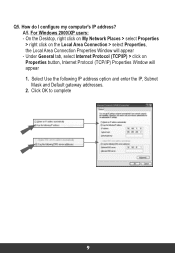
A5. Select Use the following IP address option and enter the IP, Subnet Mask and Default gateway addresses. 2. On the Desktop, right click on My Network Places > select Properties > right click on Properties button, Internet Protocol (TCP/IP) Properties Window will appear - Click OK to complete 9 How do I configure my computer's IP address? Q5. For Windows 2000/XP users: - Under General tab, select Internet Protocol (TCP/IP) > click on the Local Area Connection > select Properties, the Local Area Connection Properties Window will appear 1.
A5. Select Use the following IP address option and enter the IP, Subnet Mask and Default gateway addresses. 2. On the Desktop, right click on My Network Places > select Properties > right click on Properties button, Internet Protocol (TCP/IP) Properties Window will appear - Click OK to complete 9 How do I configure my computer's IP address? Q5. For Windows 2000/XP users: - Under General tab, select Internet Protocol (TCP/IP) > click on the Local Area Connection > select Properties, the Local Area Connection Properties Window will appear 1.
Quick Installation Guide
Page 12
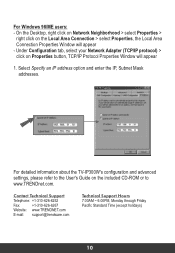
For detailed information about the TV-IP300W's configuration and advanced settings, please refer to www.TRENDnet.com. Under Configuration tab, select your Network Adapter (TCP/IP protocol) > click on the included CD-ROM or to the User's Guide on Properties button, TCP/IP Protocol Properties Window will appear - Select Specify an IP address option and enter the IP, Subnet Mask addresses. On the Desktop, right click on...
For detailed information about the TV-IP300W's configuration and advanced settings, please refer to www.TRENDnet.com. Under Configuration tab, select your Network Adapter (TCP/IP protocol) > click on the included CD-ROM or to the User's Guide on Properties button, TCP/IP Protocol Properties Window will appear - Select Specify an IP address option and enter the IP, Subnet Mask addresses. On the Desktop, right click on...

Quick Installation Guide
Page 13
Go to register your product online. TRENDnet TRENDware, USA What's Next in Networking @ Product Warranty Registration Please take a moment to TRENDware's website at http://www.TRENDNET.com TRENDware International, Inc. 3135 Kashiwa Street Torrance, CA 90505 http://www.TRENDNET.com Copyright ©2004. All Rights Reserved. TRENDware International, Inc.
Go to register your product online. TRENDnet TRENDware, USA What's Next in Networking @ Product Warranty Registration Please take a moment to TRENDware's website at http://www.TRENDNET.com TRENDware International, Inc. 3135 Kashiwa Street Torrance, CA 90505 http://www.TRENDNET.com Copyright ©2004. All Rights Reserved. TRENDware International, Inc.


