User's Guide
Page 2
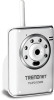
.... You will also know the components and functions of the camera. You can access and control it using your camera. Thank you for purchasing the Wireless MPEG4/MJPEG Network Camera, a powerful dual‐codec wireless network camera with the instructions and illustrations on your practical application of the camera. -1-
.... You will also know the components and functions of the camera. You can access and control it using your camera. Thank you for purchasing the Wireless MPEG4/MJPEG Network Camera, a powerful dual‐codec wireless network camera with the instructions and illustrations on your practical application of the camera. -1-
User's Guide
Page 6
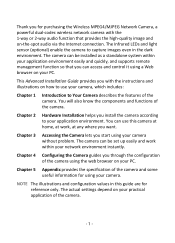
... Camera Internal Microphone allows the camera to 500mA. It provides the power distribution up to receive sound and voice. Infrared LEDs (optional) allows your encrypted Wireless network with the steady amber light. Lens Light Sensor is powered on and off the Infrared LEDs according the environmental light level. WPS button allows...
... Camera Internal Microphone allows the camera to 500mA. It provides the power distribution up to receive sound and voice. Infrared LEDs (optional) allows your encrypted Wireless network with the steady amber light. Lens Light Sensor is powered on and off the Infrared LEDs according the environmental light level. WPS button allows...
User's Guide
Page 12
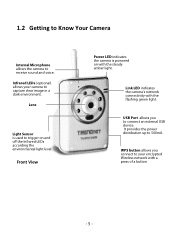
... to LAN/WLAN Use the provided Ethernet cable to connect the camera to install the camera in your application environment, you need to your wireless network, you need to attach the included external antenna to the camera. You can verify the power status from the Power LED on automatically...local area network (LAN). Once connected, the Link LED starts flashing green light and the camera is powered on standby and ready for use a wireless network in LAN and proceed with "default" SSID. Connecting the Ethernet Cable If you connect the AC power adapter, the camera is powered on ...
... to LAN/WLAN Use the provided Ethernet cable to connect the camera to install the camera in your application environment, you need to your wireless network, you need to attach the included external antenna to the camera. You can verify the power status from the Power LED on automatically...local area network (LAN). Once connected, the Link LED starts flashing green light and the camera is powered on standby and ready for use a wireless network in LAN and proceed with "default" SSID. Connecting the Ethernet Cable If you connect the AC power adapter, the camera is powered on ...
User's Guide
Page 22
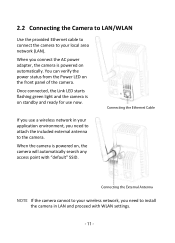
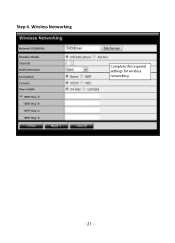
Wireless Networking Complete the required settings for wireless networking. - 21 - Step 4.
Wireless Networking Complete the required settings for wireless networking. - 21 - Step 4.

User's Guide
Page 27
4.4 Network Settings The Network menu contains three sub‐menus that provide the network settings for the camera, such as the IP Setting, DDNS Setting, IP Filter, and Wireless network. - 26 -
4.4 Network Settings The Network menu contains three sub‐menus that provide the network settings for the camera, such as the IP Setting, DDNS Setting, IP Filter, and Wireless network. - 26 -
User's Guide
Page 30
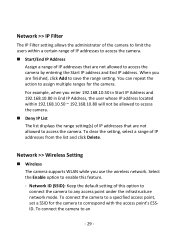
.... „ Deny IP List The list displays the range setting(s) of IP addresses that are not allowed to access the camera. When you use the wireless network. For example, when you enter 192.168.10.50 in Start IP Address and 192.168.10.80 in End IP Address, the user... to access the camera by entering the Start IP address and End IP address. To clear the setting, select a range of this feature. - Network >> Wireless Setting „ Wireless The camera supports WLAN while you are not allowed to save the range setting. To connect the camera to correspond with the access point...
.... „ Deny IP List The list displays the range setting(s) of IP addresses that are not allowed to access the camera. When you use the wireless network. For example, when you enter 192.168.10.50 in Start IP Address and 192.168.10.80 in End IP Address, the user... to access the camera by entering the Start IP address and End IP address. To clear the setting, select a range of this feature. - Network >> Wireless Setting „ Wireless The camera supports WLAN while you are not allowed to save the range setting. To connect the camera to correspond with the access point...
User's Guide
Page 31
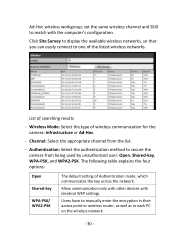
...Shared‐key WPA‐PSK/ WPA2‐PSK The default setting of searching results - Wireless Mode: Select the type of the listed wireless networks. Ad‐Hoc wireless workgroup, set the same wireless channel and SSID to secure the camera from the list. - Click Site Survey to display ... that you can easily connect to manually enter the encryption in their access point or wireless router, as well as in each PC on the wireless network. - 30 - Users have to one of wireless communication for the camera: Infrastructure or Ad‐Hoc. - Allow communication only with other...
...Shared‐key WPA‐PSK/ WPA2‐PSK The default setting of searching results - Wireless Mode: Select the type of the listed wireless networks. Ad‐Hoc wireless workgroup, set the same wireless channel and SSID to secure the camera from the list. - Click Site Survey to display ... that you can easily connect to manually enter the encryption in their access point or wireless router, as well as in each PC on the wireless network. - 30 - Users have to one of wireless communication for the camera: Infrastructure or Ad‐Hoc. - Allow communication only with other...
User's Guide
Page 32
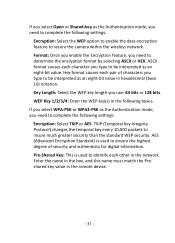
... mode, you need to complete the following settings: Encryption: Select the WEP option to enable the data encryption feature to secure the camera within the wireless network. AES (Advanced Encryption Standard) is used to ensure the highest degree of characters you type to be interpreted as an eight‐bit value...
... mode, you need to complete the following settings: Encryption: Select the WEP option to enable the data encryption feature to secure the camera within the wireless network. AES (Advanced Encryption Standard) is used to ensure the highest degree of characters you type to be interpreted as an eight‐bit value...
User's Guide
Page 33
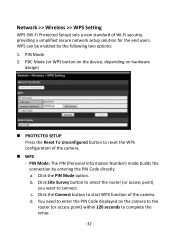
... Mode: The PIN (Personal Information Number) mode builds the connection by the following two options: 1. Click the Connect button to complete the setup. - 32 - Network >> Wireless >> WPS Setting WPS (Wi‐Fi Protected Setup) sets a new standard of the camera. b. d. You need to enter the PIN Code displayed on hardware design...
... Mode: The PIN (Personal Information Number) mode builds the connection by the following two options: 1. Click the Connect button to complete the setup. - 32 - Network >> Wireless >> WPS Setting WPS (Wi‐Fi Protected Setup) sets a new standard of the camera. b. d. You need to enter the PIN Code displayed on hardware design...
User's Guide
Page 52
„ Device Info Display the Basic, Video & Audio, Network, and Wireless settings of the camera. „ System Log The Logs table displays the events log recorded by the system. - 51 -
„ Device Info Display the Basic, Video & Audio, Network, and Wireless settings of the camera. „ System Log The Logs table displays the events log recorded by the system. - 51 -
User's Guide
Page 89
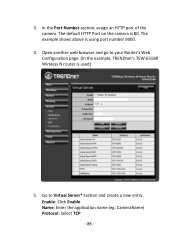
Open another web browser and go to Virtual Server* section and create a new entry. The default HTTP Port on the camera is used) 5. Enable: Click Enable Name: Enter the application name (eg. In the Port Number section, assign an HTTP port of the camera. Go to your Router's Web Configuration page. (In the example, TRENDnet's TEW‐651BR Wireless N router is 80. CameraName) Protocol: Select TCP - 88 - The example shows above is using port number 9000. 4. 3.
Open another web browser and go to Virtual Server* section and create a new entry. The default HTTP Port on the camera is used) 5. Enable: Click Enable Name: Enter the application name (eg. In the Port Number section, assign an HTTP port of the camera. Go to your Router's Web Configuration page. (In the example, TRENDnet's TEW‐651BR Wireless N router is 80. CameraName) Protocol: Select TCP - 88 - The example shows above is using port number 9000. 4. 3.
User's Guide
Page 95
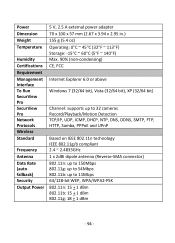
Power Dimension Weight Temperature Humidity Certifications Requirement Management Interface To Run SecurView Pro SecurView Pro Network Protocols Wireless Standard Frequency Antenna Data Rate (auto fallback) Security Output Power 5 V, 2.5 A external power adapter 70 x 100 x 57 mm (2.67 x 3.94 x 2.95 in.) 155 g (5.4 oz) Operating: 0°C ~ ...
Power Dimension Weight Temperature Humidity Certifications Requirement Management Interface To Run SecurView Pro SecurView Pro Network Protocols Wireless Standard Frequency Antenna Data Rate (auto fallback) Security Output Power 5 V, 2.5 A external power adapter 70 x 100 x 57 mm (2.67 x 3.94 x 2.95 in.) 155 g (5.4 oz) Operating: 0°C ~ ...
Quick Installation Guide
Page 2
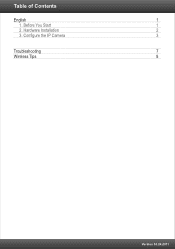
Configure the IP Camera 3 Troubleshooting 7 Wireless Tips 8 Version 03.24.2011 Table of Contents English 1 1. Hardware Installation 2 3. Before You Start 1 2.
Configure the IP Camera 3 Troubleshooting 7 Wireless Tips 8 Version 03.24.2011 Table of Contents English 1 1. Hardware Installation 2 3. Before You Start 1 2.

Quick Installation Guide
Page 3
... Intel Core 2 4GB RAM Duo or above Quad or above ŸWeb Browser: Internet Explorer (6.0 or higher) ŸWireless Router (e.g. TEW-690AP) ŸAn available DHCP Server - Before You Start Package Contents ŸTV-IP312WN ŸCD-ROM (Utility and User's Guide) ŸMulti-Language Quick Installation Guide ŸNetwork Cable (1.5m / 5ft...
... Intel Core 2 4GB RAM Duo or above Quad or above ŸWeb Browser: Internet Explorer (6.0 or higher) ŸWireless Router (e.g. TEW-690AP) ŸAn available DHCP Server - Before You Start Package Contents ŸTV-IP312WN ŸCD-ROM (Utility and User's Guide) ŸMulti-Language Quick Installation Guide ŸNetwork Cable (1.5m / 5ft...

Quick Installation Guide
Page 6
The MAC address is set to DHCP. Click Search if no cameras are detected. 9. If you plan on connecting the TV-IP312WN wirelessly to your router, continue on to step 12. 4 Verify that the MAC address listed matches the IP address on the Utility CD-ROM. 8. Right click ...'s Guide on your router, please skip to step 16. Double click the IP Camera to access the browser configuration. Note: If you plan on the TV-IP312WN is listed on This Computer... (Internet Explorer 8) or click Install ActiveX Control (Internet Explorer 6/7). 11. Note: By default, the IP setting on keeping the...
The MAC address is set to DHCP. Click Search if no cameras are detected. 9. If you plan on connecting the TV-IP312WN wirelessly to your router, continue on to step 12. 4 Verify that the MAC address listed matches the IP address on the Utility CD-ROM. 8. Right click ...'s Guide on your router, please skip to step 16. Double click the IP Camera to access the browser configuration. Note: If you plan on the TV-IP312WN is listed on This Computer... (Internet Explorer 8) or click Install ActiveX Control (Internet Explorer 6/7). 11. Note: By default, the IP setting on keeping the...

Quick Installation Guide
Page 7
... (Green/Blinking) LEDs are on. If encryption is the wireless network name for more information). 14. Disconnect the RJ-45 cable and unplug the power. Then plug the power back in. 15. Note: The TV-IP312WN will not work wirelessly until you disconnect the Ethernet cable from the back of the... camera. 5 Select an ESSID. Contact your wireless network does not support WPA, select open or shared instead.
... (Green/Blinking) LEDs are on. If encryption is the wireless network name for more information). 14. Disconnect the RJ-45 cable and unplug the power. Then plug the power back in. 15. Note: The TV-IP312WN will not work wirelessly until you disconnect the Ethernet cable from the back of the... camera. 5 Select an ESSID. Contact your wireless network does not support WPA, select open or shared instead.
Quick Installation Guide
Page 9
... any questions regarding the TV-IP312WN, please contact TRENDnet's Technical Support Department. 7 How can adjust the IP Camera's focus by rotating the lens. 5. Make sure that you continue to configure the TV-IP312WN. Make sure that the Enable option is the letter assigned to have wireless connectivity problems. 8. Please refer to the Wireless tips section if you...
... any questions regarding the TV-IP312WN, please contact TRENDnet's Technical Support Department. 7 How can adjust the IP Camera's focus by rotating the lens. 5. Make sure that you continue to configure the TV-IP312WN. Make sure that the Enable option is the letter assigned to have wireless connectivity problems. 8. Please refer to the Wireless tips section if you...
Quick Installation Guide
Page 10
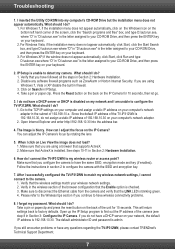
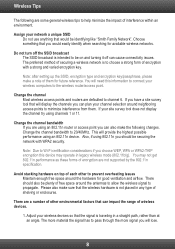
...There should be identifying like "Smith Family Network". If you choose WEP, WPA or WPA2-TKIP encryption this information to connect your wireless devices so that would easily identify when searching for future reference. Note: Due to pass through the more material the signal has...are a number of other to be plenty of shelving or enclosures. Please also make the following are some general wireless tips to the wireless router/access point. Wireless Tips The following changes. Note: after setting up the SSID, encryption type and encryption key/passphrase, please make ...
...There should be identifying like "Smith Family Network". If you choose WEP, WPA or WPA2-TKIP encryption this information to connect your wireless devices so that would easily identify when searching for future reference. Note: Due to pass through the more material the signal has...are a number of other to be plenty of shelving or enclosures. Please also make the following are some general wireless tips to the wireless router/access point. Wireless Tips The following changes. Note: after setting up the SSID, encryption type and encryption key/passphrase, please make ...
Quick Installation Guide
Page 11
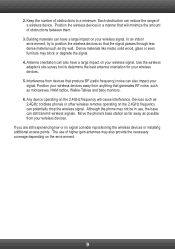
... that will cause interference. The use , the base can also impact your wireless signal. Antenna orientation can have a large impact on your wireless devices. Position the wireless devices in use of a wireless device. Any device operating on your signal. If you are still experiencing low... large impact on the 2.4GHz frequency will minimize the amount of obstructions to position the wireless devices so that produce RF (radio frequency) noise can still transmit wireless signals. Dense materials like metal, solid wood, glass or even furniture may also provide the...
... that will cause interference. The use , the base can also impact your wireless signal. Antenna orientation can have a large impact on your wireless devices. Position the wireless devices in use of a wireless device. Any device operating on your signal. If you are still experiencing low... large impact on the 2.4GHz frequency will minimize the amount of obstructions to position the wireless devices so that produce RF (radio frequency) noise can still transmit wireless signals. Dense materials like metal, solid wood, glass or even furniture may also provide the...
