
User's Guide
Page 17
After installing the IPSetup utility, the application is set to 192.168.10.30. - 16 - The camera's IP address will be in " Start \Program\TRENDnet\IPSetup". 7. The IPSetup window will default to DHCP client. The default IP setting is automatically installed to your computer, and creates a folder in the same subnet as your network, the IP address will appear. If you do not have a DHCP server in your network. 6. Click Start > Programs > TRENDnet > IPSetup, and then click IPSetup 8.
After installing the IPSetup utility, the application is set to 192.168.10.30. - 16 - The camera's IP address will be in " Start \Program\TRENDnet\IPSetup". 7. The IPSetup window will default to DHCP client. The default IP setting is automatically installed to your computer, and creates a folder in the same subnet as your network, the IP address will appear. If you do not have a DHCP server in your network. 6. Click Start > Programs > TRENDnet > IPSetup, and then click IPSetup 8.
User's Guide
Page 18
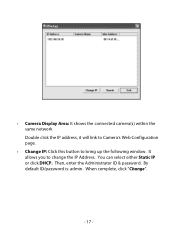
You can select either Static IP or click DHCP. By default ID/password is: admin. - Then, enter the Administrator ID & password. When complete, click "Change". - 17 - Change IP: Click this button to change the IP Address. It allows you to bring up the following window. Camera Display Area: It shows the connected camera(s) within the same network Double click the IP address, it will link to Camera's Web Configuration page. -
You can select either Static IP or click DHCP. By default ID/password is: admin. - Then, enter the Administrator ID & password. When complete, click "Change". - 17 - Change IP: Click this button to change the IP Address. It allows you to bring up the following window. Camera Display Area: It shows the connected camera(s) within the same network Double click the IP address, it will link to Camera's Web Configuration page. -
User's Guide
Page 34
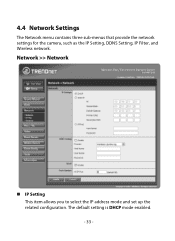
The default setting is DHCP mode enabled. - 33 - Network >> Network IP Setting This item allows you to select the IP address mode and set up the related configuration. 4.4 Network Settings The Network menu contains three sub-menus that provide the network settings for the camera, such as the IP Setting, DDNS Setting, IP Filter, and Wireless network.
The default setting is DHCP mode enabled. - 33 - Network >> Network IP Setting This item allows you to select the IP address mode and set up the related configuration. 4.4 Network Settings The Network menu contains three sub-menus that provide the network settings for the camera, such as the IP Setting, DDNS Setting, IP Filter, and Wireless network.
User's Guide
Page 35
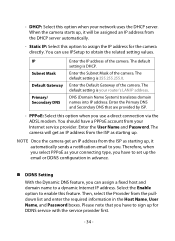
... you have to set up , it will get an IP address from the DHCP server automatically. - The default setting is 255.255.255.0. DNS (Domain Name System) translates domain names into IP address. IP Subnet Mask Default Gateway Primary/ Secondary DNS Enter the IP address of the camera. The default setting is your connecting type, you . PPPoE: Select this...
... you have to set up , it will get an IP address from the DHCP server automatically. - The default setting is 255.255.255.0. DNS (Domain Name System) translates domain names into IP address. IP Subnet Mask Default Gateway Primary/ Secondary DNS Enter the IP address of the camera. The default setting is your connecting type, you . PPPoE: Select this...

User's Guide
Page 38
Network >> Wireless Setting (For TV-IP410W only) The camera supports WLAN while you use the wireless network. Select the Enable option to enable this option to connect the camera to access the camera. To connect the camera to a specified access point, set a SSID for the camera to an - 37 - To connect the camera... to correspond with the access point's ESS-ID. Network ID (SSID): Keep the default setting of this feature. - To clear the setting, select a range of IP addresses that are not allowed to any access point under the infrastructure network mode. Deny IP ...
Network >> Wireless Setting (For TV-IP410W only) The camera supports WLAN while you use the wireless network. Select the Enable option to enable this option to connect the camera to access the camera. To connect the camera to a specified access point, set a SSID for the camera to an - 37 - To connect the camera... to correspond with the access point's ESS-ID. Network ID (SSID): Keep the default setting of this feature. - To clear the setting, select a range of IP addresses that are not allowed to any access point under the infrastructure network mode. Deny IP ...

User's Guide
Page 71
Enter the camera's IP address and Port default: 80), and then click Add Camera. - 70 - Click Search camera to add a camera by entering its IP address directly. 3. In the pop-up Add New Camera dialog window, you can: Select the Search tab if you are not sure of the camera's IP address. Once the camera is found and is shown in the list, select it and click Add Camera. Select the Input tab to search the available camera within the network.
Enter the camera's IP address and Port default: 80), and then click Add Camera. - 70 - Click Search camera to add a camera by entering its IP address directly. 3. In the pop-up Add New Camera dialog window, you can: Select the Search tab if you are not sure of the camera's IP address. Once the camera is found and is shown in the list, select it and click Add Camera. Select the Input tab to search the available camera within the network.

Quick Installation Guide
Page 7
If you want to give the TV-IP410/TV-IP410W static IP address, continue on the TV-IP410/TV-IP410W is set to DHCP. Select the camera server and click Change IP. 6. By default: ID: admin Password: admin 7. Click OK. 5 English Configure the IP address to step 9. Please skip to be in the same subnet as your network, type in the Administrator ID and Password and click Change. Click OK and wait 30 seconds. 8. Note: By default, the IP setting on to step 5. 5.
If you want to give the TV-IP410/TV-IP410W static IP address, continue on the TV-IP410/TV-IP410W is set to DHCP. Select the camera server and click Change IP. 6. By default: ID: admin Password: admin 7. Click OK. 5 English Configure the IP address to step 9. Please skip to be in the same subnet as your network, type in the Administrator ID and Password and click Change. Click OK and wait 30 seconds. 8. Note: By default, the IP setting on to step 5. 5.

Quick Installation Guide
Page 11
... encounter problems or have a DHCP server or DHCP is disabled on the Internet camera? A3: You can I adjust the focus on my network and I do ? This will return settings back to detect my camera. Open up the IPSetup program to configure the TV-IP410/W. Q2: I forgot my password. How can adjust the Internet Camera's focus by rotating the lens.
... encounter problems or have a DHCP server or DHCP is disabled on the Internet camera? A3: You can I adjust the focus on my network and I do ? This will return settings back to detect my camera. Open up the IPSetup program to configure the TV-IP410/W. Q2: I forgot my password. How can adjust the Internet Camera's focus by rotating the lens.