User's Guide
Page 18
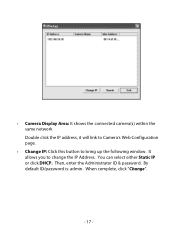
When complete, click "Change". - 17 - Change IP: Click this button to change the IP Address. It allows you to bring up the following window. Camera Display Area: It shows the connected camera(s) within the same network Double click the IP address, it will link to Camera's Web Configuration page. - By default ID/password is: admin. You can select either Static IP or click DHCP. - Then, enter the Administrator ID & password.
When complete, click "Change". - 17 - Change IP: Click this button to change the IP Address. It allows you to bring up the following window. Camera Display Area: It shows the connected camera(s) within the same network Double click the IP address, it will link to Camera's Web Configuration page. - By default ID/password is: admin. You can select either Static IP or click DHCP. - Then, enter the Administrator ID & password.

User's Guide
Page 20
4. When the login window appears, enter the default User name (admin) and password (admin) and press OK to access to the main screen of the camera's Web Configuration. - 19 -
4. When the login window appears, enter the default User name (admin) and password (admin) and press OK to access to the main screen of the camera's Web Configuration. - 19 -
User's Guide
Page 26
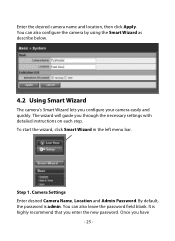
.... It is admin. To start the wizard, click Smart Wizard in the left menu bar. By default, the password is highly recommend that you through the necessary settings with detailed instructions on each step. Step 1. You can also configure the camera by using the Smart Wizard as describe below. 4.2 Using Smart Wizard The...
.... It is admin. To start the wizard, click Smart Wizard in the left menu bar. By default, the password is highly recommend that you through the necessary settings with detailed instructions on each step. Step 1. You can also configure the camera by using the Smart Wizard as describe below. 4.2 Using Smart Wizard The...

User's Guide
Page 32
User Name: Enter the user's name you are strongly recommend to change the default administrator password. Password: Enter the password for the new user. - 31 - Basic >> User Administrator To prevent unauthorized access to the camera's Web Configuration, you want to add to use the camera. - Type the administrator password twice to set and confirm the password. General User -
User Name: Enter the user's name you are strongly recommend to change the default administrator password. Password: Enter the password for the new user. - 31 - Basic >> User Administrator To prevent unauthorized access to the camera's Web Configuration, you want to add to use the camera. - Type the administrator password twice to set and confirm the password. General User -
User's Guide
Page 35
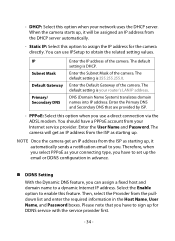
.... Then, select the Provider from the ISP as your network uses the DHCP server. Please note that are provided by ISP. - The default setting is your Internet service provider. - The camera will be assigned an IP address from the DHCP server automatically. - Therefore, when you select PPPoE as starting up... LAN IP address. When the camera starts up . The default setting is 255.255.255.0. Enter the Primary DNS and Secondary DNS that you have to sign up the email or DDNS configuration in the Host Name, User Name, and Password boxes. Static IP: Select this...
.... Then, select the Provider from the ISP as your network uses the DHCP server. Please note that are provided by ISP. - The default setting is your Internet service provider. - The camera will be assigned an IP address from the DHCP server automatically. - Therefore, when you select PPPoE as starting up... LAN IP address. When the camera starts up . The default setting is 255.255.255.0. Enter the Primary DNS and Secondary DNS that you have to sign up the email or DDNS configuration in the Host Name, User Name, and Password boxes. Static IP: Select this...
User's Guide
Page 39
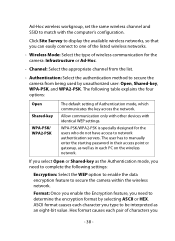
...the starting password in each pair of Authentication mode, which communicates the key across the network. Hex format causes each PC on the wireless network. Ad-Hoc...Open Shared-key WPA-PSK/ WPA2-PSK The default setting of characters you type to secure the camera from the list. - Authentication: Select the ...authentication method to be interpreted as in their access point or gateway, as well as an eight-bit value. Click Site Survey to display the available wireless networks, so that you need to network authentication servers...
...the starting password in each pair of Authentication mode, which communicates the key across the network. Hex format causes each PC on the wireless network. Ad-Hoc...Open Shared-key WPA-PSK/ WPA2-PSK The default setting of characters you type to secure the camera from the list. - Authentication: Select the ...authentication method to be interpreted as in their access point or gateway, as well as an eight-bit value. Click Site Survey to display the available wireless networks, so that you need to network authentication servers...

User's Guide
Page 65
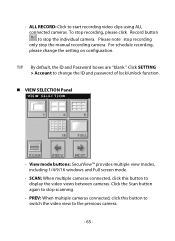
PLAY: Click to resume controls for example, Windows Media Player by default). - SETTING: Click to the main screen of SecurView™. Click again to play the recorded video file using the media player on the computer (for the camera. CONTROLS Panel - LOCK: Click to unlock. - 64 - Click again to return to enter the Setting screen of SecurView™. - If you have set ID and Password in SETTING > Account, you will be asked to enter the required information to lock the camera controls.
PLAY: Click to resume controls for example, Windows Media Player by default). - SETTING: Click to the main screen of SecurView™. Click again to play the recorded video file using the media player on the computer (for the camera. CONTROLS Panel - LOCK: Click to unlock. - 64 - Click again to return to enter the Setting screen of SecurView™. - If you have set ID and Password in SETTING > Account, you will be asked to enter the required information to lock the camera controls.
User's Guide
Page 66
... lock/unlock function. VIEW SELECTION Panel - Click SETTING > Account to the previous camera. - 65 - Click the Scan button again to display the video views between cameras. Please note: stop recording only stop scanning. - - TIP By default, the ID and Password boxes are "blank." To stop recording, please click Record button to start recording...
... lock/unlock function. VIEW SELECTION Panel - Click SETTING > Account to the previous camera. - 65 - Click the Scan button again to display the video views between cameras. Please note: stop recording only stop scanning. - - TIP By default, the ID and Password boxes are "blank." To stop recording, please click Record button to start recording...

User's Guide
Page 85
... for the notification email. Trigger Out: If the selected camera supports Trigger Out connector, select this option to login the mail server. - You can set the interval time between cameras. - For example, [email protected]. - The default setting is 2 seconds. Password: Enter the password to enable the Trigger Out function. User Name: Enter the user...
... for the notification email. Trigger Out: If the selected camera supports Trigger Out connector, select this option to login the mail server. - You can set the interval time between cameras. - For example, [email protected]. - The default setting is 2 seconds. Password: Enter the password to enable the Trigger Out function. User Name: Enter the user...

Quick Installation Guide
Page 7
By default: ID: admin Password: admin 7. Please skip to be in the same subnet as your network, type in the Administrator ID and Password and click Change. Select the camera server and click Change IP. 6. Click OK. 5 English Configure the IP address to step 9. Note: By default, the IP setting on to DHCP. If you want to give the TV-IP410/TV-IP410W static IP address, continue on the TV-IP410/TV-IP410W is set to step 5. 5. Click OK and wait 30 seconds. 8.
By default: ID: admin Password: admin 7. Please skip to be in the same subnet as your network, type in the Administrator ID and Password and click Change. Select the camera server and click Change IP. 6. Click OK. 5 English Configure the IP address to step 9. Note: By default, the IP setting on to DHCP. If you want to give the TV-IP410/TV-IP410W static IP address, continue on the TV-IP410/TV-IP410W is set to step 5. 5. Click OK and wait 30 seconds. 8.

Quick Installation Guide
Page 8
Right click and select Install ActiveX Control. 12. Note: If you have the TV-IP410W, continue on to step 13. By default: User Name: admin Password: admin 11. 9. If you have the TV-IP410, skip to access the browser configuration. 10. Enter the User name and Password, and then click OK. Click Install. Double click the camera server to step 16. 6 English
Right click and select Install ActiveX Control. 12. Note: If you have the TV-IP410W, continue on to step 13. By default: User Name: admin Password: admin 11. 9. If you have the TV-IP410, skip to access the browser configuration. 10. Enter the User name and Password, and then click OK. Click Install. Double click the camera server to step 16. 6 English

Quick Installation Guide
Page 11
... the Internet camera). Q6: :After I successfully configured the TV-IP410W to match my wireless network settings, I forgot my password. Q7: I can adjust the Internet Camera's focus by rotating the lens. A7: Take a pin or paperclip and press the reset button on Live View the image does not load? Second, disable any questions regarding the TV-IP410/TV-IP410W, please contact TRENDnet...
... the Internet camera). Q6: :After I successfully configured the TV-IP410W to match my wireless network settings, I forgot my password. Q7: I can adjust the Internet Camera's focus by rotating the lens. A7: Take a pin or paperclip and press the reset button on Live View the image does not load? Second, disable any questions regarding the TV-IP410/TV-IP410W, please contact TRENDnet...

