User's Guide
Page 8
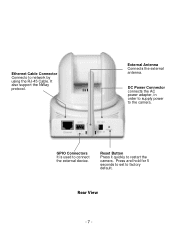
Ethernet Cable Connector Connecto to restart the camera. External Antenna Connects the external antenna. Reset Button Press it quickly to network by using the RJ-45 Cable. GPIO Connectors It is used to factory default. Press and hold for 5 seconds to set to connect the external device. Rear View - 7 - It also support the NWay protocol. DC Power Connector connects the AC power adapter, in order to supply power to the camera.
Ethernet Cable Connector Connecto to restart the camera. External Antenna Connects the external antenna. Reset Button Press it quickly to network by using the RJ-45 Cable. GPIO Connectors It is used to factory default. Press and hold for 5 seconds to set to connect the external device. Rear View - 7 - It also support the NWay protocol. DC Power Connector connects the AC power adapter, in order to supply power to the camera.

User's Guide
Page 56
The camera configuration will be retained after rebooting. Configuration - 55 - 4.10 Tools The Tools menu provides the commands that allow you to restart the camera just like turning the device off and on. You can also backup and restore your configuration, and upgrade the firmware for the camera. Factory Reset Click Reset to restore all factory default settings for the camera. System Reboot Click Reboot to restart or reset the camera.
The camera configuration will be retained after rebooting. Configuration - 55 - 4.10 Tools The Tools menu provides the commands that allow you to restart the camera just like turning the device off and on. You can also backup and restore your configuration, and upgrade the firmware for the camera. Factory Reset Click Reset to restore all factory default settings for the camera. System Reboot Click Reboot to restart or reset the camera.

Quick Installation Guide
Page 11
...regarding the TV-IP410/TV-IP410W, please contact TRENDnet's Technical Support Department. 9 Third, click on your computer's network adapter in the subnet of 192.168.10.30 on my network and ... TV-IP410/W. Q3: The Image is disabled on your wireless network settings. See step 10 and 11 in Section 3: Configure the Internet camera). Q6: :After I successfully configured the TV-...server or DHCP is blurry. Second, run the IPSetup program and double click on the back of the camera (see step 5 in Section 2: Configure the Internet Camera. Q4: When I connect the TV-IP410W to detect my camera...
...regarding the TV-IP410/TV-IP410W, please contact TRENDnet's Technical Support Department. 9 Third, click on your computer's network adapter in the subnet of 192.168.10.30 on my network and ... TV-IP410/W. Q3: The Image is disabled on your wireless network settings. See step 10 and 11 in Section 3: Configure the Internet camera). Q6: :After I successfully configured the TV-...server or DHCP is blurry. Second, run the IPSetup program and double click on the back of the camera (see step 5 in Section 2: Configure the Internet Camera. Q4: When I connect the TV-IP410W to detect my camera...
