
Datasheet
Page 1
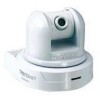
... motion detection recording, email alerts and scheduled recordings. internet cameras Pan/Tilt Internet Camera Server TV-IP410 (A1.0R) The Pan/Tilt Internet Camera Server (TV-IP410) provides real-time security surveillance over a secure connection. See more with one Internet camera-remotely pan the camera side-toside a remarkable 330 degrees and tilt up to your camera's viewing field and manage the camera from any Internet connection. The TV-IP410 provides high quality video streams over a large...
... motion detection recording, email alerts and scheduled recordings. internet cameras Pan/Tilt Internet Camera Server TV-IP410 (A1.0R) The Pan/Tilt Internet Camera Server (TV-IP410) provides real-time security surveillance over a secure connection. See more with one Internet camera-remotely pan the camera side-toside a remarkable 330 degrees and tilt up to your camera's viewing field and manage the camera from any Internet connection. The TV-IP410 provides high quality video streams over a large...

Datasheet
Page 3
...8226; 1 input and 1 output NETWORKING SOLUTIONS Home Monitoring (TV-IP410) Family Monitoring (TV-IP410) Wireless N Gigabit Router (TEW-633GR) Property Monitoring (TV-IP410W) Wireless 54Mbps Internet 100Mbps Cable/DSL Modem Business Monitoring (TV-IP410W) PACKAGE CONTENTS • TV-IP410 • Multi-Language Quick installation... and product names are trademarks of their respective holders. Copyright © TRENDnet. Pan/Tilt Internet Camera Server TV-IP410 (A1.0R) SPECIFICATIONS System Requirement (SecurView™ Software) CPU Memory Size • Pentium 4 1GHz or above...
...8226; 1 input and 1 output NETWORKING SOLUTIONS Home Monitoring (TV-IP410) Family Monitoring (TV-IP410) Wireless N Gigabit Router (TEW-633GR) Property Monitoring (TV-IP410W) Wireless 54Mbps Internet 100Mbps Cable/DSL Modem Business Monitoring (TV-IP410W) PACKAGE CONTENTS • TV-IP410 • Multi-Language Quick installation... and product names are trademarks of their respective holders. Copyright © TRENDnet. Pan/Tilt Internet Camera Server TV-IP410 (A1.0R) SPECIFICATIONS System Requirement (SecurView™ Software) CPU Memory Size • Pentium 4 1GHz or above...

User's Guide
Page 2
... software to monitor your network environment instantly. The TV-IP410/TV-IP410W provides high quality video streams over a large viewing area. Accessing the Camera lets you want. The camera can use . SecurView Softwae using your application environment. Configuring the Camera guides you install the camera according to Your Camera describes the features of the camera. PREFACE The Pan/Tilt Internet Camera Server (TV-IP410) /Wireless Pan/Tilt Internet Camera Server (TV-IP410W) provides real...
... software to monitor your network environment instantly. The TV-IP410/TV-IP410W provides high quality video streams over a large viewing area. Accessing the Camera lets you want. The camera can use . SecurView Softwae using your application environment. Configuring the Camera guides you install the camera according to Your Camera describes the features of the camera. PREFACE The Pan/Tilt Internet Camera Server (TV-IP410) /Wireless Pan/Tilt Internet Camera Server (TV-IP410W) provides real...
User's Guide
Page 5
SECURVIEW™ SOFTWARE 58 5.1 INSTALLATION 58 5.2 USING INSTALLATION 63 ITEM FEATURES 63 TO ADD A CAMERA 69 TO REMOVE A CAMERA 72 TO LINK TO THE WEB PAGE OF THE CAMERA 73 TO RECORD VIDEO 74 TO CONFIGURE THE RECORDING SETTINGS 79 TO PLAYBACK THE RECORDED VIDEO 81 TO SET UP MOTION DETECTION OPTIONS 82 ACCOUNT 84 OTHER 84 INFORMATION 85 APPENDIX 87 A.1 SPECIFICATION 87 A.2 GPIO TERMINAL APPLICATION 89 A.3 GLOSSARY OF TERMS 90 Limited Warranty 99 - 4 -
SECURVIEW™ SOFTWARE 58 5.1 INSTALLATION 58 5.2 USING INSTALLATION 63 ITEM FEATURES 63 TO ADD A CAMERA 69 TO REMOVE A CAMERA 72 TO LINK TO THE WEB PAGE OF THE CAMERA 73 TO RECORD VIDEO 74 TO CONFIGURE THE RECORDING SETTINGS 79 TO PLAYBACK THE RECORDED VIDEO 81 TO SET UP MOTION DETECTION OPTIONS 82 ACCOUNT 84 OTHER 84 INFORMATION 85 APPENDIX 87 A.1 SPECIFICATION 87 A.2 GPIO TERMINAL APPLICATION 89 A.3 GLOSSARY OF TERMS 90 Limited Warranty 99 - 4 -

User's Guide
Page 9
... bundled SecurView software application, the administrator can easily change the configuration of external alarm devices. The users are also allowed to the left/right (165/165 degrees) or up to a variety of the camera via the network. Multiple Platforms Supported The camera supports multiple network protocols, including TCP/IP, SMTP e-mail, HTTP, and other Internet...
... bundled SecurView software application, the administrator can easily change the configuration of external alarm devices. The users are also allowed to the left/right (165/165 degrees) or up to a variety of the camera via the network. Multiple Platforms Supported The camera supports multiple network protocols, including TCP/IP, SMTP e-mail, HTTP, and other Internet...

User's Guide
Page 10
... or above User Interface: Microsoft® Internet Explorer 6.0 or above Accessing the Camera using SecurView® Platform: Microsoft® Windows® 2000/XP/Vista Hardware Requirement: 1 camera connected: Intel Pentium III 800MHz; 512MB RAM 2 ~ 4 cameras connected: Intel Pentium 4 1.3GHz; 512MB RAM 5 ~ 8 cameras connected: Intel Pentium 4 2.4GHz; 1GB RAM 9 ~ 16 cameras connected: Intel Pentium 4 3.4GHz; 2GB RAM...
... or above User Interface: Microsoft® Internet Explorer 6.0 or above Accessing the Camera using SecurView® Platform: Microsoft® Windows® 2000/XP/Vista Hardware Requirement: 1 camera connected: Intel Pentium III 800MHz; 512MB RAM 2 ~ 4 cameras connected: Intel Pentium 4 1.3GHz; 512MB RAM 5 ~ 8 cameras connected: Intel Pentium 4 2.4GHz; 1GB RAM 9 ~ 16 cameras connected: Intel Pentium 4 3.4GHz; 2GB RAM...
User's Guide
Page 25
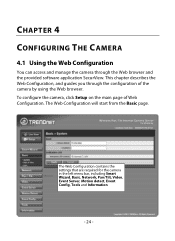
... Smart Wizard, Basic, Network, Pan/Tilt, Video, Event Server, Motion detect, Event Config, Tools and Information. - 24 - To configure the camera, click Setup on the main page of the camera by using the Web browser. This chapter describes the Web Configuration, and guides you through the Web browser and the provided software application SecurView. CHAPTER 4 CONFIGURING THE...
... Smart Wizard, Basic, Network, Pan/Tilt, Video, Event Server, Motion detect, Event Config, Tools and Information. - 24 - To configure the camera, click Setup on the main page of the camera by using the Web browser. This chapter describes the Web Configuration, and guides you through the Web browser and the provided software application SecurView. CHAPTER 4 CONFIGURING THE...
User's Guide
Page 59
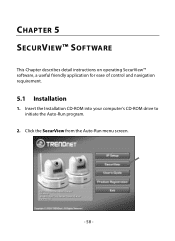
CHAPTER 5 SECURVIEW™ SOFTWARE This Chapter describes detail instructions on operating SecurView™ software, a useful friendly application for ease of control and navigation requirement. 5.1 Installation 1. Insert the Installation CD-ROM into your computer's CD-ROM drive to initiate the Auto-Run program. 2. Click the SecurView from the Auto-Run menu screen. - 58 -
CHAPTER 5 SECURVIEW™ SOFTWARE This Chapter describes detail instructions on operating SecurView™ software, a useful friendly application for ease of control and navigation requirement. 5.1 Installation 1. Insert the Installation CD-ROM into your computer's CD-ROM drive to initiate the Auto-Run program. 2. Click the SecurView from the Auto-Run menu screen. - 58 -

User's Guide
Page 60
Then SecurView Setup Wizard will detect it and, if the program is not installed yet, ask you must have Microsoft .NET Framework 2.0 installed in the computer. Click "Next" when the Welcome to install it during the process of installing SecurView™. 3. The setup wizard will appear. NOTE To use SecurView™, you to the SecurView Setup Wizard appears - 59 -
Then SecurView Setup Wizard will detect it and, if the program is not installed yet, ask you must have Microsoft .NET Framework 2.0 installed in the computer. Click "Next" when the Welcome to install it during the process of installing SecurView™. 3. The setup wizard will appear. NOTE To use SecurView™, you to the SecurView Setup Wizard appears - 59 -

User's Guide
Page 61
Then Click "Next". - 60 - Click "Browse" to choose the desired destination location. By default, the destination location is C:\Program Files\TRENDnet\SecurView. 4.
Then Click "Next". - 60 - Click "Browse" to choose the desired destination location. By default, the destination location is C:\Program Files\TRENDnet\SecurView. 4.

User's Guide
Page 62
5. Click t When the Installation Complete window appears, click "Close". - 61 - Click "Next" to confirm the SecurView software to be installed to the computer. 6.
5. Click t When the Installation Complete window appears, click "Close". - 61 - Click "Next" to confirm the SecurView software to be installed to the computer. 6.

User's Guide
Page 63
7. After installing the IPSetup utility, the application is automatically installed to your computer, and creates a folder in " Start \Program\TRENDnet\SecurView". - 62 -
7. After installing the IPSetup utility, the application is automatically installed to your computer, and creates a folder in " Start \Program\TRENDnet\SecurView". - 62 -
User's Guide
Page 64
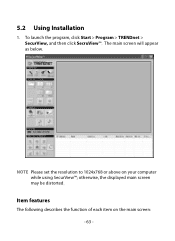
The main screen will appear as below. otherwise, the displayed main screen may be distorted. NOTE Please set the resolution to 1024x768 or above on the main screen: - 63 - Item features The following describes the function of each item on your computer while using SecurView™; 5.2 Using Installation 1. To launch the program, click Start > Program > TRENDnet > SecurView, and then click SecruView™.
The main screen will appear as below. otherwise, the displayed main screen may be distorted. NOTE Please set the resolution to 1024x768 or above on the main screen: - 63 - Item features The following describes the function of each item on your computer while using SecurView™; 5.2 Using Installation 1. To launch the program, click Start > Program > TRENDnet > SecurView, and then click SecruView™.

User's Guide
Page 65
SETTING: Click to the main screen of SecurView™. Click again to return to enter the Setting screen of SecurView™. - If you have set ID and Password in SETTING > Account, you will be asked to enter the required information to lock the camera controls. CONTROLS Panel - PLAY: Click to resume controls for example, Windows Media Player by default). - LOCK: Click to unlock. - 64 - Click again to play the recorded video file using the media player on the computer (for the camera.
SETTING: Click to the main screen of SecurView™. Click again to return to enter the Setting screen of SecurView™. - If you have set ID and Password in SETTING > Account, you will be asked to enter the required information to lock the camera controls. CONTROLS Panel - PLAY: Click to resume controls for example, Windows Media Player by default). - LOCK: Click to unlock. - 64 - Click again to play the recorded video file using the media player on the computer (for the camera.
User's Guide
Page 66
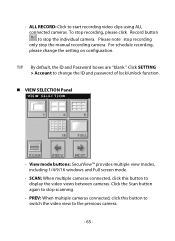
...; VIEW SELECTION Panel - View mode buttons: SecurView™ provides multiple view modes, including 1/4/9/16 windows and Full screen mode. - PREV: When multiple cameras connected, click this button to the previous camera. - 65 - Click SETTING > Account to stop the manual recording camera. - ALL RECORD: Click to stop the individual camera. TIP By default, the ID and...
...; VIEW SELECTION Panel - View mode buttons: SecurView™ provides multiple view modes, including 1/4/9/16 windows and Full screen mode. - PREV: When multiple cameras connected, click this button to the previous camera. - 65 - Click SETTING > Account to stop the manual recording camera. - ALL RECORD: Click to stop the individual camera. TIP By default, the ID and...
User's Guide
Page 75
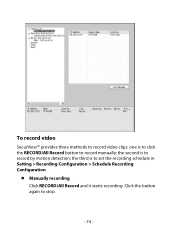
the third is to record by motion detection; the second is to set the recording schedule in Setting > Recording Configuration > Schedule Recording Configuration. Manually recording Click RECORD/All Record and it starts recording. Click the button again to record manually; To record video SecurView™ provides three methods to record video clips: one is to click the RECORD/All Record button to stop. - 74 -
the third is to record by motion detection; the second is to set the recording schedule in Setting > Recording Configuration > Schedule Recording Configuration. Manually recording Click RECORD/All Record and it starts recording. Click the button again to record manually; To record video SecurView™ provides three methods to record video clips: one is to click the RECORD/All Record button to stop. - 74 -

User's Guide
Page 85
... example, [email protected]. - User Name: Enter the user name to login the mail server. - Subject: Enter a subject for the notification email. Trigger Out: If the selected camera supports Trigger Out connector, select this option to lock & unlock the main screen of the user who... will receive the email. - You can set the interval time between cameras. Other Click SETTING > Other to setup the scanning time between 2 ~ 20 seconds. - 84 - - Mail To: Enter the email address of the SecurView. The default setting is 2 seconds. Account Click SETTING > Account to setup...
... example, [email protected]. - User Name: Enter the user name to login the mail server. - Subject: Enter a subject for the notification email. Trigger Out: If the selected camera supports Trigger Out connector, select this option to lock & unlock the main screen of the user who... will receive the email. - You can set the interval time between cameras. Other Click SETTING > Other to setup the scanning time between 2 ~ 20 seconds. - 84 - - Mail To: Enter the email address of the SecurView. The default setting is 2 seconds. Account Click SETTING > Account to setup...

User's Guide
Page 89
..., UDP, ICMP, DHCP, NTP, DNS, DDNS, SMTP, FTP, PPPoE, UPnP Pan/Tilt Pan 165 degree (left) to 165 degree (right) Tilt 90 degree (up) to 15 degree (down) Software OS Support Windows 2000/XP/Vista Browser Internet Explorer 6.0 or above Software SecurView for playback/recording/ configuration features Operating Environment Temperature - Storage: 0% ~ 90% non...
..., UDP, ICMP, DHCP, NTP, DNS, DDNS, SMTP, FTP, PPPoE, UPnP Pan/Tilt Pan 165 degree (left) to 165 degree (right) Tilt 90 degree (up) to 15 degree (down) Software OS Support Windows 2000/XP/Vista Browser Internet Explorer 6.0 or above Software SecurView for playback/recording/ configuration features Operating Environment Temperature - Storage: 0% ~ 90% non...
Quick Installation Guide
Page 6
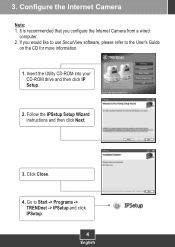
3. It is recommended that you would like to use SecurView software, please refer to Start -> Programs -> TRENDnet -> IPSetup and click IPSetup. 4 English Follow the IPSetup Setup Wizard instructions and then click Next. 3. Go to the User's Guide on the CD for more information. 1. Click Close. 4. Insert the Utility CD-ROM into your CD-ROM drive and then click IP Setup. 2. If you configure the Internet Camera from a wired computer. 2. Configure the Internet Camera Note: 1.
3. It is recommended that you would like to use SecurView software, please refer to Start -> Programs -> TRENDnet -> IPSetup and click IPSetup. 4 English Follow the IPSetup Setup Wizard instructions and then click Next. 3. Go to the User's Guide on the CD for more information. 1. Click Close. 4. Insert the Utility CD-ROM into your CD-ROM drive and then click IP Setup. 2. If you configure the Internet Camera from a wired computer. 2. Configure the Internet Camera Note: 1.