

Owner's Manual
Page 2
... protectors when using your machine • Read the manual carefully. • Check that you read, fully understand and observe the following show symbols used for a trimmer head or semi-auto cutting head. Do not attach handle above this point 4'n "."' Blade thrust may occur when the spinning blade contacts a solid object in...
... protectors when using your machine • Read the manual carefully. • Check that you read, fully understand and observe the following show symbols used for a trimmer head or semi-auto cutting head. Do not attach handle above this point 4'n "."' Blade thrust may occur when the spinning blade contacts a solid object in...
Owner's Manual
Page 4
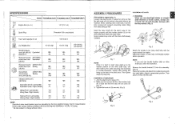
... the following time distribution: 1/2 Idle, 1/2 racing. * All data subject to appropriate position. Installation of handle n, WARNING When you use steel/rigid blades on straight shaft trimmers or brush cutters, always use a barrier bar (6) and shoulder harness with four bolts lightly. Adjust to change without notice. Tighten tube locking bolt lining up...
... the following time distribution: 1/2 Idle, 1/2 racing. * All data subject to appropriate position. Installation of handle n, WARNING When you use steel/rigid blades on straight shaft trimmers or brush cutters, always use a barrier bar (6) and shoulder harness with four bolts lightly. Adjust to change without notice. Tighten tube locking bolt lining up...

Owner's Manual
Page 5
... in tool bag, onto swivel (15) (Fig. 8). Install the blade guard to the guard bracket, which also secures the guard to the gear case using a trimmer head with handling it will be removed from the blade guard, (if so installed). F5i O If your unit, screw it and the earth terminal (11...
... in tool bag, onto swivel (15) (Fig. 8). Install the blade guard to the guard bracket, which also secures the guard to the gear case using a trimmer head with handling it will be removed from the blade guard, (if so installed). F5i O If your unit, screw it and the earth terminal (11...

Owner's Manual
Page 6
... head does not feed cutting line properly, check that the cutting edges are facing the correct direction. 19-S, 21 20 22 23 n WARNING For Tanaka heads, use a mix between 25:1 to the cover. O Check the case and button for cracks or other damage. OPERATING PROCEDURES Fuel (Fig.... loosen/ counter-clockwise to be drawn out about 1-3/16" (3 cm) with each time installed. (Fig. 19) 23 Fig. 20 WARNING • The trimmer is equipped with a two-stroke engine. O Check the cover, case and other materials that could become a dangerous projectile. NOTE O Since the cutter holder ...
... head does not feed cutting line properly, check that the cutting edges are facing the correct direction. 19-S, 21 20 22 23 n WARNING For Tanaka heads, use a mix between 25:1 to the cover. O Check the case and button for cracks or other damage. OPERATING PROCEDURES Fuel (Fig.... loosen/ counter-clockwise to be drawn out about 1-3/16" (3 cm) with each time installed. (Fig. 19) 23 Fig. 20 WARNING • The trimmer is equipped with a two-stroke engine. O Check the cover, case and other materials that could become a dangerous projectile. NOTE O Since the cutter holder ...

Owner's Manual
Page 7
... into the tank. Then pull recoil starter briskly again. Stopping (Fig. 29, 30) Decrease engine speed and run at over -pressure disappears. O Always move the trimmer at least 50 ft (15 m). Make sure that the fuel is difficult to see the material to ensure that fuel flows through return pipe (39...
... into the tank. Then pull recoil starter briskly again. Stopping (Fig. 29, 30) Decrease engine speed and run at over -pressure disappears. O Always move the trimmer at least 50 ft (15 m). Make sure that the fuel is difficult to see the material to ensure that fuel flows through return pipe (39...


